Page is loading ...

aspenhome
RASSEMBLY INSTRUCTIONS
MADE IN MALAYSIA
ah
Page 1/2
ITEM NO: I318-6030 Pedestal Dining Table
Thank you for purchasing this quality product. Be sure to check all packing material carefully for
small parts that may come loose inside the carton during shipment.
BEFORE USING THIS PRODUCT PLEASE READ, UNDERSTAND, AND FOLLOW THESE INSTRUCTIONS.
Save these instructions for future reference. FOR INDOOR USE ONLY
TOOLS REQUIRED (NOT PROVIDED)
PHILLIPS SCREWDRIVER
HARDWARE LIST:
No. Description Sketch Quantity
A
B
C
D Allen Key M4 1 PC
COMPONENTS LIST:
No. Description Sketch Quantity
1 Table Top 1 PC
2 Pedestal Left
JCBC Bolt M6 x 1-3/8"
Spring Washer 1/4"
Flat Washer 1/4" x 5/8"
24 PCS
12-13-2021
24 PCS
24 PCS 3 Pedestal Right 1 PC
1 PC
FUNCTIONALITY INSTRUCTION
Adjust the leveler
when necessary
Leveler on Legs
Pedestal Right
Pedestal Left
Table Top
4 Mounting Panel 2 PCS

STEP 2: Lay the table top face down on a soft surface. Attach the pedestal left assembly and
pedestal right assembly to table top by using 12 bolts(A), spring washers(B) and flat washers(C).
Use the allen key(D) provided to tighten all the bolts. Turn the assembled table to the upright position.
Table Front
Pedestal Right
Assembly Pedestal Left
Assembly
A
B
C
D
aspenhome
RASSEMBLY INSTRUCTIONS
MADE IN MALAYSIA
ah
Page 2/2
ITEM NO: I318-6030 Pedestal Dining Table
STEP 1: Attach the mounting panels to pedestal left and pedestal right by using 12 bolts(A),
spring washers(B), flat washers(C).
Pedestal Left Pedestal Right
Mounting Panel
12-13-2021
A
B
C
D

Page 1/2
ITEM NO: I318-6640S Uph Dining Side Chair (2/Ctn)
Thank you for purchasing this quality product. Be sure to check all packing material carefully for
small parts that may come loose inside the carton during shipment.
aspenhome
RASSEMBLY INSTRUCTIONS
MADE IN MALAYSIA
ah
BEFORE USING THIS PRODUCT PLEASE READ, UNDERSTAND, AND FOLLOW THESE INSTRUCTIONS.
Save these instructions for future reference. FOR INDOOR USE ONLY
FUNCTIONALITY INSTRUCTION
HARDWARE LIST:
No.
B
C
D
Description Sketch Quantity
A
COMPONENTS LIST:
No.
1Description Sketch Quantity
2 Chair Seat
3
1 PC
1 PC
1 PC
Front Leg
E10 PCS
10 PCS
Chair Back
F
2 PCS
4 PCS
4 PCS
2 PCS
Spring Washer 1/4"
Flat Washer 1/4" x 3/4"
Spanner
Hex. Bolt M6 x 3-1/8"
Hex. Bolt M6 x 2-3/8"
Hex. Bolt M6 x 1-9/16"
12-13-2021
TOOLS REQUIRED (NOT PROVIDED)
PHILLIPS SCREWDRIVER

Page 2/2
aspenhome
RASSEMBLY INSTRUCTIONS
MADE IN MALAYSIA
ah
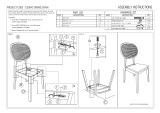
STEP 2: Attach the front legs to chair seat by
using 4 bolts(B), lock washers(D), flat
washers(E). Completely tighten all bolts. Turn
the assembled chair to the upright position.
Front Leg
B
D
E
STEP 1: Attach the chair seat to chair back by
using 4 bolts(A), 2 bolts(C), 6 lock washers(D),
6 flat washers(E) with a spanner(F).
DA
ITEM NO: I318-6640S Uph Dining Side Chair (2/Ctn)
Front Leg
Chair Seat
Front Leg
Chair Seat
Chair Back
E
DC
E
12-13-2021
/