Page is loading ...

1
Hang ‘N’ Lock Mirrors
Thank you for purchasing this Croydex product. Please follow the xing and care instructions to
ensure your Hang ‘N’ Lock Mirror is tted safely and retains its high quality nish.
Please retain this leaet for future reference.
This installation guide applies to the following mirrors:
MM700100 - Bampton Rectangular Mirror with Shelves
MM700200 - Coniston Oval Mirror with Shelves
MM700300 - Devoke Rectangular Double Layer Mirror with Shelf
MM700400 - Faireld Arch Mirror with Shelf
MM700500 - Helton Rectangular Mirror with Under Mirror Shelf
MM700600 - Langdale Arch Mirror with Shelf
MM700700 - Meadley Circular Mirror with Mosaic Surround
MM700800 - Rydal Rectangular Double Layer Mirror with Shelf
MM701200 - Belham Oval Mirror
MM701300 - Harrop Rounded Rectangular Mirror
MM701400 - Kentmere Rectangular Mirror
MM701500 - Simpson Round Mirror
Tools required - not supplied
Pencil;Tape Measure; Philips Screwdriver; Flat Head Screwdriver; Drill; 5/16” (8mm) Drill Bit,
5/16” (8mm) Ceramic drill bit (optional).
KEEP DIY TOOLS OUT OF THE REACH OF CHILDREN
Home Safety Advice
- It is recommended that two people t this product to ensure that it is tted safely.
- Always take care when using power tools, particularly in the bathroom.
- Always check for hidden cables and pipework before drilling and take extreme care if there is any
water in the working area.
- It is advisable to use a residual current circuit breaker (RCCB/GFCI).
- Always wear suitable eye protection when drilling.
- If the product is to be tted on a ceramic tiled wall, a ceramic drill bit should be used.
- Always ensure that the drill hole passes through the central tiled area rather than through the
grouted area. To prevent damage to the tile, mask the area around the hole with tape
before drilling.
- Do not strike the product with hard or sharp objects.
- Do not overload the glass shelves. Maximum loading for the small shelf is 1.1Ib (0.5Kg) and
2.2Ib (1Kg) for the larger shelves, evenly distributed. The maximum loading for the Helton Mirror
shelf MM700500 is 4.4kg evenly distributed.
Product Care
To retain the best quality nish, clean product regularly with a soft damp cloth.
Do not use abrasive or chemical cleaners as these will damage the product.
Do not position glass components directly above a heat source.
MIR 028 R03

2
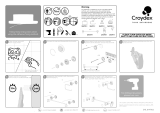
A. Assemble the shelf support arms to the mirror
as shown.
Slide the glass shelf into the support brackets
and secure in position using the brass grub
screws supplied.
DO NOT OVERTIGHTEN THE SCREWS
Maximum shelf loading 4.4Ib (2kgs) evenly
distributed.
B. Assemble the shelf support brackets as shown,
ensuring the slot is horizontal and the grub screws
pointing downwards. Slide the glass shelf into the
support brackets and secure in position using the
brass grub screws supplied.
DO NOT OVERTIGHTEN THE SCREWS
Maximum small shelf loading 1Ib (0.5kgs), large
shelf loading 2.2Ib (1kg) evenly distributed.
MIR 028 R03
Glass shelf assembly - MM700500
Glass shelf assembly -
MM700100, MM700200, MM700300
MM700400 MM700600 & MM700800
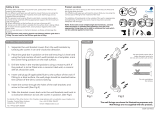
Hang ‘N’ Lock pre-installation guide
D. Refer to the dimensions below to position the
Hang ’N’ Lock bracket. (Dimension are for reference
only. Please double check dimension against mirror).
Product Code Portrait Landscape
MM700100 8 3/16” (208) n/a
MM700200 12 33/64” (318) n/a
MM700300 7 9/32” (185) n/a
MM700400 8 21/32” (220) n/a
MM700500 9 1/4” (235) n/a
MM700600 7 11/16” (195) n/a
MM700700 8 11/32” (212) n/a
MM700800 7 9/32” (185) n/a
MM701200 10 9/16” (268) 7 25/64” (188)
MM701300 8 17/64” (210) 6 3/8” (162)
MM701400 8 3/16” (208) 7” (178)
MM701500 8 11/32” (212) n/a
Bottom edge of Hang ‘N’ Lock bracket
Refer to table
Top edge of mirror glass
C. Attach the wall spacer to the mirror spacer
by joining the hook and loop fasteners together.
Mirror spacer assembly
Wall Spacer

3
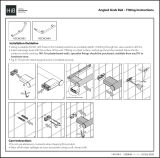
Installation Guide
2. Place the bottom edge of the Hang ’N’ Lock bracket onto
the reference line and mark a screw hole position in each
cam hole recess. Remove the bracket from the wall.
1. Assemble the Hang ‘N’ Lock bracket sections making sure
all parts are slotted tightly together.
MIR 028 R03
4. With the Hang ’N’ Lock bracket loosely attached to the
wall, adjust for height and level by rotating the cams with a
at head screwdriver, then use a Philips screwdriver to fully
tighten the mounting screws, to securely x the bracket into
position.
3. Drill holes to a depth of 1 3/4” (45mm) and insert the wall
plugs level with the surface of the wall. (Note: if you are tting
the product to a tiled surface, insert the wall plugs below the
surface of the tile to avoid cracking the tiles). Insert the coun-
tersink screws through the Hang ‘N’ Lock cams and loosely
secure the Hang ‘N’ Lock bracket to the wall.

4
Installation Guide
6. Peel the protective cover strip from the double sided tape
on the support brackets.
(The adhesive tape is ideal for use on tiled and laminate
surfaces but may cause damage to painted and papered
walls.)
5. Align the centre of the mirror with the centre line of the
Hang ’N’ Lock bracket and the carefully hang the mirror
on the bracket. Ensure the mirror is fully supported on the
bracket before releasing it.
Check the level of the mirror and its position on the wall.
Carefully ease the bottom of the mirror from the wall to
access the back of the wall spacers. Make sure that the
mirror is fully supported on the bracket at all times when
doing this.
MIR 028 R03
7. Carefully lower the mirror to a vertical position and press
the adhesive pads against the wall.
The mirror can be removed by separating the hook and loop
fastener between the mirror and wall spacers.
8. The wall spacer can be screwed to the wall if the mounting
surface is unsuitable for xing with adhesive tape.
Mark the centre of the wall spacer on the wall surface.
Remove the mirror from the Hang ‘N’ Lock bracket and
separate the wall spacers from the mirror. Fasten the wall
spacers using the screws provided and re-hang the mirror.
For details of the other items in the Croydex range please visit our website: www.croydex.com
UK: Croydex, Central Way, Andover, Hants, SP10 5AW, UK
EU: MIL, Unit 8 Purcellsinch Ind Est, Dublin Road, Kilkenny, R95 HP71, Ireland
Tel: +44 (0) 1264 365881
Fax: +44 (0) 1264 356437
Email: [email protected]
/