Canon imagerunner advance C5550i Faq Manual

Category
Laser/LED printers
Type
Faq Manual
FAQ Guide
FT6-1677 (010) XXXXXXXXXX Copyright CANON INC. 2017 PRINTED IN THAILAND
/ / /
/ / /
Please read "Important Safety Instructions" before
operating this product. P.38
After you finish reading this guide, store it in a safe
place for future reference.
The information in this document is subject to change
without notice.
You can access canon.com/oip-manual
to read the User's Guide that describes all
functions of this machine.
What is
Your Question?
2
Paper Jams Occur .............................17
Paper Jams Occur Frequently . . . . . . . . . . . . . . . . . . 18
If Paper Jams Occur P.
17
Check the Following First . . . . . . . . . . . . . . 4
The Machine Does Not Respond to the
Computer .....................................5
The Authentication Screen (Logon Screen) Is
Displayed and You Cannot Go Further . . . . . . . . . 5
If You Cannot Send Documents to a Server Using
[Scan and Send] ..............................24
Stopping Scanning/Faxing. . . . . . . . . . . . . . . . . . . . . 24
Scanned Documents Cannot Be E-Mailed . . . . . . 25
If You Cannot Send/Forward Faxes . . . . . . . . . . . . . 26
If You Cannot Receive Faxes . . . . . . . . . . . . . . . . . . . 27
The Machine Does Not
Operate P.4
Scan/Fax Cannot Be
Performed Successfully
Loading Paper in the Paper Drawer . . . . . . . . . . . . . 6
When You Have Loaded a Different Type of
Paper than the Preset One . . . . . . . . . . . . . . . . . . . . 7
Loading Paper in the Multi-Purpose Tray . . . . . . . . 8
Loading Paper with Printed Logos . . . . . . . . . . . . . 10
Loading Envelopes ............................11
How to Load Paper P.
6
P.
24
What's Your Problem?
Contents
3
Canceling Copy/
Print Jobs P.28
Installing the
Printer Driver P.29
Replacement Parts P.30
An Error Screen is
Displayed P.32
Images Are Shifted/Slanted . . . . . . . . . . . . . . . . . . . . 13
Irregularities Appear in Images/
Images Are Faint .............................13
Black Streaks Appear in Images . . . . . . . . . . . . . . . . 14
Bleed-through Occurs . . . . . . . . . . . . . . . . . . . . . . . . . 16
Printing Results Are
Not Satisfactory P.
13
Loading Paper or Paper
Settings Cannot Be Done
Successfully
Illustrated Index P.34
Appendix P.38
You Can Consult the User's Guide! . . . . . . . .43
If You Notice a Search Number . . . . . . . . . . . .43
Do You Want to
Know More? P.43
P.
19
Paper Is Not Fed ...............................19
If the "Load paper." Message Is Displayed . . . . . . 20
Printing Cannot Be Performed on the Expected
Side of Paper .................................22
Printing Cannot Be Performed with the
Expected Size ................................22
In Two-Sided Printing, the Print Direction Differs
between the Front and Back Sides of the
Paper ........................................23
4
Check the Following First
Is a message displayed on the touch
panel display?
Message
Simple Message
N O T E
If an error message is displayed P.32
Check 1
Is the main power indicator O?
If the main power indicator does not light
when you turn the main power ON, check
the power plug.
Main power
indicator
I(ON)
Check 3
Is lit?
Press this to cancel the
Sleep mode.
Check 2
Is the machine correctly connected to
the computer?
Check the network connection.
10H4-0JS
Setting the network environment
User's Guide
How to use the search number P.43
Check 4
The Machine Does Not Operate
Check the Following First
5
The Machine Does Not Respond to the Computer / The Authentication Screen (Logon Screen) Is Displayed and You Cannot Go Further
Set the IP address again.
10H4-00K
Setting the IP address
User's Guide
How to use the search number P.43
Solution 3
Restart the machine.
1. Press the main power switch to turn off the
machine.
CAUTION!
Note that turning OFF the machine deletes the
data that is waiting to be printed.
2. Check that the main power indicator has turned
off.
3. Press the power switch again.
Install the printer driver again.
N O T E
For more information P.29
Solution 1
Solution 2
The Machine Does Not Respond
to the Computer
The Authentication Screen
(Logon Screen) Is Displayed
and You Cannot Go Further
Log on to the machine using a
registered user ID.
To continue the operation when the
authentication screen (logon screen) is
displayed, it is necessary to log on with a
registered user ID.
10H4-022
Logging on to the Machine
User's Guide
How to use the search number P.43
Solution
Loading Paper in the Paper Drawer
6
How to Load Paper
Loading Paper in the Paper
Drawer
1
2 Slide the light blue knobs to adjust the positions
of the paper guides.
Align the protrusion to the
appropriate paper size marking.
3 First fan the paper stack well and then load it.
Make sure that
this line is not
exceeded.
The print side face up
Paper Orientation
Paper
Paper
Drawer
A4 A4R
4 Place the paper drawer back into the machine.
CAUTION!
Be careful not to get your ngers caught
between the paper drawer and the machine.
PO INT
When you have changed the paper size, replace
the paper size label with an appropriate one, as
necessary. P.34
When you have loaded a different type of paper
than the preset one, be sure to change the paper
type setting. P.7
When You Have Loaded a Dierent Type of Paper than the Preset One
7
When You Have Loaded a Dierent
Type of Paper than the Preset One
5
CAUTION!
Make sure to select paper type that matches the
basis weight of the loaded paper.
2. Press [OK].
6 Press [OK].
When you have loaded custom size
paper
Specify the paper size manually.
10H4-02C
Specifying free size paper (custom
size paper)
User's Guide
How to use the search number P.43
1. Select the
paper type.
1
2 Press [Preferences] [Paper Settings] [Paper
Settings] on the touch panel display.
3
1
2
PO INT
Any paper source other than 1 and 2 is optional.
For more information User's Guide
4
PO INT
If the displayed paper size is different from the
loaded paper size, adjust the paper guides.
2. Press [Set].
Press
Select the
paper source.
1. Check the
paper size.
10H4-0KL
Specifications
How to use the search number P.43
For available paper, see the following.
Loading Paper in the Multi-Purpose Tray
8
How to Load Paper
CAUTION!
When using coated paper or paper that does
not feed well, load one sheet at a time.
1
2 Adjust the position of the paper guides.
Align the paper
guides to the paper
size markings.
Tray extension
PO INT
Pull out the tray extension when loading large-
sized paper.
3 Fan the paper stack well, align the edges on a
flat surface, and then load it.
Make sure that this line is not exceeded.
The print side face down
4
If the paper size/type setting does not
match the paper you have loaded
In the screen for this step 4, change the setting
manually.
1
2
3 Press [Change] in [Paper Type].
4
1. Check the
paper size/
type.
2. Press
Press
2. Press
1. Select the
paper size.
1. Select the
paper type.
2. Press
Loading Paper in the Multi-
Purpose Tray
Loading Paper in the Multi-Purpose Tray
9
When you have loaded custom size
paper
Specify the paper size manually.
10H4-02E
Specifying free size paper (custom
size paper) User's Guide
How to use the search number P.43
Printing on the back side of printed
paper
1. Load paper in the multi-purpose tray the
print side face down.
2. In the [Paper Type] selection screen,
press [2nd Side of 2-Sided Page].
CAUTION!
For this operation, paper can only be loaded
in the multi-purpose tray.
PO INT
You can use only paper printed with this
machine.
10H4-0KL
Specifications
How to use the search number P.43
For available paper, see the following.
Loading Paper with Printed Logos
10
How to Load Paper
Loading Paper with Printed Logos
Refer to the table below to load paper with printed logos.
Example: When printing on A4 size paper
Orientation
Printing result
Paper Drawer Multi-Purpose Tray
Paper Drawer
Co. Ltd
Logo
Paper
Multi-Purpose Tray
Co. Ltd.
ABC
Co. Ltd.
Co. Ltd
Co. Ltd.
ABC
Co. Ltd.
Co. Ltd
Co. Ltd.
ABC
Co. Ltd.
Co. Ltd
Co. Ltd.
ABC
Co. Ltd.
N O T E
When copying to paper with printed logos User's Guide
N O T E
Basic Paper Loading Operations
For paper drawer P.6
For multi-purpose tray P.8
Loading Envelopes
11
Loading Envelopes
CAUTION!
You can load envelopes in the paper drawer 2 or multi-purpose tray.
Do not use envelopes that have glue attached to their aps, as the glue may melt due to the heat and pressure of
the xing unit.
Do not print on the reverse side of the envelopes (the side with the glued areas).
For the paper drawer 2, load envelopes the front side face up, and for the multi-purpose tray, load them the front
side face down. For the loading orientation, see the table below.
Paper Drawer 2 Multi-Purpose Tray
ISO-C5
Monarch
COM10 No.10
DL
Paper Drawer 2 Multi-Purpose Tray
Yougatanaga 3
Nagagata 3
Kakugata 2
Preparation before Loading Envelopes
1 Take five or so pieces of envelopes, fan them well
to eliminate curls, and level the stack flat.
Press the stack along
the four side edges.
2 To prevent the sealing edge of the seal flap from
floating from the body of the envelope, press the
envelope in the four corners and expel the air.
Loading Envelopes
12
How to Load Paper
When loading envelopes in the multi-
purpose tray
1 Check the orientation of the stack of envelopes,
and load it in the multi-purpose tray.
N O T E
Basic Handling Operations for the Multi-
Purpose Tray P.8
2
3
4 Press [OK].
Loading custom size envelopes
You can load custom size envelopes only in
the multi-purpose tray.
10H4-02E
Making Settings for Custom Size
Envelopes
User's Guide
How to use the search number P.43
Press
Select the
type of
envelopes.
When loading envelopes in the paper
drawer 2
1 Check the orientation of the stack of envelopes,
and load it in the paper drawer 2.
N O T E
Envelope Feeder Attachment-D1
User's Guide
2
3 Press [Preferences] [Paper Settings] [Register
Envelope Drawer].
4
1. Select
[ENV.1] or
[ENV.2].
2. Select the
envelope
type.
Press
13
Images Are Shifted/Slanted/Irregularities Appear in Images/Images Are Faint
Printing Results Are Not Satisfactory
Irregularities Appear in
Images/Images Are Faint
Images Are Shifted/Slanted
Adjust the paper guides.
Adjust the guide exactly.
Multi-purpose tray
Solution
The paper may have absorbed
moisture. Replace it with paper that
has not absorbed moisture.
Perform gradation adjustment.
1. Press
2. Press [Adjustment/Maintenance] [Adjust Image
Quality] [Auto Adjust Gradation] on the touch
panel display.
Follow the instructions in the screen to
perform gradation adjustment.
For more information, see the User's Guide
10H4-0HR
Adjusting gradation
User's Guide
How to use the search number P.43
Solution 1
Solution 2
Black Streaks Appear in Images
14
Black Streaks Appear in
Images
Clean the document feed scanning
areas.
If the Single Pass DADF-A1 is attached:
1. Turn OFF the machine, and unplug the power
plug from the AC power outlet.
2. Open the feeder, and clean the lower side
document feed scanning area using the
supplied glass-cleaning sheet.
3. Open the cover.
1
2
4. Open the inner cover.
Solution
5. Wipe the original scanning area.
Wipe the thin and
long glass area.
6. Close the cover and inner cover
7. Close the feeder.
8. Insert the power plug into the power outlet, and
turn the power ON.
Printing Results Are Not Satisfactory
Black Streaks Appear in Images
15
If the DADF-AV1 is attached:
1. Open the feeder, and clean the lower side
document feed scanning area using the
supplied glass-cleaning sheet.
2. Close the feeder.
If black streaks still appear after the
document feed scanning areas have
been cleaned
Perform feeder cleaning.
1. Press
2. Press [Adjustment/Maintenance]
[Maintenance] [Clean Feeder] [Start]
the touch panel display.
PO INT
It takes approximately 20 seconds to
clean the feeder.
Bleed-through Occurs
16
Bleed-through Occurs
Set the type of original properly.
For copying, a button is provided in the Quick
Menu.
1. Press
2. Press [Shared] [Copy(Prevent Bleed-Thru)].
3. Press [Yes].
Set a lower background density.
1. Press
2. Select the function on the touch panel display.
3. Press [Options].
4. Press
Example: Fax
Solution 1
Solution 2
5. Press
6. Press [OK].
Printing Results Are Not Satisfactory
Paper Jams Occur
17
Paper Jams Occur
If paper jams occur, a screen like the following appears on the touch panel display.
Follow the instructions in the screen to remove the jammed paper.
Remedy
Paper jam locations
Use these buttons and bar to operate the video.
PO INT
The screen disappears once all the jammed paper is removed and all the machine’s covers and drawers are closed
correctly.
If you do not understand the remedy
by referring to the screen
See the User's Guide to make sure of the
remedy. 10H4-0JY
Paper jams
User's Guide
How to use the search number P.43
If Paper Jams Occur
Paper Jams Occur Frequently
18
Paper Jams Occur Frequently
Check the paper type setting.
2. Press
3. If the paper type setting does not match the
loaded paper, change the setting.
For paper drawer P.6
For multi-purpose tray P.8
For optional paper sources User's Guide
1. Press
Remove paper fractures.
If you forcibly remove the jammed paper,
torn scraps of paper may remain in the
main unit or optional devices. If paper tears,
check that there are no scraps of paper
inside and try to remove all of the scraps
(Do not try to pull out the jammed paper
forcibly).
Solution 3
Solution 4
Adjust the paper guides.
Adjust the guide exactly.
Multi-purpose tray
Check the paper feed.
If paper jams occur due to overlapping of
sheets of paper when being fed, reload the
paper by changing the orientation.
Solution 1
Solution 2
If Paper Jams Occur
Paper Is Not Fed
19
Loading Paper or Paper Settings Cannot Be Done Successfully
Paper Is Not Fed
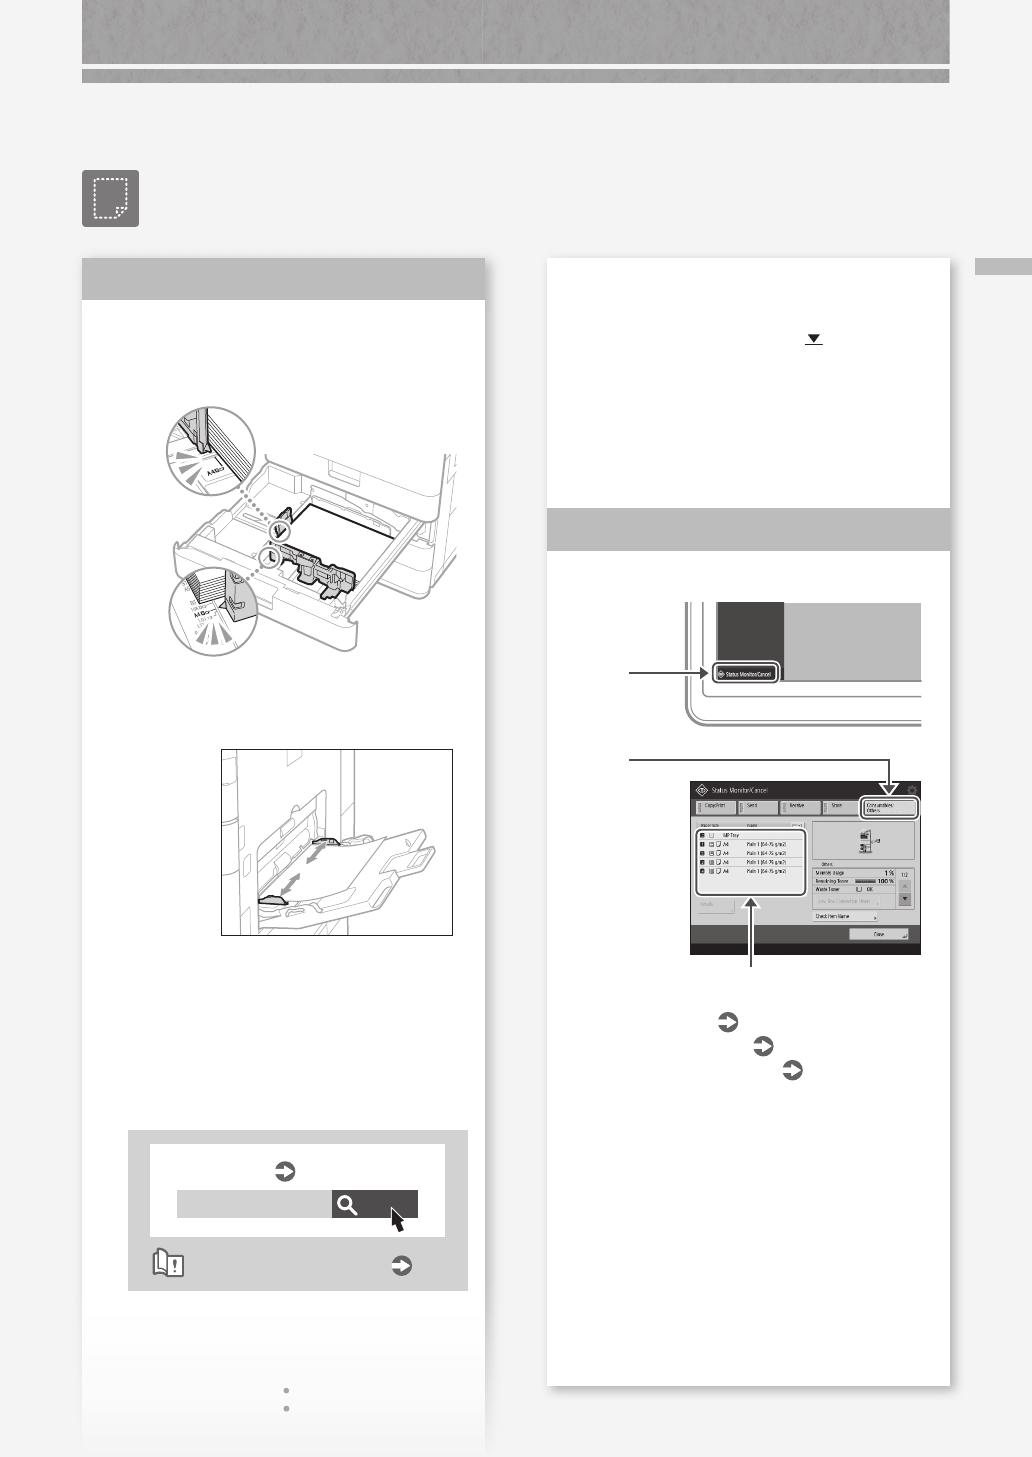
Open the paper source to check whether
paper has been loaded properly.
Adjust the paper guides
Adjust the guide exactly.
Multi-purpose tray
Check if the paper is sticking together.
First fan the paper stack well and then load it.
Check whether the appropriate paper
has been loaded in the paper source.
For available paper, see the following.
10H4-0KL
Specifications
User's Guide
How to use the search number P.43
Solution 1
Remove the excess amount of paper.
Make sure that the paper stack does not
exceed the load limit line ( ).
Load paper of the same size and same
type in the same paper source.
You cannot load paper of different sizes
or different types in one paper source.
Check the paper type setting.
1. Press
2. Press
3. If the paper type setting does not match the
loaded paper, change the setting.
For paper drawer P.6
For multi-purpose tray P.8
For optional paper sources User's Guide
Solution 2
If the "Load paper." Message Is Displayed
20
If the "Load paper." Message
Is Displayed
Replenish paper.
If the paper source is vacant, replenish
paper.
Adjust the paper guides.
Adjust the guide exactly.
Multi-purpose tray
Solution 1
Solution 2
Check the paper type setting.
1. Press
2. Press
3. If the paper type setting does not match the
loaded paper, change the setting.
For paper drawer P.6
For multi-purpose tray P.8
For optional paper sources User's Guide
Solution 3
Loading Paper or Paper Settings Cannot Be Done Successfully
  • Page 1 1
  • Page 2 2
  • Page 3 3
  • Page 4 4
  • Page 5 5
  • Page 6 6
  • Page 7 7
  • Page 8 8
  • Page 9 9
  • Page 10 10
  • Page 11 11
  • Page 12 12
  • Page 13 13
  • Page 14 14
  • Page 15 15
  • Page 16 16
  • Page 17 17
  • Page 18 18
  • Page 19 19
  • Page 20 20
  • Page 21 21
  • Page 22 22
  • Page 23 23
  • Page 24 24
  • Page 25 25
  • Page 26 26
  • Page 27 27
  • Page 28 28
  • Page 29 29
  • Page 30 30
  • Page 31 31
  • Page 32 32
  • Page 33 33
  • Page 34 34
  • Page 35 35
  • Page 36 36
  • Page 37 37
  • Page 38 38
  • Page 39 39
  • Page 40 40
  • Page 41 41
  • Page 42 42
  • Page 43 43
  • Page 44 44

Canon imagerunner advance C5550i Faq Manual

Category
Laser/LED printers
Type
Faq Manual

Ask a question and I''ll find the answer in the document

Finding information in a document is now easier with AI