Page is loading ...

Electronic Filter Wheel 2 - User’s manual
Thank you for purchasing the Atik Electronic Filter wheel 2 (EFW2) with USB. With it, you will be able to easily change lters without
touching the telescope. This is specially important when imaging, as it often happens that, when using manual wheels, autoguiders
tend to lose their guide star, due to shaking and/or backlash. With the Atik EFW2, you can change lters without disturbing autogu-
iding. Additionaly, and when using Atik Capture software or the Ascom driver, lter changing can be fully automatic, allowing for
unattended imaging sessions. Optional lter disks are available in different congurations, from 1.25” to 50.8mm, and can be easily
interchangeable by the user. Also, the optional Off-axis Guider module can be directly attached to the wheel itself.
Knowing your wheel
The EFW2 was designed to be easy to use. Adding lters is very simple as well as changing the internal disks. Additionally, you can
rotate the camera to the desired position without the need for extra adapters that add to the back focus distance. The following pic-
tures provide an overview of the EFW2 components:
Loading lters and changing disks
Attaching your camera to the EFW2
1
2
3 4 5 6
7
Unscrew the screws and
take the cover off. Install l-
ters in the numbered slots.
To remove the disk, take the
spring, metal bushing and
bearing off.
Push the motor in the direc-
tion of the USB socket. Note
that the shaft will detach
from the rubber.
Take the disk off while push-
ing the motor. To install the
new disk, repeat the process
in reverse. Make sure the cover is
put back in place in an up-down motion,
to avoid bending the central spring.
Take the camera adapter off
the EFW2 and attach it to
your camera.
Insert the camera with the
adapter into the EFW2 and
screw in the two retaining
grub screws.
If camera rotation is needed,
slightly unscrew the two re-
taining screws, rotate and
tighten again.
1- Camera adapter; 2- Motor 3- Power input; 4- USB socket;
5- Motor tension adjustment
6- 2” adapter 7- Camera adapter locking
screws.

Powering up
Power the wheel using the supplied 12V car lighter type plug. In case you want to use your own power cable or AC adapter, the socket
is a 2.1mm type, and the wheel draws a maximum of 300mA. On power up, the wheel will turn twice. The rst turn is to detect the disk
type, and the second will position lter number 1 in the opening. At this point the wheel is ready to accept commands.
L WARNING: Mains power adaptors are intended for indoor or observatory use only. There is a risk of electric shock if the adaptor is
used in damp environments or outside. If in doubt do not use an adaptor and consult a trained electrician.
Software Installation
All the software required to control the lter wheel is included on the CD. Simply execute the SetupArtemisUniversal installer and
follow the prompts. Please check the Atik website at http://www.atik-cameras.com for software updates.
The software comprises the three components described below.
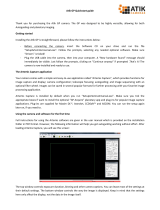
ArtemisCapture
ArtemisCapture is a standalone program providing control of both a camera and a lter
wheel. By default it will be installed in the ArtemisCCD program group folder.
The lter wheel control dialog can be launched either by selecting the “Filter wheel...” op-
tion in the “Camera” menu or by clicking on the lter wheel icon on the toolbar, as shown
on the picture on the left.
For further instructions on using ArtemisCapture please refer to ArtemisCapture.pdf on
the CD.
FilterWheelRunner
This standalone program is installed alongside ArtemisCapture in the ArtemisCCD program
group folder, and it provides a simple means of controlling the lter wheel.
Click on the “Connect” checkbox to connect/disconnect the lter wheel. The lter wheel
can be moved incrementally using the spin control, or a named lter can be selected using
the dropdown list. The lter names and focus offsets can be changed by clicking on the
“Setup...” button, which launches the dialog shown on the left.
Select a lter position using the spin control at the top, and change the lter name and/or
focus offset as appropriate. The lter names provide the means for imaging programs to
allow lters to be selected by name and for lter names to be recorded in image headers
automatically. Similarly the focus offsets provide the means for imaging programs to apply
automatic focus adjustments when changing lters, in order to allow for the different optical
thicknesses of the lters. The lter names and focus offsets are made available through
the ASCOM interface (see below). If you are using an imaging program which does not
support these capabilities, or if you do not know the optical thicknesses of your lters or
just wish to keep things simple, these values can be left at zero.
ASCOM
The ASCOM driver allows the lter wheel to be controlled using third-party imaging programs
which support ASCOM, such as Astroart and MaxIm DL. In such programs, select the AS-
COM lter wheel option , then select “Atik Filterwheel EFW2” in the ASCOM FilterWheel
Chooser dialog. Once the lter wheel has been selected, clicking on the “Properties...” button
in the Chooser dialog will launch an ASCOM-compliant version of the FilterWheelRunner
program. Use of this program is the same as for the standalone version described above.
You will need ASCOM 5.5 or above to properly control the wheel.
For further details of how to control a lter wheel using ASCOM, please refer to the in-
structions of the particular program you are using or visit the ASCOM website at http://
ascom-standards.org/.
Declaration of Conformity
EU Declaration of Conformity: This product carries the CE Mark in accordance with the related European Directive. CE Marking is the responsibility of:
Perseu, SA - R. Dr. Agostinho Neto, 1D - 2690-576 Sta Iria da Azoia - Portugal
Critical Applications: This product is not designed for any “critical applications”. “Critical applications” means life support systems, medical applications , connections to medical devices, commercial
transportations, nuclear facilities or systems or any other applications where product failure could lead to injury to persons or loss of life or catastrophic property damage.
This product is not a toy.
This is a class A product. In a domestic environment this product may cause radio interference in which case the user may be required to take adequate measures.
Disposal of the camera: When no longer required do not dispose of this electronic device with general household waste. To minimise pollution and protect the environment the
camera should be recycled. Local recycling drop off points available under the Waste from Electrical and Electronic Equipment (WEEE) regulations which will accept the camera.
For further information contact Perseu SA at the above address, or the shop from which the camera was bought.
v 1.1
/