Meade 645003 User manual

Category
Telescopes
Type
User manual

This manual is also suitable for

LPI-G Series Quick Start Guide
645001: LPI-G Color
645002: LPI-G Monochrome
645003: LPI-G Advanced Color
645004: LPI-G Advanced Monochrome
2
Requirements
Compatible with Windows XP / Vista / 7 / 8 / 10 (32 & 64 Bit), Mac OS X, and Linux
Computer should have at least 2GB of memory, Intel Core2 2.8GHz CPU equivalent or higher, and be
equipped with a USB 2.0 port. For the LPI-G Advanced camera, USB 3.0 is recommended for maximum
frame rate.
Quick Start Summary
1. Install Meade’s SkyCapture software, camera DirectShow drivers, and ASCOM Platform & camera driv-
ers onto the computer using the included Meade SkyCapture CD-ROM.
2. If you will be using a special camera lter, attach the included nosepiece to the front of the camera.
Then thread on the special camera lter to the front of the nosepiece.
3. Connect the Meade LPI-G to the computer using the included USB cable.
4. If using the camera as an autoguider, connect one end of the included ST-4 autoguide cable into the
camera and the other end into the telescope guider port. See your telescope mount instructions on how to
do this.
Included Items
3
Software Installation
Insert the CD-ROM into the computer and wait for the below screen to appear. If it doesn’t appear, go to
“My Computer” and double-click on the CD-ROM drive where the Meade SkyCapture was placed. Then,
double click on the autorun.exe.
Meade SkyCapture
Select the “Camera Application Software” to install Meade’s SkyCapture software. The SkyCapture soft-
ware allows for both basic image capture and image processing functions suitable for both planetary and
deep-sky imaging.
After the SkyCapture software installation completes, double-click on the SkyCapture icon placed on the
desktop to open Meade’s SkyCapture software.
4
Basic Camera Operation
1. Plug the camera into your computer’s USB
port. If this is the rst time plugging the camera
into your computer, wait for the camera drivers to
install.
2. Open SkyCapture. On the left side of the
screen, the Camera window displays the camera
controls. By default, the Camera List and Cap-
ture & Resolution tabs will appear.
3. Conrm your Meade LPI-G series camera
model is shown on the Camera List. For exam-
ple “Meade LPI-GC Advanced”.
4. Click the camera model shown in the Camera
List to begin a live video stream.
5. Using your telescope, nd and focus your
target.. You can adjust the Gain and Exposure
Time slider bars to get the brightness to the
desired level. Alternatively, you can check the
Auto Exposure box, however lunar and planetary
often have best results when manually setting the
exposure and gain.
Note: You can monitor the framerate and number
of frames streamed at the bottom of the screen.
6. Click Snap to take an individual exposure.
You can save individual exposures by going to
File: Save
The following procedure will guide you through capturing your rst image with the LPI-G Series camera.
For detailed instructions on using the numerous SkyCapture features, go to the Help menu for more de-
tails.
5
7. Click Record to start recording video. Note that recording video even for a few moments can quickly
consume a lot of storage space on your computer. When recording video be sure you have ample space
available.
For a Windows system, the default save location is:
C:\Users\(your user name)\Documents\SkyCapture
You can change the save path by going to Options: Preferences, under the Record tab.
The default recording le format is SER. You can switch to AVI in the Preferences screen.
Capture Format
For Color cameras, we recommend using the default RGB mode found under Format in the Capture &
Resolution tab. You can select RAW, but note that if you later export your raw SER or AVI le to a third
party processing program, it will appear black and white unless your third party program is able to convert
to color (debayer).
6
DirectShow Drivers
It’s recommended you install the DirectShow driv-
ers before using the Meade LPI-G camera. Direct-
Show drivers allow you to use 3rd party programs
that use the DirectShow interface. Additionally, the
DirectShow drivers allow the camera to image at a
higher frame-rate than ASCOM drivers and is ideal
for taking video. The DirectShow drivers also offers
additional features such as auto-exposure. How-
ever, the RAW format is not supported by Direct-
Show.
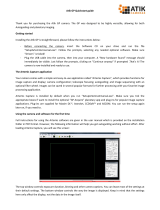
To install the DirectShow drivers, click on “Camera
DirectShow Driver” button found on the CD-ROM
startup screen. Follow the on-screen instructions to
complete the installation.
ASCOM Drivers
Many 3rd party software uses the ASCOM platform to interface with cameras and telescope equipment. If
auto-guiding, imaging in RAW format, or wanting plug and play compatibility with 3rd party software, it’s
necessary to install the ASCOM & DirectShow drivers. Third party software such as Maxim DL, FireCap-
ture, SharpCap, and PHD Guiding will also require the ASCOM and/or DirectShow drivers for LPI-G func-
tionality.
To install the ASCOM drivers, rst install the “ASCOM Platform” by clicking on the “ASCOM Platform”
button found on the CD-ROM startup screen and follow the on-screen instructions.
After the ASCOM platform is installed, install the ASCOM Camera Drivers by clicking on the “ASCOM
Camera Driver” button found on the CD-ROM startup screen. Follow the on-screen instructions to com-
plete the installation
7
Autoguiding with the LPI-G Series Camera
The Meade SkyCapture software does not contain autoguiding software. To use the the LPI-G or LPI-G
Advanced camera as an autoguiders, you must install the LPI-G ASCOM driver. The LPI-G series cameras
work in a number of freeware autoguiding programs, such as PHD2 Guiding (available from openphdguid-
ing.org).
Connect the included autoguide cable (ST-4 compatble) from the LPI-G to the to the autoguide port on
your mount. Note: Some mounts use similar 6-pin ports which are not intended for the autoguider.
Please conrm that your mount is ST-4 compatble before using the LPI-G as an autoguider.
Autoguiding with PHD2 Guiding using ASCOM
Run PHD Guiding software rst and click the camera button on the left bottom of the application
Select the “ASCOM Camera Chooser” in the Camera selection drop list box and then click the “Connect”
button.
8
Select “ASCOM Meadecam Driver” in the drop list box and click “Properties”.
Change the setting in the following dialog and then click the “OK” button.
Select the “On-Camera” in the Mount drop list box and click “Connect”.
9
Close the Connect Equipment dialog to go back to PHD Guiding main interface. Then click the loop but-
ton to start the exposure
You can begin the autoguiding process at this step. Loop exposures, focus, click on the desired guide
star, and proceed to calibrate and autoguide in PHD2.
10
Using the DirectShow Driver in PHD2 Guiding
Select “Windows WDM-style webcam camera” in the camera selection drop list box and click “Connect”
button.
Choose “MeadeCam” in the pop up Camera choice box.
Choose the resolution in the Camera mode box.
11
Go back to the main interface and click the loop button to start the exposure as the following.
12
Using the ASCOM Driver in MaxIm DL
With the LPI-G Series camera connected to your computer’s USB port, open MaxIm DL and click the
Camera Control Window Icon.
Click the “Setup Camera” button in the pop up Camera Control Window.
Select “ASCOM” and click the “Advanced….” button.
13
Select “ASCOM Meadecam Driver” in the drop list box and click the “Properties” button.
Adjust the camera settings as appropriate, or use the default settings, then click “OK”
Click the ”Connect” button to accomplish the connection.
14
Using the DirectShow Driver in MaxIm DL
With the LPI-G camera connected to your computer’s USB port, open MaxIm DL and click the Camera
Control Window Icon.
Select the “Video DS” in the pop up dialog and click “OK”.
Click the “Setup Camera” button in the pop up Camera Control Window.
15
Click “Connect” to start the video.
16
Using the ASCOM Driver in SharpCap
Select “ASCOM Meadecam” item in the ASCOM cameras section of the Cameras menu.
Change settings (or not) and click “OK” to start the video.
17
Using the DirectShow Driver in SharpCap
Select “MeadeCam” item in the DirectShow cameras section of the Cameras menu to start the video.
© 2018 Meade Instruments Corp. reserves the right to
change product specications or to discontinue products
without notice.
20171201 REV 2
  • Page 1 1
  • Page 2 2
  • Page 3 3
  • Page 4 4
  • Page 5 5
  • Page 6 6
  • Page 7 7
  • Page 8 8
  • Page 9 9
  • Page 10 10
  • Page 11 11
  • Page 12 12
  • Page 13 13
  • Page 14 14
  • Page 15 15
  • Page 16 16
  • Page 17 17

Meade 645003 User manual

Category
Telescopes
Type
User manual
This manual is also suitable for

Ask a question and I''ll find the answer in the document

Finding information in a document is now easier with AI