Page is loading ...

INSTALLATION
Dear customer:
The product you have purchased has been engineered and manufactured to the highest standards of quality and
performance. Please read the instruction sheet carefully before installing your new shade.
Pin Wheel Pin Bracket Ball Bracket Wall Plugs
Ball Chain
Installation
Screws
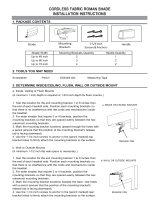
Hardware Contents:
1 1
1 1 7 7
Get acquainted with your new shade
Pin Wheel
Headrail
For assistance with installation or missing parts, please call 1 (800) 860-1677
Pour obtenir de l’aide concernant l’installation ou des pièces manquantes, composez le 1(800) 860-1677
Para obtener ayuda con la instalación o si faltan piezas, comuníquese al 1 (800) 860-1677
Step 1
Bracket location and installation
a). Inside
Mounting to the inside or between
the sides of the window.
© Copyright 2015
860 East Sandhill Avenue • Carson, CA 90746
7950 Third Flag Parkway • Austell, GA 30168
Pin Bracket
Ball Bracket
Ball Chain
Bottom Rail
Child Safety Device
b). Outside
Mounting to the face or outside the
window frame.
c). Top
Mounting overhead to a surface such
as the top inside of the window frame
or the ceiling.
Step 2
Measure where you want the shade to hang, make sure the blind is centered
and level. Hold ball bracket at desired location and mark screw holes with a
pencil. Drill pilot holes where you marked the screw holes. Use a screwdriver to
attach the ball bracket with installation screws to the wall or window frame.
Repeat for pin bracket at opposite end.
Step 3
Insert pin wheel and ball chain onto rod ends (figure 1).
Step 4
Pick up the shade and rotate the pin wheel to retract pin (figure 2). Place ball
chain end of roller shade into ball bracket first. Hold the pin wheel end next to the
pin bracket and rotate pin wheel to extrude pin into pin bracket and secure in
place.
Step 5
Make sure ball chain is pulled tight (figure 3), use a screwdriver to attach safety
device to wall or window frame.
Roller Sunshade Instructions
Safety Device
1
Tools Needed:
1/16 in.
IMPORTANT:
The safety feature (figure 4) is designed to operate correctly when the back
spring is fully secured to installation surface, (this ensures that all 3 installation
screws are tightly secured).If the safety device becomes loose the shade will not
operate.
figure 2
figure 3
10.21.2015
The cords on this product present a potential strangulation hazard.
Les câbles de ce produit représentent un danger potentiel de
strangulation.
Los cordones de este producto representan un peligro potencial de
estrangulamiento.
figure 1
figure 4
Tie Down Rings
Wind Tie
Down Rings
2
Step 6
Wind Tie Down Rings (figure 5) allow the shade to be fastened down from the
bottom rail. Secures shade in windy conditions.
figure 5
Printed in China
/