Page is loading ...

1. PACKAGE CONTENTS
2. TOOLS YOU MAY NEED
Screwdriver Pencil Drill/drill bits Measuring Tape
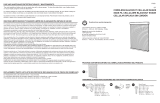
a. Inside, Ceiling or Flush Mounts
(A minimum 1 inch depth is required or 1-3/4 inch depth for flush mounts.)
b. Wall or Outside Mounts
(A minimum 1-1/2 inch flat wall space is necessary.)
3. DETERMINE INSIDE/CEILING, FLUSH, WALL OR OUTSIDE MOUNT
1. Test the location for the end mounting bracket 1 to 6 inches from
the end of each headrail side. Position each mounting brackets so
that there is no interference with the cords and mechanisms inside
the headrail.
2. For wider shades that require 3 or 4 brackets, position the
mounting brackets so that they are spaced evenly between the two
outermost mounting brackets.
3. Mark the mounting bracket locations upward through the holes with
a pencil (ensure that the position of the mounting bracket's release
tab is facing downward).
4. Use the 1-1/4 inch screws to anchor in the (pencil marked) top
bracket holes to firmly attach the mounting brackets to the surface.
1. Test the location for the end mounting bracket 1 to 6 inches from
the end of each headrail side. Position each mounting brackets so
that the
re is no interference with the cords and mechanisms inside
the headrail.
2. For wider shades that require 3 or 4 brackets, position the
mounting brackets so that they are spaced evenly between the two
outermost mounting brackets.
3. Mark the mounting bracket locations towards the back, rear holes
with a pencil (ensure that the position of the mounting bracket's
release tab is facing downward).
4. Use the 1-1/4 inch screws to anchor in the (pencil marked) rear
bracket holes to firmly attach the mounting brackets to the surface.
Up to 60 inch 3 2
Up to 72 inch 4 2
Shade Width Mounting Brackets Quantity Handle Quantity
Up to 48 inch 2 1
CORDLESS FABRIC ROMAN SHADE
INSTALLATION INSTRUCTIONS
RELEASE TAB
a. INSIDE OR CEILING MOUNTS
b. WALL OR OUTSIDE MOUNTS
RELEASE TAB
Mounng
Brackets
Shade
1-1/4 inch
Screws & Anchors
Handle

5. ATTACH THE HANDLE / HOW TO OPERATE
6. REMOVE THE HEADRAIL
7. CLEANING & CARE
a. To remove the blind, insert a screwdriver between the headrail and
the bottom back of the mounting bracket (tab which extends out
slightly from each mounting bracket).
b. Gently pry the screwdriver to release the mounting bracket from the
headrail. Please be cautious to not damage the painted finish of the
headrail. As you
release the mounting brackets, support the headrail.
Packaging and shipping will typically cause the fabric of this product to wrinkle. First, allow all items to hang
for a few days so that the wrinkles can relax and begin to fall out. If necessary, steam the shade on a low
heat setting to remove stubborn wrinkles. However, be aware that if the temperature is too high, it could
melt/damage the shade. To clean the fabric on the shade, use a feather duster or vacuum lightly using the
soft brush attachment.
4. INSERTING THE HEADRAIL
a. Lift the headrail into position so that the front edge of each mounting bracket is under the inner front edge
of the headrail
b. Rotate the headrail back towards the window, then push the headrail upward until the flexible tab at the
bottom of each bracket snaps onto the back of the headrail. Once a snapping sound is heard, you will know
the headrail is attached to the mounting bracket.
c. Check to
assure that each mounting bracket is properly secured to the headrail.
Attach the handle to the bottom of the shade as illustrated below. For shades over 48 inch wide, attach two
handles, shoulder width apart at the center. The handle is designed to minimize contact with the fabric of the
shade. Always raise and lower the shade slowly to assure that the fabric gathers neatly.
To lower the shade: grip the handle and slowly pull straight down.
To raise the shade: put one hand under the handle (palm facing up) and lift slowly until the desired height is
reached.
Important Note: Always push and pull at the center of the shade to assure that the bottom of the shade
remains even (i.e. parallel to the top of the shade). If the shade becomes uneven, slowly pull it all the way
down, and then lift up to the
desired position. If necessary, reach behind the shade and manually pull the
cording slowly out of the headrail until the bottom of the shade is level.
SNAP INTO PLACE
Insert screwdriver here and gently pry to release.
/