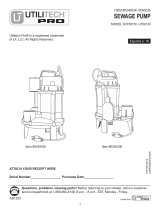
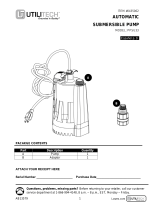
Utilitech 090EPP307 is a submersible sump pump suitable for permanent and temporary installation to pump rainwater or other non-flammable, non-corrosive liquids with suspended solid particles that are 3/8 in. or less in diameter. The pump has a built-in thermal protection switch that stops the pump in case of an overload condition and restarts it automatically after it cools down. It comes with a float assembly that activates the pump when the water level rises to a certain height and turns it off when the water level drops.
Utilitech 090EPP307 is a submersible sump pump suitable for permanent and temporary installation to pump rainwater or other non-flammable, non-corrosive liquids with suspended solid particles that are 3/8 in. or less in diameter. The pump has a built-in thermal protection switch that stops the pump in case of an overload condition and restarts it automatically after it cools down. It comes with a float assembly that activates the pump when the water level rises to a certain height and turns it off when the water level drops.


-
 1
1
-
 2
2
-
 3
3
-
 4
4
-
 5
5
-
 6
6
-
 7
7
-
 8
8
-
 9
9
-
 10
10
-
 11
11
-
 12
12
-
 13
13
-
 14
14
-
 15
15
-
 16
16
-
 17
17
-
 18
18
-
 19
19
-
 20
20
-
 21
21
-
 22
22
-
 23
23
-
 24
24
-
 25
25
-
 26
26
-
 27
27
-
 28
28
-
 29
29
-
 30
30
-
 31
31
-
 32
32


Utilitech 090EPP307 is a submersible sump pump suitable for permanent and temporary installation to pump rainwater or other non-flammable, non-corrosive liquids with suspended solid particles that are 3/8 in. or less in diameter. The pump has a built-in thermal protection switch that stops the pump in case of an overload condition and restarts it automatically after it cools down. It comes with a float assembly that activates the pump when the water level rises to a certain height and turns it off when the water level drops.
Ask a question and I''ll find the answer in the document
Finding information in a document is now easier with AI
in other languages
- français: Utilitech 090EPP307 Guide d'installation
- español: Utilitech 090EPP307 Guía de instalación
Related papers
-
 Utilitech 148010 Operating instructions
-
 Utilitech PPSP33 Installation guide
-
 Utilitech 148137 Operating instructions
-
 Utilitech UT58130 Installation guide
-
 Utilitech PPSP33 Operating instructions
-
 Utilitech UT58130 Installation guide
-
 Utilitech PPSU33 User manual
-
 Utilitech 148003 User guide
-
 Utilitech PPTPC50 User manual
-
 Utilitech VT100GUT Installation guide


Other documents
-
Everbilt ESE60W-HD User guide
-
Everbilt HDS50 User guide
-
none WSSPC5V User guide
-
Everbilt SUP54-HD User guide
-
Zoeller 1099-0001 Operating instructions
-
-
-
-
-