Page is loading ...

IMPORTANT SAFETY INSTRUCTIONS
LIGHTED BULB IS HOT!
WARNING: To reduce the risk of FIRE or INJURY TO PERSON:
• Turnoffandallowtocoolbeforereplacingbulb.
• BulbgetsHOTQUICKLY!Contactswitchonlywhenturningoff.
• DONOTremaininlightifskinfeelswarm.(Lightisintense,
maycause“sunburn”)
• DONOTlookdirectlyatlightedbulb.
• Keepmaterialsawayfrombulbthatmayburn.
• UseONLYwithwattagespeciedorlower.
• DONOTtouchbulbatanytime,useasoftcloth.Oilfromskin
maydamagebulb.
• DONOToperatexturewithmissingordamagedglass.
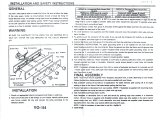
1) Assemblemountingscrewstobackpanusinghexnut.
2) Atthecenterofthebackpanareknockoutslots.Remove
thesetthatmatchesyouroutletbox.
3) Securethebackpantotheoutletbox.
4) Anchorthebackpantothewallusingthesetofholesat
eachendofxtureusingwoodscrews,togglebolts,plastic
anchors,etc.
5) TURN OFF POWER.
IMPORTANT:Beforeyoustart,NEVERattemptanywork
withoutshuttingofftheelectricityuntiltheworkisdone.
a) Gotothemainfuse,orcircuitbreaker,boxinyour
home.Placethemainpowerswitchinthe“OFF”
position.
b) Unscrewthefuse(s),orswitch“OFF”thecircuitbreaker
switch(s),thatcontrolthepowertothextureorroom
thatyouareworkingon.
c) Placethewallswitchinthe“OFF”position.Ifthexture
tobereplacedhasaswitchorpullchain,placethosein
the“OFF”position.
6) Connectxturegroundwiretooutletboxgroundwirewith
wireconnector.Neverconnectgroundwiretoblackorwhite
powersupplywire.
7) Makewireconnections(connectorsnotprovided).Reference
chartbelowforcorrectconnectionsandwireaccordingly.
8) Carefullypushwireconnectionsbackintooutletboxmaking
sureallconnectionsremainsecure.
9) Slipfaceplateovermountingscrewsandbackpan.
NOTE:Becertainwiresdonotgetpinchedbetween
backpanandfaceplate.
10) Securefaceplatetobackpanusingthreadedballs.
11) Insertrecommendedbulb.CAUTION: DONOTtouchbulb
withbarehands.Ifthishappens,cleanbulbwithdenatured
alcoholandalintfreecloth.
12) Slipglasssleeveoverbulb.
13) Placefrontglassinbetweenfaceplateandcurvedbar,
aligningholesinglasswithholesoninsideofbar.
14) Pushsmallrubberwashersontoballstuds.
15) Frombackofglass,threadballstudsintoholesinglassand
andcurvedbar.
16) Tightenballstudstosecureglasstobar.(DONOTover
tighten.)
17) Settopglassontopofxturealigningholesinglasswith
holesintabsonbackplate.
18) PushsmallrubberwashersontoPhillipheadscrews.
19) Fromtopofglass,threadPhillipheadscrewsintoholesin
glassandtabs.Tightenscrewstosecureglasstoxture.
(DONOTovertighten.)
20) Raisebottomglassuptoxture,aligningholesinglasswith
holesintabsonbackplate.
21) PushsmallrubberwashersontoPhillipheadscrews.
22) Frombottomofglass,threadPhillipheadscrewsintoholes
inglassandtabs.Tightenscrewstosecureglasstoxture.
(DONOTovertighten.)
Connect Black or
Red Supply Wire to:
Connect
White Supply Wire to:
Black White
*Parallel cord (round & smooth) *Parallel cord (square & ridged)
Clear, Brown, Gold or Black
without tracer
Clear, Brown, Gold or Black
with tracer
Insulated wire (other than green)
with copper conductor
Insulated wire (other than green)
with silver conductor
*Note: When parallel wires (SPT I & SPT II)
are used. The neutral wire is square shaped
or ridged and the other wire will be round in
shape or smooth (see illus.)
Neutral Wire
DateIssued:1/04/13 IS-45088-CB
FACEPLATE
PLAQUEFRONTALE
INSTRUCTIONS
For Assembling and Installing Fixtures in Canada
Pour L’assemblage et L’installation Au Canada
FRONTGLASS
VERRE
BACKPAN
PANNEAUARRIÈRE
THREADEDBALL
BOULE
PHILLIPHEADSCREW
VISÀTÊTE
SMALLRUBBERWASHER
PETITERONDELLE
CAOUTCHOUTÉE
CURVEDBAR
BARRECOURBÉE
TOPGLASS
VERRESUPÉRIEUR
BOTTOMGLASS
VERREINFÉRIEUR

IMPORTANTES CONSIGNES DE SÉCURITÉ
UNE AMPOULE ALLUMÉE EST BRÛLANTE !
AVERTISSEMENT: Pour réduire les risques D’INCENDIE ou DE
BLESSURE:
• Éteindreetlaisserrefroidiravantderemplacerl’ampoule.
• LesampouleschauffentTRÈSRAPIDEMENT!N’éteindrequ’à
l’aidedel’interrupteur.
• NEPASresterdanslalumièresiunesensationdechaleurest
ressentiesurlapeau.(Lalumièreestintenseetpeutprovoquer
descoupsdesoleil).
• NEJAMAISregarderdirectementuneampouleallumée.
• Tenirlesmatériauxàl’écartd’uneampoulepouréviterqu’ils
nebrûlent.
• UtiliserUNIQUEMENTdesampoulesàlapuissancenominale
indiquée(watts)ouàunepuissanceinférieure.
• NEJAMAIStoucherl’ampouleàmainnue,seservird’untissu
doux.L’huiledelapeaupeutendommagerl’ampoule.
1) Installerlesvisdemontagesurlepanneauarrièreàl’aidede
l’écrouhexagonal.
2) Aucentredupanneauarrièresetrouventdesfentesamovibles.
Enleverl’ensemblecorrespondantàvotreboîteàprises.
3) Visserlepanneauarrièresurlaboîteàprises.
4) Fixerlepanneauarrièreaumurenutilisantlesetdetrous
surchacunedesextrémitésdesluminairesl’aidedesvisà
bois,boulonsàailettes,ancresenplastiqueetc.
5) COUPERLECOURANT.
IMPORTANT:TOUJOURScouperl’électricitéavantde
commencerletravail.
a) Localiserlecoffretàfusiblesouledisjoncteurdu
domicile.Mettrel’interrupteurprincipalenposition
d’Arrêt.
b) Dévisserleoulesfusibles(oumettreledisjoncteursur
Arrêt)quicontrôlentl’alimentationversleluminaireoula
piècedanslaquelleletravailesteffectué.
c) Mettrel’interrupteurmuralenpositiond’Arrêt.Sileluminaire
àremplacerestdotéd’uninterrupteuroud’unechaîne
connectéeàl‘interrupteur,placercesélémentsen
positiond’Arrêt.
6) Avecl’attache-l,connecterleldemiseálaterreaul
d’alimentationnoirouáceluiquiestblanc.
7) Connecterlesls(connecteursnonfournis).Sereporterau
tableauci-dessouspourfairelesconnexions.
8) Replacersoigneusementleslsdanslaboîteàprisesen
veillantàcequelesconnexionsnesoientpasdéconnectées.
9) Passerlaplaquedecontactsurlesvisdemontageetle
panneauarrière.REMARQUE:Veilleràcequeleslsnese
retrouventpascoincésentrelepanneauarrièreetlaplaque
frontale.
10) Fixerlaplaquefrontaleaupanneauarrièreàl’aidedesboules.
11)Introduirel’ampoulerecommandée.ATTENTION:NEPAS
toucherl’ampouleàmainnue.Silapeauentreencontact
avecl’ampoule,nettoyerl’ampouleavecdel’alcooldénaturé
etuntissunonpelucheux.
12)Passerlemanchondeverresurlalampe.
13) Placerleverreavantentrelaplaquefrontaleetlabarre
courbéeenprenantsoind’alignerlestrousdansleverreaux
troussituésàl’intérieurdelabarre.
14) Pousserlespetitesrondellescaoutchoutéessurlespivotsà
rotule.
15) Depuislapartiearrièreduverre,visserlespivotsàrotule
danslestrousduverrepuisdanslestrousdelabarre.
16) Resserrerlespivotsàrotulepourbienxerleverresurla
barre.(NEPASserreravecexcès).
17) Placerleverresupérieursurledessusduluminaireen
prenantsoind’alignerlestrousdanslesattachessurla
plaquearrière.
18) Pousserlespetitesrondellescaoutchoutéessurlesvisà
tête.
19) Depuislapartiesupérieureduverre,visserlesvisàtête
danslestrousduverrepuisdanslesattaches.Resserrerles
vispourbienxerleverresurleluminaire.(NEPASserrer
avecexcès).
20) Souleverleverreinférieurjusqu’auluminaireenprenantsoin
d’alignerlestrousdansleverreauxtrousdesattachessur
laplaquearrière.
21) Pousserlespetitesrondellescaoutchoutéessurlesvisàtête.
22) Depuislapartieinférieureduverre,visserlesvisàtêtedans
lestrousduverrepuisdanslesattaches.Resserrerlesvis
pourbienxerleverresurleluminaire.(NEPASserreravec
excès).
DateIssued:1/04/13 IS-45088-CB
FACEPLATE
PLAQUEFRONTALE
Connecter le fil noir ou
rouge de la boite
Connecter le fil blanc de la boîte
A Noir A Blanc
*Au cordon parallèle (rond et lisse)
*Au cordon parallele (à angles droits el strié)
Au bransparent, doré, marron, ou
noir sans fil distinctif
Au transparent, doré, marron, ou
noir avec un til distinctif
Fil isolé (sauf fil vert) avec
conducteur en cuivre
Fil isolé (sauf fil vert) avec
conducteur en argent
*Remarque: Avec emploi d’un fil paralléle
(SPT I et SPT II). Le fil neutre est á angles
droits ou strié et l’autre fil doit étre rond ou
lisse (Voir le schéma).
Fil Neutre
INSTRUCTIONS
For Assembling and Installing Fixtures in Canada
Pour L’assemblage et L’installation Au Canada
FRONTGLASS
VERREFRONTALE
BACKPAN
PANNEAUARRIÈRE
THREADEDBALL
BOULE
PHILLIPHEADSCREW
VISÀTÊTE
SMALLRUBBERWASHER
PETITERONDELLE
CAOUTCHOUTÉE
CURVEDBAR
BARRECOURBÉE
TOPGLASS
VERRESUPÉRIEUR
BOTTOMGLASS
VERREINFÉRIEUR
/