
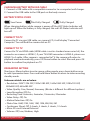
PPBCM92
Compact & Portable HD Body Camera
Wireless Camera (Audio & Video Recording) Night Vision,
Waterproof, Additional Micro SD Card Slots for Removable Memory,
Includes Remote Control

www.PyleUSA.com
2
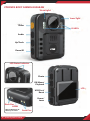
PPBCM92 BODY CAMERA DIAGRAM
Video
Audio
Up/Torch
Down/IR
IR LED’s
Lazer light
Torch Light
Photo
OK/Menu/
Playback
USB Port/
Reset
Power/
Lazer
LCD
LED Status Indicator
Dock Pins
HDMI
Removable Micro SD
Memory Card Slot
Dock Pins

www.PyleUSA.com
3
POWER ON/OFF
POWER ON
1. Press “Power” button, the LED Status Indicator will light up green with power
on sound and LCD screen will display the PYLE logo.
2. The camera system will enter into recording standby mode and the LED Status
Indicator will remain lit green.
3. The LCD will display the currently recording interface and your body camera is
ready to use.
Note: If you have set the screen saver setting to be 1min/3min/5min, if there is
no interaction with the camera, the camera LCD screen will turn o.
POWER OFF
1. Press and hold the “Power” button for at least two seconds.
2. The current le will be saved to the internal storage and the device will power
down.
VIDEO RECORDING
1. Press the “Video” button until the LED Status Indicator lights up red and ash.
The camera will beep audibly.
2. The camera will enter into Video Recording Mode and begin to record. It will
save a le every 3min/5min/10min/20min. The recording time can be set in
video setting menu list.
Note: If you have set the Auto night vision in the system setting list to be Manual.
When the lighting is insucient, press the Up/IR button can enable Night Mode
and the IR LEDs. If you have set the Auto night vision to be Auto. When the lighting
is insucient, the camera will automatically enable Night Mode and the IR LEDs.
It will automatically return to the normal recording mode when light conditions
improve.
Stop Video Recording
1. Press the “Video” button until the LED Status Indicator Lights up green.
2. The camera will enter Recording Standby Mode.
Note: If press OK button during Video recording, the le will be marked as
important le, the le name will be with a LOCK word.

www.PyleUSA.com
4
AUDIO RECORDING
1. Press the “Audio” button until the LED Status Indicator ashes green.
2. The camera will beep, the LCD screen will show the Audio Recording Mode
Screen to indicate it has begun recording audio only.
Stop Recording Audio
1. Press the “Audio” button until the LED Status Indicator shows solid green.
2. The camera will enter Recording Standby Mode.
TAKING A PHOTO
1. When the camera is in Recording Standby Mode or during Video Recording
Mode, press the “Photo” button to take a photo.
2. The LED Status Indicator will ash green once if take a photo in Recording
Standby Mode. There is photo capturing sound when taking a photo.
FILES PLAYBACK
1. Press and hold the “OK/Menu/Playback” button until the camera enters into
Playback Mode.
2. To play the currently recording le, press the “OK” button again.
3. To play another le, use the “UP” or “Down” button to cycle through the les.
Press the “OK” button when you have found the le to play it.
EXIT PLAYBACK MODE
1. To exit the Playback Mode, press and hold the “OK/Menu/Playback” button.
2. The camera will return to the Recording Standby Mode.
EXTERNAL/INTERNAL MICRO SD CARD STORAGE
1. Short press OK/Menu button to setting menu mode, press Down selection
button to select the Micro SD card, press OK button to enter submenu, press
UP/Down button to select micro SD card storage path External/Internal, press
OK again to conrm your selection.
2. If you select External, the les recorded will be saved to external micro SD card;
if select internal, the les recorded will be saved to internal micro SD card.
3. By default, the storage path is Internal, when internal micro SD card is full, les
will be saved to external micro SD card automatically. (If user has inserted the
external micro SD card in camera, it will work as this.)
4. The external micro SD card icon on LCD is white color, the internal micro SD
card icon on LCD is red color.

www.PyleUSA.com
5
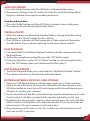
LED Indicator
Photo
Video
Audio
Note: Please format your micro SD card format to be FAT32 format before
inserting into external micro SD card slot.
CODING WITH REMOTE CONTROL
1. Turn on camera, long press photo button on camera for 3 seconds, will display
“Coding with remote control”.
2. Press and hold photo button on remote control for 3 seconds, the camera will
take a photo, the coding is successful.
Note: The coding mode can only be activated within 30 seconds after camera is
turned on.)
REMOTE CONTROL FUNCTIONS
After coding remote control with camera, short press the buttons on remote to
control camera button functions. The LED will ash red color once when press
remote button once.

www.PyleUSA.com
6
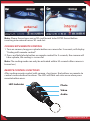
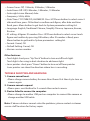
CHARGING BATTERY WITH USB CABLE
1. Connect a USB cable with a compatible connector to a computer/wall charger.
2. Connect the USB cable to the USB port on the body camera.
BATTERY STATUS ICONS
Low Power Not Fully Charged Fully Charged
When charging battery while camera is power o, the LED Status Indicator will
light up red. When the battery is fully charged, the red LED Status Indicator will
turn o.
CONNECT TO PC
Connect to PC via mini USB cable, on camera LCD, it will display “Connected
Computer”. You will nd the camera disk on PC.
CONNECT TO TV
Connect to TV via HDMI cable (HDMI cable is not in standard accessories kit), the
connector on camera is HDMI-C, if your TV HDMI connector is HDMI-A, please use
HDMI C to A cable. After camera is connected to TV, the camera will enters to
playback mode automatically, press UP/Down button to select les and press OK
button to conrm the playback on TV.
PARAMETER SETTING
Short press Menu button to enter menu setting mode, press down button once
to select parameter items. Press and hold Menu button to return to video recording
standby mode.
Submenu details are as below:
•
Resolution: 2304*1296 20P, 1920x1080 30P, 1440x1080 30P, 1280x720 30P,
800x480 30P, 640x480 30P
•
Video Quality: Fine, Normal, Economy. (Bitrate is dierent for dierent options)
•
Loop Recording: O, On
•
Recording Time: 3minutes, 5minutes, 10minutes, 20minutes
•
Video Delay: O, On
•
Motion Detection: O, On
•
Photo Size: 36M, 21M, 16M, 12M, 10M, 8M, 5M, 2M
•
Continuous Shoot: O, 2 sheets, 3 sheets, 5 sheets, 10 sheets
•
Micro SD card: External/Internal
•
Volume: O, Low, Medium, High

www.PyleUSA.com
7
•
Screen Saver: O, 1 Minute, 3 Minutes, 5 Minutes
•
Auto Power O: O, 3 Minutes, 5 Minutes, 10 Minutes
•
Auto night vision: Manual, Auto
•
Frequency: 50Hz, 60Hz
•
Date/Time: YYYY/MM/DD, HH/MM/SS. Press UP/Down button to select correct
date and time, press OK button to conrm each gure, after date and time
xed, press Menu button to get back to System parameters setting list.
•
Language: English, Traditional Chinese, Simplify Chinese, Japanese, Korean,
Russian
•
ID setting: 6 gures ID number. Press UP/Down button to select correct each
gure and conrm by pressing OK button, after ID number is xed, press
Menu button to get back to System parameters setting list.
•
Format: Cancel, OK
•
Default Setting: Cancel, OK
•
Version: version number
Other features:
•
Torch light: short press “Up/Torch” button to turn on/o torch light.
Torch light is for using in dark situation to add more light.
•
Laser pointer: short press “Power” button to turn on/o laser pointer.
Laser pointer can show the direction where lens is recording.
TROUBLE SHOOTING AND HANDLING
1. Camera cannot boot.
•
Please charge camera battery for more than 2hours rst then try to turn on
camera again.
2. Camera cannot respond.
•
Please press reset button for 2 seconds then restart camera.
3. Device failed to connect to computer.
•
Please change to another USB port on computer to connect the camera or
change another USB cable.
Note: If above solutions cannot solve the problems, please contact customer
service sta to return for factory repair.

www.PyleUSA.com
8
Features:
•
Waterproof and Shockproof
•
Anti-fog, Laser Indicator, 6 IR Night Vision
•
Motion Detection
•
Dual Micro SD Card Slots Support Up to 128GB
•
Built-in Micro SD Cards (Up to 16GB by Default)
•
Lightweight, Portable, Versatile & Wearable Body Camera
•
Multi-Functional: Camera + Camcorder + Voice Recorder
•
Record Full HD 1080p Video, Snap up to 36MP Hi-Res Images
•
Button-Activated Night Vision Illumination
•
Water-Resistant Design
•
2.0'' Digital LCD Display
•
Displays Video Recording Time/Memory Remaining
•
Built-in Microphone & Speaker for Audio Recording
•
Ability to Instantly Playback Captured Media Files (Audio +Video)
•
Removable Memory Slot Up to 128GB MAX Support
•
Built-in Rechargeable Battery
•
Input Interface: USB Mini Connector
•
Simple Touch-Button Control Operation
•
Durable ABS Construction
•
Date + Time Setting / Display
•
Auto Exposure & Picture Adjustment
•
Connect to Computer: Easy To Save, Share & Transfer Files
•
HDMI Interface for Connecting to TV
•
Integrated Torch Light to Add More Light in Dark Situation
•
Integrated Laser Pointer to Show Direction where the Lens is Recording
Video Recording:
•
Simple One-Button Video Recording
•
Displays Time Remaining While Video Recording
•
Motion Detector Function
•
Loop Recording Ability (2 Minutes, 5 Minutes)
•
Selectable Recording Options: 1296p, 1080p, 720p, 480p
(2304x1296@20fps, 1920 x 1080@30fps, 1280 x 720@30fps,
800x480@30fps, 640 x 480@30fps)
•
Video File Format: MOV
•
Captures Over 8+ Hours of Video

www.PyleUSA.com
9
Picture Snapping:
•
Simple One-Button Image Snap Ability
•
Photo Resolution: 2M/5M/8M/10M/12M/16M/21M/36M
•
Image File Format: JPG
•
Capture Over 10,000+ Images
Audio/Voice Recording:
•
Simple One-Button Voice Record Ability
•
Audio File Format: WAV
•
Record Over 10+ Hours of Audio
What's in the Box:
•
Body Camera
•
USB Wall Adapter & Charging Cable
•
(2) Mounting Clip
•
Remote Control
Technical Specs:
•
Material: ABS and PC
•
Night Vision: Manual/Auto IR Switch. 32.81 ft. can recognize the face.
•
Waterproof: IP56, Rainproof
•
Shockproof: up to 2-3 meters free-fall
•
Motion Detection: On/O
•
Display: 2.0 inch. 4:3 FHD Color Display
•
Operating System: Windows XP/Windows 7/Windows 8/Windows 10
•
Built-in Night Vision IR LED Lights
•
Interface: USB 2.0
•
LCD Display: 320 x 240 Output, 4:3
•
Extra Wide 130° Degree Angle Lens
•
Imaging Sensor: 1/3'' Full-Color CMOS
•
Electronic Shutter: 1/2 - 1/2000s
•
Battery: 2650mAh, 3.7V (Up to 8 Hours Recording 720p)
•
Dimensions: 3.15'' x 2.3'' x 0.98'' -inches
This product can expose you to a chemical or group of checmicals, which
may include ”Lead (Pb)” which is known in the state of California to cause
cancer, birth defects, or other reproductive harm. For more info, go to
https://www.p65warnings.ca.gov/.

-
 1
1
-
 2
2
-
 3
3
-
 4
4
-
 5
5
-
 6
6
-
 7
7
-
 8
8
-
 9
9
-
 10
10


Pyle PP-BCM92 User manual
- Category
- Dashcam
- Type
- User manual
Ask a question and I''ll find the answer in the document
Finding information in a document is now easier with AI
Related papers
Other documents
-
 Lifemax N73120 Operating instructions
-
 Viiwuu Smoke detector camer User guide
-
 Amayia Hidden Camera Smoke Detector, Nanny Camera and Hidden Camera,Infrared Remote Control Wall Mount Motion Detection Surveillance Camera,USB Interface,SD Card Slot,Bottom View Hidden Security Camera User guide
-
Salora CDC100 Quick start guide
-
Promate triForza User manual
-
Salora CDC300 User manual
-
Sony ILCE-7RM3 Owner's manual
-
 Sunsky A18 User manual
-
 Ucorder IRDC150 Datasheet
-
 Chinavision CVMG-DV81 User manual


