Precision AP004 User manual

Category
Alarm clocks
Type
User manual

This manual is also suitable for

Precision AP004: The World's Most Accurate Clock

Precision AP004 is the ultimate timekeeping solution for those seeking unparalleled accuracy. This radio-controlled clock receives atomic clock signals, ensuring your time is always precise to within 1 second in 10 million years. With its sleek design and user-friendly interface, the AP004 seamlessly blends style and functionality.

AP004 - Instruction Manual
The Radio-Controlled Clock
With the Radio-Controlled Clock, you can have the most accurate time within the UK. It can receive the
time signal transmitted by VT Communications of United Kingdom, which is regulated by atomic clock
and in average deviates less than 1 second in 10 million years. VT Communications transmit the time
signal (MSF 60kHz) continuously from Anthorn at latitude 54°55′N and longitude 3°15′W. The main
caused of reception difficulties are local interference and screening due to nearby metalwork, for
example in a steel-frame building.
For more information, please study the WEB page of VT at: http://www.npl.co.uk/time/msf.
Environmental Reception Effects
The Radio-Controlled Clock obtains the accurate time with wireless technology. As with all wireless
devices, the receiving ability may be affected by, but not limited to, the following circumstances:
Long transmitting distance.
Nearby mountains and valleys.
* Among tall buildings.
Near railway, high voltage cables, etc.
Near motorway, airport, etc.
Near construction site.
Inside concrete buildings.
* Near electrical appliances.
Near computers and televisions.
Bad weather.
Inside moving vehicles.
Nearby metallic structures.
Location precautions
This clock receives a radio wave much like a TV or radio. Be sure to locate it near a window or some
other locations where reception is good. Avoid the following locations, which can interfere with proper
reception:
In moving vehicles (cars, trains,
airplanes etc.)
Inside or near concrete/steel buildings Next or close to power station.
or structures, unless the clock is close/ where radio transmission or electronics
may interfere,
next to a window (with curtain open). with reception of the radio-controlled clock.
Too close to household appliances Near construction sites, Close to or on top of metal
traffic lights, neon lights etc. (computer, TV, video/audios, fax
machines, speakers).
Birmingham International Park. Bickenhill Lane, Solihull,B37 7GN
PH Services, Precision House, Unit 4, Startey Way,
Email Address: customerservice@peershardy.co.uk
We recommend keeping the minimum distance of 8 feet from any interfering source like TV’s
computer monitors.
Within concrete rooms (basements, superstructures, tower block, office buildings, etc.), the received signal
will be weakened. In extreme cases, the unit should be placed close to a window and/or point the clock face
or back towards the Frankfurt, Germany (DCF77) / Cumbria, England (MSF).
Avoid placing the unit on or next to metal surfaces.
Do not start reception whilst moving such as in a vehicle or on a train.
During the night, the atmospheric disturbances are usually less severe and reception is possible in most
cases. A single daily reception is adequate to keep the accuracy within 1 second.
CARE OF YOUR CLOCK
Replace the battery promptly when necessary and store the clock without batteries when not in use. It is time to
replace the batteries when the LCD display becomes dim. Clean your clock with a soft cloth or paper towel. Do
not use corrosive cleaners or chemical solutions on the clock. Avoid putting the clock in a highly humid environ-
ment such as poolside or in a bathroom. Do not expose the clock to direct sunlight, extreme hot or cold tempera-
tures. Do not use rechargeable batteries. Non-rechargeable batteries are not to be recharged. Different types
of batteries or new and used batteries are not to be mixed. Only batteries of the same or equivalent type as
recommended are to be used. Batteries are to be inserted with the correct polarity. Exhausted batteries are to
be removed from the product. The supply terminals are not to be short-circuited. Do not dispose of batteries in
fire; batteries may explode or leak.
Note:Attention ! Please dispose of used unit and batteries in an ecologicalsafe manner.
Customer help line 0121 524 1400 (Monday - Friday 9:00am - 5:00pm.)
For more inlormation relating to Precision Radio Controlled products.
Please visit our website www.precisiontimekeeping.com
National Physical Laboratory
The National Physical Laboratory (NPL) is the UK's home of measurement and
the nation's timekeeper. NPL is responsible for operating the national time system
and making accurate time available across the UK. The clock you have just received
keeps accurate time by picking up NPL's radio signal, called MSF, which is broadcast
on 60 khz from a location in Cumbria. This transmission carries a date and time code
that radio controlled clocks use to set themselves to the correct time. The signal is
controlled by atomic clocks at the radio station, and is adjusted to keep it in step with
the national time maintained at NPL's laboratory in south-west London. For more
informations visit www.npl.co.uk/time Your clock is controlled by the MSF signal which
is synchronised to the national time scale at NPL, making it ‘forever accurate'.
TIME FROM NPL
forever accurate
Note:
The WEEE symbol indicates that waste electrical and electronic equipment should not be treated
as normal household waste. It should be segregated and recycle when it has reached the end of
its life, which can be done free of charge at local Civic Amenity Sites. For your nearest facilities
see www.recycle-more.co.uk.
When the signal icon on the clock flashes, this indicates that the clock is receiving the radio signals from the
Germany (DCF) or UK (MSF) radio station (this depends on which version you purchase). When the time code is
received the signal icon turns on. If the signal icon does not appear at all and the time is not yet set, please take
note of the following should just be:
AP004 - Instruction Manual
The Radio-Controlled Clock
With the Radio-Controlled Clock, you can have the most accurate time within the UK. It can receive the
time signal transmitted by VT Communications of United Kingdom, which is regulated by atomic clock
and in average deviates less than 1 second in 10 million years. VT Communications transmit the time
signal (MSF 60kHz) continuously from Anthorn at latitude 54°55′N and longitude 3°15′W. The main
caused of reception difficulties are local interference and screening due to nearby metalwork, for
example in a steel-frame building.
For more information, please study the WEB page of VT at: http://www.npl.co.uk/time/msf.
Environmental Reception Effects
The Radio-Controlled Clock obtains the accurate time with wireless technology. As with all wireless
devices, the receiving ability may be affected by, but not limited to, the following circumstances:
Long transmitting distance.
Nearby mountains and valleys.
* Among tall buildings.
Near railway, high voltage cables, etc.
Near motorway, airport, etc.
Near construction site.
Inside concrete buildings.
* Near electrical appliances.
Near computers and televisions.
Bad weather.
Inside moving vehicles.
Nearby metallic structures.
Location precautions
This clock receives a radio wave much like a TV or radio. Be sure to locate it near a window or some
other locations where reception is good. Avoid the following locations, which can interfere with proper
reception:
In moving vehicles (cars, trains,
airplanes etc.)
Inside or near concrete/steel buildings Next or close to power station.
or structures, unless the clock is close/ where radio transmission or electronics
may interfere,
next to a window (with curtain open). with reception of the radio-controlled clock.
Too close to household appliances Near construction sites, Close to or on top of metal
traffic lights, neon lights etc. (computer, TV, video/audios, fax
machines, speakers).
Slide the [SWITCH] key to the [TIME SET] position, the time will begin to flash. Press the [MONTH • HOUR]
key to set the clock to desired hour, press the [DATE • MIN] key to set the clock to the desired minutes.
Slide the [SWITCH] key to the [RUN] position to exit the setting mode and the second will restart from 00.The
clock will now begin keeping time. If “HOUR”, “MINUTE” was not set, the seconds will keep the original time.
Note: In normal time mode, pressing the [YEAR•12/24] key will toggle between the 12 and 24 hour formats.
Once the battery is installed the clock will begin to seek out the radio signal to update the time. This typically takes
between 3-6 minutes in good conditions. If after 12 minutes the signal has not been received, we recommend that
you set the time manually. (See Setting the Time Manually.) After the first signal is received, the clock will automati-
cally seek out the atomic clock signal in Frankfurt, Germany (DCF77kHz) / England (MSF 60kHz) four times a day at
the following times: 2:00AM (3:00AM and 4:00AM will continue to seek the signal if the previous seeking was unsuc-
cessful). 8:00AM, 2:00PM and 8:00PM, and continue to do so each day.
SETTING THE TIME MANUALLY
RADIO CONTROLED TIME FEATURE
Note: The snooze will be on automatically after activating the alarm.
Note: At any time, your can press and hold the [ºC / ºF•RECEIVE] key for three seconds to make the clock seek
the atomic radio signal and set itself automatically. The signal strength indicator will blink on the display as the
clock seeks out the signal.
Slide the [SWITCH] key to the [CAL SET] position. The Year, Month and Date will begin to flash.
Press the [MONTH•HOUR] key to set the desired Month. Press the [DATE•MIN] key to set the desired Date.
Press the [YEAR•12/24] key to set the desired Year.
Slide the [SWITCH] key to the [AL SET] position. The alarm time (hour, minute) will begin flashing.
Press the [MONTH • HOUR] key to set the desired alarm hour. . Press the [DATE • MIN] key to set the desired
alarm minute.
Slide the [SWITCH] key to the [RUN] position to return to normal time mode, as well as temperature display.
The signal indicator displays signal strength in 3 levels. Wave segment flashing means time signals are being
received. The signal quality is indicated:
This clock has been pre-programmed to automatically switch when daylight savings time is in effect. Your
clock will show “DST” on the display during this time.
Please note: With the pre-programmed DST feature, if you live in an area where Daylight Savings Time is
not observed, the time display on your clock will read +/- one hour during the DST time period.
SIGNAL STRENGTH INDICATOR FOR RADIO CONTROLLED TIME SETTING
ABOUT THE DAYLIGHT SAVINGS TIME (DST)
Note: 12/24hour format of alarm time display are based on the normal time format.
To activate the alarm, slide the [ALARM ON/OFF] to the [ON] position, the bell indicator will appear on the display.
To deactivate alarm, slide the [ALARM ON/OFF] button to the [OFF] position, the bell indicator will disappear.
To activate the snooze function just press the [SNOOZE] button. The alarm will stop sounding and then sound
again in 5 minutes.
• When the Alarm function is activated, if you do not activate the snooze button the 3-step crescendo alarm
will automatically snooze once every 5 minutes for a total of 4 times. The alarm duration is 60 seconds.
Excellent signal quality
SETTING THE CALENDAR MANUALLY
SETTING THE ALARM
USING THE ALARM AND SNOOZE FUNCTION
RADIO CONTROLLED FEATURE
Poor signal quality Acceptable signal quality
If the RC clock receives signal successfully, a sync-time symbol
appears on LCD.
• Begin by opening the battery compartment cover at the bottom of the clock.
• Insert 1 AAA battery into the battery compartment and make sure the polarity is correct by following the
(+ or -) symbols engraved inside.
• Replace the battery whenever the display becomes dim or difficult to read.
Note: It is recommended that for the first use of the clock, you set the clock manually and then allow the Radio
Control signal to update the time setting each day.
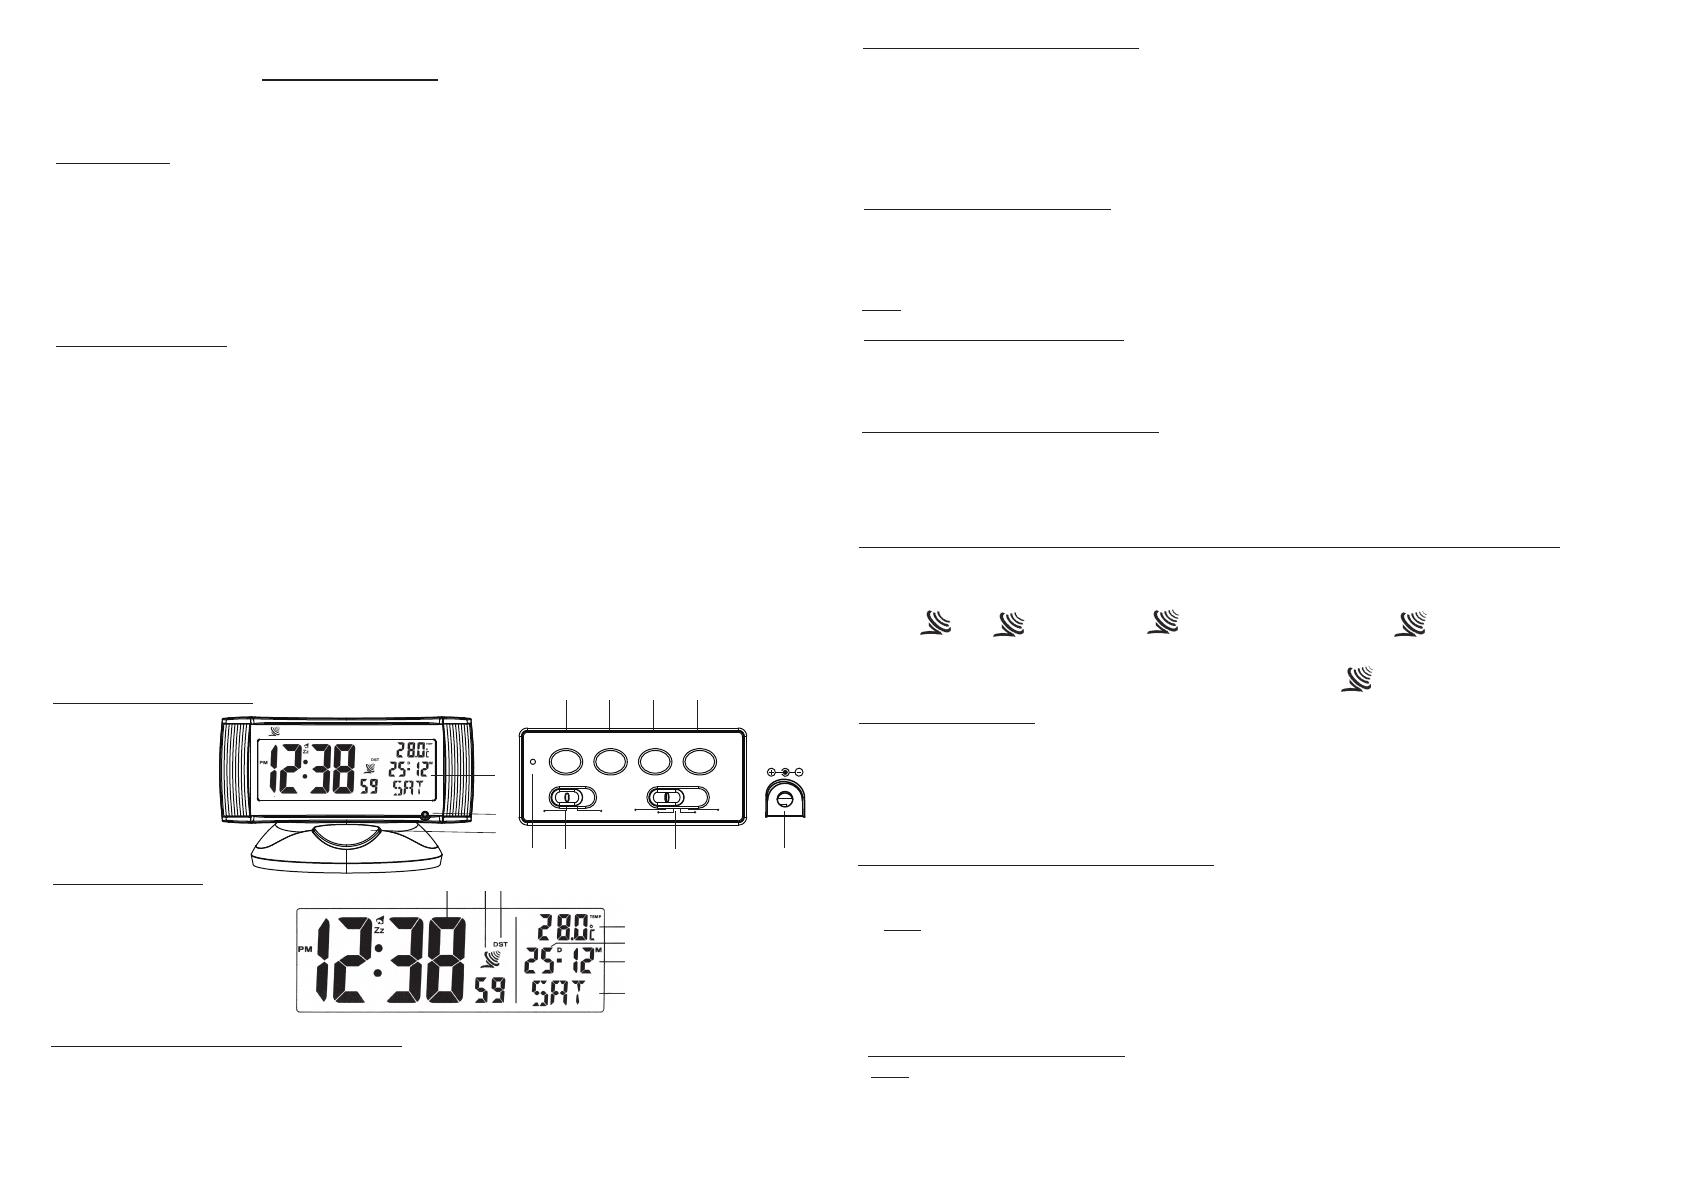
PRODUCT DESCRIPTIONS
1. LCD display
2. SENSOR
3. SNOOZE bar
4. MONTH • HOUR key
5. DATE • MIN key
6. YEAR • 12/24 key
7. ºC / ºF • RECEIVE key
8. RESET key
9. ALARM ON / OFF key
10. SWITCH key
11. DC JACK
DISPLAY SYMBOLS
LCD display
1. Clock display
2. Signal strength indicator
3. Daylight savings time indicator
4. Temperature display/Alarm time display
5. Date
6. Month
7. Day of the week
FUNCTION KEYS
SNOOZE: 1. Stop alarm sound.
2. Press and hold it for 8 seconds to stop the current RC reception.
SENSOR: 1. Adjust the brightness of display according to the environmental brightness when useing DC a
daptor power the backlight.
MONTH•HOUR: 1. In normal time mode, press the button to display Alarm time and then return to temperature display
in 5 seconds.
2. In setting mode, set the value of hour or month.
DATE • MIN: 1. In normal time mode, press the button to display Alarm time and then return to temperature display
in 5 seconds.
2. In setting mode, set the value of minutes or day.
YEAR • 12/24 1. In normal time mode, toggle between 12 and 24 hour format.
2. In setting mode, set the year.
ºC/ºF•RECEIVE: 1.Toggle between ºC and ºF format.
2.Press and hold it for 3 seconds to seek RC signal instantly.
RESET: In case of mal-function after insertion of battery, use a pin to press the RESET key to restart the clock.
ALARM ON/OFF: Switch alarm & snooze function on or off.
SWITCH: Switch to the mode in the sequence: RUN, TIME SET, CAL SET and AL SET.
2.1. 3.
4.
5.
6.
7.
INSTALLING OR REPLACING THE BATTERIES
RADIO CONTROLLED CLOCK WITH TEMPERATURE
Users Instructions
SNOOZE
3
2
1
RADIO CONTROLLED
64
98 10
11
5 7
RESET
ON ALARM OFF
RUN AL. SET
TIME SET CAL SET
HOUR
MONTH DATE YEAR ºC / ºF
MIN. 12/24 RECEIVE
DC 4.5C
Thank you for your purchase of this quality clock. The utmost care has gone into the design and manufacture of
your clock. Please read these instructions carefully and store them in a safe place for future reference.
FEATURES
• Radio Controlled Accuracy - Sets Time Automatically
• English format day of week display
Auto calendar display from Jan 1, 2000 to Dec 31, 2099
Auto time and date receiving function (12/24 hour format)
• LCD display shows Hour, Minute, Second, Month, Date, Week, Alarm & temperature
• Repeat Snooze
• Daylight savings time function (DST)
• DC adaptor power backlight for viewing in darkness
Slide the [SWITCH] key to the [TIME SET] position, the time will begin to flash. Press the [MONTH • HOUR]
key to set the clock to desired hour, press the [DATE • MIN] key to set the clock to the desired minutes.
Slide the [SWITCH] key to the [RUN] position to exit the setting mode and the second will restart from 00.The
clock will now begin keeping time. If “HOUR”, “MINUTE” was not set, the seconds will keep the original time.
Note: In normal time mode, pressing the [YEAR•12/24] key will toggle between the 12 and 24 hour formats.
Once the battery is installed the clock will begin to seek out the radio signal to update the time. This typically takes
between 3-6 minutes in good conditions. If after 12 minutes the signal has not been received, we recommend that
you set the time manually. (See Setting the Time Manually.) After the first signal is received, the clock will automati-
cally seek out the atomic clock signal in Frankfurt, Germany (DCF77kHz) / England (MSF 60kHz) four times a day at
the following times: 2:00AM (3:00AM and 4:00AM will continue to seek the signal if the previous seeking was unsuc-
cessful). 8:00AM, 2:00PM and 8:00PM, and continue to do so each day.
SETTING THE TIME MANUALLY
RADIO CONTROLED TIME FEATURE
Note: The snooze will be on automatically after activating the alarm.
Note: At any time, your can press and hold the [ºC / ºF•RECEIVE] key for three seconds to make the clock seek
the atomic radio signal and set itself automatically. The signal strength indicator will blink on the display as the
clock seeks out the signal.
Slide the [SWITCH] key to the [CAL SET] position. The Year, Month and Date will begin to flash.
Press the [MONTH•HOUR] key to set the desired Month. Press the [DATE•MIN] key to set the desired Date.
Press the [YEAR•12/24] key to set the desired Year.
Slide the [SWITCH] key to the [AL SET] position. The alarm time (hour, minute) will begin flashing.
Press the [MONTH • HOUR] key to set the desired alarm hour. . Press the [DATE • MIN] key to set the desired
alarm minute.
Slide the [SWITCH] key to the [RUN] position to return to normal time mode, as well as temperature display.
The signal indicator displays signal strength in 3 levels. Wave segment flashing means time signals are being
received. The signal quality is indicated:
This clock has been pre-programmed to automatically switch when daylight savings time is in effect. Your
clock will show “DST” on the display during this time.
Please note: With the pre-programmed DST feature, if you live in an area where Daylight Savings Time is
not observed, the time display on your clock will read +/- one hour during the DST time period.
SIGNAL STRENGTH INDICATOR FOR RADIO CONTROLLED TIME SETTING
ABOUT THE DAYLIGHT SAVINGS TIME (DST)
Note: 12/24hour format of alarm time display are based on the normal time format.
To activate the alarm, slide the [ALARM ON/OFF] to the [ON] position, the bell indicator will appear on the display.
To deactivate alarm, slide the [ALARM ON/OFF] button to the [OFF] position, the bell indicator will disappear.
To activate the snooze function just press the [SNOOZE] button. The alarm will stop sounding and then sound
again in 5 minutes.
• When the Alarm function is activated, if you do not activate the snooze button the 3-step crescendo alarm
will automatically snooze once every 5 minutes for a total of 4 times. The alarm duration is 60 seconds.
Excellent signal quality
SETTING THE CALENDAR MANUALLY
SETTING THE ALARM
USING THE ALARM AND SNOOZE FUNCTION
RADIO CONTROLLED FEATURE
Poor signal quality Acceptable signal quality
If the RC clock receives signal successfully, a sync-time symbol
appears on LCD.
  • Page 1 1
  • Page 2 2
  • Page 3 3
  • Page 4 4

Precision AP004 User manual

Category
Alarm clocks
Type
User manual
This manual is also suitable for

Precision AP004: The World's Most Accurate Clock

Precision AP004 is the ultimate timekeeping solution for those seeking unparalleled accuracy. This radio-controlled clock receives atomic clock signals, ensuring your time is always precise to within 1 second in 10 million years. With its sleek design and user-friendly interface, the AP004 seamlessly blends style and functionality.

Ask a question and I''ll find the answer in the document

Finding information in a document is now easier with AI