LRP 220108 User manual
- Category
- Remote controlled toys
- Type
- User manual
This manual is also suitable for
Page is loading ...

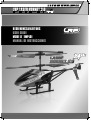
LRP LASER HORNET 2.0 2.4GHZ
INHALTS-
VERZEICHNIS
TABLE OF
CONTENTS
SOMMAIRE INDICE
DEUTSCH ENGLISH FRANÇAIS ESPANÕL PAGE
Einleitung Introduction Introduction Introducción 3
Lieferumfang Included in this package Inclus dans ce package Contenido 4
Benötigtes Zubehör Needed accessories Accessoires nécessaires Accesorios necesarios 4
Technische Daten Technical specifications Spécifications techniques Especificaciones Técnicas 4
Schnellstart Quick Start Démarrage rapide Primeros pasos 5
Fernsteuerung Remote Control Émetteur Emisora 6
Einsetzen der Akkus Insertion of batteries Insertion des piles Colocación de las baterías 7
Helikopter Helicopter Hélicoptère Helicóptero 7
Achsen des Helikopters Helicopter axes Axes de l‘hélicoptère Ejes helicóptero 8
Flugvorbereitung Preparations before flight Préparatifs avant vol Preparativos antes de volar 8
Laden des Flugakkus Charging the flight battery Chargement de l‘accu de vol Carga de la batería del modelo 8
Der erste Start The first flight Le premier vol Primer vuelo 9
Flugsteuerung Flight control Commande de vol Control en vuelo 9
Fehlersuche Troubleshooting guide Guide de dépannage Guía de problemas 11
Wechsel der Rotorblätter Replacement of the main rotor blades
Remplacement des pales du rotor
principal
Cambio de las palas 11
Explosionszeichnung Explosion drawing Dessin éclaté Despiece 12
Ersatzteilliste Spare part list Liste de pièces de rechange Repuestos 12
Allgemeine Gewährleistungs- und
Reparaturbestimmungen
Repair procedure
Condition général de garantie et de
réparation
Reparaciones / Garantía 14
Warnhinweise Warning notes Consignes de sécurité Advertencias 16
Allgemeine Hinweise General notes Informations général Información adicional 23
2

EINLEITUNG INTRODUCTION INTRODUCTION INTRODUCCIÓN
SEHR GEEHRTER MODELLBAUFREUND,
vielen Dank, dass Sie sich für den Kauf einer LRP Laser Hornet 2.0 entschieden haben.
Die LRP Laser Hornet 2.0 ist ein fertig vormontiertes, frei fliegendes Helikoptermo
-
dell, welches über eine 2.4GHz Fernsteuerung gesteuert wird und für den Indoor
Einsatz vorgesehen ist. Die LRP Laser Hornet 2.0 zeichnet sich durch gutmütigste
Flugeigenschaften, eine präzise Steuerung und eine sehr hohe Flugstabilität aus. Sie
ist werksseitig bereits eingeflogen und mit seinem Aluchassis und dem geschütztem
Hauptzahnzahnrad sehr robust.
Modellhelikopter sind generell schwieriger zu steuern als ein Flächenmodell, deshalb
lesen Sie bitte vor der ersten Inbetriebnahme die Anleitung und die Warnhinweise
sorgfältig durch. Sollten Fragen auftauchen können Sie gerne Ihren Fachhändler
kontaktieren oder sich an unsere Technik + Service Hotline wenden.
Technik + Service Hotline für D:
0900 577 4624 (0900 LRP GMBH)
(0,49eur/Minute aus dem deutschen Festnetz, Mobilfunkpreise können abweichen)
Technik + Service Hotline für A:
0900 270 313
(0,73eur/Minute aus dem österreichischen Festnetz, Mobilfunkpreise können abweichen)
DEAR CUSTOMER,
thank you for choosing this LRP Laser Hornet 2.0. The LRP Laser Hornet 2.0 is a pre-
assembled, free flying radio-controlled helicopter which is controlled by an 2.4GHz
transmitter. The helicopter is designed for indoor use. The LRP Laser Hornet 2.0 is
very easy to fly and features a precise control and high flight stability. The helicopter
is already factory tuned and tested out of the box. With its aluminium chassis and the
protected main gears, the LRP Laser Hornet 2.0 is extremely robust.
Model helicopters in general are harder to control than model airplanes. Therefore
be sure to read the user guide and the warning notes completely before flying your
helicopter the first time.
CHER CLIENT,
merci d‘avoir choisi cette Laser Hornet 2.0 de LRP. Le Laser Hornet 2.0 de LRP est
un hélicoptère préassemblé, libre vol et radiocommandé par émmetteur 2. 4GHz.
L‘hélicoptère est conçu pour l‘utilisation à l‘intérieure. Le Laser Hornet 2.0 de LRP
est très facile à piloter et dispose d‘un contrôle précis et la haute stabilité en vol.
L‘hélicoptère est déjà réglé et testé en usine hors de la boîte. Avec son fuselage
en aluminium et les engrenages principales protégés, le Laser Hornet 2.0 LRP est
extrêmement robuste.
En général, les hélicoptères R/C sont plus difficiles à voler que les avions R/C. Veillez
donc lire le guide de l‘utilisateur et les notes d‘alerte complètement avant de voler
votre hélicoptère pour la première fois.
ESTIMADO CLIENTE,
eracias por adquirir el modelo LRP Laser Hornet 2.0. El LRP Laser Hornet 2.0 es un
helicóptero de radio control premontado de fábrica con sistema de modulación en
2.4GHz. Este helicóptero esta diseñado para uso en interiores. El LRP Laser Hornet
2.0 es muy fácil de usar, con un control preciso y un alta estabilidad de vuelo. Este
helicóptero esta comprobado en fabrica y probado en vuelo. Con chasis de aluminio
que le confiere una gran robustez y corona principal protegida.
Los helicópteros de radio control son en general mas difíciles de controlar que los
aviones. Por tanto asegúrese de leer el manual de instrucciones y los consejos de
seguridad antes de volar el helicóptero por primera vez.
3

LRP LASER HORNET 2.0 2.4GHZ
1 St. vormontierte und eingeflogene LRP Laser Hornet 2.0
1 St. 2.4GHz Fernsteuersender mit integriertem Ladegerät
1 St. USB Ladekabel
1 St. Flugakku (eingebaut)
4 St. Ersatzrotorblätter
1 St. Bedienungsanleitung
Benötigtes Zubehör: 4 St. AA Mignon Batterien z.B. No.78221 VTEC AA 3000mAh
Mignon Akkus
1 pc. pre-assembled and factory-tuned LRP Laser Hornet 2.0
1 pc. 2.4GHz transmitter with built-in charger
1 pc. USB charging cable
1 pc. flight battery (built-in)
4 pcs. spare main rotor blades
1 pc. user guide
Needed accessories: 4 pcs AA-size batteries (e.g. LRP No.78221 VTEC AA 3000mAh
Mignon batteries)
1 LRP Laser Hornet 2.0 pré-assemblées et réglé à l‘usine
1 Émetteur à 2.4GHz avec chargeur intégré
1 câble de chargement à USB
1 Accu de vol (monté)
4 Pales de rotor à remplacement
1 Guide de l‘utilisateur
Accessoires nécessaires: 4 piles taille AA (p. ex. batteries LRP No.78221 VTEC AA
3000mAh Mignon)
1 Helicóptero premontado y ajustado en fabrica LRP Laser Hornet 2.0.
1 Emisora 2.4GHz con cargador integrado
1 cable de carga USB
1 Batería integrada en el modelo
4 Repuesto palas rotor principal
1 Manual de instrucciones
Accesorios necesarios para su uso: 4 baterías AA (p.e. baterías LRP No.78221 VTEC
AA 3000mAh)
TECHNISCHE DATEN
• Koaxialsystem mit gegenläufigen
Rotoren
• Gyro zur automatischen Stabilisierung
• Aluminiumchassis mit schlagge
-
schützten Hauptzahnrädern
• Eingebauter LiPo Akku
• Eingebaute mehrfarbige LED
Beleuchtung
Länge ohne Rotor: 230mm
Breite ohne Rotor: 35mm
Höhe: 110mm
Rotor Durchmesser: 190mm
Gewicht (flugfertig): 52g
Fernsteuerung
• 2.4GHz Fernsteuerung
• Trimmungsfunktion
• Status LED
• Integriertes Ladegerät für Flugakku
TECHNICAL SPECIFICATIONS
• Co-Axial system with counter-rotating
blades
• Gyro for automatic stabilizing
• Aluminium chassis with protected
main gears
• Built-in LiPo battery
• Built-in multicolor LED lights
Length without rotor: 220mm
Width without rotor: 35mm
Height: 110mm
Rotor diameter: 190mm
Weight (ready to fly): 52g
Remote Control
• 2.4GHz transmitter
• Trim function
• Status LED
• Built-in charger for flight battery
SPÉCIFICATIONS TECHNIQUES
• Système Co-Axial avec des pales
contrarotatif
• Gyro de stabilisation automatique
• Fuselage en aluminium avec eng-
renages principales protégés
• Accu LiPo intégré
• LED feux multicolore intégré
Longueur sans rotor : 220mm
Largeur sans rotor : 35mm
Hauteur : 110 mm
Diamètre du rotor : 190mm
Poids (prêt à voler): 52g
Émetteur
• Émetteur à 2.4GHz
• Fonction de Trim
• LED statut charge
• Chargeur intégré pour l‘accu de vol
ESPECIFICACIONES TÉCNICAS
• Sistema Coaxial con palas contrar-
rotatorias.
• Giróscopo incorporado.
• Chasis de aluminio con corona
principal protegida
• Batería LiPo integrada
• Luces LED multicolor incorporadas.
Longitud (sin rotor): 220mm
Ancho (sin rotor): 35mm
Altura: 110mm
Diámetro rotor: 190mm
Peso (listo para volar): 52g
Equipo RC
• Emisor 2.4GHz 3 Canales
• Función de trim.
• LED de indicador de estado
LIEFERUMFANG
INCLUDED IN THIS
PACKAGE
INCLUS EN
CE PAQUET
INCLUIDO EN
ESTA CAJA
4

CHECKLISTE VOR DEM FLUG
1. Überprüfung der Komponenten auf sichtbare Beschädigungen. Beschädigte
Komponenten müssen vor einem erneuten Flug ausgetauscht werden.
2. Überprüfen aller Schraub- und Steckverbindungen auf festen Sitz. Lose Schraub-
und Steckverbindungen müssen vor dem Betrieb gesichert werden.
3. Überprüfung der Umgebung auf Gefahrenstellen.
4. 4x AA Mignon Batterien in die Fernsteuerung einsetzen.
5. Erst den Helikopter einschalten, dann die Fernsteuerung.
6. Funktionskontrolle aller Komponenten.
7. Reichweitentest durchführen.
START
1. Flugakku laden.
2. Gas in Pos. Aus stellen.
3. Helikopter anschalten.
4. Sender anschalten.
5. Fliegen.
CHECKLISTE NACH DEM FLUG
1. Hubschrauber ausschalten.
2. Fernsteuerung ausschalten.
3. Überprüfung der Komponenten auf sichtbare Beschädigungen. Beschädigte Teile
vor dem nächsten Flug austauschen.
CHECKLIST BEFORE THE FLIGHT
1. Check all components for visible damage. Damaged components have to be
exchanged before the flight.
2. Check all screw fittings and plug connections for a tight fit. Loose screws or
plugs have to be secured before the flight.
3. Check your surroundings for dangerous spots.
4. Insert 4 pcs. AA-size batteries into the transmitter.
5. Switch on the helicopter before you switch on the receiver.
6. Check all functions of your helicopter and its components.
7. Make a maximum range check.
START
1. Charge the flight battery.
2. Throttle to the Off-position.
3. Switch on helicopter.
4. Switch on transmitter.
5. Fly!
CHECKLIST AFTER THE FLIGHT
1. Switch off helicopter.
2. Switch off transmitter.
3. Check all components for visible damage. Damaged components have to be
exchanged before the next flight.
LISTE DE VÉRIFICATION AVANT LE VOL
1. Vérifiez tous les composants pour de dommages visibles. Composants endomma
-
gés doivent être échangés avant le vol.
2. Vérifiez tous les raccords à vis et connexions à brancher pour un ajustement
serré. Vis en vrac ou bouchons doivent être serrées avant le vol.
3. Vérifiez votre entourage pour des endroits dangereuses.
4. Insérez 4 piles AA dans l‘émetteur.
5. Allumez l‘hélicoptère avant que vous allumez l‘émetteur.
6. Vérifier toutes les fonctions de votre hélicoptère avec ses composants.
7. Faire vérifier la portée maximale de l‘émetteur.
DÉCOLLAGE
1. Chargez l‘accu de vol.
2. Manette des gaz à la position Off.
3. Allumez l‘hélicoptère
4. Allumez l‘émetteur
5. Volez!
LISTE DE VÉRIFICATION APRÈS LE VOL
1. Désactivez l‘hélicoptère
2. Désactivez l‘émetteur
3. Vérifiez tous les composants pour de dommages visibles. Composants endomma-
gés doivent être échangés avant le vol.
COMPROBACIÓN ANTES DE VOLAR:
1. Compruebe todos los componentes por si hay algún daño visible. Los componen-
tes dañados o defectuosos deben de cambiarse antes de volar
2. Compruebe todos los tornillos y conectores para asegurarse de su correcta fija-
ción. Todos los tornillos y conectores que vea que están flojos debe asegurarlos
antes de volar.
3. Mire a su alrededor para controlar que el entorno es seguro y no puede causar
daños a personas o cosas.
4. Coloque 4 baterías AA en la emisora.
5. Siempre conecte la emisora antes de conectar el interruptor de ON en el helicóp-
tero.
6. Compruebe todas las funciones de su helicóptero y de sus componentes.
7. Realice una comprobación del alcance de la emisora
EMPEZAR A VOLAR:
1. Cargue la batería del modelo.
2. Coloque el Gas abajo.
3. Conecte el helicóptero.
4. Conecte la emisora.
5. A VOLAR.
COMPROBACIÓN DESPUÉS DE VOLAR:
1. Desconecte el helicóptero.
2. Desconecte la emisora.
3. Compruebe posibles daños de los componentes. Si algún componente está
dañado debe cambiarlo antes del siguiente vuelo.
SCHNELLSTART QUICK START DÉPART RAPIDE INICIO RÁPIDO
5

LRP LASER HORNET 2.0 2.4GHZ
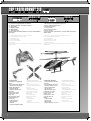
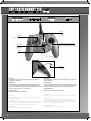
Schubregler
Throttle stick
Bâton de la manette des gaz
Stick de motor
Links/Rechts/Vorwärts/- Rückwärts-Steuerung
Left/Right/Forward/Backward control stick
Manche de commande Gauche/droite et avant/arrière
Stick de dirección Izquierda/Derecha/adelante/Atras
Status LED
Status LED
LED de statut
LED de estado
Ein/Aus-Schalter
On/Off-switch
Interrupteur ON/OFF
Interruptor On/Off
Ladekabel
Charging wire
Câble de charge
Carga de alambre
STATUS LED
LED leuchtet nicht - Sender ist ausgeschaltet. LED leuchtet rot - Der Sender ist
eingeschaltet und betriebsbereit.
TRIMMKNOPF
Sollte der Helikopter nach dem Abheben selbsttätig in eine Richtung drehen, kann
dies mit dem Trimmknopf durch Rechts- oder Linksdrehen ausgeglichen werden.
Wenn Sie den rechten Steuerungsknüppel an der Fernsteuerung loslassen sollte sich
der Helikopter weder nach links, noch nach rechts drehen.
EIN/AUS SCHALTER
Die Sender wird hiermit ein- und ausgeschaltet.
STATUS LED
LED does not glow - Transmitter is switched-off. LED glows red - Transmitter is
switched-on and operational.
TRIM BUTTON
You can adjust the stabilty of the helicopter by turning this button left or right. If the
helicopter turns left or right after take-off, adjust it with the trimm button. If you lift
your hand off the control stick, the helicopter should not turn left or right.
ON-/OFF-SWITCH
Switch-on or switch-off the transmitter with this switch.
LED DE STATUT
LED n‘est pas allumé - émetteur est désactivé. LED s‘allume en rouge - émetteur est
allumé et opérationnel.
BOUTON DE TRIM
Vous pouvez ajuster la stabilité de l‘hélicoptère en activant le bouton de trim gauche
ou droite. Si l‘hélicoptère tourne gauche ou à droite après le décollage, ajustez-le avec
le bouton trim. Si vous soulevez votre main sur le manche de contrôle, l‘hélic
INTERRUPTEUR ON/OFF
Allumez ou désactivez l‘émetteur avec l‘interrupteur
LED DE ESTADO
LED sin luz - Emisora apagada. LED brilla en rojo - Emisora conectada y operativa.
BOTÓN DE TRIM
Puede ajustar la estabilidad del modelo girando el trim a izquierda o derecha. Si el
helicóptero se desvía a izquierda o derecha después del despegue, ajústelo con el
botón del trim hacia el lado contrario de donde se desvíe. Si suelta la mano del stick,
el helicóptero no debe desviarse hacia ninguna dirección.
INTRERRUPTOR ON/OFF
Conecte o desconecte la emisora con este interruptor.
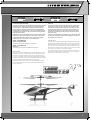
FERNSTEUERUNG REMOTE CONTROL ÉMETTEUR EMISORA
Trimmknopf
Trim button
Bouton de trim
Botón de trim
6

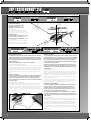
Chassis
Chassis
Fuselage
Chasis
Ein/Ausschalter
On-/Off-switch
Interrupteur ON/OFF
Interruptor On/Off
Hauptrotor
Main rotor
Rotor principal
Rotor principal
Heckrotor
Tail rotor
Rotor de queue
Rotor de cola
Kufen- bzw. Landegestell
Landing skid
Train d’atterissage
Tren aterrizaje
Paddelstange
Flybar
Barre de Bell
Barra estabilizadora
Ladebuchse
Charging jack
Point de chargement
Conector carga
Einsetzen des Akkus
Insertion of batteries
Insertion des piles
Colocacion de las baterias
Übersicht
Overview
Vue d‘ensemble
Vista general
FERNSTEUERUNG REMOTE CONTROL ÉMETTEUR EMISORA
HELIKOPTER HELICOPTER HÉLICOPTÈRE HELICOPTERO
7

LRP LASER HORNET 2.0 2.4GHZ
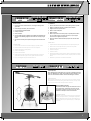
ACHSEN DES HELIKOPTERS
Bewegung um die Querachse = Nick
Bewegung um die Hochachse = Gier
Bewegung um die Längsachse = Roll
HELICOPTER AXES
Movement around the lateral axis = Elevator
Movement around the vertical axis = Rudder
Movement around the longitudinal axis = Aileron
AXES D‘HÉLICOPTÈRE
Mouvement autour de l‘axe transversal = tangage
Mouvement autour de l‘axe vertical = lacet
Mouvement autour de l‘axe longitudinal = roulis
EJES HELICOPTERO
Movimiento sobre el eje lateral = Profundidad
Movimiento sobre el eje vertical = Dirección
Movimiento sobre el eje longitudinal = Alabeo
Hochachse
Vertical axis
Axe vertical
Eje vertical
Längsachse
Longitudinal axis
Axe longitudinal
Eje longitudinal
Querachse
Lateral axis
Axe transversal
Eje lateral
LADEN ÜBER DAS USB-LADEKABEL
Das USB-Ladekabel in einen freien USB Port Ihres Personal Computers oder in eine andere
geeignete USB-Stromquelle stecken. Dann verbinden Sie die Laser Hornet mit dem Lade
-
kabel. Achten Sie bitte darauf, dass die Laser Hornet ausgeschaltet ist. Die Status LED des
Helikopters leuchtet daraufhin dauerhaft grün und zeigt Ihnen damit an, dass der Akku des
Helikopters geladen wird.
Sobald der Akku vollständig geladen ist, erlischt das Licht am Helikopter.
CHARGING WITH THE USB CHARGING CABLE
Please connect the USB-charging cable to a free USB port of your Computer or to any other
suitable USB-power supply. Next, connect the Laser Hornet to the charging cable. Please
make sure, that the helicopter is turned off when doing so. The status LED of the helicopter
will begin to continually glow green, indicating that the battery is being charged at the
moment. As soon as the battery is completely charged, the green LED on the helicopter
goes out.
Charger avec un cable USB
Connectez le cable de charge USB à votre ordinateur ou tout autre alimentation disposant
d’une prise USB. Puis connectez le cable au Laser Hornet, assurez-vous que l’hélicoptère
soit éteint avant d’effectuer cette opération. La LED verte de l’hélicoptère s’allumera
indiquant que la batterie est en train d’être chargée. La LED verte s’éteint lorsque la batterie
est totalement chargée.
CARGA CON EL CABLE DE CARGA USB
Conecte el cable de carga USB a un puerto USB libre de su ordenador o de cualquier otra
fuente de alimentación con USB. A continuación, conecte el Laser Hornet al cable de
carga. Asegúrese de que el helicóptero está apagado al conectar el cable. El LED de estado
del helicóptero se iluminará en verde, indicando que la batería está siendo cargada en
ese momento. Tan pronto como la batería está completamente cargada, el LED verde del
helicóptero se apagará.
LADEN ÜBER DEN SENDER
Zum Laden des Helikopters über den Sender, schalten Sie diesen bitte zunächst ein. Stecken
Sie das Ladekabel, welches sich im rechten Griff der Fernsteuerung unter der Schiebeklappe
befindet in den Helikopter. Achten Sie bitte darauf, dass die Laser Hornet dabei ausgeschal-
tet ist. Die Status LED des Helikopters leuchtet daraufhin dauerhaft grün und zeigt Ihnen
damit an, dass der Akku des Helikopters geladen wird. Sobald der Akku vollständig geladen
ist, erlischt das grüne Licht am Helikopter.
Bitte beachten Sie folgendes: Das Laden des Helikopters über die Fernsteuerung wird nur
empfohlen, wenn Ihnen ein Laden über das USB-Ladekabel nicht möglich ist. Der Ladevor
-
gang dauert länger als über USB und der Sender verbraucht während des Ladens einen Teil
seiner Akkukapazität.
CHARGING WITH THE TRANSMITTER
In order two load the helicopter using the transmitter, please turn on the transmitter. Then
insert the charging cable, which is located beneath the piston slide in the right handle of the
transmitter, into the helicopter. Make sure, that the Laser Hornet is turned off when doing
so. The status LED of helicopter will begin to continually glow green, indicating that the
battery is being charged at the moment. As soon as the battery is completely charged, the
green LED on the helicopter goes out.
Please note: Charging the helicopter via transmitter is only recommended if charging via
the USB-cable is not possible. The charging process takes more time and uses up battery
capacity of your transmitter, so please only use it as a backup-solution.
CHARGER AVEC LA RADIOCOMMANDE
Pour charger l’hélicoptère avec la radiocommande, allumez votre radiocommande. Puis
branchez le cable qui se trouve sous la glissière dans la poignée droite de celle-ci à
l’hélicoptère. Assurez vous que le Laser Hornet soit éteint lorsque vous effectuez cette
operation. La LED verte de l’hélicoptère s’allumera indiquant que la batterie est en train
d’être chargée. La LED s’éteint lorsque la batterie est chargée.
A noter: Charger la batterie de l’hélicoptère avec la radiocommande est conseillé unique
-
ment lorsque la recharge par cable USB n’est pas possible. La durée de charge est plus
longue et diminue l’autonomie de la batterie de votre radiocommande. Utilisez cette solution
en dernier recours.
CARGA CON LA EMISORA
Para cargar el helicóptero utilizando la emisora, enciéndala primero. A continuación conecte
el cable de carga, el cual está en el lado derecho del mando bajo la tapa deslizante. Al hacer
esto, asegúrese de que su Laser Hornet está apagado. El LED de status del helicóptero se
encenderá verde, indicando que la batería está siendo cargada en ese momento. Tan pronto
como la batería está completamente cargada, el LED verde del helicóptero se apargará.
Tenga en cuenta: Solo se recomienda cargar el helicóptero con la emisora si no es posible
la carga a partir del cable USB. El proceso de carga necesita mucho más tiempo y utiliza la
batería de su emisora.
HELIKOPTER HELICOPTER HÉLICOPTÈRE HELICOPTERO
FLUGVORBEREITUNG
PREPARATIONS BEFORE
FLIGHT
PRÉPARATIFS PRÉ-VOL
PREPARATIVOS ANTES
DE VOLAR
8

STEIGEN (SCHUB)
Durch Betätigung des Schubreglers nach vorne wird die Drehzahl der Rotoren
erhöht. Der Heli beginnt zu steigen. Durch Betätigung des Schubreglers nach
hinten wird die Drehzahl der Rotoren reduziert. Der Heli beginnt zu sinken.
CLIMB (THROTTLE)
By moving the throttle stick up, the rpm of the main rotor increases and the
helicopter starts to climb. By moving the throttle stick down, the rpm of the
main rotor decreases and the helicopter starts to descend.
MONTER (MANETTE DE GAZ)
En placeant la manette des gaz vers l‘avant, les Tr/min. du
rotor augmenteront. L‘hélicoptère commence à monter.
En appuyant la manette en arrière les Tr/min du rotor se
reduissent. L‘hélicoptère commence à déscendre.
ELEVACIÓN (MOTOR)
Moviendo el stick de motor hacia arriba, las revoluciones
del rotor principal aumentan y el helicóptero empezará a
elevarse. Moviendo el stick de motor hacia abajo, las re-
voluciones del rotor principal disminuyen y el helicóptero
desciende.
DER ERSTE START
1. Die LRP Laser Hornet 2.0 auf einen ebenen, wenn möglich rutschigen Unter
-
grund stellen.
2. Den Schubregler in die Motor „Aus“ Position stellen.
3. Den Trimmdrehknopf auf Neutral stellen.
4. Helikopter anschalten.
5. Sender anschalten.
6. Vorsichtig Schub geben bis der Helikopter leicht abhebt. Sollte das Modell nach
links oder rechts selbsttätig wegdrehen kann dies über die Trimmung korrigiert
werden.
7. Wir wünschen Ihnen ab jetzt viel Spass beim Fliegen mit der LRP Laser Hornet
2.0.
THE FIRST FLIGHT
1. Place the LRP Laser Hornet 2.0 on a flat and slippery, if possible, surface.
2. Move the throttle stick all the way down to the motor off position.
3. Adjust the trim button to neutral position.
4. Switch on the helicopter.
5. Switch on the transmitter.
6. Gently apply and increase the throttle until the helicopter lifts off. If the heli
-
copter starts to turn left or right on its own, adjust it with the trim button.
7. Enjoy your first flights with your LRP Laser Hornet 2.0.
LE PREMIER VOL
1. Placez le Laser Hornet 2.0 de LRP sur un surface plat et glissante, si possible.
2. Déplacez la manette des gaz jusqu‘ au position moteur arrêt (OFF).
3. Réglez le bouton trim au position neutre.
4. Mettre en marche l‘hélicoptère.
5. Allumer l‘émetteur.
6. Mettre de la poussée tout en douceur jusqu‘á ce que l‘hélicpotère décolle un
peu. Si le modèle se dirige vers la droite ou la gauche, on peut corriger ce
mouvement tout en réglant la compensation.
7. Nous vous souhaitons maintenant beaucoup de plaisir avec votre LRP Laser
Hornet 2.0.
PRIMER VUELO
1. Coloque el LRP Laser Hornet 2.0 preferiblemente en una superficie plana y lisa.
2. Mueva el stick de motor abajo del todo, en posición de motor parado.
3. Ajuste el botón del trim a la posición neutra.
4. Conecte el helicóptero.
5. Conecte la emisora.
6. Aumente suavemente la potencia del motor hasta que el helicóptero se levante.
Si el helicóptero se desvía a izquierda o derecha, corrija la posición con el botón
del trim.
7. Disfrute de su primer vuelo con el LRP Laser Hornet 2.0.
FLUGVORBEREITUNG
PREPARATIONS BEFORE
FLIGHT
PRÉPARATIFS PRÉ-VOL
PREPARATIVOS ANTES
DE VOLAR
FLUGSTEUERUNG FLIGHT CONTROL COMMANDES DE VOL CONTROL EN VUELO
9

LRP LASER HORNET 2.0 2.4GHZ
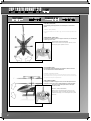
SEITE LINKS / RECHTS (GIER)
Durch Betätigung dieser Knüppelfunktion wird der Helikopter um die Hochachse
gedreht.
TURN LEFT / RIGHT (RUDDER)
By moving the rudder stick to the left or right, the nose of the helicopter will turn left
or right.
TOURNER GAUCHE / DROITE (LACET)
En déplaçant le contrôle de direction vers la gauche ou de droit, le nez de l‘hélicoptère
tournera à gauche ou à droite.
GIRO IZQUIERDA / DERECHA (DIRECCIÓN)
Moviendo el stick de dirección a izquierda o derecha, el morro
del helicóptero girara a izquierda o derecha.
VOR- / RÜCKWÄRTS (NICK)
Durch Betätigung dieser Knüppelfunktion geht die Nase des Heli nach unten oder
oben und nimmt Vorwärts- oder Rückwärtsfahrt auf.
FORWARD / BACKWARD (ELEVATOR)
By moving the elevator stick up, the nose of the helicopter goes down and the heli-
copter will fly forward. By moving the elevator stick down, the nose of the helicopter
goes up and the helicopter will fly backwards.
AVANT / ARRIÈRE (TANGAGE)
En déplaçant le contrôle de tangage vers l‘avant, le nez de l‘hélicoptère descend et
l‘hélicoptère s‘envolera vers l‘avant. En déplaçantdéplaçant le contrôle de tangage
vers l‘arrière, le nez de l‘hélicoptère monte et l‘hélicoptère
s‘envolera vers l‘arriè
ADELANTE / ATRÁS (PROFUNDIDAD)
Moviendo el stick de profundidad hacia arriba el morro del
helicóptero baja y volará hacia delante.. Moviendo el stick de
profundidad hacia abajo, el morro del helicóptero sube y volará
hacia atrás.
FLUGSTEUERUNG FLIGHT CONTROL COMMANDES DE VOL CONTROL EN VUELO
10

Problem Problem Problème Problema Mögliche Ursache Cause Cause Causa Behebung Remedy Remède Solución
Die Rotorblätter bewegen sich nicht.
The main rotor blades do not spin.
Le rotor principal ne tourne pas.
Las palas del rotor principal no giran.
Es wurde zuerst der Sender, dann der Helikopter
eingeschaltet.
The transmitter was switched on before the helicopter.
D‘abord on allumait l‘émetteur et ensuite l‘hélicoptère.
El emisor se conectó antes que el helicóptero.
Erst den Helikopter, dann den Sender einschalten.
First switch on helicopter, then switch on transmitter.
D‘abord mettre en marche l‘hélicoptère, ensuite
l‘émetteur.
Conecte primero el helicóptero y despues el emisor.
Der Helikopter ist nicht eingeschaltet.
The helicopter is switched off.
L'hélicoptère est désactivé.
El helicóptero está desconectado
Helikopter einschalten.
Switch on the helicopter.
Mettre en marche l‘hélicoptère.
Conecte el helicóptero.
Der Akku ist schwach oder leer.
The battery is empty.
L'accu de vol est vide.
La batería está descargada.
Den Akku aufladen.
Charge the battery.
Chargez l'accu de vol.
Cargue la batería.
Der Helikopter verliert langsam Leistung oder stoppt.
The helicopter slowly loses power and stops.
L'hélicoptère perd lentement la puissance et s'arrête.
El helicóptero pierde potencia lentamente y se para.
Der Akku ist schwach oder leer.
The battery is empty.
L'accu de vol est vide.
La batería está descargada.
Den Akku aufladen.
Charge the battery.
Chargez l'accu de vol.
Cargue la batería.
WECHSEL DER ROTORBLÄTTER
Die Schrauben mit einem geeigneten Schraubendreher aus- bzw. eindrehen.
Die Schrauben nicht komplett festdrehen. Die Rotorblätter müssen sich in der
Rotorblatthalterung leicht bewegen können.
REPLACEMENT OF THE MAIN ROTOR BLADES
Untighten these screws with a suitable screwdriver and re-tighten them
again. Do not fully tighten the screws. The blades schould move freely inside
the blade grips.
REMPLACEMENT DES BALAIS
Visser ou dévisser la vis avec un tournevis approprié. Ne pas la visser comp-
lètement. Il faut toujours avoir la possibilité de bouger facilement les pales de
rotor dans l‘ancrage.
SUSTITUCIÓN DE LAS PALAS DEL ROTOR
Afloje los tornillos del soporte de palas con un destornillador apropiado.
Reemplace las palas y vuelva a apretar los tornillos. Recuerde no apretar
en exceso estos tornillos. Las palas se han de mover libremente en sus
soportes.
Schraube lösen
unscrew
Desserrer la vis
desatornillar
FEHLERBEHEBUNG
TROUBLESHOOTING
GUIDE
GUIDE DE DÉPANNAGE
GUIA SOLUCION DE
PROBLEMAS
11

LRP LASER HORNET 2.0 2.4GHZ
Nummer
Number
Nombre
Número
Best.Nr.
Order No.
Art. Num.
Referencia
Bezeichnung
Description
Description
Descripción
1 222222
Paddelstangensatz inkl. Rotorblatthalter
Fly bar incl. Blade grip set
Barre de vol avec grip de blade
Barra estabil. c/soportes
2 222223
Rotorblätter (4 Stk.) inkl. Heckrotor
Rotorblades (4 pcs.) incl. tail rotor
Blades de rotor (4 pcs.) avec rotor de queue
Palas rotor (4pzs) incl. palas de cola
3 222224
Kabinenhaube
Cabin set
Cabine
Cabina
4 222225
3.7V 1S Ersatzakku
3.7V 1S replacement battery
3.7V 1S batterie
Batería 3,7V 1S
5 222226
USB-Ladekabel
USB-charger
Chargeur USB
Cargador USB
Nummer
Number
Nombre
Número
Best.Nr.
Order No.
Art. Num.
Referencia
Bezeichnung
Description
Description
Descripción
6 222227
Ersatzsender
Replacement transmitter
Radiocommande
Emisora
7 222228
Heckrohrsatz inkl. Motor und Finnen
Tail set incl. motor and tail wings
Queue avec moteur et ailerons de queue
Rotor y tubo de cola c/motor y estab.
8 222229
Hauptchassis inkl. Landegestell
Main frame set incl. landing skid
Cadre principal avec train d‘atterrissage
Chasis y tren de aterrizaje
9 222230
Hauptrotorwellenset (innen und außen) inkl. Getriebe
Main rotor shaft set (inner and outer) incl. Main gear
Kit de rotor moteur (intérieur et extérieur) avec axe central
Eje rotor principal
EXPLOSIONSZEICHNUNG EXPLODED VIEW DESSIN ÉCLATÉ DESPIECE
8
8
9
2
1
2
7
3
4
5
6
12
Page is loading ...

LRP LASER HORNET 2.0 2.4GHZ
ALLGEMEINE GEWÄHRLEISTUNGS- UND
REPARATURBESTIMMUNGEN
REPAIR PROCEDURES /
LIMITED WARRANTY
Produkte der LRP electronic GmbH (nachfolgend „LRP” genannt) werden nach
strengsten Qualitätskriterien gefertigt. Wir gewähren die gesetzliche Gewährleistung
auf Produktions- und Materialfehler, die zum Zeitpunkt der Auslieferung des Produkts
vorhanden waren. Für gebrauchstypische Verschleißerscheinungen wird nicht
gehaftet. Diese Gewährleistung gilt nicht für Mängel, die auf eine unsachgemäße
Benutzung, mangelnde Wartung, Fremdeingriff oder mechanische Beschädigung
zurückzuführen sind. Dies gilt insbesondere bei bereits benutzten Akkus oder Akkus,
die deutliche Gebrauchsspuren aufweisen. Schäden oder Leistungseinbußen aufgrund
von Fehlbehandlung und/oder Überlastung sind kein Produktfehler. Abnutzungser-
scheinungen (Kapazitätsverlust) bei intensivem Einsatz sind ebenfalls kein Produktfeh-
ler. Desweiteren beinhaltet dies folgende Punkte:
• Unfall- und/oder Absturzschäden
• Ausfall oder übermäßige Abnutzung einzelner Teile als Folge
eines Unfallschadens
• Wasserschäden oder Probleme aufgrund von eingedrungenem
Wasser/Feuchtigkeit
• Lackierte Kabinenhauben, sobald diese benutzt worden sind
LRP tauscht keine kompletten Produkte, wenn diese bereits benutzt wurden. Senden
Sie nicht das komplette Produkt ein, sondern nur die Teile, für die Sie einen Gewährlei
-
stungsanspruch geltend machen wollen. Wird das komplette Produkt eingesendet
behält sich LRP vor, die Arbeitszeit zur Demontage und Montage dem Kunden in
Rechnung zu stellen.
Bevor Sie dieses Produkt zur Reparatur einsenden, prüfen Sie bitte zunächst alle
anderen Komponenten in ihrem Modell und schauen Sie ggf. in der Fehlerfibel
des Produktes (sofern vorhanden) nach, um andere Störquellen und Bedienfehler
auszuschließen. Sollte das Produkt bei der Überprüfung durch unsere Serviceabteilung
keine Fehlfunktion aufweisen, müssen wir Ihnen hierfür die angefallenen Bearbei
-
tungskosten laut Preisliste berechnen.
Mit der Einsendung des Produktes muss der Kunde mitteilen, ob das Produkt in jedem
Fall repariert werden soll. Sollte kein Gewährleistungs- oder Garantieanspruch beste
-
hen, erfolgt die Produktüberprüfung und ggf. Reparatur in jedem Falle kostenpflichtig
gemäß unserer Preisliste. Ein Gewährleistungs- oder Garantieanspruch kann nur aner-
kannt werden, sofern eine Kopie des Kaufbelegs beigefügt ist. Auf Ihre ausdrückliche
Anforderung erstellen wir einen kostenpflichtigen Kostenvoranschlag. Wenn Sie nach
Zusendung des Kostenvoranschlags den Auftrag zur Reparatur erteilen, entfallen die
Kostenvoranschlagskosten. An unseren Kostenvoranschlag sind wir zwei Wochen ab
Ausstellungsdatum gebunden. Für eine schnelle Abwicklung Ihres Servicefalls legen
Sie bitte eine ausführliche Fehlerbeschreibung und ihre Adressdaten der Einsendung
bei.
Falls ein zurückgesandtes, defektes Produkt von LRP nicht mehr produziert wird,
und wir dieses nicht reparieren können, so erhalten Sie statt dessen ein mindestens
gleichwertiges Produkt aus einer der Nachfolgeserien.
Die von LRP angegebenen Werte über Gewicht, Größe oder Sonstiges sind als
Richtwert zu verstehen. LRP übernimmt keine formelle Verpflichtung für derartige
spezifische Angaben, da sich durch technische Veränderungen, die im Interesse des
Produkts vorgenommen werden, andere Werte ergeben können.
LRP-WERKS-SERVICE:
siehe www.LRP.cc
All products from LRP electronic GmbH (hereinafter called ”LRP“) are manufactured
according to the highest quality standards. LRP guarantees this product to be free
from defects in materials or workmanship for 90 days (non-european countries only)
from the original date of purchase verified by sales receipt. This limited warranty
doesn´t cover defects, which are a result of misuse, improper maintenance, outside
interference or mechanical damage. This especially applies on already used batteries
or batteries, which show signs of heavy usage. Damages or output losses due to
improper handling and/or overload are not a product fault. Signs of wear (loss of
capacity) after intensive usage are also no product fault. Furthermore this includes
the following points:
• Crash damage
• Component failure or premature wear as a result of crash damage
• Water damage or problems resulting from water/moisture intake
• Painted canopies, after they have been used
LRP does not do a warranty change of the whole product, once the product has been
used. Do not send in the whole product. Only send in the defective parts, on which
you want to claim warranty. If the whole product is send in, LRP will charge a service
fee for the Disassembly and Assembly of the product at our discretion.
To eliminate all other possibilities or improper handling, first check all other compon
-
ents in your model and the trouble shooting guide, if available, before you send in this
product for repair. If products are sent in for repair, which do operate perfectly, we
have to charge a service fee according to our pricelist.
With sending in this product, the customer has to advise LRP if the product should
be repaired in either case. If there is neither a warranty nor guarantee claim, the
inspection of the product and the repairs, if necessary, in either case will be charged
with a fee at the customers expense according to our price list. A proof of purchase
including date of purchase needs to be included. Otherwise, no warranty can be gran
-
ted. For quick repair- and return service, add your address and detailed description of
the malfunction.
If LRP no longer manufactures a returned defective product and we are unable to
service it, we shall provide you with a product that has at least the same value from
one of the successor series.
The specifications like weight, size and others should be seen as guide values. Due to
ongoing technical improvements, which are done in the interest of the product, LRP
does not take any responsibility for the accuracy of these specs.
LRP-DISTRIBUTOR-SERVICE:
check www.LRP.cc
14
Page is loading ...

LRP LASER HORNET 2.0 2.4GHZ
WARNHINWEISE WARNING NOTES
CONSIGNES DE
SÉCURITÉ
ADVERTENCIAS
DEUTSCH
Kein Spielzeug. Nicht für Kinder unter 14 Jahren
geeignet. Bewahren Sie das Produkt außerhalb
der Reichweite von kleinen Kindern auf. Beachten
Sie unbedingt die folgenden Hinweise, da diese
Ihr Produkt zerstören können und die Gewähr-
leistung ausschließen. Nichtbeachtung dieser
Hinweise können zu Sach- und Personenschäden
und schweren Verletzungen führen! Lassen Sie
das Produkt niemals unbeaufsichtigt, solange es
eingeschaltet, in Betrieb oder mit einer Stromquel-
le verbunden ist. Im Falle eines Defekts könnte
dies Feuer am Produkt oder seiner Umgebung
verursachen. Vermeiden Sie falschen Anschluss
oder Verpolung des Produkts. Alle Kabel und Ver-
bindungen müssen gut isoliert sein. Kurzschlüsse
können unter Umständen das Produkt zerstören.
Dieses Produkt oder andere elektronische Kompo-
nenten dürfen niemals mit Wasser, Öl, Treibstoffen
oder anderen elektrisch leitenden Flüssigkeiten
in Berührung kommen, da diese Mineralien
enthalten können, die elektronische Schaltkreise
korrodieren lassen. Bei Kontakt mit diesen Stoffen
müssen Sie sofort den Betrieb einstellen und das
Produkt sorgfältig trocknen. Die Originalstecker
und Originalkabel dürfen niemals verändert oder
abgeschnitten werden. Öffnen Sie niemals das
Produkt und löten Sie keinesfalls auf der Platine
oder anderen Komponenten Entnehmen Sie
immer den Akku aus Ihrem Produkt bzw. trennen
Sie das Produkt von der Stromquelle, wenn das
Produkt nicht verwendet wird. Produkt regelmäßig
auf Schäden überprüfen. Bei einem Schaden darf
das Produkt bis zur vollständigen Reparatur nicht
mehr verwendet werden. Laden Sie den Akku, der
zum Betrieb dieses Produkts notwendig ist, immer
außerhalb des Geräts auf. Sollte der Akku einen
Defekt haben, kann dies zu einer Beschädigung
des Produkts führen. Verbrauchte Batterien
nicht in den Hausmüll geben, sondern nur bei
den bestehenden Sammelstellen oder einem
Sondermüllplatz abgeben. Öffnen Sie niemals
einen Akku, eine Batterie oder einzelne Zellen.
Laden Sie den Akku nur unter Aufsicht. Während
der Ladung muss sich der Akku auf einer nicht
brennbaren, hitzebeständigen Unterlage benden.
Desweiteren dürfen sich keine brennbaren oder
leicht entzündlichen Gegenstände in der Nähe des
Akkus benden. Überschreiten Sie unter keinen
Umständen den maximalen Lade-/Entladestrom,
der empfohlen wird. Unter keinen Umständen
darf ein NiMH/LiPo-Akku tiefentladen werden. Der
Akku darf nicht mit Feuer, Wasser oder anderen
Flüssigkeiten in Berührung kommen. Ladevorgang
nur in trockenen Räumen durchführen. Die
Aussenhaut des LiPo-Akkus darf nicht beschädigt
werden. Achten Sie also unbedingt darauf,
dass keine scharfen Gegenstände wie Messer,
Werkzeuge, Kohlefaserkanten oder Ähnliches den
Akku beschädigen können. Achten Sie darauf,
dass der Akku nicht durch Herunterfallen, Schla-
gen, Verbiegen oder Ähnliches beschädigt wird.
Beschädigte Zellen dürfen nicht mehr verwendet
werden. Sollten die Zellen Verformungen, optische
Beschädigungen oder Ähnliches aufweisen, so
dürfen Sie diese nicht mehr verwenden. Verwen-
den Sie für die Ladung von NiMH/NiCd-Akkus
nur Lade-/Entladegeräte, die für diesen Akkutyp
speziziert wurden. Verwenden Sie keinesfalls
LiPo Lade-/Entladegeräte. Schalten Sie immer
zuerst Ihren Sender ein, bevor Sie den Empfänger
oder Fahrtenregler einschalten. Der Empfänger
könnte Störsignale auffangen, Vollgas geben,
und Ihr Modell beschädigen. Beim Ausschalten
beachten Sie die umgekehrte Reihenfolge. Erst
Empfänger und Fahrtenregler ausschalten, dann
Sender ausschalten. Vermeiden Sie eine Über-
lastung des Motors durch falsche oder zu lange
Untersetzung. Blockieren Sie niemals den Lüfter
oder die Kühlschlitze des Produkts. Sorgen Sie
für gute Luftzirkulation um das Produkt. Schließen
Sie sämtliche Teile der Ausrüstung sorgfältig an.
Falls sich die Verbindungen durch Vibrationen
lösen, können Sie die Kontrolle über das Modell
verlieren. Der Hersteller kann nicht für Schäden
verantwortlich gemacht werden, die infolge von
Nichtbeachtung der Sicherheitshinweise und
Warnungen verursacht werden. Verwenden Sie
nur Original Ersatzteile. Wenn Sie Einstellungen
am Modell vornehmen, stellen Sie vorher den
Motor ab bzw. trennen Sie die Steckverbindung.
Sie könnten unerwartet die Kontrolle über das
Modell verlieren und es könnte dadurch eine
gefährliche Situation entstehen. Schließen Sie
niemals das Ladegerät an eine andere, als die
angegebene Stromquelle an. Eine falscher Stro-
manschluss kann zur Explosion, Funkenug, oder
Feuer führen. Personen, die nicht volljährig sind,
dürfen nur unter Aufsicht Erwachsener iegen.
Wartungs- oder Reparaturarbeiten am Helikopter
dürfen nur bei nicht angeschlossenem Flugakku
durchgeführt werden. Fliegen Sie niemals unter
Alkoholeinuss! Fliegen Sie nicht in der Nähe von
Stromleitungen, Funkmasten, Personen, Tieren
or Wasser. Suchen Sie Hilfe und Unterstützung
erfahrener Modellbauer oder Ihres Händlers, wenn
Sie kaum oder keine Erfahrung im Umgang mit
ferngesteuerten Modellen haben. Das Modell und
die Fernsteuerung immer ausschalten, solange
diese nicht im Einsatz sind. Führen Sie vor jedem
Flug einen Reichweitentest durch.
ENGLISCH
No toy. Not suitable for children under 14 years.
Keep the product out of the reach of children. Pay
close attention to the following points, as they
can destroy the product and void your warranty.
Non-observance of these points can lead to
property damage, personal and severe injuries!
Never leave the product unsupervised while it is
switched on, in use or connected with a power
source. If a defect occurs, it could set re to the
product or the surroundings. Avoid incorrect
connections or connections with reversed polarity
of the product. All wires and connections have
to be well insulated. Short-circuits can possibly
destroy the product. Never allow this product or
other electronic components to come in contact
with water, oil or fuels or other electroconductive
liquids, as these could contain minerals, which are
harmful for electronic circuits. If this happens, stop
the use of your product immediately and let it dry
carefully. Never cut off or modify the original plugs
and original wires. Never open the product and
never solder on the PCB or other components.
Always remove the battery from your product or
disconnect the product from the power source, if
the product is not in use. Chech product regularly
if there are any damages. In the case of damage,
the product must not be used until it has been
completely repaired. Always charge the battery,
which is necessary to use this product, outside of
the product. The product could get damaged, if
a battery defect occurs. Do not throw away used
batteries in the household garbage, but only give
them to the collection stations or dispose them at
a special garbage depot. Never open a battery or
a single cell. Never leave the battery unattended
while charging. During charging, the battery has to
be kept on a non-ammable, heat-resistant mat.
Furthermore no ammable or highly inammable
objects may be close to the battery. Never exceed
the maximum charge/discharge current, which is
recommended. Under no circumstances a NiMH/
LiPo-battery shall be deep discharged. The battery
may never get in touch with re, water or other
liquids. Only charge in a dry place. The outside of
the LiPo-battery must not be damaged. Therefore
take special care, that no sharp objects like knifes,
tools, carbon bre edges or similar items can
damage the battery. Pay special attention that the
LiPo-battery does not get damaged or warped by
letting it fall down, hitting it, bending it or by similar
actions. Damaged packs cannot be used any lon-
ger. If the packs show signs of damage, are bent
or similar, do not use the packs anymore. Only
use chargers and dischargers, which are specied
for NiMH/NiCd-batteries by the manufacturer.
Never use chargers or dischargers, which are
specied for LiPo-batteries! Always switch on your
transmitter rst before you switch on the receiver
or the speed control. The receiver could receive
interference signals, start full acceleration and da-
mage your model. When you switch off, make sure
you do so in the reverse sequence. First switch
off the receiver and speed control, then switch off
the transmitter. Avoid overloading the motor due
to wrong or too long gear ratios. Do not block the
fan or the cooling slits of the product. Ensure a
good circulation of air around the product, while in
use. Always wire up all the parts of the equipment
carefully. If any of the connections come loose as
a result of vibration, you could loose control over
your model. The manufacturer can not be held
responsible for damages, which are a result of
non-observance of the warning notes and security
advices. Replace only with genuine parts. When
making adjustments to the model, do so with the
engine not running or the motor disconnected.
You may unexpectedly lose control and create a
dangerous situation. Never plug the charger into
an outlet other than indicated voltage. Plugging
the charger into the wrong outlet may result in an
explosion, sparking, or re. Persons that are not of
age are only allowed to y under the supervision of
an adult. Always disconnect the ight battery if you
do maintenance or repair work on the helicopter.
Never y under the inuence of alcohol! Do not y
near power lines, radio masts, people, animals or
water. If you have only little or no experience with
radio-controlled models, seek the help and advise
from an experienced hobbyist or from your hobby
shop. Always turn off the model and the transmitter
while they are not in use. Always perform an
operating range check prior to your ight.
FRANZÖSISCH
Ce produit n‘est pas un jouet. Ne convient pas
pour les enfants de moins de 14 ans. Ranger le
produit hors de porté des enfants en bas âge.
Absolument respecter les consignes ci-dessous
sous peine de détruire le produit et d‘annuler la
garantie. Le non-respect de ces consignes peut
être à l‘origine de dommages matériels et perso-
nnels ainsi que de graves blessures ! Ne jamais
laisser le produit sans surveillance tant qu‘il est
allumé, fonctionne ou est raccordé à une source
de courant. En cas de panne, ceci peut provoquer
un incendie du produit ou de son environnement.
Éviter tout branchement incorrect ou polarisation
du produit. Tous les câbles et raccords doivent
être correctement isolés. Dans certains cas, les
courts-circuits peuvent détruire le produit. Ce
produit ou les autres composants électroniques ne
doivent jamais entrer en contact avec de l‘eau, de
l‘huile, des carburants ou tous autres liquides con-
ducteurs, car ceux-ci contiennent des minéraux??
susceptibles de corroder les circuits électroniques.
En cas de contact avec ces substances, il faut
immédiatement interrompre le fonctionnement et
soigneusement sécher le produit. Ne jamais modi-
er la che d‘origine ou couper le câble d‘origine.
Ne jamais ouvrir le boîtier du produit, ni braser sur
la platine ou d‘autres composants Toujours retirer
l‘accu du produit ou débrancher le produit de la
source de courant lorsqu‘il n‘est pas utilisé. Véri-
er régulièrement le bon état du produit. Ne plus
utiliser un appareil endommagé jusqu‘à sa répa-
ration complète. Toujours charger l‘accu requis
pour le fonctionnement de ce produit démonté de
l‘appareil. Si l‘accu est défectueux, ceci peut en-
dommager le produit. Les piles usées ne doivent
pas être jetées dans les ordures ménagères, mais
doivent être recyclées dans les conteneurs ou les
déchetteries. Ne jamais ouvrir un accu, une pile ou
un élément. Ne jamais l‘accu se charger sans sur-
veillance. Pendant le chargement, l‘accu doit être
installé sur une surface ininammable et résistante
aux températures élevées. Il convient en outre de
proscrire tous objets combustibles ou aisément
inammables à proximité de l‘accu. Absolument
proscrire tout dépassement du courant de charge/
décharge recommandé par la société. Absolument
proscrire toute décharge profonde d‘un accu
NiMH/LiPo. L‘accu ne doit jamais entrer en
contact avec des ammes, de l‘eau ou tout autre
liquide. Uniquement effectuer les recharges dans
des locaux secs. La surface externe de l‘accu
LiPo ne doit pas être endommagée. Il faut donc
absolument veiller à ne pas endommager l‘accu
avec des objets tranchants tels que couteau, outil,
chants en bres de carbone ou autres. Veiller à ne
pas endommager l‘accu par une chute, un choc,
une torsion ou autre. Ne plus utiliser des éléments
endommagés. Si les éléments sont déformés,
visiblement endommagés ou autrement altérés, ils
ne doivent plus être utilisés. Uniquement charger
des accus NiMH/NiCd avec des chargeurs/déchar-
geurs spéciés pour ce type d‘accu. Ne jamais
utiliser des chargeurs/déchargeurs LiPo. Toujours
commencer par allumer l‘émetteur avant d‘allumer
le récepteur ou le régulateur de vitesse. Le
récepteur pourrait recevoir des signaux parasites,
accélérer à fond et endommager votre modèle.
Procéder dans l‘ordre inverse pour l‘extinction.
Éteindre d‘abord le récepteur et le régulateur
de vitesse, puis éteindre l‘émetteur. Éviter toute
surcharge du moteur par une démultiplication
incorrecte ou trop longue. Ne jamais obturer le
ventilateur ou les fentes de refroidissement du
produit. Assurer une circulation d‘air convenable
autour du produit. Raccorder tous les composants
de l‘équipement avec soin. Si les raccords se
détachent par des vibrations, vous pouvez perdre
le contrôle de votre modèle. Le constructeur ne
saurait être tenu responsable pour les dommages
causés par le non respect des consignes de sécu-
rité et des avertissements. Uniquement utiliser des
pièces de rechange d‘origine.
SPANISCH
Este aparato no es un juguete. No apto para niños
menores de 14 años. Mantenga este producto
fuera del alcance de los niños. Por favor, observe
las siguientes indicaciones explícitamente, ya que
de lo contrario el aparato podría sufrir daños o
se podría anular la garantía. ¡La no observancia
de estas indicaciones puede provocar daños
personales y materiales, así como graves
lesiones! Nunca deje el aparato sin vigilancia
mientras está conectado, encendido o unido a
una fuente de electricidad. Ya que, en caso de
producirse un fallo, podría incendiarse o provocar
un incendio en sus inmediaciones. Evite realizar
conexiones erróneas y una polarización inversa
del producto. Todos los cables y conexiones
deben haber sido aislados correctamente. De
lo contrario podrían producirse cortacircuitos y
destruir el aparato eventualmente. Evite que los
componentes eléctricos entren en contacto con
agua, aceite, combustibles o cualquier otro tipo de
sustancia líquida conductora de la electricidad, ya
que éstos pueden contener minerales corrosivos
para los circuitos electrónicos. En caso de entrar
en contacto con estas sustancias apague inmedi-
atamente el aparato y séquelo minuciosamente.
Las clavijas de conexión y los cables originales no
deben ser modicados ni acortados bajo ninguna
circunstancia. No abra nunca el aparato ni suelde
bajo ninguna circunstancia sobre la pletina u
otros componentes. Extraiga siempre las pilas
del aparato o desconéctelo de la red si no va a
utilizarlo. Controle regularmente que el aparato
no sea defectuoso. En caso de producirse daños
no utilice el aparato hasta que haya sido reparado
completamente. Cargue la pila de este producto
siempre fuera del mismo. En caso de que la pila
sea defectuosa podría ocasionar daños en el apa-
rato. No elimine las pilas gastadas tirándolas a la
basura doméstica, sino en contenedores adecua-
dos o lugares de recogida de basura especial. No
abra nunca un acumulador, una pila ni una célula.
Cargue la pila bajo vigilancia. Coloque el aparato
sobre una supercie resistente al calor y no
inamable durante el proceso de carga. Así mismo
no deben encontrarse objetos combustibles ni
inamables cerca de la pila. No sobrepase bajo
ninguna circunstancia la corriente de carga / de-
scarga máxima recomendada por. No descargue
nunca una pila NiMH/LiPo totalmente. Evite que la
pila entre en contacto con fuego, agua o cualquier
otro tipo de líquidos. Cargue la pila exclusiva-
mente en estancias secas. Evite que el exterior de
la pila LiPo sufra daño alguno. Por favor, observe
que la pila no pueda ser dañada por objetos punti-
agudos como son cuchillos, herramientas, aristas
de bra de carbono u objetos similares. Observe
que la pila no sufra daños por caídas al suelo,
golpes, dobladuras o causas similares. No utilice
nunca pilas dañadas. No utilice las pilas en caso
de presentar deformaciones, tener el aspecto de
ser defectuosas etc... Cargue las pilas NiMH/NiCd
exclusivamente con cargadores / descargadores
adecuados para este tipo de pilas. No utilice bajo
ninguna circunstancia cargadores / descargadores
LiPo. Conecte siempre primero el emisor antes de
conectar el receptor o el regulador de velocidad.
El receptor podría captar interferencias, acelerar
a tope y dañar así el modelo. Para desconectar el
modelo observe siempre el orden inverso. Primero
desconecte el receptor, después el regulador de la
velocidad y nalmente el emisor. Evite sobrecar-
gar el motor por reducción errónea o demasiado
larga. No bloquee nunca las rejillas de ventilación
o de refrigeración del aparato. Asegúrese de que
el aparato disponga de una buena circulación
de aire. Conecte todos los elementos del equipo
minuciosamente. En caso de que las conexiones
se soltaran por causa de las vibraciones, es
posible que pierda el control sobre el modelo. El
fabricante no asume la responsabilidad por daños
ocasionados por la inobservancia de las medidas
de seguridad y advertencias. Utilice exclusiva-
mente piezas de repuesto originales.
ITALIENISCH
Non è un giocattolo. Non adatto a ragazzi sotto i
14 anni. Conservare il prodotto fuori dalla portata
di bambini piccoli. Attenersi alle seguenti avverten-
ze per non danneggiare il prodotto e per non farne
decadere la garanzia. La mancata osservanza del-
le presenti avvertenze può provocare danni a cose
e persone e causare lesioni gravi! Non lasciare il
prodotto incustodito quando è acceso, in funzione
o sotto tensione. In caso di guasto ciò potrebbe
causare amme al prodotto o in prossimità di
esso. Evitare collegamenti errati o inversioni di
polarità del prodotto. Tutti i cavi e i collegamenti
devono essere ben isolati. Eventuali corto circuiti
possono danneggiare il prodotto. Il prodotto o altri
componenti elettronici non devono assolutamente
entrare in contatto con acqua, olio, carburanti o
altri liquidi a conduzione elettrica, poiché possono
contenere minerali che provocano corrosione
ai circuiti elettronici. In caso di contatto con tali
sostanze sospendere immediatamente il funziona-
mento e asciugare con cura il prodotto. La spina e
il cavo originali non vanno sostituiti o tagliati. Non
aprire assolutamente il prodotto e non effettuare
saldature sulla scheda o su altri componenti. Se
non si utilizza il prodotto, rimuovere l‘accumulatore
o scollegare il prodotto stesso dalla fonte di
alimentazione elettrica. Controllare regolarmente
che il prodotto non sia danneggiato. Se il prodotto
16
Page is loading ...
Page is loading ...
Page is loading ...
Page is loading ...
Page is loading ...
Page is loading ...

ALLGEMEINE HINWEISE GENERAL NOTES INFORMATION GÉNÉRAL
INFORMACIÓN
ADICIONAL
WEEE HINWEIS
Dieses Symbol weist darauf hin, dass dieses Produkt gemäß Richtlinie über Elektro- und Elektronik-Altgeräte
(2002/96/EG) und nationalen Gesetzen nicht über den Hausmüll entsorgt werden darf. Dieses Produkt kann bei
einer vorgegebenen Sammelstelle abgegeben werden. Dies kann z.B. durch Rückgabe beim Kauf eines ähnlichen
Produkts oder durch Abgabe bei einer autorisierten Sammelstelle für die Wiederaufbereitung von Elektro- und
Elektronikaltgeräten geschehen. Der unsachgemäße Umgang mit Altgeräten kann aufgrund potentiell gefährlicher
Stoffe, die häufig in Elektro- und Elektronik-Altgeräte enthalten sind, negative Auswirkungen auf die Umwelt und
die menschliche Gesundheit haben. Durch die sachgemäße Entsorgung dieses Produkts tragen außerdem Sie bei
Ihrer Stadtverwaltung, dem öffentlich-rechtlichen Entsorgungsträger, einer autorisierten Stelle für die Entsorgung
von Elektro- oder Elektronik-Altgeräten oder Ihrer Müllabfuhr.
CE HINWEIS
Hiermit erklärt die LRP electronic GmbH, dass dieses Produkt den grundlegenden Anforderungen der europäischen
Richtlinie 2004/108/EG erfüllt.
Dieser Artikel entspricht der der Richtlinie 1999/5/EC. Eine Konformitätserklärung finden Sie unter:
http://www.LRP.cc/CE
ENTSORGUNGSHINWEIS:
Laut Batteriegesetz sind Sie zur Rückgabe von Altbatterien gesetzlich verpflichtet. Altbatterien sind Sondermüll
und müssen entsprechend entsorgt werden. Die Entsorgung der Altbatterien über den Hausmüll ist gesetzlich
verboten. Schützen Sie mit uns unsere Natur vor umweltschädlichen Belastungen und entsorgen Sie deshalb die
Altbatterien nicht im Hausmüll, sondern bringen Sie sie im entladenen Zustand zu einer geeigneten Sammelstelle
für Altbatterien.
VERSICHERUNGSHINWEIS
Eine Modellflug Haftpflichtversicherung für Modelle ist seit 2005 gesetzlich vorgeschrieben. Sprechen Sie mit
Ihrem Versicherungsbüro, ob dieses Modell in Ihrer Haftpflicht eingeschlossen ist oder wenden Sie sich an den
Deutschen Modellfliegerverband www.dmfv.de
AVIS WEEE
Ce symbole indique que, selon la directive des équipements électriques et électroniques (2002/96/EG) et la légis-
lation nationale, ce produit ne peut pas être jeté dans les déchets ménagers. Ce produit doit être remis au centre
de recyclage prévu à cet effet. Il peut également être remis à un magasin l’or d’un achat d’un produit similaire.
L’utilisation incorrecte de vieux équipements électriques ou électroniques peut engendrer des effets négatifs sur
la santé humaine et sur l’environnement. Pour tous renseignements supplémentaires concernant l’élimination
correcte veuillez contacter le service de recyclage de votre commune ou un centre agrée.
AVIS CE
Par la présente LRP electronic GmbH confirme que ce produit est conforme à la directive européenne 2004/108/
EG.
Cet article est conforme à la norme 1999/5/EC. Pour avoir information sur conforme à la norme:
http://www.LRP.cc/CE
AVIS DE RECYCLAGE
Selon le règlement des déchets de batterie, vous êtes obligé de remettre vos vieilles batteries à un endroit de
recyclage prévu à cet effet. L’élimination des batteries avec les déchets ménagers est interdite. Protégez votre
environnement en donnant vos batteries usées à un centre de recyclage adapté.
AVIS D’ASSURANCE
Selon la loi de 2005 une assurance RC (responsabilité civile) pour avions télécommandé est obligatoire. Veuillez
contacter votre assurance avant la première utilisation de votre avion ou hélicoptère pour garantir que les
possibles dégâts soient couverts.
WEEE NOTES
This symbol indicates that this product is not to be disposed of with your household waste, according to the WEEE
Directive (2002/96/EC) and your national law. This product should be handed over to a designated collection point,
e.g. on an authorised one-for-one basis when you buy a new similar product, or to an authorised collection site
for recycling waste electrical and electronic equipment (EEE). Improper handling of this type of waste could have
a possible negative impact on the environment and human health due to potentially hazardous substances that
are generally associated with EEE. At the same time, your cooperation in the correct disposal of this product will
contribute to the effective usage of natural resources. For more information about where you can drop off your waste
equipment for recycling, please contact your local city office, waste authority, approved WEEE scheme or your
household waste disposal service.
CE NOTES
Hereby, LRP electronic GmbH declares that this product is in compliance with the essential requirements and
other relevant provisions of the european directive 2004/108/EC. This item is in accordance with directive 1999/5/
EC. For the declaration of conformity visit:
http://www.LRP.cc/CE
BATTERY DISPOSAL NOTES:
Batteries and accumulators used in this product are to be disposed of separately from your household waste.
Batteries and accumulators must not be disposed of as unsorted municipal waste. Users of batteries and
accumulators must use the available collection framework for the return, recycling and treatment of batteries and
accumulators. Customer participation in the collection and recycling of batteries and accumulators is important
to minimise any potential effects of batteries and accumulators on the environment and human health due to
substances used in batteries and accumulators.
INSURANCE NOTES
In some countries it is mandatory to have a special liability insurance if you use a radiocontrolled helicopter or
airplane. Be sure to check with your insurance if your liability insurance covers the use of a radio-controlled
helicopter or airplane before you use your model for the first time.
INFORMACIÓN RAEE
Este símbolo indica que este producto no debe desecharse junto con las basuras domésticas, de acuerdo a la
Directiva (2002/96/EC) transpuesta por el R.D.208/2005. Este producto debe entregarse en un punto de recogida
establecido p.e. punto limpio o punto de reciclaje. El manejo incorrecto de este tipo de desechos podría tener un
efecto negativo en el medio ambiente y en la salud debido a las sustancias potencialmente peligrosas que están
asociadas a los desechos de aparatos eléctricos y electrónicos. Del mismo modo, su cooperación para la correcta
eliminación de este producto contribuye a la conservación de los recursos naturales. Para una mayor información
de donde puede entregar los desechos de este producto para reciclaje, diríjase a las autoridades competentes o a
los puntos de reciclaje establecidos.
CE NOTES
LRP electronic GmbH declara que este producto cumple con toda la normativa de la directiva europea 2004/108/
EC.Este producto cumple la normativa 1999/5/EC. Para ver la delaración de conformidad visite:
http://www.LRP.cc/CE
INFORMACIÓN PARA EL VERTIDO DE BATERÍAS:
Las pilas y baterías utilizadas en este producto han de ser desechadas de manera distinta a su basura doméstica.
No se pueden verter en los contenedores de basura urbanos. Los usuarios de pilas y baterías deben utilizar los
servicios disponibles de recogida y reciclaje especificos. La participación del usuario final en el procedimiento de
recogida y reciclaje es fundamental para minimizar cualquier efecto negativo que pilas y baterías pudieran tener
sobre el medio ambiente y la salud debido a las sustancias incluidas en las mismas.
INFORMACIÓN SEGUROS RESPONSABILIDAD CIVIL
En algunos países es obligatorio tener un seguro de Responsabilidad Civil con la cobertura adecuada si se utilizan
aviones o helicópteros radio control. Compruebe con su aseguradora que dispone de la cobertura adecuada antes
de utilizar su modelo por primera vez.
23
Page is loading ...
-
 1
1
-
 2
2
-
 3
3
-
 4
4
-
 5
5
-
 6
6
-
 7
7
-
 8
8
-
 9
9
-
 10
10
-
 11
11
-
 12
12
-
 13
13
-
 14
14
-
 15
15
-
 16
16
-
 17
17
-
 18
18
-
 19
19
-
 20
20
-
 21
21
-
 22
22
-
 23
23
-
 24
24


LRP 220108 User manual
- Category
- Remote controlled toys
- Type
- User manual
- This manual is also suitable for
Ask a question and I''ll find the answer in the document
Finding information in a document is now easier with AI
in other languages
- français: LRP 220108 Manuel utilisateur
- español: LRP 220108 Manual de usuario
- Deutsch: LRP 220108 Benutzerhandbuch
- русский: LRP 220108 Руководство пользователя
- Nederlands: LRP 220108 Handleiding
- português: LRP 220108 Manual do usuário
- čeština: LRP 220108 Uživatelský manuál
- suomi: LRP 220108 Ohjekirja
Related papers
Other documents
-
bq BQ-1085L Hornet Max Pro Hard reset manual
-
Sennheiser IE 100 PRO Operating instructions
-
ANSMANN 2484669 Basic II 1300mAh Charger User manual
-
Swann Air Duel Operating Instructions Manual
-
SKY ROVER US858922 Knightforce 2.4GHz Radio Control Helicopter User manual
-
Ripmax Sky Spy A-ARTF68713 User manual
-
-
Alpha 858931 Red Sky Rover Knight Force User manual
-
Revell 23955 User manual
-
Schlage LRP Lock Replacement Plates Installation guide