
Document 900.0824 - 09/06 - Rev 1.01
3 Inch Dome Camera
HD3VC4SHR/HD3VC4SA/HD3VC4SHRX/HD3VC4SAX
Quick Install Guide
Warnings, Operating Notes
Installation and servicing should be performed
only by qualified and experienced technicians to
conform to all local codes and to maintain your
warranty.
WARNING! The use of CSA Certified/UL
Listed Class 2 power adapters is
required to ensure compliance
with electrical safety standards.
WARNING! To reduce the risk of fire or
electric shock, do not expose this
product to rain or moisture.
WEEE (Waste Electrical and Electronic
Equipment). Correct disposal of this product
(applicable in the European Union and other
European countries with separate collection
systems). This product should be disposed of,
at the end of its useful life, as per applicable
local laws, regulations, and procedures.
FCC Compliance Statement
Information to the User: This equipment has
been tested and found to comply with the limits
for a Class A digital device. Pursuant to Part 15
of the FCC Rules, these limits are designed to
provide reasonable protection against harmful
interference when the equipment is operated in
a commercial environment. This equipment
generates, uses, and can radiate radio
frequency energy and, if not installed and used
in accordance with the instruction manual, may
cause harmful interference to radio
communications. Operation of this equipment in
a residential area is likely to cause harmful
interference in which case the user will be
required to correct the interference at his own
expense.
Caution Changes or modifications not
expressly approved by the party
responsible for compliance could void
the user’s authority to operate the
equipment.
This Class A digital apparatus complies with
Canadian ICES-003.
Manufacturer’s Declaration of
Conformance
The manufacturer declares that the equipment
supplied with this guide is compliant with the
essential protection requirements of the EMC
directive 89/336/EEC and the Low Voltage
Directive LVD 73/23 EEC, conforming to the
requirements of standards EN 55022 for
emissions.
Operating Notes
Power Supply
This dome camera can operate on 24 VAC
or 12 VDC.
Operating Conditions
• Avoid viewing very bright objects (example,
light fixtures) for extended periods.
• Avoid operating or storing the unit in the
following locations:
• Extremely humid, dusty, hot/cold
environments (where the operating
temperature is outside the
recommended range of 14°F to 122°F
[-10°C to +50°C])
• Close to sources of powerful
electromagnetic radiation, such as
radio or TV transmitters
• Close to fluorescent lamps or objects
reflecting light
• Under unstable light sources (may
cause flickering)
Introduction
The unobtrusive, compact design of the
HD3VC4S Series 3 Inch Dome Camera is ideal
for indoor installations in commercial and
residential environments.
Before You Begin
Unpack Everything
Check that the items received match those listed
on the order form and packing slip. The
HD3VC4S Series Camera packing box should
include, in addition to this Install Guide:
• One fully assembled camera
• One hardware kit
• One 2nd video monitor output cable
• One mounting template
If any parts are missing or damaged, contact the
dealer you purchased the camera from or call
Honeywell Customer Service.
Installation
The HD3VC4S Series is a fully-integrated
enclosure with camera and lens.
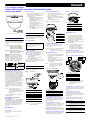
Figure 1 Camera Parts
Note See Figure 5 for an explanation of the
camera board settings.
Removing the Dome Cover
1. Gently turn the dome cover (#5 on
Figure 2) counter-clockwise to unlock and
pull free of the housing.
2. Remove the inner liner (#4) by gently
pulling it free of the two notches (#2) in the
housing (#1).
3. Set the dome (and liner) aside.
Figure 2 Dome Cover Removal
Connecting the Wiring
Follow Figure 1 to connect the video output
connector (a) and 24 VAC/12 VDC power
connector (b).
Caution For DC power supply use, make sure
the polarity is correct to avoid
malfunction and/or camera damage.
Mounting the Camera
1. Place the mounting template (supplied) on
the mounting surface and mark the holes
(see Figure 3).
2. Drill two holes, then insert the screw
anchors into the holes.
3. Secure the camera housing to the wall/
ceiling with the TP4 x 15 mm tapping
screws supplied.
Note Depending on the material of your
mounting surface, you may require
different screws and anchors than
those supplied.
Figure 3 Camera Installation
Adjusting the Camera Position
The HD3VC4S Series camera has three axes for
positioning the camera. While monitoring the
picture on the monitor, adjust the camera
position as follows:
Horizontal Adjustment Rotate the 3D
assembly in the base. Do not turn the assembly
more than 360° as this may cause the internal
cables to twist and disconnect or break.
Vertical Adjustment After loosening the
thumbnuts, position the camera as desired, then
finger-tighten the thumbnuts to set the position.
Horizontal Rotation For Wall Mount and Tilted
Ceilings Rotate the lens base (maximum 360°)
until you are satisfied with the field of view.
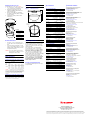
Figure 4 Camera Adjustment
Adjusting the Lens
1. Loosen the Zoom lever (#3) counter-
clockwise a little, then rotate the Zoom
lever and determine the image view.
2. Loosen the Focus lever (#4) counter-
clockwise a little, then adjust the focus for
optimum picture sharpness.
3. Re-tighten the Zoom lever and Focus lever
after adjustment.
Note It is important that you lock the zoom
and focus levers after making
adjustments. This will avoid the
positions moving (for example, from
temperature changes or vibrations).
Optional Camera Settings
See Figure 5 for location on the camera board of
the camera adjustment functions described
below.
Figure 5 Camera Adjustment Functions
Note Please use the supplied DC Iris and
Line lock adjustment tool to adjust
picture brightness and phase
adjustment.
Picture Brightness Use the LEVEL screw (#1)
to compensate for the iris level. L (low) makes
the picture darker. H (high) makes the picture
brighter.
Phase Adjustment Use the V Phase
Adjustment Pot (#2) to adjust the phase
difference between cameras. Make sure Switch
4 is ON to activate the Line lock function (AC
operation only).
DIP Switches Set the DIP switches (#3) to
activate or deactivate the following functions:
Document 900.0824 - 09/06 - Rev 1.01
RISK OF
ELECTRIC SHOCK
CAUTION: TO REDUCE THE RISK OF ELECTRIC
SHOCK, DO NOT REMOVE THE COVER.
NO USER-SERVICEABLE PARTS INSIDE
REFER SERVICING TO QUALIFIED
SERVICE PERSONNEL
THIS SYMBOL INDICATES
THAT DANGEROUS VOLTAGE
CONSTITUTING A RISK OF
ELECTRIC SHOCK IS
PRESENT WITHIN THE UNIT.
THIS SYMBOL INDICATES THAT
IMPORTANT OPERATING AND
MAINTENANCE INSTRUCTIONS
ACCOMPANY THIS UNIT.
CAUTION
Please read this guide carefully before
you install the HD3VC4S Series 3 Inch
Dome Camera. Keep this guide for
future reference.
1 — Legend
1
Conduit hole used for surface run power/video
connector
2 Camera housing
3 Dome cover
4 Zoom lever
5 Focus lever
a Video output connector
b
24 VAC/12 VDC power input connector
(red +, black -)
1
2
3
4
5
b
a
2 — Legend
1 Camera housing
2 Notches (x2)
3
Tilt adjustment bracke
t
and thumbnuts
4 Inner liner
5 Dome cover
1
3
4
5
2
M ounting Tem plate
Logo D irection
M
O
N
P
C
1
:
B
L
C
2
:
A
G
C
3
:
D
C
/
A
E
S
4
:
L
L
1
2
3
4
O
N
O
F
F
L
E
V
E
L
H
L
V PHA SE
+ -
T
O
P
2
1
3 — Legend
1 Screw anchors (x2), supplied
2 Mounting template
3 TP4 x 15 mm tapping screws (x2) supplied
3
Switch Description
1BLC (Backlight Compensation). Set to ON to
have the camera adjust the exposure to
compensate for situations where the subject is lit
from behind. The factory default setting is OFF.
2AGC (Automatic Gain Control). Set to ON
(default) to have the camera adjust the picture
for low light conditions.
3DC/AES Mode. Leave in ON position only.
4LL (Line Lock). Set the camera synchronization
to internal or line lock (line lock is only available
with 24 VAC). The factory default setting is OFF.
4 — Legend
1
Tilt adjustment bracket and thumbnuts (x2)
for vertical adjustment
2
Axis ring for horizontal rotation for wall
mount and tilted ceilings
3 Zoom lever
4 Focus lever
5
Rotate 3D assembly in base for horizontal
adjustment
1
2
3
4
5
LEVEL
H
L
V PHASE
+ -
1: BLC
2:AGC
3 : DC/AES
4: LL
1 2 3 4
ON
OFF
MON
LEVEL
H L
V PHASE
+ -
P
C
M
O
N
1:BL C
2:AG C
3:DC/AES
4:LL
1 2 3 4
ON
OFF
T
O
P
5 — Legend
1 LEVEL adjustment pot (Iris level)
2 V Phase adjustment pot (24 VAC only)
3 Mode setting DIP switches
4 Monitor out
5 Camera mounting holes
1
2
3
4
5

www.honeywellvideo.com
+1.800.796.CCTV (North America only)
900.0824 - 09/06 - Rev 1.01
© 2006 Honeywell International Inc. All rights reserved. No part of this publication may be reproduced by any means without written
permission from Honeywell Video Systems. The information in this publication is believed to be accurate in all respects. However,
Honeywell Video Systems cannot assume responsibility for any consequences resulting from the use thereof. The information contained
herein is subject to change without notice. Revisions or new editions to this publication may be issued to incorporate such changes.
Attaching the Dome Cover
To attach the dome cover, follow Figure 2:
1. Use a soft, lint-free cloth to wipe the dome
cover clean and remove fingerprints.
2. Attach the inner liner (#3) to the Tilt
adjustment thumbnuts (#2). Push down
until it clicks into place.
3. Place the dome (#4) on the unit. Make
sure all three dome tabs (#5) are inside the
housing opening.
4. Turn the dome gently clockwise until it
locks in place.
Routine Maintenance
• The dome cover is an optical part. Use a
soft, dry cloth to remove any fingerprints or
dust.
• Clean the camera housing with a soft, dry
cloth. For more stubborn stains, use a cloth
dampened with a small quantity of neutral
detergent, then wipe dry.
Caution Do not use volatile solvents such as
alcohol, benzene or thinners to avoid
damaging the surface finish.
Cable Guidelines
Product Dimensions
Figure 6 Camera Dimensions
Warranty and Service
Subject to the terms and conditions listed on the
Product warranty, during the warranty period
Honeywell will repair or replace, at its sole
option, free of charge, any defective product
returned prepaid.
In the event you have a problem with any
Honeywell product, please call Customer
Service for assistance or to request a Return
Merchandise Authorization (RMA) number.
Call 1.800.796.CCTV (North America only).
Be sure to have the model number, serial
number, and the nature of the problem available
for the technical service representative.
Prior authorization must be obtained for all
returns, exchanges, or credits. Items shipped
to Honeywell without a clearly identified
Return Merchandise Authorization (RMA)
number may be refused.
Europe and United Kingdom
For warranty information please contact your
Honeywell dealer.
Specifications Contact Information
Honeywell Video Systems (Head Office)
2700 Blankenbaker Pkwy, Suite 150
Louisville, KY 40299, USA
www.honeywellvideo.com
℡ +1.800.796.2288
Honeywell Security Australia Pty Ltd.
Unit 5, Riverside Centre, 24-28 River Road West
Parramatta, NSW 2150, Australia
www.ademco.com.au
℡ +61.2.8837.9300
Honeywell Security Asia Pacific
33/F Tower A, City Center, 100 Zun Yi Road
Shanghai 200051, China
www.security.honeywell.com/cn
℡ +86 21.2527.4568
Honeywell Security Asia
Flat A, 16/F, CDW Building, 388 Castle Peak Road
Tsuen Wan, N.T., Hong Kong
www.security.honeywell.com/hk
℡ +852.2405.2323
Honeywell Security France
Parc Gutenberg, 8, Voie La Cardon
91120, Palaiseau, France
www.honeywell.com/security/fr
℡ +33.01.64.53.80.40
Honeywell Security Italia SpA
Via Treviso 2 / 4
31020 San Vendemiano
Treviso, Italy
www.honeywell.com/security/it
℡ +39.04.38.36.51
Honeywell Security Spain
Mijancas 1. 3
a
Planta
P.Ind. Las Mercedes
28022 Madrid, Spain
www.security.honeywell.com/es
℡ +34.902.667.800
Honeywell Security Nederland
Netwerk 121
1446 WV Purmerend, Netherlands
www.SecurityHouse.nl
℡ +31.299.410.200
Honeywell Video Systems UK Ltd.
Aston Fields Road, Whitehouse Ind Est
Runcorn, Cheshire, WA7 3DL, UK
www.honeywellvideo.com
℡ +0844.8000.235
Honeywell Security South Africa
Unit 6 Galaxy Park, 17 Galaxy Avenue
Linbro Park, P.O. Box 59904
2100 Kengray, Johannesburg, South Africa
www.honeywell.co.za
℡ +27.11.574.2500
Honeywell Security Germany
Johannes-Mauthe-Straße 14
D-72458 Albstadt, Germany
www.honeywell.com/security/de
℡ +49.74 31.8 01.0
Honeywell Security Poland
Chmielewskiego 22a, 70-028
Szczecin, Polska
www.ultrak.pl
℡ +48.91.485.40.60
Honeywell Security Czech Republic
Havránkova 33, Brno
Dolní Heršpice, 619 00, Czech Republic
www.olympo.cz
℡ +420.543.558.111
Honeywell Security Slovakia Republic
Vajnorskà 142, 83104 Bratislava
Slovakia
www.olympo.sk
℡ +421.2.444.54.660
Maximum Power Supply Cable Length (feet/meters)
Cameras With AC/DC Power Supplies
Wire gauge
Total
load
Power
supply
24 AWG 22 AWG 18 AWG 16 AWG
High
Res
12 VDC
15 VDC
24 VAC
89/27
348/106
991/302
148/45
561/171
1601/488
374/114
1427/435
4061/1238
597/182
2273/693
6462/1970
Std Res 12 VDC
15 VDC
24 VAC
236/72
420/128
1155/352
384/117
679/207
1866/569
977/298
1729/527
4736/1444
1555/474
2752/839
7541/2299
Caution Calculations are based on an unregulated linear
power supply, which would be the worst case. Using a regulated
or switching power supply can increase the cable distance.
Honeywell recommends using a CSA Certified/UL listed Class 2
power adapter to ensure compliance with electrical safety
standards.
Maximum Video Coaxial Cable Length (feet/meters)
Cable type RG-59 RG-6 RG-11
Wire gauge 23 AWG* 18 AWG* 14 AWG*
Maximum length (feet/meters) 750/229 1500/457 2000/610
* Copper clad steel core, 95% braided shield
Legend
1 Camera housing
2
Tilt adjustment
bracket and
thumbnuts
3 Inner liner
4 Dome cover
5 Dome tabs (x3)
1
2
3
4
5
4.33” (110 mm)
3.91” (96.3 mm)
3.27” (83 mm)
0.2” (5 mm)
diameter
Video Signal Specifications
Video Standard: NTSC, PAL NTSC, PAL
High Res Standard Res
Scanning System: 525 lines, 2:1 interlace (NTSC)
625 lines, 2:1 interlace (PAL)
Image Sensor: 1/3” Interline Transfer CCD
Number of Pixels
(H x V):
768 x 494 (NTSC)
752 x 582 (PAL)
510 x 492 (NTSC)
500 x 582 (PAL)
Minimum
Illumination:
0.6 lux @ F1.3 0.2 lux @ F1.3
(AGC on, 50 IRE)
Horizontal
Resolution:
540 TVL 350 TVL
Video Output: 1.0 Vp-p @ 75 Ohms
S/N Ratio: 50 dB (AGC Off)
Sync System: 12 VDC: Internal, 24 VAC: Line lock
Auto Gain Control: On/off, switchable
BLC: On/Off, switchable
AI/AES Selection: On/off, switchable
Automatic Electronic
Shutter:
1/60 - 1/100,000 sec (NTSC)
1/50 - 1/100,000 sec (PAL)
Lens Type: 2.8 mm to 10 mm Vari-focal Auto Iris,
F1.3
Lens Iris Control: Direct Drive (DC) AI
Angle of View (Lens):
Wide
Tele
129.0° (D), 100.2° (H), 73.3° (V)
34.3° (D), 27.4 (H), 20.5° (V)
Focal Length: f = 2.8 mm to 10 mm
White Balance: ATW
Gamma: 0.45
Electrical Specifications
Input Voltage: 12 VDC/24 VAC
Input Voltage Range: 11 to 16 VDC
17 to 28 VAC
Power Consumption: 3.5 W (max)
Mechanical
Dimensions
(W x H):
4.33” x 3.91” (110 mm x 96.3 mm)
Weight:
Net
Shipping
.66 lb (.3 Kg)
1.32 lb (.6 Kg)
Construction: Housing and dome: Polycarbonate
Environmental
Temperature:
Operating
Storage
14°F to 122°F (-10°C to 50°C)
-4°F to 140°F (-20°C to 60°C)
Relative Humidity: 0% to 90%, non-condensing
Regulatory
Emissions: FCC, CE (EN55022)
Immunity: CE (EN50130-4)
Safety: UL2044
a
, EU: 73/23/EEC LVD
a
Applies only to HD3VC4SHR and
HD3VC4SA models.
-
 1
1
-
 2
2


Honeywell HD3VC4SAX User manual
- Category
- Security cameras
- Type
- User manual
Ask a question and I''ll find the answer in the document
Finding information in a document is now easier with AI
Related papers
-
Honeywell HCC484L User manual
-
-
-
-
-
-
-
-
-
Other documents
-
i3 International i3F417U User manual
-
Axis 26549 Datasheet
-
Sanyo VCC-9785VP User manual
-
-
-
Trust 31020 Datasheet
-
TOA PC-1867F EU User manual
-
Eneo VKC-1382/IR316 Installation And Operating Instructions Manual
-
Sony SIR4260V User manual
-
Samsung SCV-2080R User manual