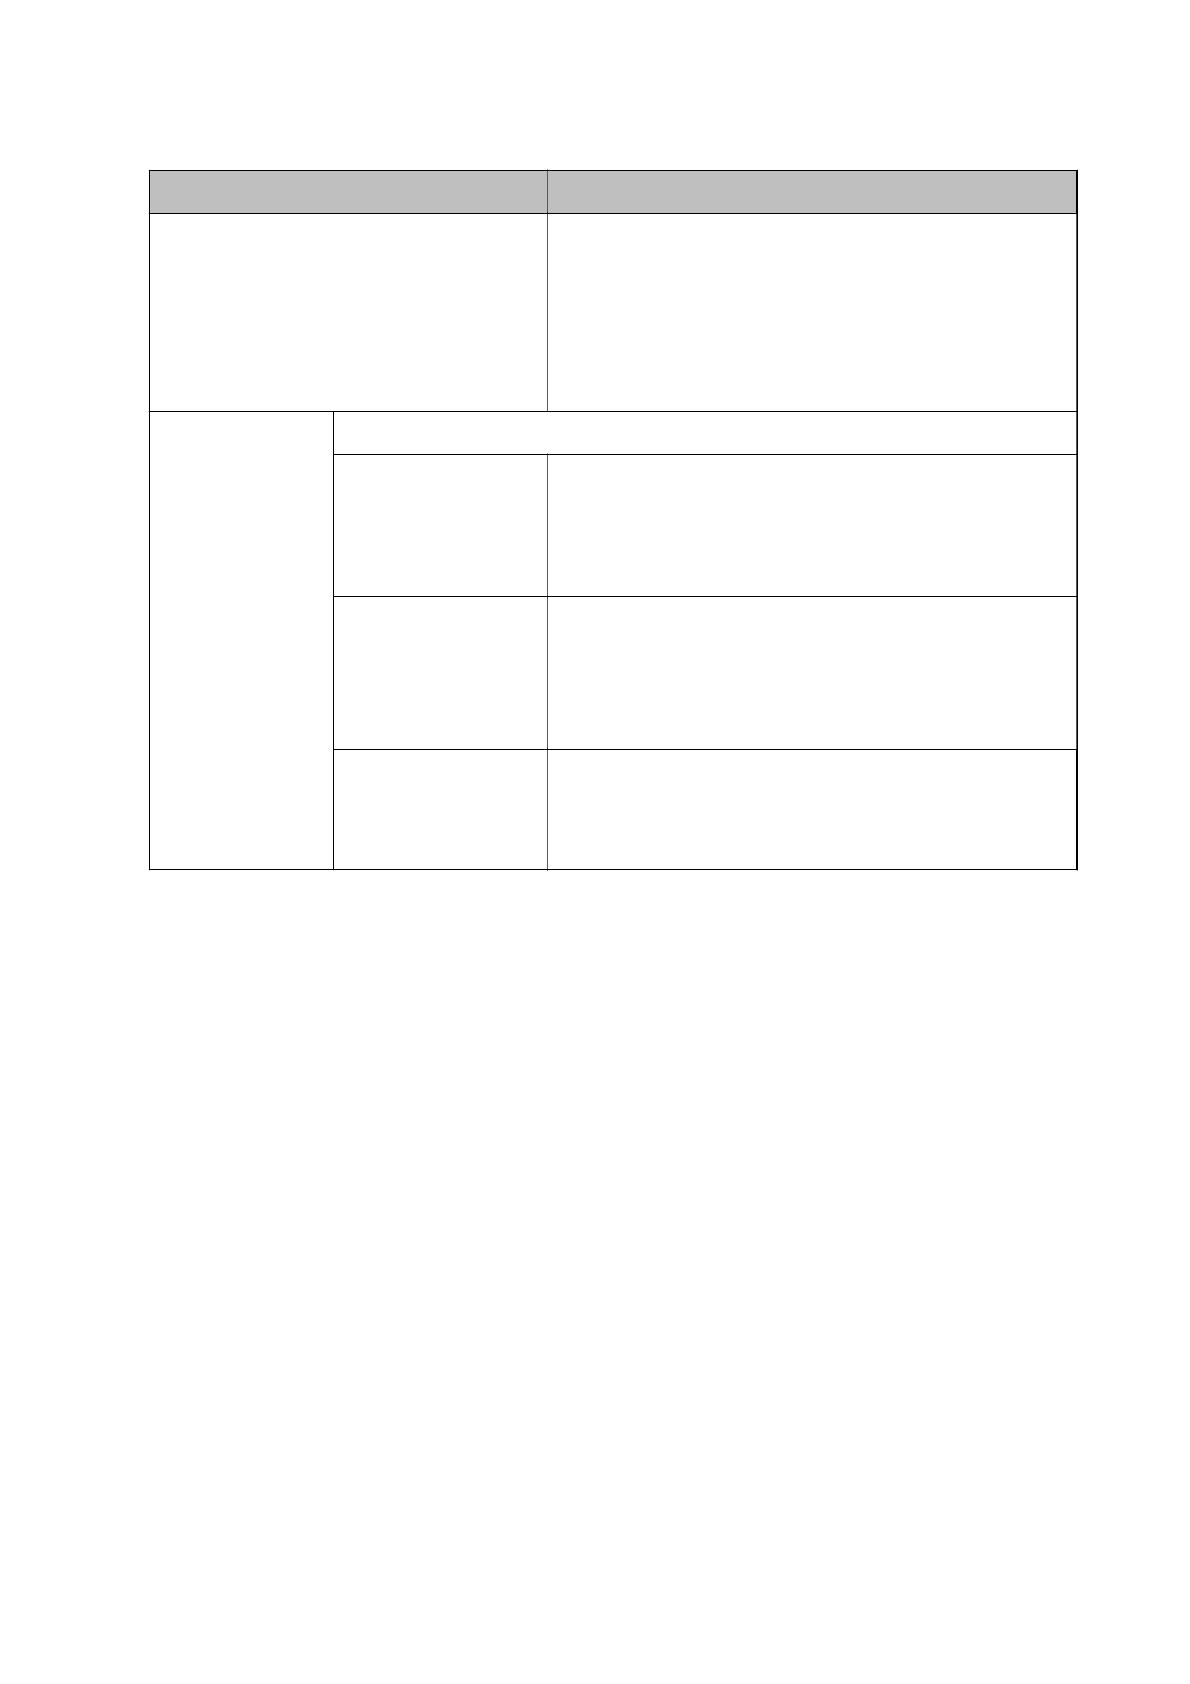
Epson AL-C9500DN User manual

Type
User manual

The Epson AL-C9500DN is a powerful and versatile color laser printer designed for high-volume printing needs. It offers fast print speeds of up to 50 ppm in both black and white and color, and a large paper capacity of up to 2,350 sheets, making it ideal for busy office environments. The AL-C9500DN also features advanced security features, such as PIN code authentication and user access control, to protect sensitive documents. Additionally, it supports mobile printing options, such as Apple AirPrint and Google Cloud Print, for easy printing from smartphones and tablets.

The Epson AL-C9500DN is a powerful and versatile color laser printer designed for high-volume printing needs. It offers fast print speeds of up to 50 ppm in both black and white and color, and a large paper capacity of up to 2,350 sheets, making it ideal for busy office environments. The AL-C9500DN also features advanced security features, such as PIN code authentication and user access control, to protect sensitive documents. Additionally, it supports mobile printing options, such as Apple AirPrint and Google Cloud Print, for easy printing from smartphones and tablets.

How to Use
NPD6824-00 EN
Contents
Introduction
e Contents ofis Document................3
Using this Guide...........................3
Marks and Symbols.......................3
Screenshots Used inis Guide..............3
Operating System References................3
Overview
About Authenticated Printing..................5
Authentication Methods
Preparing for Use...........................6
Registering an Authentication Card........... 6
Checking the ID Number...................7
Logging in to a Printer
If the authentication device is not connected. . . . . . . 8
If the authentication device is connected..........8
Changing the User Information
Changing the Password......................9
Changing the ID Number.....................9
Authenticated Printing
Printing from the Computer..................11
Setting Up the Printer Driver -Windows. . . . . . . 11
Printing from the Printer Driver -Windows. . . . . 13
Printing from the Printer Driver -Mac OS......15
Operations on the Printer....................17
Printing...............................17
Canceling Printing.......................17
Solving Problems
Forgot Your Password or ID Number........... 19
Printing Problems.........................19
Print Jobs Are not Displayed on the Control
Panel.................................19
Appendix
System Requirements......................21
Trademarks..............................21
Caution.................................21
How to Use
Contents
2
Introduction
The Contents of This Document
is guide describes how to perform the following for Epson Print Admin Serverless.
Authenticated methods
Registering an authentication card
Authenticated printing
Using this Guide
Marks and Symbols
!
Caution:
Instructions that must be followed carefully to avoid bodily injury.
c
Important:
Instructions that must be observed to avoid damage to your equipment.
Note:
Provides complementary and reference information.
Related Information
&Links to related sections.
Screenshots Used in This Guide
Setting items may vary depending on products and setting conditions.
Operating System References
Windows
In this manual, terms such as "Windows 10", "Windows 8.1", "Windows 8", "Windows 7", "Windows Vista",
"Windows XP", "Windows Server 2019","Windows Server 2016", "Windows Server 2012 R2", "Windows Server
2012", "Windows Server 2008 R2", "Windows Server 2008", "Windows Server 2003 R2", and "Windows Server 2003"
refer to the following operating systems. Additionally, "Windows" is used to refer to all versions.
Microso
®
Wi n dow s
®
10 operating system
How to Use
Introduction
3
Microso
®
Wi n d ow s
®
8.1 operating system
Microso
®
Wi n d ow s
®
8 operating system
Microso
®
Wi n d ow s
®
7 operating system
Microso
®
Wi n d ow s Vi st a
®
operating system
Microso
®
Wi n d ow s
®
XP operating system
Microso
®
Wi n d ow s
®
XP Professional x64 Edition operating system
Microso
®
Wi n d ow s S e r v e r
®
2019 operating system
Microso
®
Wi n d ow s S e r v e r
®
2016 operating system
Microso
®
Wi n d ow s S e r v e r
®
2012 R2 operating system
Microso
®
Wi n d ow s S e r v e r
®
2012 operating system
Microso
®
Wi n d ow s S e r v e r
®
2008 R2 operating system
Microso
®
Wi n d ow s S e r v e r
®
2008 operating system
Microso
®
Wi n d ow s S e r v e r
®
2003 R2 operating system
Microso
®
Wi n d ow s S e r v e r
®
2003 operating system
Mac OS
In this manual, "Mac OS" is used to refer to Mac OS X v10.7.0 or later.
How to Use
Introduction
4
Overview
Epson Print Admin Serverless provides a safe and ecient environment for using printers on networks such as
oce or school networks.
e following solutions are provided.
Enhanced Security
Only authenticated users can use the printer.
You can avoid condential documents being taken away by unauthorized personnel, mixing documents with
other user’s, and so on since they are printed from an authenticated printer.
Cost Savings
You can avoid unnecessary printing since printing can only be performed aer logging in as an authenticated
user.
About Authenticated Printing
You can store print jobs that are printed from the computer. Log in to the printer as an authenticated user, and
then print the print job.
If your system administrator allows this function, you can print jobs directly without storing them.
How to Use
Overview
5
Authentication Methods
e authentication method is set up by the system administrator, and the screen on the control panel is displayed
accordingly. e available authentication methods are as follows.
user ID and password
user ID
ID number
authentication card (if an authentication device is connected)
Preparing for Use
You need to prepare to use Epson Print Admin Serverless. Preparation is dierent depending on the authentication
method and whether an authentication device is used.
Registering an Authentication Card
If you are using an authentication card for Epson Print Admin Serverless, you need to register the user
authentication card.
Note:
e card may have been registered by your system administrator already. For more information, follow the instructions given
by your system administrator.
1. Hold the authentication card over the authentication card reader.
e conrmation screen is displayed.
2. Select Yes.
e screen for entering the user ID and password is displayed.
How to Use
Authentication Methods
6
3. Enter the user ID and password on the control panel.
If you do not know your user ID and password, contact your system administrator.
4. Select Log in.
e registration completion message is displayed. In the future, you will be authenticated only by holding the
authentication card.
Checking the ID Number
For ID number authentication, a unique ID number is issued. You can log in to the printer by entering the ID
number on its control panel. Contact your system administrator for your ID number.
How to Use
Authentication Methods
7
Logging in to a Printer
You need to log in to the printer to use the authenticated printing.
If the authentication device is not connected
You can log in by entering a user ID and password, a user ID, or an ID number.
1. Select Log in on the home screen of the printer's control panel.
2. Log in to the printer using one of the following methods.
When using a user ID and password
Enter User ID and Password, and then select Log in.
When using a user ID or an ID number
Enter User ID or ID Number.
If the authentication device is connected
You can log in by holding the authentication card over the authentication device.
Note:
When User ID and Password or ID Number is displayed aer selecting Log in on the control panel, you can also log in by
entering your user information.
Related Information
&“Registering an Authentication Card” on page 6
How to Use
Logging in to a Printer
8
Changing the User Information
Changing the Password
If the user information is registered in the printer and the administrator allows the registered user to log in to Web
Cong, you can change the password from Web Cong. Contact your system administrator for more information.
See the printer's User's Guide for details on how to use Web Cong.
1. Enter the printer's IP address into a browser to run Web Cong.
Note:
You can check the IP address by selecting on the printer's control panel.
2. Click Log in.
3. Select Registered User for Type.
4. Enter the user ID and password in User Name/User ID and Current password.
5. Click OK.
6. Select the Epson Open Platform tab > Epson Print Admin Serverless > User Settings.
7. Enter the current password, the new password, and the conrmation of the new password.
8. Click OK.
e completion message is displayed.
Changing the ID Number
If the user information is registered in the printer and the administrator allows the registered user to log in to Web
Cong, you can change the ID number from Web Cong. Contact your system administrator for more
information.
See the printer's User's Guide for details on how to use Web Cong.
1. Enter the printer's IP address into a browser to run Web Cong.
Note:
You can check the IP address by selecting on the printer's control panel.
2. Click Log in.
3. Select Registered User for Type.
4. Enter the user ID and password in User Name/User ID and Current password.
5. Click OK.
How to Use
Changing the User Information
9
6. Select the Epson Open Platform tab > Epson Print Admin Serverless > User Settings.
7. Enter the current ID number, the new ID number, and the conrmation of the new ID number from 4 to 8
digits.
Note:
Your system administrator sets the minimum number of digits for the ID number. Contact your system administrator
for more information.
8. Click OK.
e completion message is displayed.
How to Use
Changing the User Information
10
Authenticated Printing
e ow of authenticated printing is as follows:
1. Send print jobs to the printer by printing from the computer.
2. Log in to the printer, and then print.
Printing from the Computer
You will set up to use authenticated printing on the printer driver, and then print.
Setting Up the Printer Driver -Windows
Set up to use authenticated printing on a Windows printer driver. Log on to your computer as an administrator.
1. Open the printer list on the computer.
Win d ow s 1 0
Right-click on the start button, or press and hold it and then select Control Panel > Vi e w d e v i c e s a n d
printers in Hardware and Sound.
Windows 8.1/Windows 8/Windows Server 2012 R2/Windows Server 2012
Select Desktop > Settings > Control Panel > Vi e w d e v i c e s a n d p r i n t e r s in Hardware and Sound.
Windows 7/Windows Server 2008 R2
Click the start button, and select Control Panel > Hardware and Sound > Scanner and Cameras, and then
check if the printer is displayed.
Windows Vista/Windows Server 2008
Click the start button, and then select Control Panel > Printers in Hardware and Sound.
Win d ow s X P
Click the start button, and select Control Panel > Printers and Other Hardware > Scanner and Cameras,
and then check if the printer is displayed.
2. Right-click on your printer, or press and hold it, select Printer properties or Property, and then click the
Optional Settings tab.
3. Select Acquire from Printer, and then click Get.
Make sure that Epson Print Admin Serverless is set to Enable in Current Printer Information.
How to Use
Authenticated Printing
11
Note:
If it is not set to Enable, the Epson Print Admin Serverless setting may not have been completed.
4. Click Epson Print Admin Serverless Settings.
e Epson Print Admin Serverless Settings window is displayed.
5. Check that Use Epson Print Admin Serverless printing is selected, and then select how to set your user ID in
User ID for authentication.
Items Description
Use Epson Print Admin Serverless printing Select when you use authenticated printing.
How to Use
Authenticated Printing
12
Items Description
Print Methods You can use this if it has already been allowed by your system
administrator.
Secure Print: Sent print jobs are stored on the printer. Log in to
the printer using an authentication card and so on, and then print
the job.
Direct Print: Sent print jobs are printed directly. Print jobs are not
stored on the printer.
User ID for
authentication
Select how to set the user ID to use authenticated printing.
Set permanently When you use authenticated printing from this computer, always
use the user ID set in User ID. You do not need to set the user ID
again when printing.
Select this setting when using the same user ID as the login name
or when using a xed user ID.
Set manually by each
user
On the More Options tab in the printer driver, select Settings
under Job Type, and then set the user ID in the User ID Setting
window. Once you have set the user ID, you do not need to set it
again unless you change the user ID that you want to use. To
change the user ID, change the user ID in the User ID Setting
window.
Prompt user at each
print job
The User ID Setting window is displayed before printing, and then
users can enter the user ID.
This setting is useful when multiple users use a computer with a
single user account.
6. Click OK.
7. Click OK to close the Optional Settings window.
Related Information
&“When Set permanently is selected” on page 13
&“When Set manually by each user is selected” on page 14
&“When Prompt user at each print job is selected” on page 15
Printing from the Printer Driver -Windows
e printing procedure varies depending on the setting of User ID for authentication in the Epson Print Admin
Serverless Settings window.
When Set permanently is selected
e printing procedure is the same as the normal printing procedure when you select Set permanently in the
Epson Print Admin Serverless Settings window. For instructions on how to print from the Windows printer
driver, see the printer's User's Guide.
How to Use
Authenticated Printing
13
When Set manually by each user is selected
Operations may dier depending on the application. See the application's help for details.
1. Open the le you want to print.
2. Select Print or Page Setup from the File menu.
3. Select your printer.
4. Select Preferences or Properties to access the printer driver window.
5. Change the settings as necessary.
See the menu options for the printer driver for details.
6. Click Settings under Job Type on the More Options tab to display the User ID Setting window.
7. Change the user ID as necessary, and then click OK.
8. Click OK to close the printer driver window.
9. Click Print.
e print job is sent to the printer.
How to Use
Authenticated Printing
14
When Prompt user at each print job is selected
e printing procedure is the same as the normal printing procedure when you select Prompt user at each print
job in the Epson Print Admin Serverless Settings window. For instructions on how to print from the Windows
printer driver, see the printer's User's Guide.
e User ID Setting window is displayed aer clicking Print. Enter the user ID, and then click OK.
Printing from the Printer Driver -Mac OS
Note:
Operations may dier depending on the application. See the application's help for details.
1. Open the le you want to print.
2. Select Print from the File menu or another command to access the print dialog.
If necessary, click Show Details or
d
to expand the print window.
3. Select your printer.
How to Use
Authenticated Printing
15
4. Select Print Settings from the pop-up menu.
Note:
On OS X Mountain Lion or later, if the Print Settings menu is not displayed, the Epson printer driver has not been
installed correctly.
Select System Preferences from the menu > Printers & Scanners (or Print & Scan , Print & Fax ), remove the
printer, and then add the printer again. See the following to add a printer.
http://epson.sn
5. Change the settings as necessary.
See the menu options for the printer driver for details.
6. Click Print.
e authentication information input dialog is displayed.
How to Use
Authenticated Printing
16
7. Enter the user ID, enter 0 (zero) for the password, and then click OK.
e print job is sent to the printer.
Note:
If you select Remember this password in my keychain, you can skip entering the user ID and password in the future.
Operations on the Printer
You print or delete the print jobs sent to the printer.
Printing
When you log in to the printer, printing starts. You are automatically returned to the home screen when printing is
complete.
Note:
You can print directly by selecting Direct Print in Print Methods from Epson Print Admin Serverless Settings in the
printer driver.
When the number of print jobs stored in the printer reaches the maximum, no more print jobs can be accepted and a
message is displayed.
Print jobs remain in the spooler on the computer. When the stored print jobs are printed and space becomes available,
these spooled jobs are stored and printed one aer another.
Unprinted jobs will be automatically deleted when the time expires. Time until a print job is eliminated is dierent
depending on the setting. Contact your system administrator for more information.
Related Information
&“Logging in to a Printer” on page 8
Canceling Printing
You can cancel printing from the printer's control panel, or aer sending a print job by using the Epson Open
Platform tab > Epson Print Admin Serverless > Print Jobs in Web Cong.
How to Use
Authenticated Printing
17
Canceling Printing from the Printer
To cancel a job that is being printed, press on the printer's control panel.
Printing is canceled and all of the print jobs stored in the printer are deleted.
Canceling Printing from Web Cong
If the user information is registered in the printer and the administrator allows the registered user to log in to Web
Cong, you can delete the print jobs from Web Cong. Contact your system administrator for more information.
See the printer's User's Guide for details on how to use Web Cong.
1. Enter the printer's IP address into a browser to run Web Cong.
Note:
You can check the IP address by selecting on the printer's control panel.
2. Click Log in.
3. Select Registered User for Type.
4. Enter the user ID and password in User Name/User ID and Current password.
5. Click OK.
6. Select the Epson Open Platform tab > Epson Print Admin Serverless > Print Jobs.
7. Click Delete.
How to Use
Authenticated Printing
18
Solving Problems
Forgot Your Password or ID Number
If you forget your password or ID number, contact your system administrator.
Printing Problems
Print Jobs Are not Displayed on the Control Panel
Checking the printer driver settings
e user ID you set on the printer driver may be dierent from the user ID registered for Epson Print Admin
Serverless. Check the user ID you set on the printer driver. For details, see the setting on the Windows printer
driver from related information link below. If the user ID you set on the printer driver is correct, contact your
system administrator.
Checking the connection (network)
If you cannot connect to the network or cannot print over the network, contact your system administrator.
Checking the software and data
If you are printing a large data size image, the computer may run out of memory. Print the image at a lower
resolution or a smaller size.
Checking the printer status from the computer (Windows)
Click Print Queue on the printer driver's Maintenance tab, and then check the following.
Check if there are any paused print jobs.
Cancel printing if necessary.
Make sure the printer is not oine or pending.
If the printer is oine or pending, clear the oine or pending setting from the Printer menu.
Make sure the printer is selected as the default printer from the Printer menu (there should be a check mark on
the menu item).
If the printer is not selected as the default printer, set it as the default printer.
Checking the printer status from the computer (Mac OS)
e printer may not print when the user feature restriction is enabled. Contact your printer administrator.
Make sure the printer status is not Pause.
Select System Preferences from the menu > Printers & Scanners (or Print & Scan, Print & Fax), and then
double-click the printer. If the printer is paused, click Resume (or Resume Printer).
How to Use
Solving Problems
19
Related Information
&“Setting Up the Printer Driver -Windows” on page 11
How to Use
Solving Problems
20
  • Page 1 1
  • Page 2 2
  • Page 3 3
  • Page 4 4
  • Page 5 5
  • Page 6 6
  • Page 7 7
  • Page 8 8
  • Page 9 9
  • Page 10 10
  • Page 11 11
  • Page 12 12
  • Page 13 13
  • Page 14 14
  • Page 15 15
  • Page 16 16
  • Page 17 17
  • Page 18 18
  • Page 19 19
  • Page 20 20
  • Page 21 21

Epson AL-C9500DN User manual

Type
User manual

The Epson AL-C9500DN is a powerful and versatile color laser printer designed for high-volume printing needs. It offers fast print speeds of up to 50 ppm in both black and white and color, and a large paper capacity of up to 2,350 sheets, making it ideal for busy office environments. The AL-C9500DN also features advanced security features, such as PIN code authentication and user access control, to protect sensitive documents. Additionally, it supports mobile printing options, such as Apple AirPrint and Google Cloud Print, for easy printing from smartphones and tablets.

Ask a question and I''ll find the answer in the document

Finding information in a document is now easier with AI