Page is loading ...

PANEL INSTALLATION
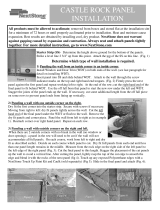
COUNTRY LEDGESTONE PANEL
Always seat and aach panels ghtly together
Metal Starter Strip - Determine at what height above grade
level you want the panel to sit on. Measure up 2 ¾" from this
point and strike a level line. Aach the top of the starter
strip on this line. End the strip 2" from each side of the
corner.
Determine which type of wall installaon is required.
Paneling the wall from an inside corner to an inside corner.
Cut the le end of the rst panel so that the panel will sit ush against the adjoining
wall. Aach to the wall through the screw indicator marks on the top and right end
tongues. Firmly press the next panel against the rst panel and repeat aachment
process across the wall. Cut the right end of the nal panel in the course ush to the
wall. Use the drop o from that panel to start the new row. Stagger the joints of the
panel ends up the wall. If necessary, cut some addional length from the drop o piece
to prevent panel ends from lining up vercally.
Paneling a wall with one outside corner on the right.
Dry t the rst corner into the starter strip. Secure with
screws if necessary. Moving from right to le: dry t panels
ghtly across the wall. Cut the le end of the nal panel to
be ush with the wall or trim piece. Remove the dry t
panels and corner piece. Panel the wall from le to right as
in example 1. Reaach corner over right panel. Connue
from corner to nish wall.
All products must be allowed to acclimate; removed from boxes and stored at at the
installaon site for a minimum of 48 hours or unl properly acclimated prior to
installaon. Heat and moisture cause expansion. Best results are obtained by installing
cool, dry product. NextStone does not warrant against gapping caused by expansion
and contracon.
Manufacturer does not warrant against gapping caused by
expansion and contracon.

COUNTRY LEDGESTONE PANEL INSTALLATION, Cont.
Paneling a wall with outside corners on the right and le.
Working from the le outside corner (OC), seat the 1st panel against the OC and down
against the starter strip, connue as described in secon 1. Cut the right OC so there is
a straight rock edge and aach. Measure
the last piece on the row and cut this panel
straight to t snugly against the OC. Caulk the
joint if necessary and use touch up paint.
Work the right corner from le to right as de-
scribed in secon 1. Work the le OC as de-
scribed in secon 2.
Opon 2: (More skill required) Working from the le outside corner (OC), seat the 1st
panel against the OC and down against the starter strip, connue as described in
secon 1. Place the right OC in place for measurement. Place a weather barrier cleat
such as black tar paper, Tyvek or the equivalent to the substrate behind the joint.
Measure the last piece on the row and cut this panel using the “T” design for the male
tongue. Use an exisng panel as a template. A carpenter knife and sabre saw is
necessary. Aach against the OC and secure both pieces. Caulk the joint if necessary
and use touch up paint. Work the right corner from le to right as described in secon
1. Work the le OC as described in secon 2.
Ledgestone panels have 4 unique panel conguraons with a number, 1 through 4,
molded into the back of the panel. Avoid racking the panels by placing like numbered
panels next to or on top of each other.
The illustraon below shows a random installaon using drops from the
previous course to start each new course. If there are no drops, randomly cut the
starng panel to length.
1
1 2 3 4 1
1 2 3 4
1 2 3 4 1 2
2 3 4 1 2
To validate warranty, product MUST be registered. Register this product at:
WWW.StoneSidingWarranty.com
/