Page is loading ...

JLP1800INS - REV 2 08/13/18 Page 1
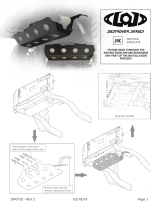
This shows the proper attachment for the license plate mount.
1. Install the mount bracket before installing the bumper. Leave bracket
loose when bumper is installed.
2. Install license plate weldment.
3. Install bolt lights (sold separately).
4. Position license plate bracket and weldment and tighten all screws.
WEB INSTALL LINK:
http://lodoffroad.com/assets/pdfs/JLP1800INS.pdf
LICENSE PLATE
RELOCATION
*PLEASE READ THROUGH THE
INSTRUCTIONS BEFORE BEGINNING
ANY PART OF THE INSTALLATION
PROCESS*
JL
Install rubber trim on
edges shown

JLP1800INS - REV 2 08/13/18 Page 2

JLP1800INS - REV 2 08/13/18 Page 3
JL Jeep
Destroyer Series
License Plate Relocation
SHIPPING SHEET
Packaged by:
________________________
On:
________________________
License
Plate
Weldment
(x1)
License
Plate
Weldment
Mount
Bracket
(x1)
Rubber Edge
Trim (31”)
Instruction
Booklet
BOLT KIT
(may vary)

JLP1800INS - REV 2 08/13/18 Page 4
Washer 1/4”
(x4)
Clip Nut
(x4)
Hex Bolt
1/4”-20 x 0.75”
(x2) BHSCS
1/4”-20 x 0.5”
(x6)
JL Jeep
Destroyer Series
License Plate Relocation
Bolt Kit
Packaged by:
________________________
On:
________________________
/


