Page is loading ...

3M™ DICHROIC Glass Finishes
DF-PA Chill & DF-PA Blaze
Doc Type Product # (opt.)
Revision D, April 2018
3M™ DICHROIC Glass Finishes
DF-PA Chill & DF-PA Blaze
Installation Guide
Revision D, April 2018
Product Description
3M DICHROIC Glass Finish DF-PA (the “Product”) offers a way to create unique, ever&
changing color to many interior building surfaces. Influenced by the color of the substrate,
this transparent Product provides a dichroic color effect, meaning it appears to change color
when viewed at various angles. The “Blaze” Product shift colors in the warm tones of cyan/
blue/magenta in transmission and red/gold color regions of the spectrum in reflection. The
“Chill” Product shift colors in the cool tones of blue/magenta/yellow in transmission and
gold/blue color regions of the spectrum in reflection. The Product has a clear, pressure&
sensitive adhesive that can be applied to glass. A hard-coated, protective surface layer helps
resist scratching during normal use. These decorative Products can be used in vertical
applications on the surface of interior glass, including the interior of an outside glass wall (the
“Interior Applications”).
Application Surfaces
The user is solely responsible for evaluating and determining whether these 3M Products are
suitable and appropriate for any particular use or manufacturing process in which they may
be used.
These application surfaces are based on test data deemed reliable but are not warranted.
• Glass
• Acrylic
• Polycarbonate
NOTE: Some plastic application surfaces can outgas. Outgassing is the release of a gas as
certain plastics or coated surfaces dry and cure. This occurs over a period of time,
but not indefinitely. Product that is applied to a surface that is still outgassing will
develop air bubbles in the Product that may appear some time after the installation.
3M assumes no liability for bubbles that appear in the applied Product due to outgassing.
Suggested Test for Outgassing of Plastic Application Surfaces
1. Apply a 5 in. x 5 in. (135mm x 135mm) piece of the Product to the plastic application
surface in question.
2. If possible, oven bake the sample for 2 hours at 150°F (65°C) or bake for 5 minutes at
350°F (176°C). If oven baking is not an option, allow the sample to sit at room tempera-
ture for 24 hours.
3. Examine the sample. Bubbles under the Product indicate that the plastic application sur-
face is outgassing. If no bubbles occur, the application surface is not outgassing.
4. To estimate how long outgassing may continue, repeat the test daily, using a new sam-
ple, until bubbles no longer appear under the Product.
5. If outgassing continues for a long period of time, consult the plastic manufacturer for
assistance.
High Humidity Conditions
Do not install DICHROIC Glass Finishes in locations in which the film may frequently come
into contact with water or where condensation often occurs.

2 3M™ DICHROIC Glass Finishes Installation Guide - Revision D,
April 2018
3M™ DICHROIC Glass Finishes
Installation Tools and Supplies
Surface and Work Area Preparation
Use the following steps to prepare the application surface for Product application. An experienced installer’s techniques may vary.
Prepare the Application Solution
Prepare a water and liquid detergent solution to use for applying the finish. It should have a concentration of approximately 0.1% to 0.2%
detergent. A solution of about 1 teaspoon of mild detergent to 1 gallon of water is sufficient for about 36 square yards of application surface.
Pour this solution into your sprayer.
• High detergent concentration causes the applicator and finish to slip, resulting in insufficient application pressure.
• Low detergent concentration causes the finish to stick or prevents the squeegee from traveling smoothly across the finish, which results
in an inconsistent application and leaves excess water behind.
Prepare the Installation Area
• Protect the areas surrounding the installation from the application solution over spray and drips, using masking tape and/or drop cloths
as appropriate.
• If possible, turn off or cover the heating or air conditioning units and ventilation ducts in the application area prior to starting the
installation.
• For the best bonding conditions, the recommended application temperature is 54°F & 100°F (12°C & 38°C) and the application surface
should be at room temperature or higher. In the lower end of this range, additional application pressure on the Product can encourage
better adhesive bonding. Attempting to install the Product at temperatures below the recommended range can cause the adhesive to
become so firm that it will not develop maximum contact with the application surface.
Check the Application Surface for Coatings
Many application surfaces have wax or other invisible coatings on them that interfere with adhesion. Use the following procedure to identify
and eliminate such coatings. Be sure your customer understands and agrees with this procedure.
• Place drops of water on several areas of the application surface. Water beads indicate that the glass or plastic has a coating that must be
removed for good Product adhesion.
• Saturate a lint-free paper towel with 70% isopropyl alcohol (IPA) and wipe clean the application surface. Wipe the application surface
clean before the IPA evaporates with a lint-free paper towel.
• Check again for water beading. If there is no beading, proceed with application surface preparation.
Clean the Application Surface
1. Place drop cloths and/or plastic sheeting to protect the application area below the application surface.
2. Spray the application solution on the application surface.
3. Scrape glass to remove dirt and other contaminants on the surface of the glass.
NOTE: Do not scrape plastic surfaces as this will cause scratches that may show through the Product.
4. Thoroughly rinse the application surface using the sprayer, then squeegee the entire application surface, wiping the squeegee after
each stroke.
5. Dry the application surface edge and frame thoroughly.
6. Apply the Product per the installation procedure immediately after cleaning the application surface. Any dirt or contaminates which
settle on the application surface after cleaning will inhibit adhesion and may be visible after application.
• Rubber application squeegee, 4 in., rubber hardness 80, 6mm
or greater thickness, nick free
• 3M™ Hand Applicator PA-1 (Blue or Gold) with 3M™ 5491
PTFE tape applied to the edges of the hand applicator
• 4 in. Window scraper with stainless steel replacement blades
• 8 in. Window cleaning squeegee with replacement rubbers
• Razor blade knife with stainless steel replacement break-away
blades
• Ruler with nick-free edges
• Scotch™ Masking Tape
• Clean, lint-free paper towels
• Drop cloths (absorbent) or plastic sheeting
• Spray bottle (garden style 1 - 2 gallon, low pressure
sprayer works well)
• Water
• Mild, non-lotion containing liquid detergent; no soaps,
waxes, oils, or enzymes
• Isopropyl alcohol (70% or industrial strength)

3M™ DICHROIC Glass Finishes Installation Guide - Revision D, April 2018 3
3M™ DICHROIC Glass Finishes
Installation Procedure
NOTE: Bring the Product to room temperature before installation.
NOTE: Product appearance has an inherent variation in color uniformity as it shifts from one color to the next, including slight color variations
across the roll. Product from the same lot of material should be used for each installation location. See additional note under “Check
the Application Surface for Coatings” on page 2.
Measure and Cut the Panels
NOTE: Product appearance has an inherent variation in color uniformity as it shifts from one color to the next, including slight color variations
across the roll. Product from the same lot of material should be used for each installation location.
• If panels are installed adjacent to each other, ensure that the panels are from the same lot. Different lots of the Product can have
slight color variations that will be noticeable at seams.
• If film panels are installed adjacent to each other, the panels should be alternated up and down in order to accommodate slight
color variations.
• Panels should not be installed at right angles to each other due to the slight directional nature of the film.
Product panels may be cut to size by hand or electronically cut. If cut by hand, any nicks or burrs on the edge of the ruler used to mark and
cut the finish could scratch it. Apply masking tape to the side of the ruler that contacts the finish to help prevent damage. Use a very sharp
cutting blade to ensure clean, smooth edges.
This Product may be cut using electronic cutting equipment, but the user must test and approve with their equipment to determine
suitability. The user must identify a suitable prespacing tape that adheres properly to the face of the Product to hold cut shapes in place.
1. Use clean, sharp blades that are set to the proper depth to avoid cutting the liner.
2. Apply a prespacing tape to hold the cut pieces together during installation.
3. Roll the Product onto a 6 in. (15 cm) core, liner side in, or lay flat until ready to use.
4. Always apply the product as soon after cutting as possible.
5. Weeding - the excess Product should be weeded (removed) as soon as practical. This is to minimize the possible effect of adhesive
flow 24 or more hours after cutting.
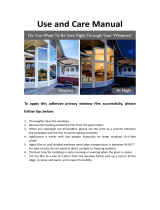
Remove the Liner and Wet the Adhesive
1. Generously spray the application surface with the application solution.
2. Lay the FRONT SIDE of the Product against the application surface so
the liner is facing you.
3. Peel back a few inches of the liner. Be sure you pull the liner away from
the Product, not the Product from the liner, to avoid stretching the
Product.
4. Generously spray the exposed adhesive with the application solution.
5. Continue peeling back the liner and spraying the adhesive with the application solution until the liner is completely removed.
NOTE: If the Product panel is large, you may need assistance for the next steps.
6. Flip the Product and position it on the wetted application surface so the adhesive contacts the application surface.
Liner
Figure 1. Peel back some liner and spray the adhesive.

4 3M™ DICHROIC Glass Finishes Installation Guide - Revision D,
April 2018
3M™ DICHROIC Glass Finishes
Installation Procedure (continued)
Apply Product
1. Recheck the alignment, spray the surface of the Product with application solution to reduce friction.
2. Apply the Product using a hand applicator.
3. Starting at the top in the center of the finish, use firm and consistent pressure, making overlapping strokes from center to edges with
the applicator. The goal is to push the water out to the edges so the adhesive makes good contact with the application surface.
4. For the rest of the panel, move the applicator down to overlap the previous strokes by about 50%, and stroke from center to edge,
center to edge again, until the panel is fully applied.
5. Wipe the edges of the Product with a clean, lint-free towel to remove any drips.
Cleaning and Maintenance
After the application is complete, some application solution may remain between the glass and the finish. This causes small water bubbles
or clouding that disappears as the water evaporates. This can take up to several days, depending on environmental conditions.
• Do NOT touch the finish during this time.
• Protect the finish from abuse.
NOTE: The Product may be cleaned beginning 30 days after installation.
Cleaning Applied Product
Regular cleaning will help maintain the Product's appearance. Use only clean, nick&free tools and wipe gently only in one direction. Do not
use ammonia, chlorine, or organic&based cleaning products, polishing or cleaning compound, sponges, brushes or electric polishing
equipment:
• If there is dust and grit, wipe it off with a soft, damp cloth.
• If it is soiled, but not gritty, use water and squeegee.
• If there is heavier soil, use a mild liquid detergent and water solution, then clear water, and wipe gently with a cloth wipe.
NOTE: Additional caution is recommended when cleaning spliced areas. Always clean in the direction of the splice.
Removal
The Product can be removed with low heat or the use of 3M Adhesive Remover Citrus Base and a scraper.
Transportation and Storage
• 40° to 90°F (4° to 32°C)
• Away from direct sunlight
• Clean dry area
• Original container

© 3M 2018. All rights reserved.
3M, Comply and DI-NOC are trademarks of 3M. Used under license in Canada.
All other trademarks are property of their respective owners.
Revision D, April 2018 Please recycle.
3M™ DICHROIC Glass Finishes
Commercial Solutions
3M Center, Building 220-12E-04
St. Paul, MN 55144
1-888-650-3497
3M.com/AMD
Health and Safety
CAUTION
!
When handling any chemical products, read the manufacturers' container labels and the Safety Data Sheets (SDS) for important
health, safety and environmental information. To obtain SDS sheets for 3M products go to 3M.com/SDS, or by mail or in case of an
emergency, call 1-800-364-3577 or 1-651-737-6501.
When using any equipment, always follow the manufacturers' instructions for safe operation.
WARNING
!
To reduce the risks of personal injury and/or property damage associated with glass breakage:
A glass surface covered by a film with areas of high opacity or dark-colored ink will absorb more heat than other glass surfaces
when exposed to sunlight. Heat absorption can create thermal expansion that could result in glass breakage or cracking. Do not use
a film with areas of high opacity or dark-colored ink on glass surfaces with significant exposure to sunlight.
Technical Information
Technical information and data, recommendations, and other statements provided by 3M are based on information, tests, or experience
which 3M believes to be reliable, but the accuracy or completeness of such information is not guaranteed. Such technical information and
data are intended for persons with knowledge and technical skills sufficient to assess and apply their own informed judgment to the
information. The typical values shown should not be used for the purpose of specification limits. If you have questions about this Product,
contact the Technical Service helpline at 1&888&650&3497.
Warranty
Please refer to the applicable Product’s technical data sheet for warranty information.
/