Page is loading ...

3M™ DI-NOC™ Architectural Finishes
PWF-500
Doc Type Product # (opt.)
Revision I, December 2019
3M™ DI-NOC™ Architectural Finishes
Installation Guide
Revision I, December 2019
Introduction
The purpose of this installation guide is to establish 3M-recommended procedures for installing the following “Product(s)”:
•3M™ DINOC™ Architectural Finishes
•3M™ DINOC™ Architectural Finishes MT Series (Matte)
•3M™ DINOC™ Architectural Finishes EX Series (Exterior)
•3M™ DINOC™ Architectural Finishes E-Series
•3M™ DINOC™ Whiteboard Film WH-111
•3M™ DINOC™ Projection Screen Whiteboard Film PWF-500
IMPORTANT NOTE
i
Please refer to the individual technical data sheets for additional information.
Contents
Application Surfaces
The Products can be applied to many types of application surfaces. See “Adhesion Compatibility with Application Surfaces” on page 3.
Glossary of Terms
Application Surface: The actual surface to which a Product is applied. This may be a bare application surface or a finish on an application
surface, such as paint, varnish, or laminate.
Porosity: The amount of void compared to solid material in an application surface. Product may appear to adhere well initially to some
porous application surfaces, but adhesion decreases significantly over time. Apply an appropriate product to seal porous surfaces.
Sealer: A coating applied to an application surface to seal a porous surface.
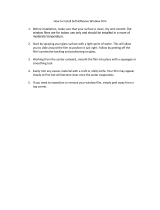
Below are some terms that describe the surface’s tactile feel, which has a significant effect on Product choice, ease of application, and
adhesion. A very smooth application surface will have the best Product adhesion and coverage. For rough application surfaces, consider
using a Product with more visual design and/or embossed texture.
• Very smooth: No surface variation, such as glass. Allows for the easiest Product application.
• Fairly smooth: Little surface texture, such as painted wallboard. Allows for easy Product application and good adhesion, but texture may
show through some Products. A Level 5 Gypsum Board Finish (ASTM C840) is an example of a “fairly smooth” surface.
• Rough: Has obvious visual and tactile surface variations, such as
concrete block, brick, textured wallpaper, etc. Product may not
adhere well due to the adhesive not having full contact with the
surface. In addition, the surface’s texture will show through
almost all Products. See “
Adhesion” on page 2 and “Surface and
Work Area Preparation” on page 9 for instructions on rough
application surfaces.
Non-compatible Application Surfaces
• Brass, Copper and other corrosion-susceptible metals
• Non-sealed Concrete and Stone
• Non-sealed Drywall, including skim-coat
• Other porous substrates
Product Description.................................................... 1
Application Surfaces.................................................. 1
Installation Tools and Supplies.................................2
Adhesion.......................................................................2
3M Adhesion Test.......................................................5
3M™ Enhanced Adhesion Cleaning Method........ 8
Surface and Work Area Preparation.......................9
Installation..................................................................10
Cleaning and Maintenance......................................14
Removal......................................................................14
Health and Safety......................................................15
Technical Information...............................................15
Warranty.....................................................................15
Troubleshooting........................................................16
Worksheet for Walls.................................................17
3M Measured Reference Guide for Adhesion.....18
Figure 1. Examples of Film Contact on Smooth Surfaces

2 3M™ DI-NOC™ Architectural Finishes Installation Guide - Revision I, December 2019
3M™ DI-NOC™ Architectural Finishes
Installation Tools and Supplies
Adhesion
Initial and Final Adhesion
An adhesivebacked Product will have both initial and final adhesion. Adhesion will vary depending on the surface type and texture,
installation conditions and techniques, and Product exposure conditions, any of which can prevent a Product from achieving a full bond to
the application surface.
• Initial Adhesion is the bond needed to hold the Product in place during installation. 800 grams of adhesion is recommended when tested
using a spring scale per the 3M Adhesion Test section. A good initial adhesion requires that a substantial portion of the adhesive be in
contact with the application surface.
• Final Adhesion, or maximum bond, is achieved in 24 to 48 hours after Product application. A good final adhesion requires all of the
following: a suitable application surface with an optimal surface, correct Product installation techniques, and Product exposure conditions
within those stated for the Product.
Adhesion Considerations
• An adhesion promoter may aid in Product adhesion. See Adhesion Promoters in the following section.
• If Product is stretched during application, it may shrink later, which decreases adhesion. Using an adhesion promoter may minimize
shrinkage.
Adhesion Promoters
Using an adhesion promoter can significantly increase a Product's adhesion. However, before using an adhesion promoter, consider these
points: the Product will be more difficult to reposition on the surface due to enhanced adhesion; and Product removal will be more difficult
and may cause additional application surface damage, if attempted.
Using Adhesion Promoter
• Adhesion promoter is recommended at Product overlaps, ends, corners or edges, or around fixtures. It should also be used wherever the
Product is stretched.
• Adhesion Promoters are often not needed on flat or high energy application surfaces, such as metal or glass.
• Allow adhesion promoters to dry per manufacturer’s instructions.
- Allow the water-based adhesion promoter to dry at least 1 hour before Product installation.
- Allow the solvent-based adhesion promoter to dry at least 5 - 15 minutes before Product installation.
• 3M™ Hand Applicator PA-1 (Blue or Gold) (optionally apply
3M™ PTFE Skived Film Tape 5480 or the loop side of 3M™
Hook and Loop Tape to reduce surface friction during
application)
• Razor blade knife with stainless steel replacement break-away
blades
• An appropriate container for holding discarded cutting blades or
tools
• Liner cutting tool (i.e. Seam Buster tool)
• Steel ruler with nick-free edges
• Scotch™ Masking Tape
• 3M™ Air Release Tool 391X
• Measuring tape
• Adhesion promoter and brush
• Industrial heat gun capable of attaining and
sustaining 100°F–300°F (38°C–149°C) or
equivalent
• Clean, lint-free cloths
• 70/30 IPA cleaning solution (70% isopropyl
alcohol, 30% water)
• 3M™ Scotch-Brite™ Hand Pad
• Sand paper
• Soft-bristle brush
Installation Tools and Supplies
Adhesion

3M™ DI-NOC™ Architectural Finishes Installation Guide - Revision I, December 2019 3
3M™ DI-NOC™ Architectural Finishes
Adhesion Promoter Properties
The following table contains general properties of adhesion promoters and general application surface types where useful.
Adhesion Compatibility with Application Surfaces
The chemistry of paints has been changing over the years to drive down the level of Volatile Organic Compounds, VOCs, due to both
sustainability efforts and regulatory requirements. These new paint formulations have changed how the painted surface interacts with the
adhesive on the Product, affecting its ability to adhere to the paint.
Because the paint formulations are protected by trade secrets, it is difficult for any manufacturer to understand how adhesives interact with
these paints. In fact, the Product may perform well on one paint and poorly on another paint. However, by using the new 3M™ Enhanced
Adhesion Cleaning Method and testing the adhesion to the walls using the 3M Adhesion Test, you can quickly, easily and successfully
adhere almost any Product to nearly any paint or surface finish.
The following table contains peel adhesion information for the Product peeled from various surfaces. A number of surfaces have acceptable
adhesion without the use of adhesion promoter. Examples of increased adhesion with adhesion promoters on certain surfaces is presented.
Surfaces vary widely, so adhesion should be assessed for each customer application surface. Some surfaces are porous and must be sealed
before application of film to prevent outgassing of the surface over time.
Adhesion Promoter
Properties
3M™ WP-2000
(Water-based)
3M™ Tape Primer 94
(Solvent-based)
Type Synthetic rubber Acrylic
Container size 3.75 liter can Multiple sizes
Usage
Optional dilution with maximum 4
parts water
Do not dilute
Coverage
135 - 270 sq. ft./gal. (12.5 - 25.1 sq.
meters/liter)
600 sq. ft./gal. (14.7 sq. meters/liter)
Color Blue Clear light yellow - clear dark orange
Solids 48% 6%
Viscosity 2400 cps (mPa-s) 1-10 cps (mPa-s)
Compatible
application surfaces
•MDF (w/sealer)
• Gypsum board (w/ sealer)
•Previously applied 3M™ DI-NOC™
Finishes
• Metals
• Plastics
•MDF (w/sealer)
• Gypsum board (w/ sealer)
• Previously applied 3M DI-NOC
Finishes
• Metals
• Plastics
Adhesion

4 3M™ DI-NOC™ Architectural Finishes Installation Guide - Revision I, December 2019
3M™ DI-NOC™ Architectural Finishes
3M™ DI-NOC™ Adhesion Compatibility with Application Surfaces
Test specimens were applied to the application surface and conditioned at 68°F (20°C) for 48 hours, then peel tested at a 180 degree angle at a tensile speed of 12 inches
(300mm) per minute.
WP-2000 undiluted for testing
Acceptable adhesion
Fails in adhesion
1 Bubbles may appear under film due to outgassing if plastic application surface is not fully cured before application.
2 If Product is wrapped and overlapped around edges, use of an adhesion promoter is highly recommended due to additional stress from wrapping the Product.
3 Sealer was wiped with Isopropyl alcohol to improve adhesion. Adhesion was tested after 15 minutes using a spring scale per the 3M Adhesion Test and passed at
800-1000 g/in.
Application Surface
Adhesion Promoter
NO ADHESION
PROMOTER
lb./in. (N/25mm)
3M™ WP-2000
(water-based)
lb./in. (N/25mm)
3M™ Tape Primer 94
(solvent-based)
lb./in. (N/25mm)
Wood
MDF (w/ sealer) 2 (8)
3
11 (51) 4 (18)
Painted MDF 4 (20) 12 (52) 7 (31)
Boards
Gypsum Board (w/skim
coat & sealer)
2 (8)
3
8 (35) 4 (19)
Metals
Aluminum 11 (47) 11 (48) 11 (47)
Anodized Aluminum 5 (23) 13 (56) 11 (49)
Stainless Steel 6 (26) 13 (56) 6 (28)
Glass Glass 6 (26) 13 (58) 6 (26)
Plastics
1
ABS 6 (28) 13 (56) 10 (44)
Acrylic 5 (22) 12 (54) 10 (43)
Polyester (PETG) 7 (29) 11 (51) 10 (45)
Polypropylene 1 (2) 4 (17) 4 (20)
Polyethylene 1 (3) 5 (21) 1 (3)
Polycarbonate 6 (28) 12 (53) 10 (44)
3M™ DI-NOC™ Film 5 (24)
2
11 (49) 9 (42)
Adhesion

3M™ DI-NOC™ Architectural Finishes Installation Guide - Revision I, December 2019 5
3M™ DI-NOC™ Architectural Finishes
3M Adhesion Test
This test is designed to show initial adhesion capability of the Product you plan to use when the wall is cleaned according to 3M's
recommendations and the it is applied to a smooth indoor wall surface.
Product applied to contaminated walls, or walls that exhibit visible signs of peeling, lifting, bubbling, or dampness are likely to fail. The results
of the 3M Adhesion Tests will help determine if the wall is prepped accurately for 3M™ DI-NOC™ installation.
Paint that has not fully cured may continue to outgas. Product that is applied over paint that has not fully cured may develop air bubbles over
time.
NOTE: Testing adhesion on smooth walls takes less than 30 minutes.
Before Doing the Test
1. Review and use the “Worksheet for Walls” on page 17.
2. Understand the types of wall surfaces and the variables that influence adhesion. For example, the paint or wall finish used on different
walls may look the same but have different paint chemistry or cure times that affect adhesion.
3. Test adhesion on each wall that will receive the Product.
4. For each Product being considered, test THREE samples of the same Product on the same wall and compare the results.
5. 3M is not responsible for the results of the Product installation.
Test Considerations
• Perform the adhesion tests in an inconspicuous area of the same wall on which you will be applying the actual job.
• If you will be applying the Product to more than one wall, perform the tests on each wall. While one wall may look the same as another
in color and gloss, they may have been painted at different times and with different paint, which can affect the adhesion test results.
Performing the test on a different wall/paint than will be used in the job will not give you the adhesion values and information you need
to make a good evaluation.
Limitations of Test and Cleaning Method
This test cannot detect problems with pre-existing variations in the wall or poor paint-to-wall bond. Such problems may result in poor
adhesion as well as wall damage upon attempted removal of the Product.
Adhesion Test Tools and Supplies
• Spring scale
- 0-1000 grams, part number 8003-MN
- 0-2000 grams, part number 8004-MA
• Isopropyl alcohol
• Lint free clothes
• 3M™ Rivet Brush RBA-1
• Copy or cut out the “3M Measured Reference Guide for Adhesion” on page 18. This will be used during the test to help you gage how
fast to pull the Product strip.
•Hole punch
• Strips of each Product you plan to test
Adhesion Test

6 3M™ DI-NOC™ Architectural Finishes Installation Guide - Revision I, December 2019
3M™ DI-NOC™ Architectural Finishes
Prepare the Product Test Strips
1. Cut three, 1 inch by 10 inch (2.5 cm x 25 cm) strips of each Product you plan to
test on a given wall.
2. Note the Product name or number on each test strip and on the Worksheet for
Walls.
3. Remove about 2 inches (5 cm) of liner and fold over the Product, adhesive to
adhesive, to make a tab.
4. Punch a hole in the tab.
Adhesion Test Procedure
1. Clean the area of the wall you will be testing using the 3M™ Enhanced Adhesion
Cleaning Method.
2. Use your thumb to initially adhere the Product strip (punched hole at the top) to
the cleaned wall.
IMPORTANT NOTE
i
Test THREE strips of each Product being evaluated on the same wall. After
all three strips are tested, compare the results.
3. Working in the long direction of the test strip and using the RBA-1 rivet brush,
use firm pressure and a circular motion to go over each strip three times to firmly
adhere it to the wall. See Figure 3, “Adhering Product strips,” on page 6.
4. Tape the Measured Reference Guide next to the Product strip you are testing.
See Figure 5, “Adhesion test,” on page 7.
5. Wait a full 15 minutes before proceeding with the test to allow some adhesion to
build.
6. Make sure the scale is zeroed out per the scale manufacturer's recommenda-
tions. See Figure 4, “Zeroing the scale,” on page 6.
7. After 15 minutes, slide the scale's S hook through the punched hole in the Prod-
uct strip.
8. Hold the scale in your palm, keeping it as straight as possible but without any
portion of the scale or your hand contacting the wall during the test.
Figure 2. Preparing the test strips
Figure 3. Adhering Product strips
Figure 4. Zeroing the scale
Adhesion Test

3M™ DI-NOC™ Architectural Finishes Installation Guide - Revision I, December 2019 7
3M™ DI-NOC™ Architectural Finishes
Adhesion Test Procedure (continued)
9. Pull the scale downward at a steady rate of about 1 inch (2.5 cm) in 5 seconds,
using the Measured Reference Guide lines as a guide. Once you have started
pulling, DO NOT STOP until the Product strip is fully released from the wall.
IMPORTANT NOTE
i
The Measured Reference Guide in Figure 5 is included at the end of this
guide.
10. As you pull down on the scale:
a. Observe the release characteristics of the Product and compare to “DI-NOC
Adhesion Test Recommendations” on page 7.
b. Note and record the value in grams/inch that register on the scale using the
“Worksheet for Walls” on page 17.
11. Repeat steps 2 to 10 for each of the same test strips. Record each of the three
test values and average them together.
Test Evaluation - Smooth Walls Only
1. Averaging test results
If two or three out of three strips of the same Product perform the same way,
use those characteristics to judge the suitability of that particular Product for that wall.
2. Use the “DI-NOC Adhesion Test Recommendations” on page 7 table below to interpret scale values.
NOTE: 454 grams equal 1 pound.
DI-NOC Adhesion Test Recommendations
• Unsatisfactory test results
a. Test strip removes unevenly.
• Inconsistent or low adhesion value; due to high and low spots in the surface texture, the adhesive does not make full contact.
• Cold wall and air temperature, which doesn't allow adhesive to flow or make full contact.
b. Test strip pulls paint off wall.
If any paint is pulled off with the test strip, the paint is not sufficiently bonded to the wall and the Product should not be applied until the
problem is corrected, a new paint is fully cured, and the “3M Adhesion Test” on page 5 is performed again with satisfactory results.
Scale Value Adhesion Characteristics Recommendation
Less than 800 grams/inch Removes very easily; little or no resistance
Unacceptable adhesion; additional cleaning may
be necessary
800-1000 grams/inch
Smooth, consistent release; no jerkiness
but more difficult to release
Acceptable adhesion; may be removable with
heat/chemicals; removal may cause wall damage
Greater than 1000 grams/inch
Smooth consistent release; no jerkiness,
but substantial resistance to releasing
Excellent adhesion; removal will cause damage
Figure 5. Adhesion test
Adhesion Test

8 3M™ DI-NOC™ Architectural Finishes Installation Guide - Revision I, December 2019
3M™ DI-NOC™ Architectural Finishes
3M™ Enhanced Adhesion Cleaning Method
Using the 3M™ Enhanced Adhesion Cleaning Method ensures that the application
surface is ready to receive and hold the Product. The installer must evaluate each
application surface to determine cleaning requirements prior to Product installation.
WARNING
!
For your safety, always wear protective eye wear and disposable gloves when
cleaning application surfaces.
1. Ensure that any needed repairs to the application surface are completed prior to
performing the 3M Enhanced Adhesion Cleaning Method.
2. Clean stubborn grease and grime using an appropriate, commercially available
cleaning product.
3. Prepare a cleaning solution with 70/30 IPA cleaning solution in a spray bottle.
4. Soak a clean, lint-free cloth with the IPA cleaning solution until it is dripping wet. See
Figure 6.
5. Clean the entire application surface with overlapping strokes. You may notice some migrated paint particles on the cloth. See Figure 7.
IMPORTANT NOTE
i
Change cleaning cloths often to avoid redepositing contaminants on another
part of the application surface. Soak each new cloth with the IPA cleaning
solution.
6. Thoroughly soak another clean, lint-free cloth with the IPA cleaning solution and
wash the application surface again.
7. The alcohol in the cleaning solution will lower the surface temperature of the appli-
cation surface as much as 10 degrees F - a noticeable difference. When the alcohol
has completely flashed off, which takes about 10 minutes, the application surface
will return to its normal temperature. You can use an IR gun (see Figure 8) to accu-
rately measure the temperature before cleaning and immediately after cleaning, or
simply touch the back of your hand to the cleaned area. When it no longer feels cool,
it is dry and you can proceed with the adhesion test, or if you are ready, with the
Product installation.
Estimated Time for Cleaning
About 30 minutes is required to clean a 125 sq. ft. (11.6 square meters) area, which is
approximately an 8 ft. x 16 ft. (2.4 m x 4.9 m) wall. Keep this in mind as you estimate
your next job.
Figure 6. Soaking a lint free cloth
Figure 7. Removing paint particles
Figure 8. Testing wall temperature
Before Cleaning Immediately After Cleaning
3M Enhanced Adhesion Cleaning Method

3M™ DI-NOC™ Architectural Finishes Installation Guide - Revision I, December 2019 9
3M™ DI-NOC™ Architectural Finishes
Surface and Work Area Preparation
Use the following steps to prepare the application surface for Product application. An experienced installer’s techniques may vary.
Inspect Application Surfaces
Before installation, contact the property manager or the general contractor of the installation site to ensure that the application surface is
ready for installation.
CAUTION
!
Before covering application surfaces susceptible to swelling, such as wooden doors, wood-core doors, or gypsum board, ensure
that the environmental conditions, such as temperature and humidity, are stable. Wide changes in humidity or temperature can
affect the application surface, which may cause wrinkles or bubbles in the applied Product.
CAUTION
!
It is critical that the paint, sealer and/or primer coatings be allowed to fully cure for the entire time period stated by the
manufacturer.
Repair Damaged Application Surfaces
Repair any damage such as holes, loose wallboard joints, and any chipped or peeling material.
1. Fill any holes or gouges with Bondo
®
or non-water-based filler. Assure that any filler is fully cured before proceeding.
2. For exterior surfaces, use a soft bristle brush to remove all loose particles, dust, sand and gravel.
3. Smooth by sanding and reclean the application surface with IPA.
4. If the surface is porous, seal the application surface with a minimum 2 coats of a primer or sealer. Follow the manufacturer's recom-
mendations for surface preparation. Allow the sealer or primer to fully cure before Product installation.
Clean the Application Surface
Wipe down the application surface with a lint-free cloth and 70/30 IPA cleaning solution, or use the “3M™ Enhanced Adhesion Cleaning
Method” on page 8 if needed.
For 3M™ DI-NOC™ EX Series Application Surfaces:
3M™ DI-NOC™ EX Series for exteriors can be applied to the following vertical application surfaces:
• Aluminum
- Anodized Aluminum
- Colored Aluminum
- Painted Aluminum
- Aluminum Composite Panel
• Galvanized Steel
• Painted steel
Textured Exterior Surfaces
Some exterior surfaces are highly dimensional and the adhesive may not have enough contact area to adhere properly to the surface.
Contact your local 3M Commercial Solutions Technical Service person if you have a question about the suitability of any surface.
Exterior Application Surface Conditions
Exterior application surfaces must not be loose, crumbling, contaminated, wet or damp.
The Product can be applied at temperatures as low as 54°F (12°C) on days when the temperature is expected to rise to at least 70°F (21°C).
Heat helps the adhesive bond to the application surface; therefore, the warmer the temperature, the better the bond.
NOTE: Do not apply the Product late in the day when the surface temperature is likely to drop.
Surface and Work Area Preparation

10 3M™ DI-NOC™ Architectural Finishes Installation Guide - Revision I, December 2019
3M™ DI-NOC™ Architectural Finishes
Installation
Recommended application temperature: 54 ºF 100 ºF (12 ºC 38 ºC)
These are the general Product application steps. An experienced installer’s techniques may vary.
1. Measure the application surface to be covered.
2. Cut the Product to size with a minimum 1/2 in. extra on all sides for trimming.
3. Put a set line in the liner 6 - 8 inches from the top.
4. Align the Product with the application surface and set the set line.
5. Pull out the liner approximately 8 inches.
6. Starting in the center, use the squeegee to adhere the Product to the application surface using overlapping strokes. Repeat steps 5 and
6 until the panel is completely applied.
7. Re-squeegee entire panel for ultimate adhesion.
Create a Double Cut Seam
This technique is not recommended for 3dimensional or curved surfaces, for which a standard overlap seam is recommended.
NOTE: If the same Product will be used on each side of the double cut, be sure to use Product from the same roll or lot.
1. Ensure that Product design and/or “grain” of an embossed pattern always
runs in the same direction or the application may have obvious shifts in color,
gloss and/or design.
IMPORTANT NOTE
i
Do not use double cut seaming with Products that have a W designation
in the 3M™ DI-NOC™ Architectural Finishes Product Catalog.
2. On the Product side where the seam will be, leave 1 inch (2.5 cm) of Product
liner on the side of Panel A. See Figure 9, “Creating a double cut seam,” on
page 10.
3. Apply Panel A.
4. Apply Panel B overlapping Panel A by 1 inch (2.5 cm).
5. Remove the Panel B liner to adhere to panel A. The transition should be flat against application surface with no air pocket underneath.
6. Use a straight edge to cut through the overlap’s center.
7. Remove the excess Product and then the Product liner.
8. Starting in the center of the seam, use your fingernail or appropriate tool to bring the two edges of the seam together and tight to the
wall. There should be no overlap of the edges at this point. Complete a one inch section of the seam before going to the next step.
9. Starting in the middle of the one inch section, firmly squeegee the seam together with a rocking motion. Work the squeegee along the
seam, keeping it tight to the film.
For 3M™ DI-NOC™ WH-111 and PWF-500 Seams:
Seams in 3M DI-NOC Whiteboard Films WH-111 and PWF-500 can accumulate marker residue. If doing a double-cut seam, make all seams
as tight as possible. If doing an overlap seam, use Primer 94 adhesion promoter under the overlap, which should be 1/2-1”. Horizontal
application at eye level is preferred, so as to allow continuous writing and erasing along the length of the whiteboard area.
Figure 9. Creating a double cut seam
A
Panel
B
Cut through both layers of Product.
Overlap
Panel
Installation

3M™ DI-NOC™ Architectural Finishes Installation Guide - Revision I, December 2019 11
3M™ DI-NOC™ Architectural Finishes
Create an Overlap Seam
NOTE: Use Product from the same roll or lot on each side of the seam.
For 3M™ DI-NOC™ EX Series Seams:
DI-NOC EX Series for exteriors must have an overlap seam of at least 0.6 in. (15
mm). Overlap panels in the shortest direction, where possible. Apply the lower
panel first, then apply the upper panel after sanding and priming the edge of the
lower panel. This allows water to shed away from the seam. Multiple layers of
overlapped film can cause edge lifting problems in high winds. Make sure there
are no more than three layers of film at any overlapped seam intersection. See
Figure 11, “Stagger seams on overlapped panels,” on page 11.
Substrate
Masking tape
For overlap
(15 mm)
Abrade the
surface with
#180 sand
@1@5B<51>?ɢ
sanding residue
with 70/30
isopropyl alcohol
solution.
Overlap
(15 mm)
Primer
Abrade the surface
Figure 10. Creating an overlap seam
Figure 11. Stagger seams on overlapped panels
Installation

12 3M™ DI-NOC™ Architectural Finishes Installation Guide - Revision I, December 2019
3M™ DI-NOC™ Architectural Finishes
Trimming
After application, resqueegee all Product edges to help ensure good edge
adhesion before trimming. See Figure 12, “Re-squeegee to ensure good
adhesion,” on page 12.
Outside corners should be cut at a 45 degree angle. Inside corners should have an
overlap of 1/8 inch.
For 3M™ DI-NOC™ EX Series Trimming: Inside corners should have a double-
cut seam.
Compound Curved Surfaces
NOTE: 3M recommends testing and approving application to compound
curved surfaces.
Use Heat to Conform Product Around Three Dimensional Surfaces
You can improve many Products’ conformability by heating the surface of the
Product until it is pliable enough to form around a three dimensional surface.
CAUTION
!
Overheating can result in damage to Product. Practice this technique
on a test piece before attempting on finished Product.
1. Ensure that you have enough Product to wrap around the edges to the
surface’s bottom. Allow a minimum of 3 inches around the entire panel.
2. Apply adhesion promoter to the edges, starting about 1/2 inch from where the shape changes (see Reference X) and extending to the
back side of the surface for at least 1/2 inch (see Reference Y). Allow the adhesion promoter to dry to improve adhesion and minimize
shrinkage. See Figure 13, “Apply adhesion promoter between X and Y,” on page 12.
3. Apply the Product to the flat surface before conforming the corners and then
along the straight edges in this sequence: A, then B, C and D, then E and F,
etc. See Figure 14, “Apply the Product on the corner,” on page 12.
4. Neatly trim excess Product on the surface’s back side.
NOTE: Products identified in the 3M DI-NOC Architectural Finishes Product
Catalog with the symbol, and also noted in the 3M DI-NOC Tech-
nical Data Sheet, cannot be wrapped around three dimensional surfaces.
Please note that excessive stretching and heat may deform Product’s
design and texture.
For DI-NOC EX Series on Compound Curved Surfaces: Compound curved
surfaces are not recommended. Stretching the film can adversely affect Product
performance including outdoor durability.
For DI-NOC EX Series Edge Sealing:
The DI-NOC EX film edge should not be covered by sealing material except when absolutely necessary. Certain exterior applications of DI-
NOC EX may require a seam sealer by the installer. When necessary, the film edge should be covered 1 to 2 mm maximum by the sealer.
CAUTION
!
Application to exterior glass surfaces is not warranted due to the risk of glass breakage caused by thermal expansion.
IMPORTANT NOTE
i
Adhesion to exterior glass is not warranted, but caulking the entire edge of the installed film may help prevent water penetration.
Application to exterior glass is customer test-and-approve.
Inside corner
Outside corner
Around openings,
such as doorways
Figure 12. Re-squeegee to ensure good adhesion
X
Y
Figure 13. A
pply adhesion promoter between X and Y
D
F
E
C
B
A
Figure 14. Apply the Product on the corner
!
Installation

3M™ DI-NOC™ Architectural Finishes Installation Guide - Revision I, December 2019 13
3M™ DI-NOC™ Architectural Finishes
Additional Recommendations by Product Series
3M™ DI-NOC™ EX Series Exterior Architectural Finishes
1. Handle with care to prevent creases and tears. DI-NOC EX series tears and creases more easily than standard DI-NOC. In particular,
applying and removing the product and making cuts requires careful attention. The product may tear at a cut.
2. In low temperature environments, the product can whiten at creases, tears and folded corners. Apply at recommended exterior tem-
peratures.
3. DI-NOC EX series is more difficult to cut than standard DI-NOC. When cutting the product, be sure to cut through to the adhesive to
avoid unexpected tearing or rough edges.
4. Although the product is highly durable when used outdoors, the product performance life will be reduced when used on non-vertical
surfaces.
5. Aluminum is the preferred substrate for DI-NOC EX series for maximum performance life.
6. DI-NOC EX series is not as conformable as standard DI-NOC. Do not use on three-dimensional curved surfaces.
7. Avoid stretching the product during application due to low conformability. If the product is stretched it may be distorted. Accurately
determine the starting point for the application of the product so there will be no need for adjustments.
8. When overlapping the product at the joints, please sand the face of the bottom layer and apply 3M™ Primer 94 or 3M DP-900N3.
9. Pattern may appear random or not aligned at seams. Prior to application, confirm that appearance at seams is acceptable.
3M™ DI-NOC™ MT Series Matte Architectural Finishes
Please take note of the points below when applying 3M DI-NOC MT Series Architectural Finishes:
1. This product has a special matte surface texture that will have reduced scratch and stain resistance compared to other series. Avoid
applications in medium to high traffic areas.
2. Pressure such as squeezing during installation may leave marks resembling white indentations. Some indentations may recover with
time. Wiping with a damp microfiber cloth will shorten the recovery time. Use care when handling lightly patterned or deeply colored
products as these marks will be especially noticeable. Use care to avoid impacting the matte surface with hard objects, etc.
3. When using a squeegee on inside corners or butt joints, first wrap the squeegee in 3M™ Teflon Tape 5480. Handle with care to avoid
creases and tears, especially VM-MT Series. Applying and repositioning the product and making cuts requires careful handling.
4. This product is not recommended for application on 3D surfaces. Excessive heating may cause discoloration and/or damage of the
matte surface.
5. It is not possible to apply the product with overlap joint without additional preparation. When applying overlap joints, sand the surface
until it is smooth, then clean with 70/30 Isopropyl alcohol solution and apply 3M™ Tape Primer 94.
6. Creases may form on the surface when the film is excessively bent. Exercise care when handling during application.
7. Do not pierce the film to release air bubbles as it may result in conspicuous white marks.
8. Be aware when cutting, the cut edge may become noticeably white on deeply colored patterns.
9. If the product becomes white when wrapping around outside corners, warming with a heat gun will make this less noticeable. Please
note that excessive heating may cause discoloration and/or damage to the matte surface.
10. Be aware that VM-MT and PS-MT Series may have spots of uneven gloss indicated by a red label on the film. Please check the appear-
ance before application for acceptability.
NOTE:
For additional questions, refer to 3M Technical Service 1-800-328-3908.
Installation

14 3M™ DI-NOC™ Architectural Finishes Installation Guide - Revision I, December 2019
3M™ DI-NOC™ Architectural Finishes
Cleaning and Maintenance
Regular cleaning will help maintain the appearance of the finish. Use mild detergent and water, and a soft cloth or sponge without abrasives.
For difficult stains, spot clean with a diluted Isopropyl Alcohol solution and a soft cloth. Avoid using strong solvents or detergents that are
either highly alkaline (pH>11) or acidic (pH<3). Do not use ammonia, chlorine, or strong organicbased cleaning products, polishing or
cleaning compound, hard-bristle brushes or electric polishing equipment. Use only clean, nickfree tools and wipe gently.
For DI-NOC EX Series:
Power Washing Films
Power-washing, or pressure-washing, may be used. However, aggressive washing can damage the Product.
Excessive pressure during power-washing can damage the Product, by forcing water underneath the surface. Water lowers the adhesion
force of the Product to the substrate, allowing the graphic to list or curl. These problems are further worsened by high winds, which can
remove the Product from the substrate. Avoid pressure-washing perforated films applied without edge-sealing tape.
To avoid edge-lifting, or other damage to the Products, follow these important steps:
• Use a spry nozzle with a 40°-wide (minimum) spray pattern
• Ensure the spray nozzle includes a nozzle protector (or tip guard)
• Use a maximum pressure of 1200 psi (80 bar)
• If the system is heated, limit the water temperature to 140°F (60°C) or less
• Hold the nozzle at least 12 inches (30 cm) away from, and perpendicular to, the Product, or a minimum of 39 inches (1 m) away from the
Product at spray angles of 30° or greater.
• Do not direct the water stream between 0° and 60° from the Product surface.
Removal
Although Products may be removed, application techniques and adhesion promoters increase adhesion, so clean removal without
substantial damage is unlikely. The following removal techniques can be tried, but effort and results will vary:
1. Make Product cuts about 4 inches (10 cm) apart, assuring no damage to the application surface.
2. Optionally, use a heat gun set to 150° to 200°F (66° to 93°C) to soften Product adhesive.
3. Immediately pull the heated section of Product down at about a 180 degree angle.
4. Heat more Product and continue pulling.
Problem Solution
Dust and grit Wipe with a soft, damp cloth.
Soiled (but not gritty) Use water and a soft cloth
Heavily Soiled
Clean first using a solution of mild liquid detergent and
water, then use clear water. Wipe gently with a soft
cloth.
Difficult Stains
Spot clean with 70/30 IPA (70% Isopropyl Alcohol/
30% Water) cleaning solution
Type of Surface
Damage
Appearance of Surface Damage Method to Reduce Visibility
Mar
Dragging an item, such as a colored briefcase,
across the film and leaving a deposit of color on
the surface.
Rub with a soft cloth and warm soapy water to
remove the mar.
Indentation
Pressing into the film surface without breaking
the surface, such as pressure from a chair.
Carefully heat the indentation with a heat gun,
which allows the film surface to rebound and
reduce visibility.
Scratch
Breaking the surface layer of film leaving a
slightly jagged whitish mark on the surface, such
as by dragging a sharp rivet from a purse.
Rub with a surface restorer such as 3M™ Marine
Vinyl Cleaner & Restorer to reduce the visibility of
scratches.
Gouge
Breaking though the entire film, such as severe
impact from sharp chairs or carts.
Repair by cutting out the damaged film and replac-
ing that piece with the same pattern of film or
remove and replace an entire panel of film.
Cleaning and Maintenance
Removal

3M™ DI-NOC™ Architectural Finishes Installation Guide - Revision I, December 2019 15
3M™ DI-NOC™ Architectural Finishes
Health and Safety
CAUTION
!
When handling any chemical products, read the manufacturers' container labels and the Safety Data Sheets (SDS) for important
health, safety and environmental information. To obtain SDS sheets for 3M products go to 3M.com/SDS, or by mail or in case of an
emergency, call 1-800-364-3577 or 1-651-737-6501.
When using any equipment, always follow the manufacturers' instructions for safe operation.
WARNING
!
To reduce the risks of personal injury and/or property damage associated with glass breakage:
A glass surface covered by a film with areas of high opacity or dark-colored ink will absorb more heat than other glass surfaces
when exposed to sunlight. Heat absorption can create thermal expansion that could result in glass breakage or cracking. Do not use
a film with areas of high opacity or dark-colored ink on glass surfaces with significant exposure to sunlight.
Technical Information
Technical information and data, recommendations, and other statements provided by 3M are based on information, tests, or experience
which 3M believes to be reliable, but the accuracy or completeness of such information is not guaranteed. Such technical information and
data are intended for persons with knowledge and technical skills sufficient to assess and apply their own informed judgment to the
information. The typical values shown should not be used for the purpose of specification limits. If you have questions about this Product,
contact the Technical Service helpline at 18886503497.
Warranty
Please refer to the applicable product’s technical data sheet for warranty information.
Health and Safety
Technical Information

© 3M 2019. All rights reserved.
3M, DI-NOC, Scotch-Brite, and Bondo are trademarks of 3M. Used under license in Canada.
All other trademarks are property of their respective owners.
Revision I, December 2019 Please recycle.
3M™ DI-NOC™ Architectural Finishes
Commercial Solutions
3M Center, Building 220-12E-04
St. Paul, MN 55144
1-888-650-3497
3M.com/AMD
Troubleshooting
Every effort should be made to ensure that walls are in good condition before applying the Product. This generally reduces installation time
while improving appearance, and if applicable, removal characteristics.
• Review all troubleshooting options before deciding on a course of action.
• Every wall paint must be fully cured for the full amount of time recommended by the paint manufacturer.
• Follow the 3M Adhesion Test for every Product you intend to use and on each different wall included in the installation.
• Every installation wall must be cleaned with the 3M™ Enhanced Adhesion Cleaning Method before doing the 3M Adhesion Test and
before doing the full installation.
Problem What To Look For Recommended Solutions
Installation Problems - Smooth Walls
The Product does not
adhere well or falls off wall.
The Product was not tested on the
wall prior to installation.
Always perform the 3M Adhesion Test for each Product and on
each application surface before committing to the complete instal-
lation.
Low VOC paint was used on the wall.
Wall repairs were not properly sealed,
primed, painted or cured.
Walls were not washed with 70% iso-
propyl alcohol and 30% water.
Always follow the 3M™ Enhanced Adhesion Cleaning Method in
this guide to increase adhesion.
The texture of the application surface
is not well suited to the Product being
used.
If the wall texture is other than just smooth, contact the general con-
tractor.
• Some textured paint additives create too much texture for Prod-
ucts that are intended for smooth walls.
• A wall with too little texture may prevent proper air bleed during
installation, trapping air under the film. In this case, use the 3M™
Air Release Tool 391X to make a small hole in the film to allow the
air to escape. Re-squeegee as necessary.
Application Surface temperature too
low.
Refer to the “Installation” on page 10 for the proper installation tem-
perature range.
Post-Installation Problems - All Walls
Edges of the Product lifting
from application surface.
Poor installation technique, or wrong
tools.
Review this Bulletin and make sure you are using the right Product,
right tools, and right techniques for your walls. Lots of practice is
critical for consistent success.
Large portion of the Product
lifts or falls off.
Poor initial bond of paint to wall.
Perform the 3M Adhesion Test. Perform the 3M™ Enhanced Adhe-
sion Cleaning Method if the test results are less than 800 grams.
Wall not properly cleaned.
Follow the procedure “Surface and Work Area Preparation” on
page 9.
Under-cured paint.
Be sure the paint is properly applied and fully cured per the manu-
facturer’s specifications before applying the Product.
Troubleshooting

3M™ DI-NOC™ Architectural Finishes Installation Guide - Revision I, December 2019 17
3M™ DI-NOC™ Architectural Finishes
Worksheet for Walls
Make copies of this page as needed.
Installation Site Information Adhesion Test Results
Business Name Test Strip
Test Strip Product
Number
Adhesion Value
Address 3M™ DI-NOC™ sample 1
City/State/Zip 3M™ DI-NOC™ sample 2
Customer Information 3M™ DI-NOC™ sample 3
Contact Name
Business Name
Address
City/State/Zip
Area Code/Phone
Installation Site Information Adhesion Test Results
Business Name Test Strip
Test Strip Product
Number
Adhesion Value
Address 3M™ DI-NOC™ sample 1
City/State/Zip 3M™ DI-NOC™ sample 2
Customer Information 3M™ DI-NOC™ sample 3
Contact Name
Business Name
Address
City/State/Zip
Area Code/Phone
Worksheet for Walls

3M Measured Reference Guide for Adhesion
1.5
7 in.
6 in.
}
5 in.
4 in.
3 in.
2 in.
1 in.
8 in.
2.5
3.5
4.5
5.5
6.5
7.5
0.5
5 seconds
}
5 seconds
}
5 seconds
}
5 seconds
}
5 seconds
}
5 seconds
}
5 seconds
}
5 seconds
/