11
English
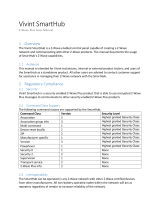
Using the TV's Controller
✎ The color and shape of the TV Controller may vary depending on the model.
✎ The TV's Controller, a small joy stick like button on the bottom right side of the TV, lets you control the TV without the
remote control.
mR
P
TV Controller
The control stick is located at the
lower-left corner on the back of the TV.
Turn off the TV.
Open Smart Hub.
Open the menu.
Select a source.
Remote control sensor
When you use the Remote control, the
standby LED does not respond, except
when you press the P button.
Power on Turn the TV on by pressing the Controller when the TV is in standby mode.
Adjusting the volume Adjust the volume by moving the Controller from side to side when the power is on.
Selecting a channel Select a channel by moving the Controller backwards and forwards when the power
is on.
Using the Function menu To view and use the Function menu, press and release the Controller when the
power is on. To close the Function menu, press and release the Controller again.
Selecting the MENU (
m
)
With the Function menu visible, select the MENU (m) by moving the Controller to
the left. The OSD (On Screen Display) Menu appears. Select an option by moving
the Controller to the right. Move the Controller to the right or left, or backwards and
forwards to make additional selections. To change a parameter, select the it, and
then press the Controller.
Selecting SMART HUB (™) With the Function menu visible, select SMART HUB (™) by moving the Controller
upwards. The SMART HUB main screen appears. Select an application by moving
the Controller, and then pressing the Controller.
Selecting a Source (s) With the Function menu visible, open the Source screen (s) by pushing the
Controller to the right. The Source screen appears. To select a source, move the
Controller back and forth. When the source you want is highlighted, press the
Controller.
Power Off (P) With the Function menu visible, select Power Off (P) by pulling the Controller
forwards, and then press the Controller.
✎ To close the Menu, SMART HUB, or Source, press the Controller for more than 1 second.
Standby mode
Your TV enters Standby mode when you turn it off, and continues to consume a small amount of electric power. To be safe
and to decrease power consumption, do not leave your TV in standby mode for long periods of time (when you are away on
vacation, for example). It is best to unplug the power cord.