Page is loading ...

MODEL 9100
AUTOMATED TELLER MACHINE
INSTALLATION MANUAL
TDN 07100-00007D 04/2007
COPYRIGHT NOTICE
© 2002 - 2007 Delaware Capital Formation, Inc. All Rights Reserved. Triton Systems of Delaware, Inc. is an
operating company of Dover Electronics, Inc., a subsidiary of Dover Corporation (NYSE-DOV). DOVER, the
DOVER logo and the family of marks and TRITON, the TRITON logo and the Triton family of marks are
registered trademarks of Delaware Capital Formation, Inc., a wholly owned subsidiary of Dover Corporation.
CORPORATE HEADQUARTERS:
522 E. Railroad Street
Long Beach, MS 39560
Phone: (228) 868-1317
Fax: (228) 868-0437
RMA (RETURN MATERIAL A UTHORIZATION)
RETURN A DDRESS:
21405 Avenue “B”
Long Beach, MS 39560

2
MODEL 9100 INSTALLATION MANUAL
This manual gives step-by-step procedures for completing the physical installation of a Model 9100 ATM.
This manual is divided into the following sections:
! ATM ENVIRONMENTAL / POWER PRECAUTIONS CHECKLIST. Describes the general environmental and
power requirements when installing the ATM. To help ensure proper operation of the ATM, ensure the
environmental criteria listed in this checklist are met.
! CABINET DIMENSIONS. Displays the dimensions for the cabinet(s), exterior control panel components,
and signage.
! INSTALLATION - STANDARD/CHEMICAL ANCHORS. Describes how to install the cabinet assembly using
standard (steel) or chemical anchor bolts.
Note: The anchor kits are NOT included with the unit. You must purchase these optional anchor
install kits.
! DISPENSING MECHANISM INSTALLATION. Describes how to install the TDM-100, SDD, and Minimech
dispensing mechanisms into the ATM security cabinet.
! POWER AND COMMUNICATION. Describes how to route the ATM to the facility power and communication
connections.
* NOTICE *
The Model 9100 ATM supports most models of TDM mechanisms (TDM-
100/150/200/250) including the Minimech and SDD. The TDM-100, SDD, and
Minimech are shipped separately and must be field installed. The rest of the
TDM family are shipped installed in the cabinet.
WHAT’S IN THIS INSTALLATION GUIDE
! APPENDIX A. Software License Agreement / Compliance/Emissions statements
! APPENDIX B. ATM Installation for Accessibility guidelines.

3
INSTALLATION PROCEDURES
Contents
ENVIRONMENTAL PRECAUTIONS ....................................................................................... 5
TEMPERATURE / POWER / RF INTERFERENCE REQUIREMENTS ........................................................................ 6
DIMENSIONS .................................................................................................................. 7
FRONT VIEW ............................................................................................................................................. 8
ANCHOR FOOTPRINT(S) .............................................................................................................................. 8
SHALLOW CABINET .................................................................................................................................... 9
SIDE / REAR VIEW ................................................................................................................................... 9
SIGNAGE ................................................................................................................................................. 9
DEEP CABINET .......................................................................................................................................... 10
SIDE / REAR VIEW ................................................................................................................................... 10
SIGNAGE ................................................................................................................................................. 10
CABINET INSTALLATION ................................................................................................... 11
UNPACK ATM .......................................................................................................................................... 12
MARK / DRILL MOUNTING HOLES .............................................................................................................. 14
INSTALL / BOLT STANDARD A NCHORS .......................................................................................................... 15
INSTALL / BOLT OPTIONAL CHEMICAL ANCHORS .......................................................................................... 16
DISPENSER INSTALLATION ............................................................................................... 19
TDM-100 INSTALLATION .................................................................................................................................. 20-22
SDD INSTALLATION ........................................................................................................................................... 23-25
MINIMECH ........................................................................................................................................................ 26-27
POWER AND COMMUNICATION ........................................................................................ 29
CABLE ROUTE / CONNECTIVITY ................................................................................................................... 30
APPENDIX A - SOFTWARE LICENSE A GREEMENT ............................................................. A-1
COMPLIANCE / EMISSION STATEMENTS
APPENDIX B - ATM INSTALLATION FOR ACCESSIBILITY GUIDELINES ............................. B-1

4
MODEL 9100 INSTALLATION MANUAL
THIS PAGE INTENTIONALLY LEFT BLANK

5
INSTALLATION PROCEDURES
ENVIRONMENTAL PRECAUTIONS

6
MODEL 9100 INSTALLATION MANUAL
When installing an ATM, some general environmental and power precau-
tions need to be considered. Evaluate the location where the ATM will be
installed. To help ensure proper operation of the ATM, ensure the environ-
mental criteria listed in this checklist are met.
TEMPERATURE/HUMIDITY
1. The ATM will operate over a range of tempera-
tures and humidity. Generally, these param-
eters must fall within the following ranges:
" Temperature
• 10°C to 40°C
• 50°F to 104°F
" Relative Humidity
• 20% to 80%
• (Non-Condensing)
AC POWER REQUIREMENTS
2. Ensure the following AC power requirements
are met:
! Power Consumption
• 2.0A @ 115 VAC at 60 Hz
• 1.0A @ 230 VAC at 50 Hz
Dedicated source. The ATM AC power feed will be a
dedicated line, to which no other electrical devices
are connected. The ATM power line will be wired for
a single “duplex”-style outlet and connected directly
to the AC service panel.
Isolated Ground. An equipment grounding conduc-
tor that is insulated from the conduit or raceway and
all other grounding points throughout its entire
length. The only points of electrical connection will
be at the duplex outlet and service panel ends of the
line.
DEDICATED TELEPHONE
3. Ensure the following telephone-line require-
ments are met:
Dedicated line. The telephone line servicing the ATM
will not be a “party” line or any other shared type
connection.
Proximity to Interference Sources. Thetelephone
line must not be in close proximity to “noisy” de-
vices that could induce interference into the ATM
communications channel. See the next section for
additional information on “interference sources.”
RF INTERFERENCE
4. Ensure there are no devices near the terminal
that may cause RF interference, such as:
" TVs
" Coolers
" Security devices
" Neon signs
" Devices with compressors
* IMPORTANT *
AC power for the terminal should come from a
dedicated source with an isolated ground.

7
INSTALLATION PROCEDURES
CABINET DIMENSIONS
Note
All dimensions listed comply with US Federal ADA Guidelines. For USA
installations, check for additional guidance. For non-USA installations,
check regulations relating to the country of install. Dimensions measured
in inches. Note: Measurements shown in brackets are in millimeters.

8
MODEL 9100 INSTALLATION MANUAL
PHYSICAL DIMENSIONS
Front View
Anchor “footprint”
(w/ TDM/Minimech dispensers)
Anchor “footprint”
(w/ SDD dispenser)

9
INSTALLATION PROCEDURES
CABINET FOR TDM / MINIMECH DISPENSERS
Side View
Rear View
Cabinet (w/signage)

10
MODEL 9100 INSTALLATION MANUAL
p
CABINET FOR SDD DISPENSERS
Side View
Rear View
Cabinet (w/signage)

11
INSTALLATION PROCEDURES
CABINET INSTALLATION

12
MODEL 9100 INSTALLATION MANUAL
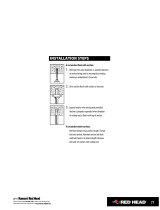
1. Carefully inspect the shipping container for any damage and report any damage immediately to the
shipping company. Refer to the warranty information in the User or Service manual (as applicable) for
information about reporting shipping damage.
2. Remove the ATM cabinet from the carton by cutting the straps and removing the top of the box.
3. Remove the packing material from inside of the box.
4. Remove the silver key from the white plastic bag attached to the ATM wrapping.
5. Stand the unit up and walk it out of the shipping carton.
6. Remove the wrapping from the ATM.
The following procedure applies to installing the cabinet assembly using either standard (P/N 06200-00066)
or chemical (06200-00060) anchor kits. The anchor kits are not supplied with the unit.
UNPACK ATM
deriuqeRslooT
,sdnuoptoof06tsaeltaotelbatsujda,hcnerweuqroT
hcnerwtehctarro,hcnerwtnecsercelbatsujda
stniopllirdgnikr
amrof)tnelaviuqero(hcnupretneC
remmaHtekcos)mm91("4/3revirdwercstalfegraL
levelelbbuBhcnerwxob/tekcos"61/7s
elggogytefaS
noitcetorpgniraeH
,)mm21("2/1,)mm6("4/1
-edibrac)mm51("61/9dna
ta-stibllirdyrnosamdeppit
gnol
"6tsael
cirtceleytud-yvaeh"4/3
)remmah/yrator(llird
tlebtroppuskcaBrenaelcmuucavelbatroPhsurberiW
tiKrohcnAdradnatS
srehsawtalf"2/1
epyt-eveels"4/1-4x"2/1
stlobrohcna
stun"2/1
tiKrohcnAlacimehC
dnastunxeH
srehsaw
seluspacrohcnalacimehC
tniop-lesihcdedaerhT
sdor
CABINET INSTALLATION

13
INSTALLATION PROCEDURES
7. Use the silver key to unlock both the control panel and the
fascia door (which conceals the locking mechanism) on the
front of the cabinet. Open the fascia door.
8. Lift the handle under the bill chute to open the front enclosure
door. If the door is locked, see the sidebar on this page for
help in unlocking the electronic or mechanical lock, if
applicable..
9. Remove the packing material from inside the vault enclosure.
Next, carefully remove the dispensing mechanism (TDM-
100/SDD, if applicable). Inspect the dispenser and report
any damage to Triton. Set the mechanism aside, if applicable.
This will be installed in later steps.
10. The accessory box is shipped inside the cabinet enclosure.
Open and inspect the contents. Check the contents against
the enclosed packing list and report any missing parts to
Triton.
UNLOCKING
COMBINATION LOCKS
Mechanical Lock. There are two
marks on the dial ring. The index mark
at the top of the dial is used for open-
ing the lock. A revolution is counted
each time the selected number is
aligned with the opening index.
Locks are shipped on a factory set-
ting of ‘50’. To unlock, turn the dial
to the left (counterclockwise) FOUR
(4) turns, stopping on ‘50’. Then turn
the dial to the right (clockwise) until
the bolt is retracted.
Electronic Lock. The combination of
the lock is preset to 1-2-3-4-5-6. To
unlock, enter the preset combination
and check for proper operation. After
each keypress, the lock will ‘beep’.
After the final digit has been entered,
the lock will beep twice, and the open
period begins. When a valid combi-
nation has been entered, the operator
will have approximately 3 seconds to
open the lock. To open the lock, turn
the outer ring of the dial clockwise.
After the lock is opened, the vault
door may be opened.
NOTE
The Model 9100 ATM is designed
for indoor use only!

14
MODEL 9100 INSTALLATION MANUAL
3. Standard anchors: Use a 1/2" (12 mm) diameter carbide-
tipped masonry bit to drill four holes at least 2-3/4" (70 mm)
deep into the floor. Be sure to take into account the depth of
any floor covering, such as tile or vinyl when gauging the
depth of the anchor holes. Make sure the holes are drilled at
least 2- 3/4" into the concrete floor.
2. Use a 1/4" (6 mm) diameter carbide-tipped masonry bit to drill
four pilot holes at the drilling points marked in the previous
step. Drill the pilot holes approximately 1/2" (12 mm) deep into
the floor. These holes will help guide the masonry bit that will
be used to drill the anchor-bolt holes in the next step.
CONCRETE STRENGTH
The floor at the installation loca-
tion should consist of commercial-
grade concrete measuring at least
2000 psi in compression strength.
The full effectiveness of the
mounting anchors depends upon
meeting this specification! Check
with the contractor/builder or
owner of the installation to verify
that this requirement can be sat-
isfied.
TOOL USE/SAFETY
Observe ALL safety precautions
for operating hand and power
tools! Wear eye and ear protection
while operating the electric drill!
Mark the location of the cabinet mounting holes on the concrete floor. This is accomplished as described
below:
1. Move the ATM to the location where it will be installed.
Open the cabinet door at least 90° to improve access. Locate
the four anchor-bolt holes (cutouts) in the bottom of the
cabinet. Use a felt-tip pen or other marker to carefully mark the
center of each of these four holes on the floor; these marks
will serve as guides for the anchor bolt holes that will be
drilled in the next step. Move the ATM aside to provide clear
access to the mounting hole marks. Center punch each mark
to help align the drill bit.
Mark/Drill
Mounting Holes
SELECTING THE INSTALLATION LOCATION
Choosing the right location for your ATM is very important. Security concerns
suggest a location that is away from any door or external access point. Ideally,
the terminal should be mounted as close to a back wall as possible. For market-
ing reasons, however, it may be desirable to locate the terminal near the front
where your customers can easily locate it. Wherever you decide to locate the
terminal, be sure to follow the recommended procedures for both mounting the
terminal and for removing cash when the unit will be unattended.

15
INSTALLATION PROCEDURES
Drill anchor holes
4. Use a portable vacuum cleaner to remove any dust or debris that may have fallen into the holes during
the drilling process.
3a. Chemical anchors: Use a 15 mm (9/16") diameter carbide-tipped masonry bit to drill four holes at
least 115 mm (4-1/2") deep into the floor. Be sure to take into account the depth of any floor covering,
such as tile or vinyl when gauging the depth of the anchor holes. Make sure the holes are drilled at
least 4- 1/2" (115 mm) into the concrete floor.
Blow out dust/debris.
2 Move the ATM into position for mounting by aligning the base over the four holes drilled in the
previous procedure.
3 Place an anchor bolt through the cabinet base and into one of the mounting holes. Use a ball peen
hammer to tap the bolt completely into the hole.
IMPORTANT: If the anchor bolt “falls” into the hole without needing to be tapped in, the hole is too
large! The mounting-hole pattern will have to be moved and redrilled using smaller holes as
necessary to achieve a snug fit.
1. Ensure the leveling feet are flush with the bottom of the cabinet. If necessary, use a screwdriver to
adjust the leveling bolts inside the cabinet (near the four corners) so that the leveling feet are flush with
the bottom of the cabinet.
Place anchor bolts in mounting holes.
Tap anchor bolts into mounting holes.
Install Standard Anchors
Bolt ATM to Floor

16
MODEL 9100 INSTALLATION MANUAL
Install Chemical Anchors
Bolt Plinth to Floor
1. Move the ATM into position for mounting by aligning the base over the four holes drilled in the
previous procedure.
2. Begin by inserting a Chem Stud capsule into one of the mounting holes. Either end of the capsule may
be inserted first.
3. Place a washer and a nut (in that order) onto a chisel point rod. Thread the nut onto the rod, leaving 3
to 4 threads exposed.
4. Thread the rod coupler onto the threaded rod until it is tight against the nut. The threaded rod used
should be free of dirt, grease, oil or other foreign material.
5. Select the drive unit, insert it into a rotary hammer drill and engage the coupling to be used.
Insert Chem Stud capsule in mounting hole.
Prepare chisel point anchor rod.
Add washer and nut.
4. Place a flat washer on the anchor bolt followed by a 1/2” nut.
5. Repeat Steps 2 and 3 for the remaining anchor bolts.
6. Ensure the cabinet is as level as possible given the floor conditions. Use a bubble level to verify this.
If a bubble-level is not available, the cabinet can be “rocked” gently from front-to-back and side-to-
side to check the need for leveling.
7. Use a torque wrench and 3/4” socket to tighten each nut to a torque setting of 60 foot-pounds
(required to establish the maximum pull-out strength of the anchors). If a torque wrench is not
available, use a ratchet wrench and 3/4” socket to tighten the nuts three full turns beyond hand tight.
8 Once the nuts are tightened as specified in Step 7, install a second nut on each bolt and tighten down
firmly.

17
INSTALLATION PROCEDURES
6. Insert the chisel point of the rod into the hole to break the glass capsule. Change to rotary and spin it
into the capsule at a speed of 250 to 500 RPM, until it is fully embedded. IMPORTANT! Turn the
rotary hammer drill OFF IMMEDIATELY when the rod is fully embedded!
Drive anchor rod into capsule using hammer drill.
7. Pull the driver out of the coupling while holding the rod. Hold the hex nut with a wrench to unthread the
coupler.
8. Repeat steps 1-7 for each of the remaining mounting holes.
9. Allow the adhesive to cure for the specified time (see chart and important not, which follow) prior to
applying any load to the anchors. During the winter, the hole temperature may be different than the
room temperature! The hole temperature should be measured to determine the curing time required. DO
NOT disturb or load the anchors until they are fully cured!
Allow seated anchor to cure.
*erutarepmeTlairetaMesaB emiTgnitteS
revodnaCº02/Fº86setunim02
Cº02/Fº86otCº01/Fº05setunim03
Cº01/Fº05otCº0/Fº23ruoh1
Cº0/Fº23otCº5-/
Fº32sruoh5
Cº5-/Fº32otCº01-/Fº41sruoh01
12. Once the ATM is square (level), install a second nut on each bolt and tighten down firmly.
10. Ensure the ATM is as level as possible given the floor conditions. Use a bubble level to verify this. If
a bubble-level is not available, the cabinet can be “rocked” gently from front-to-back and side-to-side
to check the need for leveling.
11. Use an adjustable wrench or a ratchet wrench with 18 mm (3/4-inch) socket to tighten the nuts down.
No minimum torque setting for the nuts is required. Simply ensure the nuts are tightened down firmly
enough to secure the plinth to the anchors. Tightening the nuts just beyond hand tight should prove
adequate.

18
MODEL 9100 INSTALLATION MANUAL
THIS PAGE INTENTIONALLY LEFT BLANK

19
INSTALLATION PROCEDURES
DISPENSER INSTALLATION
(TDM-100 / SDD / MINIMECH)

20
MODEL 9100 INSTALLATION MANUAL
1. Unlock and open the control panel. Verify that the power switch
is in the OFF (0) position. Close the control panel.
4. Open the security cabinet and check the position of the turntable. The turntable must be in the cassette
“SERVICE” position to correctly install the dispensing mechanism. The turntable is in the “Service”
position when the green handle is towards the rear of the cabinet.
2. Remove the packing material from the ends of the dispenser
data and power cables that are hanging inside the cabinet.
3. Unpack and remove the dispensing mechanism from its shipping
container. Remove the currency and reject cassette from the
dispenser.
TDM-100 INSTALLATION
Turntable in cassette
“Service” position.
Turntable in cassette
“Operate” position.
Power switch on right side of
power module.
/