
96” WORKBENCH
72” WORKBENCH
48” WORKBENCH
Workbench Series
Warning: Excessive weight hazard!
Use two or more people to move, assemble or install workbench.
Failure to do so can result in back or other injury.

SHORT SUPPORT
BEAM
SHORT CROSS BEAM
TOOL TRAY
LEG (A) LEG (B)
TOOL TRAY DIVIDERS
5/16” X 5/8”
HEX BOLTS
5/16” LOCK
WASHERS
#8-32 X 7/8”
BOLTS
#8-32 X 3/4”
SCREWS
#8-32 X 1”
SCREWS
#8-32 LOCK
WASHERS
AND NUTS
ADJUSTABLE FEET
WORKTOP
LONG CROSS BEAM
LONG SUPPORT BEAM FOR 96” BENCH
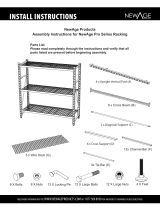
Parts List

Evenly Distributed
Weight Capacity (lbs)
Tray Weight Capacity (lbs)
48” Workbench 2000 40
72” Workbench 2000 40
96” Workbench 2000 40
Parts 48” Workbench 72” Workbench 96” Workbench
Threaded Adjustable Foot 4 4 4
Long Cross Beam 2 2 2
Long Support Beam 0 0 1
Short Cross Beam 2 2 2
Short Support Beam 2 2 2
Leg (A) 2 2 2
Leg (B) 2 2 2
5/16” x 5/8”L Hex Bolts 32 32 36
5/16” Lock Washers 32 32 36
#8 x 3/4” Wood Screws 12 12 12
#8-32 x 7/8” Bolts 2 2 2
#8 Lock Washers 2 2 2
#8-32 Nuts 2 2 2
9/32” Mini Wrench 1 1 1
#8 x 1” Wood Screws 4 4 4
Tool Tray 1 1 1
Tool Tray Dividers 4 6 8
Worktop 1 1 1
Power bar 1 1 1
Tablet Stand 1 1 1
WARNING:
Mechanical Max load. 2000lb.
Electrical limitations is Max 15A.
Parts and Hardware Supplied
Rated Weight Capacity
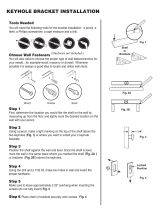
Tools Needed
1 x Pencil1 x Pliers1 x #2 Phillips Bit Screwdriver
1 x 9/16” wrench
1 x 12” Magnetic Leveler
1 x Tape Measure

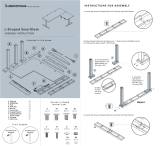
1. Select one Leg (A) and one Leg (B) and lay them opposite one another
on the oor with the leg brackets positioned on the outside of the two legs,
and facing in the same direction. See Figure 1.
2. Select one Short Cross Beam, and one Short Support Beam, and bolt the side
frame assembly together with the supplied 5/16” hex bolts and lock washers.
See Figure 1.
Note: Legs are shown being assembled upside down, as this will be easiest
for assembly and installing the top.
3. Repeat steps 1 and 2 for assembling the opposite side frame assembly.
4. Secure the two Long Cross Beams to the post of the two legs
with the supplied 5/16” hex bolts and lock washers. See Figure 2
5. Repeat Step 4 for the opposite side to secure the two side frame
assemblies to the Long Cross Beams.
6. Secure the leg brackets to the Long Cross Beams with the supplied 5/16”
hex bolts and lock washers. See Figure 3.
7. Repeat Step 6 for the remaining leg brackets.
8. Place the workbench top upside down on a protected surface and mark
the top with a pencil 2” in from the sides, 1-9/16” in from the front
edge, and 3/16” in from the back edge as seen in Figure 4. This boundary
represents the correct mounting location for the steel workbench frame.
9. Place the frame within the marked boundary and attach the top
with the supplied #8 x 5/8” wood screws in the 12 locations provided.
For bamboo top: Drill 1/16” pilot holes and install screws. See Figure 5.
Assemble The Frame
3/16"
2"
1-9/16"
2"
Fig.1
LEG (A)
LEG (B)
Front Edge
(Stainless steel top has metal edge wrap around)
Rear Edge
(Stainless steel top has holes for mounting workbench tray)
Fig.2
Fig.5
Fig.4
Fig.3

1. For Stainless Steel Top:
Install four #8 x 1” screws in the
locator holes along the edge of the
worktop, 3/4 of the way in.
3. Slide the tray down over the screws
and tighten with a screwdriver to
secure the tray to the workbench.
Insert screwdriver through
the access holes for easy
installation.
4. Thread in the leveling feet and
adjust as needed for leveling the
workbench.
5. Insert tray dividers in the desired
locations.
2. Slide the keyholes on the side of the
tray over the heads of the screws.
AA
SECTION
A-A
SCALE
1 : 2
+
TRAY
WORKTOP
Side View
KEYHOLE ON TRAY
MARK CENTER HERE
Installing Bamboo Top Tray
Fig.1
Mounting
The Tool Tray
Fig.2
For Bamboo Top:
Place tray flush with the top of
worktop (Figure 1) and use the tray
as a guide to mark the center of the
top of the keyholes for the 4 screw
locations along the edge. (Figure 2)
Drill 1/16” pilot hole and install
screws 3/4 of the way in.
1
2
3
4
5

1. Insert the two #8-32 bolts into the
slots on the back of the power bar.
Secure the screws in the lower gap
towards the cord.
Using the supplied 9/32” wrench,
fix the power bar in place with the
provided lock washers and #8-32
nuts.
Note: It may be necessary to grip the
ends of the bolt with a pair of pliers to
prevent the bolt from spinning while
tightening.
Install the power bar onto the
workbench by inserting the two
screws through the corresponding
holes on the front, or sides of the
workbench.
If installing the power bar on the
front of the workbench you can feed
the cord for the power bar through
the rubber grommets on the front
and back of the workbench.
INSTALL TABLET STAND (OPTIONAL):
1. Angle the tablet stand and insert
through slots located on the workbench
tray and allow the hooks to engage under
the workbench tray.
Use the tablet stand with your favorite
device.
Mounting
Power Bar
2.
3.
Note: Ensure your device is stable inside the stand. Newage products will not be
responsible for any damage caused to your device as a result accidental droppage or use
of this stand.
1
2
3
Thank you for purchasing fromNewAge Product.

NEWAGE PRODUCTS INC. WILL NOT PAY FOR:
1. Service calls to correct the installation of any NewAge products or to instruct you how to use or install them.
2. Damage resulting from improper handling or shipping of products, or products damaged by accident, misuse,
abuse, re, ood, improper installation, acts of God, neglect, corrosion, modication or mishandling.
3. Products damaged by improperly loading beyond the specied maximum weight capacity outlined in the
instructions provided with the product.
4. Repairs or replacement when your product is used in other than normal, single-family household use, such as
a commercial environment, or handled in any way inconsistent with the installation instructions included with
the product.
5. Cosmetic damage, including scratches, dings, dents or cracks in paint that do not aect the structural or functional
capability of the product.
6. Surfaces damaged due to chemical interaction resulting in corrosion of paint or metal.
7. Replacement parts for NewAge products outside Canada, United States, or United Kingdom.
8. Replacement keys or locking mechanisms.
9. Loss of product contents due to theft, re, ood, accident or acts of God.
10. Shipping or freight fees to deliver replacement products or to return defective products.
11. Any labor costs during the limited warranty period.
DISCLAIMER OF IMPLIED WARRANTIES; LIMITATION OF REMEDIES
IMPLIED WARRANTIES, INCLUDING TO THE EXTENT APPLICABLE WARRANTIES OF MERCHANTABILITY OR FITNESS
FOR A PARTICULAR PURPOSE, ARE EXCLUDED TO THE EXTENT LEGALLY PERMISSIBLE. ANY IMPLIED WARRANTIES
THAT MAY BE IMPOSED BY LAW ARE LIMITED TO ONE YEAR, OR THE SHORTEST PERIOD ALLOWED BY LAW. SOME
STATES AND PROVINCES DO NOT ALLOW LIMITATIONS OR EXCLUSIONS ON HOW LONG AN IMPLIED WARRANTY OF
MERCHANTABILITY OR FITNESS LASTS, SO THE ABOVE LIMITATIONS OR EXCLUSIONS MAY NOT APPLY TO YOU. THIS
WARRANTY GIVES YOU SPECIFIC LEGAL RIGHTS, AND YOU MAY ALSO HAVE OTHER RIGHTS WHICH VARY FROM STATE
TO STATE OR PROVINCE TO PROVINCE
When this product is installed, operated and maintained according to the instructions attached to or furnished with the
product, NewAge Products Inc. will replace the defective product or parts if the part fails as a result of defective materials
or workmanship for a period of ten years from the date of purchase.
NEWAGE PRODUCTS INC. WELDED WORKBENCH
10 YEAR LIMITED MANUFACTURER WARRANTY
Need more information? Try WWW.NEWAGEPRODUCTS.COM
Call At 1.877.306.8930; for UK 0800.031.4069
Or e-mail at info@newageproducts.com
NewAge Products Inc.
201 Chrislea Road, Vaughan, ON
L4L 8N6, Canada
Page is loading ...
Page is loading ...
Page is loading ...
Page is loading ...
Page is loading ...
Page is loading ...
Page is loading ...
-
 1
1
-
 2
2
-
 3
3
-
 4
4
-
 5
5
-
 6
6
-
 7
7
-
 8
8
-
 9
9
-
 10
10
-
 11
11
-
 12
12
-
 13
13
-
 14
14


NewAge Products 31090 Operating instructions
- Type
- Operating instructions
Ask a question and I''ll find the answer in the document
Finding information in a document is now easier with AI
in other languages
- français: NewAge Products 31090 Mode d'emploi
Related papers
-
 NewAge Products 65884 Installation guide
-
 NewAge Products 40103 Operating instructions
-
 NewAge Products 55989 Installation guide
-
 NewAge Products 50512 Owner's manual
-
 NewAge Products 65400 Installation guide
-
 NewAge Products 65014 Installation guide
-
 NewAge Products 60011 User guide
-
 NewAge Products 65013 Installation guide
-
 NewAge Products 65001 Installation guide
-
 NewAge Products 65005 Installation guide


Other documents
-
Lindy 9-11 Inch Tablet Lock - Universal User guide
-
 Wallscapes 1129227 Operating instructions
-
 Autonomous L-Shaped SmartDesk Assembly Instructions
-
 Muscle Rack WB722436 Operating instructions
-
 Newage 10-Outlet Power Strip User manual
-
Newage 66913 User manual
-
Kreator KRT672002 Owner's manual
-
 Seville Classics WEB292 Assembly Instructions
-
Gladiator GAWB06HWEG User manual
-


