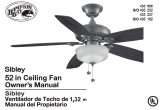
12
Assembly - Attaching the Fan Blades
Attaching the light kit tter assembly Installing the bulbs and attaching
the glass bowl
12
13
□ Loosen the three screws on the switch cup cover of the light
kit tter assembly (E).
□ Connect the wires from the light kit tter assembly (E) to the
wires from the switch cup of the fan motor assembly (D) by
connecting the molded adaptor plugs together (blue to black,
white to white). Carefully tuck all wires and splices in the
switch cup.
□ Align the three screws on the switch cup cover of the light
kit tter assembly with the three key slots in the switch cup.
Make sure the notch in the switch cup cover of the light kit
tter assembly clears the reversing switch in the switch
cup. Position the light kit tter assembly on the switch cup
and turn it clockwise until it locks. Tighten the three screws
that were loosened in rst step to secure the light kit tter
assembly (E).
□ Remove the rubber washer, hex nut, bottom cover and nial
from the threaded nipple of the light kit tter assembly (E).
□ With power off, install the two incandescent bulbs (Max. 60W,
included) (I) by screwing into the light bulb sockets.
□ Position the glass bowl (H) over the threaded nipple.
□ Re-install the rubber washer, hex nut and bottom cover to the
threaded nipple to secure the glass shade properly.
□ Re-install and tighten the nial.
CAUTION: To reduce the risk of electric shock, disconnect
the electrical supply circuit to the fan before installing the
light xture.
CAUTION: Do not over tighten the hex nut, overtightening the
hex nut may cause the glass to break.
NOTE: Notice the location of the fan’s slide switch. This is the switch
used to change the fan’s directional rotation. For more information
on the operation of this switch, see Operating Your Fan and Remote
Control on page 12.
WARNING: Over lamping the fan will result in the fan lights
shutting down until the proper wattage of bulbs are installed.
Reset the lights by turning off, replace bulbs with the correct
wattage bulbs, turn on.
D
E
I
H
E