Page is loading ...

16
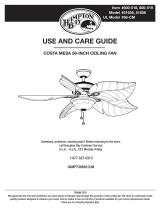
Assembly - Assembling the Fan Without the Light Kit
Installing the bulbs and attaching
the glass bowl
2
□ Remove the rubber washer (P), hex nut (Q), bottom cover (R),
and nial nut (S) from the threaded nipple of the light kit tter
assembly (F).
□ With power off, install the three CFL Light bulb, (14-Watt maxi-
mum included) (L) by screwing into the light bulb sockets.
□ Position the glass bowl (I) over the threaded nipple.
□ Re-install the rubber washer (P), hex nut (Q), and bottom cover
(R) to the threaded nipple to secure the glass shade properly.
□ Re-install and tighten the nial nut (S).
CAUTION: Do not over tighten the hex nut, overtightening the
hex nut may cause the glass to break.
E
F
L
I
P
R
Q
S
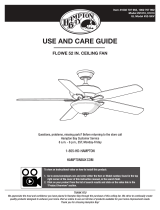
Assembly - Attaching the Lights
Assembling the fan without the
light kit
1
□ Remove the three light kit mounting screws (RR) on the black
bracket below the fan-motor assembly (E).
□ In order to use the fan without the light kit, remove the switch
cup (2) from the top of the light kit tter assembly (F) by
removing the center hex nut inside the switch cup cover, and
then thread the switch cup cover off of the threaded nipple on
the top of the light kit tter assembly (F).
□ Press the plastic plug (GG) (provided) into the center hole of
the switch cup (2).
□ Connect the quick connect couplers. (The fan will not start
without this connection).
□ Position the switch cup (2) onto the black bracket and reinstall
the light kit mounting screws (RR).
E
GG
RR
2
IMPORTANT: It is critical to attach the switch cup using the
quick connector. The fan will not operate unless the light kit is
connected to the fan.
/