
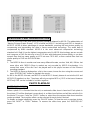
1
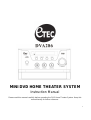
MINI DVD HOME THEATER SYSTEM
Instruction Manual
Please read this manual carefully before operating the DVD Home Theater System. Keep this
manual handy for further reference.

2
TABLE OF CONTENTS
BEFORE USE
Safety Precautions and Important Safety Instructions……….…………..….…….....2-4
Notices and Disc Protection ………………………………………………………….…5-6
Playable Disc Formats and Accessories………………………….……………………...7
CONTROL AND CONNECTION
Basic connection…………………………………………………………….………….......8
Front panel or back panel and led display……………………………......……………...9
Remote control…………………………………………………………………..…….……10
Preparations…………………………………………………………………………………11
BASIC PLAYBACK
Basic Playback……….……………………………………………………………………..12
Pause / Step playback……….………………………….…………………..………..…....12
Previous / Next…………….……………………………..…………………..….…..…...…12
Fast Forward / Next and Fast Reverse / Previous………..……………………..………12
Stop Playback…………………….………………………………………………..………..13
Slow………………………………….…………………………………………………..…...13
Function………………………………….………………………………..……..………..…13
ADVANCED PLAYBACK
Time …………………………………………….……………………………..…….…..…...14
Zoom……………………………………………………………………….………...……….14
Program…………………………………………………………………………….….….....14
Subtitle…………………………………………………………………………….………….14
Title………………………………………………………………….…..……….…………...14
Menu…………………………………………………………………..……….………….....14
Angle…………………………………………………………….…………….……….........14
N/P……………………………………………………………….…………..………..……..14
Repeat / A-B Repeat……………………………………………………..………….……..15
Volume and mute…………………………………………..…………….…………………15
Audio………………………………………………………….………….………..…………15
SPECIAL FUNCTIONS PLAYBACK
JPEG & MP3 disc playback…..……………………………………….…………………..15
MPEG-4 disc function introduction………………………………………..……….….….16
Picture CD playback………………………………………………………………….…....17
RADIO
Radio band and function operations.………………………………….…………….……18
REFERENCE
System setup…………………………………..…………………….…………………..19-25
Troubleshooting…………………………………………..…………….……………………26
Special Function of DVD…………………………………………………………..………..27
Function supported by DVD Discs…………………………………..……………….……27
Specifications…………………………………………………………………………..…….27
Warranty………………………………………………………………………………………28

3
The Lightning flash with arrowhead
symbol, within an equilateral triangle, is
intended to alert the user to the presence of
un-insulated “dangerous voltage” within
product’s enclosure that may be of sufficient
magnitude to constitute a risk of electric
shock to persons.
The exclamation point within an equilateral
triangle is intended to alert the user to the
presence of important operating and
maintenance (servicing) instructions in the
literature accompanying the appliance.
The symbol for class II (double insulation).
WARNING: TO REDUCE THE RISK OF FIRE OR ELECTRIC SHOCK, DO NOT EXPOSS
THIS APPLIANCE TO RAIN OR MOISTURE, AS DANGEROUS HIGH VOLTAGES ARE
PRESENT INSIDE THE ENCLOSURE. DO NOT OPEN THE CABINET. REFER
SERVICING TO QUALIFIED PERSONNEL ONLY.
CAUTION: when replacing the direct plug in power supply or a separable, cord-connected
power supply, the replacement must be exact duplicate or one recommended by the
manufacturer.
TO PREVENT ELECTRIC SHOCK, MATCH WIDE BLADE OF PLUG TO WIDE SLOT, AND
FULLY INSERT
This Digital Video Disc player employs a laser system.
Use of controls, adjustment or the performance of procedures than those specified may
result herein hazardous radiation exposure to prevent direct exposure to laser beam. Do not
try to open the enclosure. Visible laser may radiate when the cabinet is opened or the
interlocks are defeated.
DO NOT STARE INTO THE LASER BEAM

IMPORTANT SAFETY INSTRUCTIONS
CAUTION:
::
:PLEASE READ AND OBSERVE ALL WARNINGS AND INSTRUCTIONS FOUND IN THIS
MANUEL AND MARKED ON THE UNIT. RETAIN THIS BOOKLET FOR FUTURE REFERENCE.
This set has been designed and manufactured to assure personal safety. Improper use can result in
electric shock or fire hazard. The safeguards incorporated in this unit will protect you if you observe the
following procedures for installation, use, and servicing. This unit is fully transistorized and does not
contain any parts that can be repaired by the user.
DO NOT REMOVE THE CABINET COVER OR YOU MAY BE EXPOSED TO DANGEROUS VOLTAGE.
REFER ALL SERVICING TO QUALIFIED SERVICE PERSONNEL ONLY.
1. Read this manual.
After unpacking this product, read the instruction manual carefully. Follow all operating and other
instructions.
2. Ventilation
Slots and openings in the cabinet are provided for ventilation and to ensure operation of the product by
protecting it from overheating. These openings must not be blocked or covered by placing the product on a
bed, sofa, or other soft surface.
3. Heat
The product should be situated away from heat sources such as radiators, heat registers, stoves, or other
products (including amplifiers) that produce heat.
4. Water and Moisture
Do not use this product near water including a bathtub, washbowl, kitchen sink, laundry tub, in a wet
basement, or near a swimming pool.
5. Cleaning
Unplug this product from the wall outlet before cleaning. Do not use liquid or aerosol cleaners. Use a dry
cloth for cleaning.
6. Power-cord protection
Power-supply cords should always be routed in a manner so they are not likely to be walked on or pinched
by items placed upon or against them. Pay particular attention to the cord at plugs, convenience
receptacles, and at the point where they exit from the product.
7. Lightning
For added product protection during a storm, or if left unattended and unused for long periods of time,
unplug the unit from the wall outlet. This will prevent damage to the product due to lightning and power-line
surges.
8. Object and Liquid entry
Never push an object of any kind into this product through openings as they may touch dangerous voltage
points or short-out parts that could result in a fire or electric shock. Never spill liquid of any kind on the
product.
9. Attachments
Do not use attachments not recommended by the product manufacturer as they may cause hazards.

5
IMPORTANT SAFETY INSTRUCTIONS
10. Accessories
Do not place this product on an unstable cart, stand, tripod, bracket, or table. The product
may fall, causing serious injury to a child or adult, and serious damage to the product. Use
only with a cart, stand, tripod, bracket, or table recommended by the manufacturer, or sold
with the product. Any mounting of the product should follow the manufacturer’s instructions,
and should use a mounting accessory recommended by the manufacturer. A product and
cart combination should be moved with care. Quick stops, excessive force, and uneven
surfaces may cause the product and cart combination to overturn.
11. Disc tray
Keep your fingers clear of the disc tray as it is closing. Neglecting to do so may cause serious personal
injury and damage the product.
12. Burden
Do not place a heavy load, step on the product, or use it as a stand for an object. The object may fall
causing serious personal injury and serious damage to the product.
13. Damage Requiring Service
Unplug this product from the wall outlet and refer any servicing to qualified service personnel under the
following conditions:
a) When the power-supply cord or plug is damaged.
b) If liquid has been spilled, or objects have fallen into the product.
c) If the product has been exposed to rain or water.
d) If the product does not operate normally by following the operating instructions. Adjust only those
controls that are covered by the operating instructions as an improper adjustment of other controls may
result in damage and will often require extensive work by a qualified technician to restore the product to
its normal operation.
e) If the product has been dropped or damaged in any way.
f) When the product exhibits a distinct change in performance. This could indicate a need for service.
14. Servicing
Do not attempt to service this product yourself as opening or removing covers may expose you to
dangerous voltage or other hazards. Refer all servicing to qualified service personnel.
15. Replacement Parts
When replacement parts are required, be sure the service technician has used replacement parts specified
by the manufacturer or has the same characteristics as the original part. Unauthorized part substitutions
may result in fire, electric shock, or other hazards.
16. Safety Check
Upon completion of any service or repairs to this product, ask the service technician to perform safety
checks to determine that the product is in proper operating condition.
NOTICES AND DISC PROTECTION
NOTES ON USE
■ The top and rear panels of the unit may become warm after a long period of use. This is not a
malfunction of the product.

6
■ When the unit is not use, be sure to remove your disc and turn off the power.
■ If you do not use the unit for a long period, the unit may not function properly in the future. Turn on and
use the unit occasionally.
■ Do not place foreign objects on the tray.
LOCATION
Do not locate the unit in places such as:
■ Near heating devices or in enclosed car.
■ High temperature (47
O
C or higher) or high humidity (90% or higher)
■ Dirty places.
■ Avoid direct exposure to sunshine
INTERFERENCE
When you place this unit near a TV, radio or VCR, the playback picture may become poor and the sound
may be distorted due to signal interference. In this case, place the unit away from the TV, Radio or VCR.
NOTES ON MOISTURE CONDENSATION
The laser pickup may get water condensation under the following situations.
■ When you bring the unit directly from a cold place to a warm place
■ When you use the unit in a room where cold air from an air-conditioner blows directly on the unit.
■ During the summer, when you use the unit in a hot and humid place right after moving the unit from an
air-conditioned room.
■ The room is very humid or damp.
If water condensation exists, the unit will not operate properly. Remove the disc and connect the power
cord to the wall outlet. Turn the unit ON, and leave it for 2-3 hours. After 2-3 hours the unit will have warmed
up and evaporated any moisture. Keeping the unit connected to the wall outlet will prevent condensation
from occurring.
PLAYBLE DISC FORMATS and ACCESSORIES
The following disc formats can be played:
DVD, CD, CD+/-R/RW, MP3, JPEG.
● Discs formats not listed above cannot be played in this unit.
● Non-standardized discs cannot be played even if they are labeled as above.
● The performance of a recorded disc depends on the method and quality of the disc-burning
equipment. In some cases, a burned disc may not play.

7
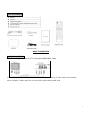
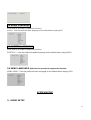
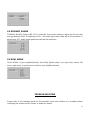
ACCESSORIES
BASIC CONNECTION
BASIC CONNECTION
● Connecting the player to a TV using the Audio/Video cable
If the TV only has an S-video input, connect the DVD player with an S-video cable (not included).
When using an S-video cable, do not connect the yellow video cable ends.

8
BASIC CONNECTION
● Connecting through an audio system
● Connecting to a High definition TV
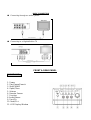
FRONT & REAR PANEL
FRONT PANEL
1. Power
2. Play/Pause/Search
3. Stop/FM/AM
4. Open/Close
5. Volume
6. Remote Sensor
7. Function
8. Audio/Stereo
9. Prev/Ch-
10. Next/Ch+
11. LED Display Window

9
1 2 3 4
REAR PANEL
REAR PANEL
1. R/L Ch Output
2. Digital Audio Coaxial Output
3. S-video Output
4. Digital Audio Optical Output
5. Speaker Outputs
6. Composite CB/CR/ Y Output
7. AUX Audio in
8. Video Output
9. FM Antenna
10. AM Antenna
LED DISPLAY
LED DISPLAY of DVD

10
REMOTE CONTROL
1. POWER
2. MUTE
3. NUMBER BUTTONS
4. FAST REVERSE
5. FAST FORWARD
6. AUTO SEARCH
8. NAVIGATION (LEFT)
9. MENU
10. AUDIO
11. N/P
12. ANGLE
13. SUBTITLE
20. VOLUME +/- 7. SETUP
21. TONE (BASS/TREBLE)
22. NEXT (CH+)
23. PREVIOUS (CH-)
24. STOP / AM/FM BAND
25. FUNCTION
26. NAVIGATION (UP)
27. NAVIGATION (RIGHT)
28. NAVIGATION (DOWN)
29. TITLE
30. OSD
31. ZOOM
14. REPEAT
15. A-B
16. EQ
17. PROGRAM
18. OPEN/CLOSE
19. DVD CHAPTER UP/DOWN
32.TIME
33. RETURN
34. PBC
35. SLOW

11
36. STEP
37. RAN (RANDOM)
REMOTE CONTROL
Loading Batteries
1. Remove the Battery Compartment Cover
-------------------------------------------------------------------------------
2. Insert Batteries
Make sure to match the Positive “+” and Negative “-“ ends of the batteries to
“+” and “-“ marks inside the battery compartment.
---------------------------------------------------------------------------------
3. Replace the battery compartment cover
IMPORTANT Notes On Batteries
● Do not insert batteries into the remote control in the wrong direction.
● No not discard batteries into a fire.
● Do Not Use Different Types Of Batteries Together or Mix Old And New Batteries.
● If The Remote Control Does Not Function Correctly Or The Operating Range Becomes
Reduced, replace all Batteries With New Ones.
OPERATING THE REMOTE CONTROL
When using the remote control, the front of the remote should always be
directly at the infrared sensor on the player front panel. For proper operation,
always use the remote within an angle of ± 30 degrees and a range of less than
30” feet
.
Notes On The Remote Control
● Point The Remote Control At The Remote Sensor on the front of the
● Do Not Drop Or Subject The Remote Control To hard Shocks.
● Do Not Leave The Remote Control in or Near an Extremely Hot / Humid
Place.
● Do Not Spill Water Or Leave Anything Wet On The
Control.
● Do Not Disassemble The Remote Control.

12
BASIC PLAYBACK
Preparations
● To play a DVD disc, turn on your TV and select the video input source the player is connected
to.
BASIC PLAYBACK
1. Press the POWER button on the front panel to ON. When the unit turns on, the TV screen will
display the opening screen/logo. If a disc is already in the tray, it will begin to play once the
power is switched on.
2. Press OPEN/CLOSE to open the disc tray and place a disc correctly on the disc tray.
● There are two different disc size placement guides in the top of the disc trays. Place the disc
in the correct size guide on the disc tray. If the disc is not properly placed in the disc tray guide,
damage may be caused to the disc and/or the player.
● Do not play a disc format which is not compatible in this unit.
3. Press OPEN/CLOSE to close the disc tray and playback will automatically start.
● Some discs may not support the automatic playback function. Press PLAY button to start
playback.
4. Many newer discs begin playback with a menu. Use the navigation buttons on the remote
control to select the desired menu option and press PLAY to start.
5. When using the AM/FM Radio. Press the PLAY/PAUSE button to automatically search for
your desired radio station.
Pause /Step playback
1. Press the PAUSE/STEP button once to pause playback (still mode). The audio will be muted
during still mode.
2. Press the STEP button continuously to step forward one frame at a time in the video.
3. Press the PLAY button to resume normal playback.
Previous and Next
During DVD, or CD playback, press the PREV button once to play the previous chapter, title or
track. Each press of this button move play backwards through the chapters, titles or tracks in
reverse to the beginning of the disc.
Each press of the NEXT button during playback will skip the current chapter, title or track and
play the next one.
When using the AM/FM Radio, press the PREV/NEXT button to move to the previous or next
station.

13
BASIC PLAYBACK
Fast Forward and Fast Reverse
1. Press the F. FWD button to fast forward through the disc. Each time the F. FWD button is
pressed, the fast forward motion speed changes.
2. Press ENTER/PLAY to resume normal playback.
3. Press F. REV to fast reverse through the disc. Each time the F. REV button is pressed, the
fast reverse motion speed changes.
4. Press ENTER/PLAY to resume normal playback.
5. When using the AM/FM Radio, press F. REV or F. FWD Button, move to the next station with
proper signal strength (similar to tuning by hand)
Stop playback
1. Press STOP button once to stop playback. The TV screen will show the opening logo. Some
DVDs and audio CDs are coded to allow the unit to recall the last stop location.
2. Press PLAY to resume playback from the same location the disc was last stopped at or from
the beginning of the disc.
3. Press STOP button twice to stop completely. Pressing the STOP button twice will allow recall
of the last stop location.
4. When functioning as a Radio, press the STOP button to switch the radio band between AM
and FM.
Slow
Press the SLOW button to play a disc in slow forward motion. Each time the SLOW button is
pressed, the slow motion speed changes. Press PLAY to resume normal speed playback.
Note: this function is not compatible with CD and MP3 discs.
NOTES:
1. “INVALID KEY” may appear on the TV screen during operation. The “INVALID KEY” means
that the operation is not permitted by the unit or the disc.
2. This unit is controlled by an IC circuit processor and starts a screen saver a short time after
stopping play. Press any key to end the screen saver and activate the unit. If you do not want to
use the screen saver function, set the SCREEN SAVER to OFF in the SYSTEM Setup menu.
TONE
Press the TONE button to enter the tone menu and use the volume +/- buttons to adjust the Bass,
Treble, and Balance levels
FUNCTION
Press the FUNCTION button to switch the unit between DVD/CD, AM/FM STEREO, or AUX-IN
functions.

14
ADVANCED SETTINGS
IMPORTANT NOTE:
THE FOLLOWING FUNCTION DESCRIPTIONS ARE FOR DVD DISCS ONLY. OPERATION AND
DISPLAY ON THE TV SCREEN MAY BE DIFFERENT FOR OTHER DISC FORMATS.
TIME
Press the TIME button to set the correct time. Use the NAVIGATION LEFT/RIGHT buttons to
scroll through the different time settings then press ENTER/PLAY button to confirm your
selection.
ZOOM
Press this button to zoom into a picture. Each time the button is pressed, the magnification level
will increase. After maximum ZOOM level is reached, image view will return to normal size.
PROGRAM
When playing discs, press the PROGRAM button to enter the programming function. Use the
NUMBER buttons to input the chapter/track numbers or use the NAVIGATION buttons and move
the cursor to the chapter/track numbers you want and press PROGRAM to confirm each
selection. Press the “ENTER/PLAY” button to start programmed playback. If you want to cancel
this function, press “STOP”.
SUBTITLE
(Note: Disc must be encoded with the Subtitle capability)
Press this button and the screen will display the language subtitle options encoded on the disc.
TITLE
(Note: Disc must be encoded with the Title capability)
Press the TITLE button to display the title menu. Press the NUMBER buttons to select the
chapter you want to view.
MENU
(Note: Disc must be encoded with the Root Menu capability)
Press the MENU button to display the root menu of the DVD. Select the menu item you desire
using the NAVIGATION buttons and press the PLAY button to access.
ANGLE
(Note: Disc must be encoded with ANGLE capability)
Press the ANGLE button to view action from different angles.
N/P
Press the key will switch between NTSC, PAL and AUTO.

15
ADVANCED PLAYBACK
REPEAT
Press once to repeat the CHAPTER;
Press twice to repeat the TITLE
Press three times to cancel the repeat function
A-B REPEAT
Press A-B to begin the function and mark the “A” start-point. Press A-B again to mark the “B” end
point and complete the setting. The selected A-B section will be repeated. Press the A-B button a
third time to cancel this function.
VOLUME AND MUTE
Press the VOLUME “+” button to increase volume. Press the VOLUME “-“ button to decrease
volume. Press the MUTE button once to mute the audio and “MUTE” will display on the TV
screen. Press the MUTE button a second time and the audio will return to normal.
AUDIO
Press this button on remote control to change the Audio mode.
For example:
MUSIC PLAY BACK
MP3 PLAYBACK
Place a MP3 disc on the disc tray, the player will immediately begin to read the disc and a
navigation menu will be displayed automatically if the disc has been properly burned.
In the menu, use the NAVIGATION UP/DOWN buttons to choose the desired folder and then
press the “ENTER/PLAY” button to confirm and the folder menu will open. In the folder, use the
NAVIGATION UP/DOWN buttons to select the desired track/file, and then press “ENTER/PLAY”
to play the selected track/file. From the track/file menu, use the NAVIGATION LEFT button to
return to the previous menu. Press the PREV or NEXT buttons to go to the previous or next
menu page.

16
MPEG-4 DISC FUNCTION INSTRUCTION
MPEG-4 is the forth video and audio encoding standard released by MPEG (The abbreviation of
“Moving Pictures Expert Group”). VCD is based on MPEG-1 technology and DVD is based on
MPEG-2. MPEG-4 takes advantage of narrow bandwidth, pursuing the best picture quality by
compressing and transmitting the data in frame restructured technology. The audio data is
compressed by WMA standard. MPEG-4 is the most advanced compression technology
standard in AV field. It has the highest compression rate. By MPEG-4 technology, we can encode
and compress a DVD film into one or two CD-R disc with pretty good picture quality, or can burn
several films that has same quality as VCD into one CD-R disc, or burn several films that has
similar quality to DVD into DVD-ROM disc.
Note:
1. The MPEG-4 discs in market now have many different formats, such as Xvid, AVI, RM etc. but
some discs with “MPEG-4”logo in market are not encoded by MPEG-4 technology. It is
normal that some of the disc can’t be played well in this player because of the incorrect
encoding standard.
2. The MPEG-4 files are displayed as a list in the screen; choose the icon using the cursors and
press “ENTER/PLAY” button to playback the movie.
As AVI is the MPEG-4 format, and MPEG is the MPEG-1 format, please do not mix the AVI and
MP3/JPEG together in a disc. The player will only recognize MP3 or JPEG in that case. However
MP3 and JPEG can be included in one disc together.
PHOTO PLAYBACK
PHOTO CD PLAYBACK
PLAYBACK (normal)
When a photo CD is inserted into the unit, an automatic slide show is launched. Each photo in
the picture CD will be displayed consecutively in a slide-show fashion and will be scaled to fit in
the whole TV screen. Press the “PROG “ button to select from the various slide-show transition
modes provided. The transition effect can be selected for each photo if desired.
To display an image indefinitely, press the “PAUSE” button. To view the next or previous picture,
press the “NEXT” or “PREV” buttons. To resume the slide show, press the “ENTER/PLAY”
button.

17
IMAGE ROTATION
This player allows a photo to be rotated in four different way; ”invert”, “mirror”, “left”, and “right”.
Image rotation will only function when a picture is being displayed normally on the screen. The
image rotation function is cancelled automatically when a new picture is displayed. The
NAVIGATION buttons are used to select the different rotation modes:
ZOOM
The “ZOOM” key is used to turn on or off the zoom function. When the zoom function is on, any
picture will be displayed at the last zoom ratio selected by the user. A message on the screen will
indicate the current zoom ratio.
In the zoom mode the ZOOM button is used to control the in/out zoom ratio. When the ZOOM
function is off, the picture is scaled to fit the whole TV screen.
Notes: When using the zoom function, slide-show transition effects and image rotation functions
are disabled. To cancel the zoom function, press the “ZOOM” button again and the slide show will
resume.
IMPORTANT NOTE: quality of picture displayed on the screen is highly dependent on the
viewing device
JPEG DISC PLAYBACK
When playing a JPEG disc, a navigation menu will automatically be displayed. In the menu use
the NAVIGATION UP/DOWN buttons to select a file and then press “ENTER/PLAY” to play as a
slideshow. Press the PREV or NEXT buttons to select the previous or the next picture. Press the
PAUSE button to pause the current picture. Press ENTER/PLAY to resume viewing. Press
ZOOM to start the zoom function. When the ZOOM function is on, press the PREV or NEXT
buttons to switch between pictures. Pressing the NAVIGATION buttons can scroll through the
enlarged picture. The display transition between the photos can be changed by pressing the
PROG button and then selecting from the options: RANDOM, WIPER L, WIPER R, DIAGIONAL
R, UP-DOWN, LEFT-RIGHT, WINDOW V, EDGE TO CENTER, etc.

18
AM/FM RADIO OPERATION
1. AM/FM RADIO
The built-on memory can hold up to 40 pre-set radio stations (20 FM & 20 AM). This will allow
you to simply select the assigned station memory number to immediately switch to any of the
preset stations.
2. AUTOMATIC PRESET TUNING & SELECTION
The radio stations in your area can be automatically scanned and saved in the preset station
memory.
2.1: Repeatedly press the “STOP/FM/AM” button to select “AM” or “FM” frequencies.
2.2: Press the “AUTO SEARCH” button to begin scanning the selected band and automatically
saving the found stations into the preset station memory.
3. MANUAL PRESET TUNING & SELCTION
The radio stations in your area can be manually selected and saved in the preset station
memory.
3.1: Repeatedly press the “STOP/FM/AM” button to select “AM” or “FM” bands
3.2: Press the 0 to 10 the number keys to enter the station frequency number and then press
the ENTER button to store your selection.
Tip:To improve radio reception,please adjust the antenna or the annex to the external antenna
market.
4. LISTENING TO THE RADIO
To listen to the radio, choose either a preset station from memory, or enter the desired station
frequency number manually.
5. PRESET MEMORY TUNING
Selecting a station from preset memoryequipment.
6.1: Repeatedly press the “STOP/FM/AM” button to select the “FM”or“AM” bands.
6.2: Repeatedly press the “CH+”or“CH-” buttons to scroll through and select the preset radio
station to listen to.

19
SYSTEM SETUP
● When you press the SETUP button on the remote control, the setup menu will be displayed.
The setup menu selections will include; “SYSTEM SETUP”, “LANGUAGE SETUP”,“AUDIO
SETUP”, “VIDEO SETUP”,“SPEAKER SETUP”,and “DIGITAL SETUP”.
1. When in the setup menu, you can use the NAVIGATION UP, DOWN, LEFT and RIGHT buttons
on the remote control to move the cursor to your selection and then press the ENTER/PLAY
button to confirm your selection. Press the NAVIGATION LEFT button to return to the previous
menu.
2. To exit the setup menu, you can select the exit setup menu item or press the SETUP button
again.
1. SYSTEM SETUP PAGE
Setup: TV screen format, video type, and all DVD functions.
1.1 TV SYSTEM
TV SYSTEM: The default TV System setting of this player is NTSC (used in the USA). This
player will also support the PAL System (Latin/South America).
● If your TV supports only NTSC or PAL and had you inadvertently selected the wrong TV system,
the TV screen will flicker and only black and white colors will be displayed.
In this case, you should press the SETUP button to set as following Note.
SYSTEM SETUP

20
1.2 AUTO PLAY
1.3 VIDEO
VIDEO: Sets the video output.
1.4 TV (SCREEN) TYPE
The TV (SCREEN) TYPE will select the different display format ratio to be shown on the TV
screen. (Please see page 21: Multi-image ratio mode).
Note:
● No matter which display format is selected, a picture recorded in standard 4:3 format always
displays in the 4:3 aspect ratio.
● The display format of DVD titles may vary; please refer to the information that accompanies
your specific DVD title.
● If the DVD title is recorded in 16:9 wide display format while the TV is a standard 4:3 screen,
horizontal compression of the image will result.
● Some DVD titles may be recorded in special formats. In such cases, the DVD titles will always
appear on the screen in their original format, regardless of which TV display format you select.
SYSTEM SETUP
Page is loading ...
Page is loading ...
Page is loading ...
Page is loading ...
Page is loading ...
Page is loading ...
Page is loading ...
Page is loading ...
Page is loading ...
-
 1
1
-
 2
2
-
 3
3
-
 4
4
-
 5
5
-
 6
6
-
 7
7
-
 8
8
-
 9
9
-
 10
10
-
 11
11
-
 12
12
-
 13
13
-
 14
14
-
 15
15
-
 16
16
-
 17
17
-
 18
18
-
 19
19
-
 20
20
-
 21
21
-
 22
22
-
 23
23
-
 24
24
-
 25
25
-
 26
26
-
 27
27
-
 28
28
-
 29
29


