Page is loading ...

SM-CMD3004
DVD/MP3/CDRECEIVER DVD/MP3/CD-
Instruction manual
CLK
OPEN
A UX
AF
TA
P
T
Y
APS
POW
MOD
MUT
BND
SUB /NP
SM-CMD 3004
504
Wx
SD
MMC

2
Dear customer!
Thank you for purchasing our product. For safety, it is strongly recommended to read this manual carefully
before connecting, operating and/or adjusting the product and keep the manual for reference in the future.
Table of contents
Table of contents.......................................................................................................................... 2
Important safeguards ................................................................................................................... 3
Installation/Connections................................................................................................................ 4
Panel controls .............................................................................................................................. 8
Remote control .......................................................................................................................... 10
Glossary.................................................................................................................................... 11
Features.................................................................................................................................... 12
Compatible discs........................................................................................................................ 13
General operation....................................................................................................................... 16
Radio Operations........................................................................................................................ 17
DVD operations.......................................................................................................................... 21
Mixed-disc operation................................................................................................................... 23
VCD/CD operation ...................................................................................................................... 25
Other operations........................................................................................................................ 26
System setup............................................................................................................................. 28
Anti-theft system ....................................................................................................................... 37
Handling discs............................................................................................................................ 38
Cleaning.................................................................................................................................... 38
Troubleshooting guide................................................................................................................. 39
Specification.............................................................................................................................. 40

3
Important safeguards
Using the device at temperature below -10º may cause the breakage of the device. BEFORE
USING PLEASE HEAT UP THE PASSENGER COMPARTMENT TO THE RECOMMENDED
TEMPERATURE!
Read carefully through this manual to familiarize yourself with this high-quality sound system.
Disconnect the vehicle's negative battery terminal while mounting and connecting the unit.
When replacing the fuse, be sure to use one with an identical amperage rating. Using a fuse with
a higher amperage rating may cause serious damage to the unit.
DO NOT attempt to disassemble the unit. Laser beams from the optical pickup are dangerous to
the eyes.
Make sure that pins or other foreign objects do not get inside the unit; they may cause
malfunctions, or create safety hazards such as electrical shock or laser beam exposure.
If you have parked the car for a long time in hot or cold weather, wait until the temperature in
the car becomes normal before operating the unit.
DO NOT open covers and do not repair yourself. Consult the dealer or an experienced technician
for help.
Make sure you disconnect the power supply and aerial if you will not be using the system for a
long period or during a thunderstorm.
Make sure you disconnect the power supply if the system appears to be working incorrectly, is
making an unusual sound, has a strange smell, has smoke emitting from it or liquids have got
inside it. Have a qualified technician check the system.
The unit is designed for negative terminal of the battery, which is connected to the vehicle metal.
Please confirm it before installation.
Do not allow the speaker wires to be shorted together when the unit is switched on. Otherwise
it may overload or burn out the power amplifier.
Do not install the detachable panel before connecting the wire.
Do not use the unit in places where it can be exposed to water, moisture and dust.

4
Installation/Connections
First complete the electrical connections, and then check them for correctness. If you are not confident working
with electrical wiring, removing and reinstalling interior panels, carpeting, dashboards or other components of
your vehicle, please call your dealer in order to have the unit professionally installed.
Before the installation
IMPORTANT: Remove two screws before installation. Otherwise, the DVD Player will not work.
This unit can be installed in any dashboard having an opening as shown below. The dashboard should be 4.75 –
5.56 mm thick in order to be able to support the unit.
1. Insert mounting collar into the dashboard, and bend the mounting tabs out with a screwdriver.
Make sure that lock lever is flush with the mounting collar (not projecting outward).
2. Secure the rear of the unit.
After fixing mounting bolt and power connector, fix the rear of the unit to the car body by rubber cushion.

5
3. Insert trim plate.
When you prepare to insert trim plate, please check it’s direction. Once it was up side down, it cannot be fixed.
NOTE: Outer trim frame, hook, and mounting sleeve are not used for this installation.
This is only intended as a general guide; contact the vehicle's manufacturer for specific instructions.
This method of installation uses the screw holes at the sides of the unit and the holes of the existing vehicle
mounting bracket.
1. Remove the hooks on both sides.
2. Align the screw holes of the mounting bracket supplied with the car and the screw holes of the main unit.
Tighten the 2 screws on each side of the unit. Then fasten the brackets to the car.
3. Attach wires of the unit to existing speaker wires. See wiring diagram.

6
Electrical connections
Speaker Wiring Notes
Follow the above wiring diagram to install the head unit with new or existing speakers.
This unit is designed for use with four (4) speakers with an impedance 4 Ohms.
An impedance load of less than 4 Ohms could damage the unit.
Never bridge or combine the speaker wire outputs. When not using four speakers, use electrical tape to tape
the ends of the unused speaker outputs to prevent a short circuit.
Never ground the negative speaker terminals to chassis ground.
For your driving safety, please link your parking wire with low power level, and keep it controlled by manual
brake switch. Wire should be high power level and the unit cannot play video disc.

7
Using the ISO Connector
1. If your car is equipped with the ISO connector, then connect the ISO connectors as
illustrated.
2. For connections without the ISO connectors, check the wiring in the vehicle carefully before
connecting, incorrect connection may cause serious damage to this unit.
Cut the connector, connect the colored leads of the power cord to the car battery as shown in
the colour code table below for speaker and power cable connections.
Location
FUNCTION
Connector A Connector B
1 Rear Right(+)---Blue
2 Rear Right(-)---Blue/White Stripe
3 Front Right(+)---Grey
4 Battery 12V (+)/yellow Front Right(-)---Grey/White Stripe
5 Auto Antenna/Orange Front Left(+)---Green
6 Front Left(-)---Green/White Stripe
7 ACC+/red Rear Left(+)---Brown
8 Ground/black Rear Left(-)---Brown/White Stripe

8
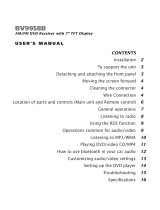
Panel controls
Front panel
1. POW (POWER)
2. MOD/MUTE button
3. AF button
4. VOL +/-/SEL knob
5. TA button
6. TFT screen
7. OPEN button
8. PREV button
9. NEXT button
10. SD card slot
11. BND/SUB/NP button
12. PTY button
13. Infra red sensor
14. APS button
15. CLK button
16. AUX button
17. USB slot

9
18. EJECT button
19. RESET button
20. European/American Frequency Switch (Option)
21. Panel status indicator
22. Connector

10
Remote control
1. MODE BUTTON
2. POWER BUTTON
3. BND/SYS BUTTON
4. CURSOR BUTTONS
5. ENTER BUTTON
6. STOP/RETURN BUTTON
7. ST/PROG BUTTON
8. AMS/RPT BUTTON
9. LOC/RDM BUTTON
10. SEEK +/- / (PREV)/(NEXT) BUTTONS
11. MENU/PBC BUTTON
12. OSD BUTTON
13. DIGIT AREA
14. PLAY/PAUSE BUTTON
15. GOTO BUTTON
16. TITLE BUTTON
17. SUB-T BUTTON
18. SETUP BUTTON
19. ANGLE BUTTON
20. SLOW BUTTON
21. ZOOM BUTTON
22. VOL +/- BUTTON
23. SEL BUTTON
24. AUDIO BUTTON
25. MUTE BUTTON
Changing the battery
1. Press the catch and at the same time pull out the battery tray.
2. Insert the 1 x lithium battery, type CR 2025 3V battery with the stamped (+)
mark facing upward.
3. Insert the battery tray into the remote control.

11
Glossary
PBC (PlayBack Control)
PlayBack Control is a menu recorded on the disc with SVCD or VCD2.0 format. For the discs contained PBC, it can
playback interactive software with the menu displayed on TV. And if the disc contains still images, it can
playback high definition of still image.
Title
The title is the important part of DVD disc. The memory volume of the disc is rather big, that makes possible to
record several films on one disc. For example, if a disc contains three films, they may be divided into Title 1, Title
2 and Title 3. You can easy use the functions of looking-for.
Chapter
A title can be divided into several blocks, so that every block can be operated as a unit, the unit is called chapter.
The chapter contains a unit at least.
Track
It is the biggest component of VCD. Generally, every song of karaoke disc is a track.

12
Features
Fully compatible
Fully compatible with the most popular discs’ formats such as DVD, CD, CD-R (containing MP3, JPEG), CD-RW
represented in the market.
Upgrade intelligently
Support the function of upgrading the software for playing discs of new formats to keep up with the market
competition.
Strong output function
The player has an analogue audio output of 2 channels, digital audio output and video output of complex video.
Supports picture CD, Photo CD
Fully compatible with Picture CD and Photo CD without setting additional software. It automatically activates the
media player menu to process.
Screen saver
Supports the screen saver function. If there is no operation or no disc during 5 minutes, the player will
automatically turn into the state of screen saver. It can prolong the serviceability of the player.

13
Compatible discs
DVD Video
DVD disc include video and audio data. The data can contained by the 12 cm diameter of DVD disc is 7 times of
one can contained by the common CD-R disc. Its maximum continuous playback time can be up to 2 hours (one
of double-sided disc can be up to 4 hours). DVD disc sort as 4 kinds of ones: single-layer and double-layers and
single-sided, single layer and double-sided, double-layers and double-sided disc.
SVCD
Super VCD disc adopt MPEG-II compression way. It can provide better quality of video than VCD disc. And it can
record 2 stereo audio track. Super VCD disc can also supports wide screen.
VCD2.0
Compare with VCD1.1 disc, VCD2.0 disc has a playback list. Generally, Karaoke disc with VCD2.0 format has a
PBC menu.
VCD1.1
Picture CD disc its size is same as audio CD disc include audio and video data. The maximum playback time of
the standard 12 cm of disc with VCD1.1 is 74 minutes.
DVCD
Compatible with DVCD disc. DVCD disc is high density of VCD disc. Compared with VCD disc, a DVCD disc can
contain more data.
CDDA
Compatible with CDDA disc. CDDA disc include audio data. The maximum playback time of the standard 12 cm
of CDDA disc is 74 minutes.
MP3/JPEG
Compatible with CD-R/CD-RW/CD-ROM discs contained files with MP3/JPG format. Also supports JPG pictures
playback with MP3 tracks as background music, provides fine video and audio effect.
Picture-CD
Compatible with Picture-CD disc. Do not need setting the additional software. Picture-CD is a disc format that
stores photo with electronic file format developed by Kodak company.
Photo-CD
Compatible with Photo-CD disc. Do not need setting the additional soft ware. Photo-CD is a disc format that
stores photo with electronic file format developed by Konica company.

14
CD-R/CD-RW
Compatible with CD-R/CD-RW disc with ISO9660 specification include the format of MP3, JPG, JPEG, Ac3, PCM,
MP4, MPEG.
DVD+/-R
Compatible with DVD+/-R disc with UDF specification include the format of MP3, JPG, JPEG, Ac3, PCM, MP4,
MPEG4, DivX (3.11/4.0/5.0/6.XX).
Note: Support of MPEG4 Standard: playback of digital video compressed in DivX 3.11, DivX 4.0, DivX5.0, DivX
6.XX. (It may not be possible to play certain DivX disc due to the configuration and characteristics of the disc or
condition of the recording).
Discs for playback
This set can play all digital audio CD, HDCD, CD-R/RW, MP3,WMA, VCD, SVCD, DVD, DVD-ROM.
The following file types are supported:
Audio files: MP3 (*.mp3)
WMA (*.wma)
Video files: MP4 (*.avi, DIVX3.11/4.0/5.0/6.XX and XVID)
MPEG 2(*.vob)
MPEG 1(*.dat)
Picture file: JPEG (*.jpg)
ISO 9660 or ISO 9660 +Joliet format - Max. 30 characters
Max. Track number is 448
Max. nested directory is 8 levels
The max. album number is 99
The max. length of each track is 99 minutes 59 seconds
Supported sampling frequency for MP3 disc :8KHz to 48 (44.1KHz preferably) KHz
Supported bit-rates of MP3 disc are: 32 - 320 kbps (128 kbps preferably).
Following formats are NOT supported *.ACC, *.DLF, *.M3U, *.PLS, MP3 PRO, files with DRM.
Open session discs are NOT supported.

15
USB/SD/MMC notes
USB functions (flash memory type) MP3 music play.
1. SD/ MMC card support, 2in1 (SD/ MMC) support.
2. USB flash memory.
3. FAT 12/ FAT 16/ FAT 32 is possible
- FAT 12/16 (dir: 200 support, file: 500 support),
- FAT 32 (dir: 200 support, file: 500 support).
4. Filename: 32 byte/ Dir name: 32 byte.
5. Tag (id3tag ver2.0)
- Title/ Artist/ Album: 32 byte support.
6. Multi card reader not support.
7. USB 2.0 support.
Note:
USB format supports 2.0.
Capacity: 8 MB ~ 1 GB.
SD cards brands: Cannon, Fuji film, Palm, Motorola, Microsoft, IBM, HP, Compaq, Sharp, Samsung, etc.
Capacity: 8 MB ~ 1 GB.
MMC cards brands: Ericsson, Nokia, Motorola, HP, Palm, Sanyo, Microsystems, etc.
Capacity: 16 MB ~ 1 GB.

16
General operation
Power ON/OFF
Press POW button on the front panel or POWER button on the RC to turn the unit on. Press it again to turn the
unit off.
Mode Selection
Press MOD/MUT button on the front panel or MODE button on the RC to cycle the Play Mode: AUX => TUNER
(RADIO) => DISK => USB => CARD.
NOTE: USB, CARD, DISK mode will be active only when an USB flash memory, CARD or DISC are inserted.
Audio settings adjustment
Press the SEL button (VOL knob) on the front panel or SEL button on RC until the display shows: VOL => BAS
=> TRE => BAL => FAD => LOUD => LOC => ST => EQ. Rotate the VOL knob or press VOL+/VOL- buttons on
the RC to adjust each mode.
Loudness control
Press the VOL knob/SEL button until “LOUD OFF” is shown. Turn the volume knob to select between ON or OFF.
EQ setting
You can choose equalizer sound effects. The sequence of settings: EQ OFF => POP => ROCK => CLAS.
NOTE: Bass (BAS) and Treble (TRE) controls are unavailable only when EQ is OFF.
Mute function
Press and hold the MOD/MUT button on the front panel or press MUTE button on the RC to turn off the sound.
Press it again or VOL +/- to resume.
Subwoofer control
Press and hold the BND/ SUB/NP button to activate the subwoofer control. An external amplifier is required to
operate a subwoofer.

17
Clock display
Press the CLK button to display the clock. To set the clock press and hold the button until the hour becomes white
in color. Rotate the VOL knob to set hours, then press the VOL knob for the minutes to become white in color
and rotate the VOL knob to set. Press the CLK button again or leave the unit idle for new setting to effect.
RESET
Press OPEN button to open the panel. Then press the RESET button with some sharp object (pin or ball-point pen)
to restore factory settings.
Radio Operations
Choose Radio Band
Press the MOD/MUT button to access the radio function. Then press the BND/SUB/NP button on the front panel
or BND/SYS button on the RC to choose among the five radio bands: three FM Bands (FM1, FM2, and FM3) and
two AM Bands (AM1, and AM2). Each of the five bands can store up to six preset stations, for a total of 30 preset
memory stations.
Radio Tune / Seek Function
In Radio Mode, press Seek +/- button to manually adjust the radio frequency. Press and hold Seek +/- button
for more than 1 second, the radio will seek to the next up or down strong and clear frequency station. Repeat
this action to seek for other desired stations.
Mono/Stereo Reception Control
In FM radio mode, press the SEL button repeatedly to select stereo or mono reception. “ST ON” will show on the
display indicating that stereo reception is received. Improvement of reception of distant stations can be done by
selecting “ST OFF” operation which may cut down some reception noise.
Local/Distance Control
In radio mode, press the SEL button repeatedly to select local or distance reception.
a. “LOC ON” showing on the display, means local reception is turned on;
b. “LOC OFF” showing on the display, means distant reception is turned on.

18
Local and distance reception setting can facilitate the radio reception, depending on the location in which the
radio is being used. You also can choose LOC ON or OFF pressing the LOC/RDM button on the RC.
Save Your Preset Stations
There are six numbered preset buttons, which can store and recall stations for each band. While listening to a
radio station you would like to save as a pre-set, press and hold one of the buttons numbered 1-6 until you hear
a beep. The button you pressed is now the pre-set button for that station.
Automatic Store/Preset Scan
A. Automatic Scan & Store
While listening to the FM Radio, press and hold the AMS/RPT Button for 3 seconds. The receiver will
automatically scan and save stations for all the 3 FM Bands, whichever band (FM1, 2 or 3) you are listening to.
While listening to the AM Radio, press and the AMS/RPT Button for 3 seconds. The receiver will automatically
scan and save stations for the 2 AM Bands, whichever band (AM1 or 2) you are listening to.
B. Scan Saved Stations
Press the APS button or the AMS button on the remote control once to perform the scanning functions.
In FM mode, press the APS button or the AMS/RPT button and the stations in FM band will be scanned; press the
button in AM mode and scan the band stations of AM Band.
TA (Traffic Alarm) function
Briefly press the TA button to turn on or turn off the TA function.
When TA is enabled (on), the tuner starts searching the traffic announcement.
AF (Alternative Frequencies) function
Briefly press the AF button to turn on or turn off the AF function.
The RDS program will be automatically searched and received. The unit will search another frequency with this
RDS program. Default setting is ON.
PTY (Program Type) function
1. Press the PTY button to turn the PTY function on.

19
2. Rotate VOL/SEL knob or press +/- buttons on the RC to select the music type or speech type: NEWS,
AFFAIRS, INFO, SPORT, EDUCATE, DRAMA, CULTURE, SCIENCE, VARIED, WEATHER, FINANCE, CHILDREN,
SOCIAL, RELIGION, PHONE IN, TRAVEL, LEISURE, DOCUMENT, PTY NONE, POP M, ROCK M, EASY M, LIGHT M,
CLASSICS, OTHER M, JAZZ, COUNTRY, NATION M, OLDIES, FOLK M.
Note: While selecting PTY engagement, its selection is implement by preset button as described in notes.
3. When PTY is selected the radio starts to search corresponding PTY information and stops of the
corresponding PTY information is detected. If corresponding PTY information is not found, normal radio
reception is resumed.
ST/PROG
Press ST/PROG button or the SEL button (VOL knob) on the front panel or SEL button on RC, when ST ON or ST
OFF is shown, select ST ON or ST OFF function so that you can choose either mono or stereo sound.
TA SEEK/TA ALARM
To choose the TA mode, press the VOL +/-/SEL knob for 2 seconds, then press it repeatedly until the display
shows TA seek. Rotate the knob to choose between the TA SEEK and TA ALARM. After choosing, please leave the
unit idle to activate. In TA SEEK mode, the unit will seek for traffic announcement programme when TA is
pressed; in TA ALARM mode, no TA/TP is displayed and the alarm is set off.
MASK DPI/MASK ALL
Press the VOL +/-/SEL knob for 2 seconds, then press it repeatedly until the display shows MASK DPI. Rotate the
encoder volume to toggle between MASK DPI and MASK ALL mode, then leave the unit idle to activate. During
MASK DPI mode, the unit will mask only the AF which has different PI, this is the default mode; during MASK ALL
mode, the unit will mask the AF which has different PI and no RDS signal with high field strength.

20
RETUNE S/L - SHORT/LONG
"RETUNE" refers to the time period the unit allows for radio scan when reception is interrupted. 'S' represents
a time period of 30 seconds and 'L' represents a time period of 90 seconds.
BEEP
Turn BEEP ON if you want the pressing of buttons to be sounded.
Press SEL Button until the display shows "BEEP", then use the VOL+/- Button to turn BEEP sound on or off.
PI SOUND/MUTE
Press SEL Button until the display shows "PI SOUND", then use the VOL +/- Button to choose either PI sound or
PI mute. PI sound refers to the reception noise when the AF function tries to scan alternative frequency.
/