Page is loading ...


1
Contents
Foreword 3
1
Introduction 4
1.1
General information 4
Manufacturer 4
Objective/function of the machine 4
Intended use/inappropriate use 4
1.2
Description of the Wireless BeeHome system 4
1.3
How the Wireless BeeHome system works 6
2
Specifications 7
2.1
Type plate 7
2.2
Main dimensions 8
3
Precautions and safety 9
3.1
Machine protection requirements 9
3.2 Required training 9
4
Commissioning 10
4.1 10
4.2
Assembly and connection 10
Transmitter 10
Receiver 11
4.3
Using the Wireless BeeHome for the first time 11
Transmitter 11
Switching on the transmitter signal 12
Receiver 12
5 Operating the Wireless BeeHome system 13
5.1 Transmitter 13
Controlling the transmitter with a timer 13
Recommended opening and closing times for hives (timer) 13
Controlling the transmitter with a climate computer 13
Recommended opening and closing times for hives (climate computer) 13
Use of the transmitter’s menu 14

2
Activating and changing the digital address/frequency 14
Positioning two transmitters in one greenhouse 14
5.2 Receiver 15
Positioning of the receiver 15
Operating the receiver 15
Use of the receiver’s menu 15
Testing the closing mechanism without entering the menu 16
Changing the digital address/frequency of the receiver 16
Replacing the battery pack 16
6
Maintenance 18
6.1
Mid-year maintenance 18
6.2
Annual maintenance 18
7
Malfunctions and repairs 19
8
After use 20
Appendix 1:
Transmitter specifications 21
Appendix 2:
Receiver specifications 22
Appendix 3:
Electrical circuit diagram 23

3
Foreword
This user manual is intended for suitably trained Wireless BeeHome users and explains how the machine
is constructed and used. Make sure that the user manual is always available for reference purposes. Read
the full contents of the user manual thoroughly before you use the Wireless BeeHome system, paying
particular attention to the safety instructions. Contact your supplier if you have any questions about the
operation or have specific comments to make.

4
1 Introduction
1.1 General information
Manufacturer
Koppert Biological Systems
Veilingweg 14
2651 BE Berkel en Rodenrijs – the Netherlands
+31 (0)10-5140444
Objective/function of the machine
The Wireless BeeHome system is used to open and close Natupol hives at set times.
Intended use/inappropriate use
The Wireless BeeHome system should be used in accordance with the procedure explained in this user
manual. Read the full contents of the user manual, paying particular attention to the safety instructions.
NOTE! The user must read the full contents of these instructions for use thoroughly and make
sure that he/she understands them before using this machine for the first time. This will
avoid unnecessary risks.
Avoid contact with water. Do not drop the Wireless BeeHome system. Do not open components in the
Wireless BeeHome system if you have not received the necessary technical training.
NOTE! The Wireless BeeHome system must not come into contact with water!
Make sure that the Wireless BeeHome system – both transmitters and receivers – is not exposed to damp,
prolonged periods of intense sunshine, and violent jolts. Ensure that the system is not exposed to
condensation and water dripping from gutters etc., and also prevent the equipment from becoming wet
during spraying/misting. The user must not modify the transmitter or receiver in any way other than
described in this manual. If other modifications are made, this will result in the cancellation of the
guarantee. Other modifications are only permitted following official approval in writing from Koppert
Biological Systems in Berkel en Rodenrijs in the Netherlands, and then only when carried out by certified
staff.
1.2 Description of the Wireless BeeHome system
The Wireless BeeHome system comprises the following components (see figure 1.1.):
1. The transmitter
2. 1 or more receivers
3. Timer
4. Antenna
5. Set of mounting brackets

5
Figure 1.1 Overview of Wireless BeeHome System (based on the country of sales, the socket and plug on
the transmitter can differ. There are also different timers).
The components of the Wireless BeeHome system can vary according to the country of sales. For
instance, there are 2 types of transmitters: 1 for EU countries and 1 for the US, Canada, Mexico, and
Japan (based on the sockets and mains system in the country in question). In addition to this, we supply
receivers with a normal hive door and transmitters with a modified (‘queen excluder’) hive door. There are
also different timers (analogue or digital). However, the different transmitters and receivers are supplied
with the same manual.

6
1.3 How the Wireless BeeHome system works
A receiver is placed on each active hive in the greenhouse and tuned to the transmitter signal. Once the
devices have been set up correctly, the receivers will open and close all Natupol hives at set times.
The Wireless BeeHome system is mainly used in the winter months, at the same time as grow lights are
used (for tomato cultivation, for instance). These grow lights compensate for the lower levels of UV light in
the winter months and dominate the natural light. This affects the bumblebees’ ability to orientate
themselves, which in turn has a negative impact on pollination.
Using the Wireless BeeHome system, bumblebees can only leave the hive at times at which there is
enough natural light for them to navigate effectively. This improves the pollination results and the
development and lifetime of the bumblebee colonies.
The Wireless BeeHome system helps improve pollination during winter months, in crops cultivated under
grow lights. However, the grower is responsible for the ultimate success of the fruit set. Koppert Biological
Systems cannot be held liable for the consequences of incorrect use of the Wireless BeeHome system.
Only use products that are approved for use in your country.

7
2 Specifications
2.1 Type plate
The type plate attached to the transmitter and receiver contains all the data by which each individual
component in the Wireless BeeHome system can be identified (figure 2.1 & 2.2).
Figure 2.1 Type plate transmitter.
Figure 2.2 Type plate receiver.

8
The serial number – the unique number assigned to each transmitter or receiver – consists of the year
followed by a sequential number. Please quote this number on all reports and correspondence so that the
relevant machine can be identified.
2.2 Main dimensions
Transmitter: 146 x 250 x 60 mm
Receiver: 130 x 75 x 60 mm

9
3 Precautions and safety
3.1 Machine protection requirements
The Wireless BeeHome transmitter must only be used while following these protection requirements:
•
Check the local safety and Occupational Health Inspectorate rules.
•
Always switch off the power before opening up the transmitter.
•
When programming the transmitter, do not touch any components that are connected to the
mains.
•
Only use earthed sockets.
•
Never connect safety components such as fuses.
•
Do not remove any safety stickers.
3.2 Required training
The user must be familiar with the correct method of using the Wireless BeeHome system.
NOTE! The user must read the full contents of these instructions for use thoroughly and make
sure that he/she understands them before using this machine for the first time. This will
avoid unnecessary risks.
Voltage
Always keep in mind the following precautionary measures and safety instructions. This will minimize the
risk of injury or damage.

10
4 Commissioning
4.1 Delivery
1 Transmitter
1 or more receivers
1 Timer
1 Antenna
1 Set of mounting brackets, consisting of 2 long and 2 short brackets
4 long bolts, 8 wing nuts, 8 m6 rings
4.2 Assembly and connection
Transmitter
Attach the transmitter to a pole along the aisle in a central area in the greenhouse. The transmitter has a
range of approximately 100 metres in both directions along the aisle. If the distance is more than 100
metres, a second transmitter is recommended. Both transmitters must transmit on the same digital
address/frequency (see 5.1). Two neighbouring growers must therefore use different digital
addresses/frequencies for both the transmitters (see 5.1).
When placing the transmitter, ensure a distance of at least 25 centimetres between the pole and the
transmitter (using the supplied material for attachment of the transmitter. Ensure that the antenna sticks
out above the crop.
Figure 4.1 Transmitter and antenna.

11
Position the transmitter in a dry spot in the shade (as a preventative action, pay attention to potential damp
problems by avoiding points in the greenhouse where drops of water could fall as a result of leaking
gutters, or where condensation could accumulate and drip!).
Connect the transmitter to the mains with a fixed mains cable.
Receiver
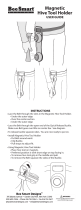
Place a Wireless BeeHome receiver on each active hive. You can prevent bees from escaping by pushing
the hive door down and then inserting the receiver in one movement from the top of the hive entrance.
This will also ensure the product's safety.
All Wireless BeeHome receivers operated by the same transmitter must be set to the same digital
address/frequency.
Figure 4.2 Placing the receiver on a bumblebee hive.
4.3 Using the Wireless BeeHome for the first time
Transmitter
When using the Wireless BeeHome for the first time, you must test whether the receivers pick up the
signal from the transmitter and, more generally, verify that the receivers and transmitters are working. To
perform this test, push the red button on the transmitter to activate the test signal. This signal will be
emitted for one hour.
During this hour, you can verify whether a Wireless BeeHome receiver is working by turning it off and on. If
the device is receiving the test signal, the closing mechanism on the receiver will open and close
continuously for 30 seconds. After this, the mechanism will remain in the opened position, ensuring that
the entrance and exit of the hive are accessible for the bumblebees.

12
Switching on the transmitter signal
You can use a timer to switch on the transmitter signal. Alternatively, you can connect the transmitter to
the climate computer in the greenhouse.
Once controlled by the timer or climate computer, the transmitter will emit an ‘open’ or ‘close’ command for
11 minutes. The transmitter usually emits this signal twice a day (hives open in the morning and hives
closed in the afternoon).
Please note: If you experience a power cut, check the time on the timer and adjust if necessary. When
you use a digital timer, thanks to the timer's internal battery, the transmitter will remain operational during a
power cut. If it does not, you will need to replace the battery in the timer. When you use an analogue timer,
the transmitter will be shut down during a power cut.
If you are not using a timer, the transmitter will not emit a signal during a power cut (the closing
mechanism on the transmitter will also remain in the same position). Once power has been restored, the
transmitter will emit a signal that is usual for that time of day (open or closed). This may cause the closing
mechanism to open or close.
Receiver
The Wireless BeeHome receivers automatically check every 5 minutes whether there is a signal from the
transmitter. After transmitting the ‘open or close’ command, it can take 5 to 10 minutes before all the
Wireless BeeHome receivers respond.
Check on a daily basis whether the receivers are open and closed when they should be.

13
5 Operating the Wireless BeeHome system
5.1 Transmitter
Controlling the transmitter with a timer
Plug the supplied timer into the power socket on the transmitter casing. Insert the plug of the short cable
coming out of the transmitter into the timer. When first installing the timer, always set the manual control
button to ‘OFF’ before programming it. After reading the manual supplied with the timer, set the times at
which you would like the hive to open and close. Select: ‘op elke dag schakelen’ (‘switch every day’).
Please be aware that the timer will not immediately activate the transmitter after all changes to the timer
have been made and after switching to ‘automatisch’ (‘automatic’). A command will only be given when the
following switching time comes around (open or close).
Recommended opening and closing times for hives (timer)
The Netherlands (degree of latitude: 51-52)
•
Two weeks before and after the shortest day (mid December – mid January)
o Open at 10:00
o Close at 14:00
•
4 weeks before and after the shortest day (mid November – mid December)
o Open at 9:30
o Close at 14:30
•
8 weeks before and after the shortest day (mid October – mid November)
o Open at 9:00 AM
o Close at 15:00
•
Outside these periods:
o Never open earlier than 9:00
o Never close later than 15:00
Finland (degree of latitude: 60-64)
•
Open at 11:00
•
Close at 14:00
Controlling the transmitter with a climate computer
Connect the climate computer (UNI) 24V port to the computer in-port on the transmitter. The polarity of this
(UNI) signal is not important (24 V + and –, or 24V – and +). The signal from the climate computer will now
dictate when the receivers open and close.
Recommended opening and closing times for hives (climate computer)
•
Opening
o At least 15 minutes after sunrise AND
o At least 28 watt/m
2
of solar radiation (sunlight)
o OR 10:00 at the latest
•
Close
o 2 hours before sunset
o 2 hours before the screen closes

14
Use of the transmitter’s menu
The transmitter's menu is only used to connect the climate computer to the transmitter or to change the
digital frequency of the transmitter. The menu can only be used once the lid of the transmitter has been
opened (appendix 1).
The following information is used to explain how the transmitter's menu works:
•
If the LED on the printed circuit-board (PCB) (appendix 1) illuminates once (= pulse), the symbol
‘▲’ will be used in the text.
•
If the LED on the printed circuit-board (PCB) (appendix 1) does not illuminate (= pulse), the
symbol ‘-’ will be used in the text.
The general menu settings of the transmitter:
1. Must be set to 1.
2. This can be used to set the frequency (address) of the transmitter (there are 8 options).
3. Is never modified (is always set to 2).
4. The menu is left immediately and the home screen is displayed.
The menu is left automatically after 30 seconds of inactivity.
Please note: If the transmitter's digital address is modified, all receivers controlled by this transmitter will
have to be set to the new address. The default address/frequency of the transmitter is 1.
Press the menu button (appendix 1) on the PCB once, and HOLD it in. This will bring you to menu 1, and
the LED will flash once - - - ▲ - -.
Various menus can be selected by BRIEFLY pressing the menu button once or a number of times. You
can enter a menu by pressing and holding the menu button.
For example: Press briefly once. The LED will flash twice - - - ▲▲- - . You are now in menu 2. If you
continue to hold the menu button, you will enter menu 2.
Activating and changing the digital address/frequency
The default address/frequency of the transmitter is 1. Note: within menu 2, there is a pulse if the LED is not
lit!
Enter menu 2 as described above. Enter menu 2 by pressing and holding the menu button. Briefly
pressing the menu button alternates between address/frequency 1 and address/frequency 2.
You can tell which address/frequency has been set by the flashing of the LED.
For example: ▼▼▼▼▼▼▼- ▼▼▼▼▼▼▼ - = address 1
For example: ▼▼▼▼▼▼▼- ▼▼▼▼▼▼▼ - = address 2
Confirm the selected address/frequency by pressing and holding the menu button once.
Positioning two transmitters in one greenhouse
If the main aisle in the greenhouse is longer than 200 metres, two transmitters with the same digital
address (see above for instructions on how to set the address/frequency) will have to be installed in the
aisle.
In order to prevent signal interference, the second transmitter must receive the signal from the timer or
climate computer 15 minutes earlier or later than the first transmitter.
Divide the main aisle into 4 equal sections, and mount 1 transmitter 1/4 of the way along and 1 transmitter
3/4 of the way along.
Mount the transmitters in such a way that the signal can be transmitted just above the plants.

15
5.2 Receiver
Positioning of the receiver
Place the Natupol hive in the greenhouse (following Koppert's placement advice). Leave the hive for at
least 15 minutes before placing the Wireless BeeHome receiver.
Although each hive should be placed at a different location, hives can also be stacked if necessary
(maximum two hives). If so, use the piece of polystyrene supplied with the receiver. Place this at the rear
of the receiver on top of the Natupol hive to provide padding and a stable base for the second hive.
Please note: Ensure that the closing mechanism of both receivers can still move upwards after you have
stacked the hives. Ensure that the entrances to the two hives are rotated (with each entrance pointing in a
different direction).
Remove the hive door from the hive by pushing it downwards out of the fixing ridges. At the same time,
insert the receiver along the top edge of the fixing ridges (see figure 4.2). This will prevent bumblebees
from escaping and also minimize the chance of getting stung.
Operating the receiver
Switch on the Wireless BeeHome receiver by turning the switch from 0 to 1. If the closing mechanism of
the Wireless BeeHome receiver was not closed, this will close immediately, even if all other closing
mechanisms are open. From that moment, the receiver will await a command from the transmitter. If this
command was already given earlier in the day, the receiver will not open until the next day.
If you want the bumblebees to fly out immediately, you must manually raise the closing mechanism so that
the bees can exit the hive.
Use of the receiver’s menu
The Wireless BeeHome receiver has an internal menu including settings for the digital address/frequency,
which must be the same as the digital address/frequency of the transmitter. The default address/frequency
of the transmitter is 1. The receiver's menu can only be used after the receiver has been opened
(appendix 2).
The following information is used to explain how the receiver's menu works:
•
If the LED (appendix 2) illuminates once (= pulse), the symbol ‘▲’ will be used in the text.
•
If the LED (appendix 2) does not illuminate (= pulse), the symbol ‘-’ will be used in the text.
The general menu settings of the receiver:
1. Is not used.
2. This can be used to set the frequency (address) of the transmitter.
3. Measurement of signal strength (this cannot be modified)
4. Is never modified (is always set to 1).
5. Is never modified (is always set to 5).
6. The menu is left immediately and the home screen is displayed.
The menu is left automatically after 30 seconds of inactivity.
Press the menu button (appendix 2) on the PCB once, and HOLD it in. This will bring you to menu 1, and
the LED will flash once - - - ▲ - -.
Various menus can be selected by BRIEFLY pressing the menu button once or a number of times. You
can enter a menu by pressing and holding the menu button.
For example: Press briefly once. The LED will flash twice - - - ▲▲- - . You are now in menu 2. If you
continue to hold the menu button, you will enter menu 2.

16
Testing the closing mechanism without entering the menu
Press the menu button once briefly (appendix 2). The closing mechanism will now change its position.
Press the menu button once more briefly (appendix 2). The closing mechanism will return to its former
position.
Changing the digital address/frequency of the receiver
The receivers and transmitter in one greenhouse must be set to the same digital address/frequency.
The default address/frequency of the transmitter is 1. Note: within menu 2, there is a pulse if the LED is not
lit!
Enter menu 2 as described above. Enter menu 2 by pressing and holding the menu button. Briefly
pressing the menu button alternates between address/frequency 1 and address/frequency 2.
You can tell which address/frequency has been set by the flashing of the LED.
For example: ▼▼▼▼▼▼▼- ▼▼▼▼▼▼▼ - = address 1
For example: ▼▼▼▼▼▼▼- ▼▼▼▼▼▼▼ - = address 2
Confirm the selected address/frequency by pressing and holding the menu button once.
Replacing the battery pack
Each receiver contains a battery pack (figure 5.1). This pack will last for 2 seasons if the receiver is used
properly.
Please note: The battery pack will last for 2 seasons if the receiver is turned off once it has been removed
from the greenhouse.
Figure 5.1 Battery pack Wireless BeeHome receiver.
Please note: unused battery packs have a shelf life of 10 years, if they are stored under dry conditions.
Therefore, the date mentioned on the packing of the battery pack can vary.

17
The battery power is measured internally. If the batteries are empty, the receiver's closing mechanism will
be turned to the full upwards position – much higher than the usually opening – and will remain in this
position, like a flag (figure 5.2).
Figure 5.2 The battery pack of the receiver has to be changed.
If 3 or more receivers indicate during the second season that the battery pack is empty, we advise you to
change the battery packs in all receivers. If the original battery packs have not been replaced after 2
seasons, we advise you to replace them before the beginning of the third season.
The receiver must be opened in order to replace the battery pack. When changing the batteries in the
battery holder, we advice to spray the contact points in the holder with an oil-based anti-moisture spray,
such as those used to counteract damp in car ignition mechanisms (not plastic spray). ‘Valma
Vochtverdrijver’ (anti-moisture) is recommended. It is also advisable to spray the rest of the electronics as
well to prevent accelerated wear due to damp.

18
6 Maintenance
Maintenance other than the maintenance referred to below must be carried out by qualified personnel.
6.1 Mid-year maintenance
After the lighting season, the transmitter can be switched off and checked for any damage. The transmitter
would normally stay in the greenhouse after the lighting season (in ‘off’ mode). After the lighting season,
the receivers can also be switched off and checked for any damage. The receivers must be removed from
the hives and stored elsewhere.
6.2 Annual maintenance
Ensure that the transmitter is turned on again before the start of the lighting season. You may perform the
following checks after turning on the transmitter:
•
‘Power’ indication by LED: If a green light is visible, the internal power supply is working properly;
if the LED is not lit up, the power is switched off or not working properly.
•
‘Transmitting’ indication by LED: If the red LED is lit up, a signal is being transmitted; if the LED is
not lit up, no signal is being transmitted.
Figure 6.1 LED located on transmitter.
At the start of a new lighting season, you must turn on the receivers and check that they are in working
order.

19
7 Malfunctions and repairs
WARNING! Contains 115 or 230VAC components
WARNING! Contains batteries
Below are some possible malfunctions in the Wireless BeeHome system:
Malfunction
Possible cause
Green LED on transmitter does not light up.
There is no power supply, or there may
be a fault in the power supply.
Red LED on transmitter does not light up.
There is no transmitter signal.
Receiver will not turn on.
The battery pack is empty.
Receiver will still not turn on.
The PCB is broken.
The receiver turns on but is not receiving a signal.
The receiver is broken.
Please contact the Applications and Technology department at Koppert Biological Systems for quick,
expert help to resolve your issue.
/