Page is loading ...

ATTENTION:
READ BEFORE REMOVING FIXTURE FROM CARTON.
Tools Required: Allen Key (3/16"), Phillips screw driver,
electrical wiring tools.
NOTE: This lighting fixture should not be used in area
of limited ventilation or in high ambient temperature
enclosures. It must be stored in a dry location prior to
installation. Do not expose lighting fixture to rain, dust or
other environmental conditions prior to installation.
Best results will be obtained if installed and maintained
according to the following recommendations.
NOTE: Care must be taken not to set lighting fixture down
on optical lenses or lift the fixture in the lens area.
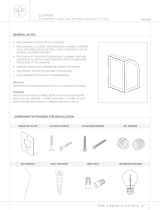
APPLICATIONS
• Minimum 90ºC Supply Conductors when
connections are made external to the unit.
• Rated for 40ºC (104ºF) ambient.
• Suitable for wet location.
• Wall mount luminaire only.
• Construction is suitable for down mount only.
• Must be mounted above grade at minimum 4 feet
or higher.
• Suitable for mounting on combustible construction
grade wall surfaces.
INSTALLATION
Standard Down Mount Application—
FIG. 1 and FIG. 1a
1 Remove the mounting plate from the fixture by
loosening the two socket head cap screws using 3/16"
allen key.
2 Loosen the lock nut from the mounting plate.
3 Detach tether from the mounting plate.
4 Mount the mounting plate to the junction box or wall
with gasket contacting wall, away from the luminaire
and secure to the structure with screws (by others).
These instructions do not claim to cover all details or variations in the equipment, procedure, or process described, nor to provide directions for meeting every possible contingency
during installation, operation or maintenance. When additional information is desired to satisfy a problem not covered sufficiently for user’s purpose, please contact your nearest
representative.
ENTRI LED
Sheet 1 of 4
1/6/10 IMI-722
INSTALLATION INSTRUCTIONS
IMPORTANT: READ CAREFULLY BEFORE INSTALLING FIXTURE.
TM
WARNING: Risk of Fire/Electric Shock. If not qualified, consult an electrician.
WARNING: Risk of Electric Shock. Disconnect power at fuse or circuit breaker before installing or servicing.
WARNING: Risk of Burn. Disconnect power and allow fixture to cool before servicing.
WARNING: Risk of Personal Injury. Fixture may become damaged and/or unstable if not installed properly.
NOTE: Specifications and dimensions subject to change without notice.
Visit our web site at www.cooperlighting.com
Customer First Center 1121 Highway 74 South Peachtree City, GA 30269 770.486.4800 FAX 770.486.4801 AVU091925
FIG. 1
Door Latch
Fixture
Mounting
Bracket
Tether
Lock Nut (2)
J-Box
or Wall
Gasket
on Back
Allen Head
Screws (2)
Mounting Plate
(Secure to J-Box or Wall)
Plug
(Make sure this is in place
before securing fixture to wall)
FIG. 1a

Mounting plate must be in upright position as specified
by label.
NOTE: Care must be taken not to set lighting fixture down
on optical lenses or lift the fixture in the lens area.
5 Make sure plug at bottom of housing is in place properly
as shown in FIG. 1a.
6 Make electrical connections.
7 Re-attach tether to mounting plate.
8 Tighten the lock nut.
NOTE: Tether must be able to rotate freely; therefore, do
not over tighten lock nut. Fixture must hang from the
tether, NOT from electrical wires.
9 Slide the luminaire-mounting bracket over the top lid of
the mounting plate to nest the hanging mechanism.
Hold luminaire in place while allowing the back surface
of luminaire to rest against wall.
10 Screws must be captured behind lower beveled edge
of mounting plate to ensure luminaire is secure. Press
luminaire firmly against wall and re-tighten the two (2)
socket head cap screws to secure the luminaire to the
mounting plate.
THRUWAY BOX-VA2001-XX ACCESSORIES
FIG. 2, 2a, and 2b, for use in down mount application
only.
NOTE: Unit with a thruway box weighs more than 25
pounds. Therefore, connect mounting plate to the wall
using the 4 larger holes and appropriate
anchors/hardware (not provided).
1 Remove the mounting plate from the back of thruway
box by loosening two (2) Allen head screws.
2 Mount the mounting plate to the wall using the four (4)
larger holes with required hardware (by others). Plate
must be in the correct upright position.
These instructions do not claim to cover all details or variations in the equipment, procedure, or process described, nor to provide directions for meeting every possible contingency
during installation, operation or maintenance. When additional information is desired to satisfy a problem not covered sufficiently for user’s purpose, please contact your nearest
representative.
ENTRI LED
Sheet 2 of 4
1/6/10 IMI-722
INSTALLATION INSTRUCTIONS
IMPORTANT: READ CAREFULLY BEFORE INSTALLING FIXTURE.
TM
NOTE: Specifications and dimensions subject to change without notice.
Visit our web site at www.cooperlighting.com
Customer First Center 1121 Highway 74 South Peachtree City, GA 30269 770.486.4800 FAX 770.486.4801 AVU091925
FIG. 2
Gasket
Thruway Box
Housing
Allen Head
Screws (2)
(4) Larger Holes
Mounting
Screws
Gasket
on Back
Mounting Plate
(Secure to Wall)
Donut Gasket
(on Back Box)
Wireway Plug
Mounting
Bracket
Thurway Box Cover
FIG. 2a
Allen Head
Screw
Gasket
on Back
10-24 x 5/8"
SST Screw
10-24 x 5/8"
SST Screw
Thruway
Box Cover
Thruway
Box Housing
Thruway
Box Gasket
Tether
Hex Washer Nut
Nylon Lock Nut
Mounting Plate
(Remove from
back of fixture)
Tether’s Connection
(Connect to the back of fixture)
WARNING: Risk of Fire/Electric Shock. If not qualified, consult an electrician.
WARNING: Risk of Electric Shock. Disconnect power at fuse or circuit breaker before installing or servicing.
WARNING: Risk of Burn. Disconnect power and allow fixture to cool before servicing.
WARNING: Risk of Personal Injury. Fixture may become damaged and/or unstable if not installed properly.

3 Slide the thruway box mounting bracket over the lid of
the mounting plate.
4 Re-tighten the two (2) Allen head screws to secure the
thruway box to the mounting plate.
5 If used with thru branch wiring, then remove plugs on
side as required and install 3/4" NPS pipe. Seal pipe
with Teflon tape or paste.
6 Remove the thruway box cover from the thruway box
housing by loosening five (5) screws.
7 Remove mounting plate from the back of the fixture by
loosening two (2) Allen head screws.
8 Install the fixture-mounting plate on thruway box cover
with four (4) screw and nuts provided.
9 Pull supply wires through center hole and re-install
thruway box cover back on thruway box housing.
NOTE: Make sure wire plug stays in place.
10 Attach the tether from the back of fixture to the
mounting plate.
11 Tighten the lock nut.
NOTE: Tether must be able to rotate freely; therefore, do
not over tighten lock nut.
12 Slide the luminaire-mounting bracket over the top lid
of the mounting plate
13 Tighten the two (2) Allen screws to secure the
luminaire to the mounting plate.
THRUWAY BOX WITH OPTIONS
FIG 3 and 3a, for use in down mount application only
1 Repeat step 1 through 6 in “Thruway Box—VA2001-XX
Accessories.”
2 Remove the thruway box cover from thruway box
housing by loosening five (5) screws.
3 Remove the thruway box door by loosening four (4)
screws.
4 Pull supply wires and re-install thruway box cover back
on thruway box housing.
These instructions do not claim to cover all details or variations in the equipment, procedure, or process described, nor to provide directions for meeting every possible contingency
during installation, operation or maintenance. When additional information is desired to satisfy a problem not covered sufficiently for user’s purpose, please contact your nearest
representative.
ENTRI LED
Sheet 3 of 4
1/6/10 IMI-722
INSTALLATION INSTRUCTIONS
IMPORTANT: READ CAREFULLY BEFORE INSTALLING FIXTURE.
TM
NOTE: Specifications and dimensions subject to change without notice.
Visit our web site at www.cooperlighting.com
Customer First Center 1121 Highway 74 South Peachtree City, GA 30269 770.486.4800 FAX 770.486.4801 AVU091925
Fixture
Mounting Plate
Thruway Box
FIG. 2b
Mounting Plate
(secure to wall)
Mounting Plate
Quick Disconnect
FIG. 3
WARNING: Risk of Fire/Electric Shock. If not qualified, consult an electrician.
WARNING: Risk of Electric Shock. Disconnect power at fuse or circuit breaker before installing or servicing.
WARNING: Risk of Burn. Disconnect power and allow fixture to cool before servicing.
WARNING: Risk of Personal Injury. Fixture may become damaged and/or unstable if not installed properly.

NOTE: Make sure wire plug stays in place.
5 Attach the tether from the back of fixture to the
mounting plate.
6 Tighten the lock nut.
NOTE: Tether must be able to rotate freely; therefore do not
over tighten lock nut.
7 Plug the quick-disconnect.
8 Push the wires into the thruway box.
9 Slide the luminaire-mounting bracket over the top lid of the
mounting lid.
10 Tighten the two (2) Allen head screws to secure the
luminaire to the mounting plate.
11 Re-install the thruway box door.
WIRE GUARD INSTALLATION (OPTIONAL)
FIG. 4, for use in down mount application only.
1 Unscrew four (4) Philip screw from the bottom of the
housing.
2 Align the four (4) holes in clips of wire guard with holes in
the bottom of housing.
3 Secure wire guard to luminaire with four (4) provided
screws.
MAINTENANCE:
NOTE: A regular maintenance schedule should be followed
to retain optimal light output and thermal performance.
Optical lens cleaning should be performed with a clean dry
soft cloth to remove any dust or other contaminants.
Additional cleaning can be performed with non-abrasive
acrylic cleanser.
NOTE: DO NOT USE GLASS CLEANERS.
These instructions do not claim to cover all details or variations in the equipment, procedure, or process described, nor to provide directions for meeting every possible contingency
during installation, operation or maintenance. When additional information is desired to satisfy a problem not covered sufficiently for user’s purpose, please contact your nearest
representative.
ENTRI LED
Sheet 4 of 4
1/6/10 IMI-722
INSTALLATION INSTRUCTIONS
IMPORTANT: READ CAREFULLY BEFORE INSTALLING FIXTURE.
TM
NOTE: Specifications and dimensions subject to change without notice.
Visit our web site at www.cooperlighting.com
Customer First Center 1121 Highway 74 South Peachtree City, GA 30269 770.486.4800 FAX 770.486.4801 AVU091925
Quick Disconnect
FIG. 3a
WARNING: Risk of Fire/Electric Shock. If not qualified, consult an electrician.
WARNING: Risk of Electric Shock. Disconnect power at fuse or circuit breaker before installing or servicing.
WARNING: Risk of Burn. Disconnect power and allow fixture to cool before servicing.
WARNING: Risk of Personal Injury. Fixture may become damaged and/or unstable if not installed properly.
Housing
Wire Guard
Screw
(Secure to Housing)
FIG. 4
/