Page is loading ...

Smart Air Purier White
Please read these instructions carefully before use and retain for future reference
Before switching on your appliance,
always check for any damage which may have been caused in transit
IG9600WIFI
USER MANUAL

2
CONTENTS
Safety Instructions ...................................................................3-4
Technical Specications ..............................................................5
Appliance Overview ...................................................................6
Filter Installation ..........................................................................7
Operating Instructions ...........................................................8-9
Tips For Correct Use ................................................................9
Setting Up Wi-Fi Function ................................................ 10-18
Cleaning and Maintenance ..................................................... 19
Troubleshooting ........................................................................ 20
Fuse Replacement .................................................................... 21
Disposal Information ............................................................... 21
Igenix Warranty Information ........................................... 22-23

3
Carefully read the instructions before operating the unit. Please
retain this manual for future reference.
Important: This product is intended for domestic and light ofce
use ONLY and not for commercial, industrial or outdoor use.
When using electrical appliances, basic safety precautions should
always be followed:
• All electrical repairs must be carried out by a qualied electrician.
Inadequate repairs may result in a major source of danger for the
user and invalidate the warranty.
• Do not operate the unit if the plug or cord is damaged, after it
malfunctions or has been dropped or damaged in any way. It must
be repaired by a qualied electrician.
• Make sure the unit is connected to an earthed power supply of
the correct rating. Please refer to the rating label located at the
side of the unit.
• Use of an extension cord is not recommended with this product.
• This unit should only be used by adults.
• Keep the unit and its cord out of reach of children.
• Children shall not play with the appliance.
• Cleaning and user maintenance shall not be made by children.
• The unit should not be used by persons with reduced physical,
sensory or mental capabilities.
• It is not recommended to place this appliance in cupboards,
closets, boats, caravans or similar locations.
• Do not use the unit in a wet room, such as a bathroom or
laundry room or in areas where the unit is likely to get splashed.
• Always place unit on a dry and stable surface.
• Do not insert pencils or any other objects into the openings of
the unit.
• Do not spray any ammable materials such as pesticides or
perfumes around the product.
SAFETY INSTRUCTIONS

4
• Do not allow any liquid or any ammable detergent to get into
the product. This is to avoid electric shocks and re.
• Do not clean the unit by spraying it or immersing in water.
• Do not unplug the unit while it is working, as this could damage
the electronic circuits.
• Always use the control panel to start and stop the unit.
• Always turn the unit off when not in use by removing the plug
from the wall socket; making sure to pull on the plug top and not
the cord.
• Always turn off the unit before cleaning, carrying out
maintenance or moving location.
• Do not pull or place the electrical cable near a source of heat;
always unroll it completely to avoid dangerous overheating.
• The lter must always be used with the product. When removing
it for cleaning always turn the unit off and unplug from the mains
wall socket.
• This product cannot replace normal ventilation, daily dust
collection or oil pumping when cooking.
• Ensure the power cord plug is well connected with the power
socket. If not, the plug will become hot.
• Leave at least 30cm of space all around the product, and at least
50cm of space above the product when using.
• Do not place the product under an air conditioner to prevent
condensation water dropping into the product.
• Ensure both the lter and the back cover are properly installed
before connecting to power source.
• Please only use and replace the lter specially designed for this
product.
• Do not use hard objects to strike the products, especially the air
outlet and air inlet.

5
SPECIFICATION
Model IG9600WIFI
Voltage (V) 220 - 240
Frequency (Hz) 50 - 60
Power (W) 50
Coverage Area (m2) 50
CADR (m3/h) 400
Air Flow (m3/h) 300
Filter Type H13 HEPA
Filtration 3 Stage (pre-lter - activated carbon lter - HEPA lter)
Timer 2H / 4H / 8H
Fan Speed Auto / High / Sleep
Noise Level (dB) 30 - 60
Product dimensions (mm) H:532 x W:272 x D:302
Product weight (kg) 5 kg

6
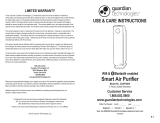
APPLIANCE OVERVIEW
Back Shell Filter*
Air Quality Sensor
Handle
Top Shell
Air Outlet
Control Panel
Fans Component
Light box
Main Body
*Replacement H13 HEPA lter available - search for code IGAP0001 on the Igenix website:
www.igenix.co.uk

7
FILTER INSTALLATION
IMPORTANT: Before use, ensure all packaging on the lter is removed. Always
ensure the machine is unplugged before removing or installing the lter.
1. Press and hold the release button to remove the back cover.
2. Remove the lter from the machine.
3. Remove all packaging on the lter.
4. Insert the lter into the machine and ensure it’s securely in place.
5. Replace the back cover onto the machine.
Close
Open
Close
1 2 3
4 5

8
Light Indicator
• Red light emitted – air quality is poor; the machine is operating in a high mode.
• Yellow light emitted – air quality is average; the machine is operating in a standard mode.
• Blue light emitted – air quality is good; the machine is operating in a low mode.
Modes and Button Operation
Plug in and switch on to connect the power, all indicators lights will ash on for 1 second. After
that, the machine will go in standby mode.
Power Button
Press the Power button to turn on the machine. The unit will start up in Auto mode and
the light indicator on the top of the machine will cycle through a series of colours (Blue
- Cyan - Green - Yellow - Orange - Red – Purple) lasting around 30 seconds. During this
preheating stage, the machine works in a High Mode and the value on the digital display
is 00. After 30 seconds, the indicator light will be inuenced by the air quality. (see ‘Light
Indicator’ above).
The digital display will show the PM2.5 value according to the air quality.
OPERATING INSTRUCTIONS
CONTROL PANEL
A. Wi-Fi
B. Delay Timer (2H / 4H / 8H)
C . Sleep and High Mode
D. Auto Mode
EE
BB
AA
DD
E. Change Filter Indicator
F. Anion/UV Function Indicator
G. PM2.5 Value (air quality rating)
CC
FFGG

9
Wind Speed Button
Press the Wind Speed button to cycle through the different wind speed options (Auto –
Sleep – High). Once the desired wind speed is selected the corresponding light will show
on the digital display.
Sleep Mode
This function is intended for night time use as it gradually reduces operation of the
appliance before turning off. The lights are dimmed, and the noise level is reduced. If the
unit is in Sleep Mode and the air quality is good (blue light emitted from the top of the
unit) then the machine will turn off automatically after 5 seconds.
Auto Mode
The wind speed will be automatically adjusted according to the air quality detected by
the unit’s laser sensor. The colour of the light emitted from the top of the unit will change
according the air quality.
High Mode
The wind speed is on its strongest setting to assist in purifying the air more quickly.
Delay Timer / Wi-Fi Button
To adjust the Delay Timer for the machine, press the Delay Timer button continuously
to cycle through the options of 2 hours (2H), 4 hours (4H) or 8 hours (8H) until your
preferred time is selected. The machine will then automatically turn off after the selected
length of time.
UV / Anion Light Button
When the machine is on, each time you touch the UV/Anion/Light button an alert will
sound for 1 second and the light will switch between soft - standard - off
When the machine is on, press and hold for 5 seconds until the alert sounds, and then
UV and Anion Function will be turned on. Press and hold for another 5 seconds until the
alert sounds, UV and Anion will turn off.
TIPS FOR CORRECT USAGE
To get the best from your appliance, follow the below recommendations:
• Close all windows and doors in the room to be air puried
• Never rest objects of any kind on the appliance
• Do not block the air inlet or outlet of the appliance
• Reduced air ow will result in poor performance and could damage the unit
• Never use the appliance in very damp rooms
• Never use the appliance outdoors
• Make sure the appliance is standing on a level surface
• When not in use and switched off at the plug, cover the appliance to protect
from dust. This will help the lter last longer

10
SETTING UP WI-FI FUNCTION
1. Setting up the Igenix app
• Download the Igenix app from Apple Store for IOS or from Google Play for android and install
the app on your device.
• Register your new Igenix account and sign in to the app.
NOTE: This product will only connect to 2.4GHz bandwidth. While most
modern routers are dual bandwidth (both 5GHz and 2.4GHz) and will
automatically select the correct one for individual WiFi compatible appliances,
please try manually adjusting your router to 2.4GHz if struggling to connect.
2. Pair the Air Purier with the Igenix app
• Plug your IG9600WIFI into a power socket and leave it in the standby mode.
• Press and hold the Delay Timer button until it beeps and the Wi-Fi light symbol starts to ash.
• From the Igenix app choose ‘add device.’
• Please then follow instructions on the screen. (small appliances - Air Purier (Wi-Fi)

11
Description Analysis of cause
Appliance can’t be
congured successfully
1. Check the mobile connected WLAN router SSID and
password is correct
2. Check whether there are additional settings of WLAN router
as shown below:
a) Firewall by router itself or by PC
b) MAC address ltering
c) Hidden SSID
d) DHCP server
Reboot WLAN router, mobile device and appliance (WLAN
module) and connect appliance by CF mode again. Before
rebooting, check nobody has already connected to same appliance
Mobile can’t control
appliance
1. When appliance (WLAN module) is rebooted and app displays
device remove, ignoring this conrmation will lead to mobile
device losing control permission of the appliance. You will
meed to connect the appliance by CF mode again
2. In case of power failure, mobile device will lose control
permission of appliance for 3 minutes after power failure
(Notication will now show up on the mobile device)
If you cannot control the app (appliance) even after power
restored, you will need to connect the appliance by CF mode again.
Mobile can’t nd the
appliance
1. App display appliance Device online. Please check the
following conditions:
a) The appliance has been recongured
b) Appliance out of power
c) Router out of power
d) Appliance can’t connect to router
e) Appliance can’t connect to network through the router
f) Mobile device can’t connect to network
2. After adding the device, it disappears in device list.
Hold and slide down to refresh the device list. If it has no change,
shut down the app and start again.
Wi-Fi Troubleshooting

12
g.1
SYNCING DEVICE WITH AMAZON ALEXA
1. Set up Amazon Echo and enable Igenix app
• Search the “Amazon Alexa” app on the Apple Store for IOS, or on Google Play for Android, and
install the app to your device.
• Once the device conguration is successful you then have the option to rename your device.
Note: In order to successfully sync with your Amazon Echo, it is advised that
you rename your device to an easily recognised word or phrase, such as “Air
Purier”, as this will have a much greater compatibility with Alexa.

13
• Select the “Menu” option in the top left corner (g.3), select “Settings” (g.4), then tap “SET UP A
NEW DEVICE” (g.5).
1a. Set up Echo with Alexa app
Note: You will need to purchase an Amazon Echo device to utilise this
functionality. If you already have an Echo device that is set up you can skip this
step.
• Plug your Echo device (Echo, Echo Tap or Echo Dot) into a power socket and turn it on.
• Make sure your Echo device is energized.
• Open the Alexa app by tapping the app icon on your mobile device.
• Register for an Amazon account, if you don’t have one, or enter your Amazon account and
password, then tap “sign in” (g.2)
g.2
g.3 g.4 g.5

14
• Select your Echo device (g.6), choose the appropriate language (g.7), and then tap “CONNECT
TO WI-FI” (g.8)
• Hold down the dot button on the top of your Echo device until the orange light shows up (g.9),
and then tap “CONTINUE”. When your device is connected to Echo, tap “CONTINUE” (g.10-
11)
g.6 g.7 g.8
g.9 g.10 g.11

15
• Tap “CONTINUE” when Echo is connected to the network (g.15). After an introduction video,
tap “NEXT” to nish the setup (g.16)
• Select a Wi-Fi network to let Echo access the Internet (g.12). Type in the Wi-Fi password
and then tap “CONNECT” (g.13). Echo may take several minutes to connect to the network
(g.14).
g.12 g.13 g.14
g.15 g.16

16
1b. Link Igenix app account to Alexa app
• Select the “Menu” option in the top left corner and select “Skills” (g.17), and then search
“Igenix” in the search bar (g.18).
• Select “Igenix” and tap “ENABLE” to enable the skill.
• You will be redirected to the account link page.
• Type in your Igenix account and password and then tap “Link Now” to link your Igenix account
(g.19)
Note: The country, the account and the password must match the exact
content in step 2.
g.17 g.18
g.19

17
2. Control your Air Purier through Amazon Echo
2a. Discover your IG9600WIFI device
• Echo needs to discover your smart devices before it controls them.
• You can say “Alexa, discover devices” to Echo. Then Echo will discover devices that have already
been added in the Igenix app.
• Alternatively, you can select in the “Menu” option “Smart Home” (g.20) and then tap
“DISCOVER” to discover the smart devices (g.21). Discovered devices will be shown in the list
(g.22).
Note: Every time you change the device’s name in the Igenix app, Echo must
rediscover before you can control them.
g.20 g.21 g.22

18
CONTROL YOUR AIR PURIFIER BY VOICE COMMANDS
Now you can control your Igenix device through Echo. You can use the following commands to
control your Air Purier:
To Turn on Power:
“Alexa, turn on AIR PURIFIER.”
“Alexa, turn off AIR PURIFIER.”
To Choose Mode:
“Alexa, set AIR PURIFIER to <Mode: Sleep/H/Auto>”
“Alexa, what is the mode on AIR PURIFIER?”
To Turn on Night light:
“Alexa, turn on light on the AIR PURIFIER.”
“Alexa, turn off light on the AIR PURIFIER.”
“Alexa, is light on for AIR PURIFIER?”
To Turn on Anion:
“Alexa, turn on anion on the AIR PURIFIER.”
“Alexa, turn off anion on the AIR PURIFIER.”
To Turn on UV:
“Alexa, turn on UV on AIR PURIFIER.”
”Alexa, turn off UV on AIR PURIFIER.”

19
CLEANING & MAINTENANCE
Before any cleaning or maintenance, turn the appliance off on the control panel or via your smart
device. Wait for a few minutes then unplug from the mains socket.
Filter Replacement Indicator
• To keep your appliance working efciently, the machine automatically detects when the lter
is saturated and needs to be replaced. After running for 2200 working hours, the replacement
lter indicator light will continuously ash red
• To replace the lter, please follow the instructions outlined in the FILTER INSTALLATION
section of the instruction manual
• NOTE: Ensure that you are using the specially designed H13 HEPA lter
supplied by Igenix. These lters are available by searching for code
IGAP0001 on the igenix website (www.igenix.co.uk)
• Once the new lter has been correctly installed into the unit, press and hold the Wind Speed
button for 7 seconds to turn off the ashing red light
IMPORTANT:
• Change for a clean lter when indicator dictates
• Do not wash or reuse the lter
• Do not use a vacuum cleaner to clean the lter or wash it directly
• Ensure the machine is unplugged before replacing the lter
• Please sterilize the lter under sunlight regularly
Cleaning and Storage
• Ensure the machine is unplugged before carrying out any maintenance
• Do not immerse the air purier in water or use any liquid for cleaning
• Do not use abrasive, corrosive or ammable cleansers (such as bleach or alcohol) to clean any
part of the unit
• Do not drop any water into the machine when cleaning the air outlet
How to Clean
• Ensure the machine is turned off and unplugged from the power socket
• Take out the lter to clean and remove any dust from the appliance
• Use a soft cloth with neutral cleanser to clean away any dust or debris from the surface of the
machine
• After the lter is air dried, re-install back into the air purier before restarting
• If you do not use the machine for a long time, ensure the machine is dried out, the dust cover is
placed over it and it is stored in a cool, well-ventilated location

20
TROUBLE SHOOTING GUIDE
If you experience difculties with the appliance, please check the suggestions below before
contacting customer services:
Problem Solution
Appliance isn’t working
• It isn’t plugged into a power socket
• There is a power outage
• The home leakage switch or fuse is cut off
• The lter replacement indicator keeps ashing,
meaning the lter needs to be replaced urgently
The appliance is performing poorly
• There is a large amount of dust built up on the
surface of the primary lter
• There are obstacles blocking the air inlet/outlet
The appliance is making a signicant
noise
• There is an object stuck on the fan in the air outlet
• The machine is not sat on a level surface
• The wind speed is on the High setting (reduce the
wind speed setting if the noise is obtrusive and the
high speed performance is not required)
A nasty smell is being emitted from
the appliance
• It is the normal phenomenon that the machine emits
the smell of plastic when used for the rst time
• The machine will emit a nasty smell if the lter is
dusty, so in this situation, please clean or replace the
lter
• If a burning smell is being emitted from the machine,
unplug the unit from the power socket immediately
and contact customer service
The Filter Replacement Indicator is
still ashing after the lter has been
replaced
• Press the wind speed button for 7 seconds to reset
the machine and the indicator light will switch off
WARNING: If the above troubleshooting tips cannot solve your problem
and your unit requires further maintenance, please contact the supplier or
customer service. Please do not disassemble the machine to maintain by
yourself.
/