Page is loading ...

E A
D
D
C
B
B
C
K&H 3 Stair Pet Steps
Assembly Instructions
K&H Pet Products, Central Garden & Pet
Colorado Springs, CO
www.khpet.com l (719) 591-6950
Made in China
Thank you for purchasing the 3 Stair Pet Steps by K&H Pet Products. They were designed for pets who need
assistance getting on and off furniture and when used properly, they will last for many years to come.
Recommended for Small to Medium Sized Dogs
PANEL 1 PANEL 2
Figure 2
Figure 1
Left Crease Right
Crease
Figure 3
Figure 4
Figure 6
Figure 5
Figure 7
PANEL 1
PANEL 1
PANEL 1
PANEL 2
PANEL 2
PANEL 2
FLAP 1
FLAP 1
FLAP 1
FLAP 2
D
D
BC
BC
A
A
B
BC
AA
A
Form
90 degree
horizontal
angle
C
D
E
B
B
Left
Crease (B)
Right
Crease
(B)
90 degree
vertical
angle
PANEL 1 PANEL 2
A
E
D
C
Left
Crease (B)
Right
Crease (B)
B
7
6
5
4
3
2
1
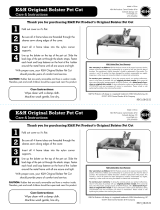
ASSEMBLY INSTRUCTIONS:
OVER
Unfold and lay both PANEL 1 and PANEL 2 onto a oor or table as
shown above in Figures 1 & 2. PANEL 1 must be placed so that the
sticker labels A and E with the hook and loop material are facing up.
Position PANEL 1 the same way it’s shown in Figure 1 with sticker E
on the left.
Lay down PANEL 2 directly to the right of PANEL 1. Make sure the smaller
hook and loop strips are also facing up (6 total).
IMPORTANT: Position PANEL 2 as shown in Figure 2 with sticker label A
on the left side, and to the right of PANEL 1.
Starting with PANEL 2, fold FLAP 1 on edge A at the crease into the
upright position so that it’s free to bend more easily. See Figure 3.
Connect PANEL 1 and PANEL 2 by attaching the edges labeled A on
both panels to one another. See Figure 4. Evenly overlap and press at
to adhere together.
Next, stand PANEL 1 into the upright position as shown in Figure 5.
On PANEL 2, identify both the far left crease and the right crease on
section B. See Figure 5.
Now bring the far right end (edge E) of PANEL 2 inward towards the
left bending the left crease of section B until it forms a 90 degree
vertical
angle
. See Figure 6.
Holding PANEL 2, bend the right crease of section B into a 90 degree
horizontal
angle
. See Figure 7. (Note: Sticker labels A, B, C & D of
PANEL 2 should now be facing down towards the inside of the structure).
E
hook & loop
faces out
hook & loop
faces out
hook & loop
faces out
A
hook & loop
faces out

K&H Pet Products, Central Garden & Pet
Colorado Springs, CO
www.khpet.com l (719) 591-6950
Made in China
K&H Pet Products with design is a registered trademark of K&H Manufacturing, LLC.
©2022 Central Garden & Pet Company REV0_02-25-22
K&H 3 Stair Pet Steps
Assembly Instructions
Hook
and loop
outer edge Hook
and loop
inside edge
Figure 8
Figure 10
Figure 9
Figure 11
PANEL 1
PANEL 2
CARE INSTRUCTIONS:
The cover is removable and machine washable. Line drying is recommended.
The inside structure can be wiped clean with a damp cloth.
K&H 3 Stair Pet Steps
B
B
B
B
C
C
C
CC
D
D
D
E
Front of rst stair
Figure 14
LAY
FLAT
C
C
D
D
E
E
90 degree
vertical angle
followed by
a 90 degree
horizontal
angle
Panel 1 edge
(D) attached
to Panel 2
edge (D)
Hook and loop
on inside edge
Hook and loop on
outside edge (E)
Figure 12
FLAP 2
E
E
Hook and loop
on inside edge (E)
D
CONTINUED...
11
12
13
10
9
Locate the bottom hook and loop covered outer edge on PANEL 1 labeled
B. Fold outer edge B towards the inside edge B of PANEL 2. The inside
edge B of PANEL 2 is also covered with hook and loop material. See
Figure 8.
Tuck the outer edge labeled B from PANEL 1 into the open corner to meet
the inside edge B of PANEL 2. See Figure 9. Attach hook and loop
edges B from both panels to one another. Make sure the corners and edges
are lined up and ush. Repeat this on the other side. Once both sides are
ush, rmly adhere all hook and loop edges B to one another. Repeat this
same pattern for both C and D. See
Figures 10 & 11.
At this time, pull apart and re-attach any sections if adjustments are need-
ed until the entire structure is a solid form and all outer edges are ush.
You should now be at the top and ready to close the structure. Bend FLAP 2
outside edge E and insert into the structure. Attach the hook and loop mate-
rial from outside edge E to the inside edge E. See Figure 12.
While the 3-stair structure is still on its end, locate the cover and position
it so the K&H logo patch is on the front of the rst stair step where edges
E are attached. Slide the cover over each of the 3 stair steps, one at a
time working your way down. See Figure 13.
For reference of where edges E and the front side of the rst stair step
are, See Figure 14.
P
ull the cover over the 3-stair structure completely covering it. See Figure
15. Zip closed.
8
Figure 13
E
K&H logo
patch
Figure 15
E

7
6
5
4
3
2
1
K&H 4 Stair Pet Steps
Assembly Instructions
K&H Pet Products, Central Garden & Pet
Colorado Springs, CO
www.khpet.com l (719) 591-6950
Made in China
Thank you for purchasing the 4 Stair Pet Steps by K&H Pet Products. They were designed for pets who need
assistance getting on and off furniture and when used properly, they will last for many years to come.
Recommended for
Small to Medium Sized Dogs
ASSEMBLY INSTRUCTIONS:
OVER
Unfold and lay both PANEL 1 and PANEL 2 onto a oor or table as
shown above in Figures 1 & 2. PANEL 1 must be placed so that the
sticker labels A and E with the hook and loop material are facing up.
Position PANEL 1 the same way it’s shown in Figure 1 with sticker E
on the left.
Lay down PANEL 2 directly to the right of PANEL 1. Make sure the smaller
hook and loop strips are also facing up (6 total).
IMPORTANT: Position PANEL 2 as shown in Figure 2 with sticker label A
on the left side, and to the right of PANEL 1.
Starting with PANEL 2, fold FLAP 1 on edge A at the crease into the
upright position so that it’s free to bend more easily. See Figure 3.
Connect PANEL 1 and PANEL 2 by attaching the edges labeled A on
both panels to one another. See Figure 4. Evenly overlap and press at
to adhere together.
Next, stand PANEL 1 into the upright position as shown in Figure 5.
On PANEL 2, identify both the far left crease and the right crease on
section B. See Figure 5.
Now bring the far right end (edge E) of PANEL 2 inward towards the
left bending the left crease of section B until it forms a 90 degree
vertical
angle
. See Figure 6.
Holding PANEL 2, bend the right crease of section B into a 90 degree
horizontal
angle
. See Figure 7. (Note: Sticker labels A, B, C & D of
PANEL 2 should now be facing down towards the inside of the structure).
Left Crease Right
Crease
Figure 3
Figure 4
Figure 6
Figure 5
Figure 7
PANEL 1
PANEL 1
PANEL 1
PANEL 2
PANEL 2
PANEL 2
FLAP 1
FLAP 1
A
A
B
BC
AA
A
Form
90 degree
horizontal
angle
C
D
E
B
B
Left
Crease (B)
Right
Crease
(B)
90 degree
vertical
angle
PANEL 1 PANEL 2
A
E
D
C
Left
Crease (B)
Right
Crease (B)
B
E A
D
D
C
B
B
C
PANEL 1 PANEL 2
Figure 2
Figure 1
FLAP 1
FLAP 2
D
D
BC
BC
E
hook & loop
faces out
hook & loop
faces out
hook & loop
faces out
MAIN BOX (4th Step)
Stored Panel 1 and 2. Set aside for later.
IMPORTANT: All contents come inside a main box which eventually will become the 4th step. Empty contents of the main box and set aside for later.
A
hook & loop
faces out

E
K&H logo
patch
K&H Pet Products, Central Garden & Pet
Colorado Springs, CO
www.khpet.com l (719) 591-6950
Made in China
CONTINUED...
K&H Pet Products with design is a registered trademark of K&H Manufacturing, LLC.
©2022 Central Garden & Pet Company REV0_02-25-22
11
12
13
10
9
K&H 4 Stair Pet Steps
Assembly Instructions
Locate the bottom hook and loop covered outer edge on PANEL 1 labeled
B. Fold outer edge B towards the inside edge B of PANEL 2. The inside
edge B of PANEL 2 is also covered with hook and loop material. See
Figure 8.
Tuck the outer edge labeled B from PANEL 1 into the open corner to meet
the inside edge B of PANEL 2. See Figure 9. Attach hook and loop
edges B from both panels to one another. Make sure the corners and edges
are lined up and ush. Repeat this on the other side. Once both sides are
ush, rmly adhere all hook and loop edges B to one another. Repeat this
same pattern for both C and D. See
Figures 10 & 11.
At this time, pull apart and re-attach any sections if adjustments are need-
ed until the entire structure is a solid form and all outer edges are ush.
You should now be at the top and ready to close the structure. Bend FLAP 2
outside edge E and insert into the structure. Attach the hook and loop mate-
rial from outside edge E to the inside edge E. See Figure 12.
While the 3-stair structure is still on its end, locate the cover and position
it so the K&H logo patch is on the front of the rst stair step where edges
E are attached. Slide the cover over each of the 3 stair steps, one at a
time working your way down. See Figure 13.
For reference of where edges E and the front side of the rst stair step
are, See Figure 14.
Now close the MAIN BOX that originally stored PANEL 1 and PANEL 2.
Lay the 3-stair structure down at and insert the main box (4th step) into
the end of the cover and pull the cover over both structures completely.
See Figure 15. Zip closed.
8
Hook
and loop
outer edge Hook
and loop
inside edge
Hook and loop on
outside edge (E)
K&H logo patch
should be on the
front of the
rst stair
Figure 8
Figure 10
Figure 9
Figure 12
Figure 15
PANEL 1
PANEL 2
FLAP 2
CARE INSTRUCTIONS:
The cover is removable and machine washable. Line drying is recommended.
The inside structure can be wiped clean with a damp cloth.
K&H 4 Stair Pet Steps
B
B
B
B
C
C
C
CC
D
D
E
E
E
Hook and loop
on inside edge
Hook and loop
on inside edge (E)
Figure 11
FLAP 2
E
DD
Main box
(4th step)
3-Stair
Structure
Figure 13
Front of rst stair
Figure 14
C
C
D
D
E
E
/