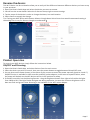
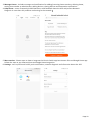
iEBELONG Kinetic Switch lets you control your home appliances from anywhere using your smartphone. It's easy to set up and use, and it works with Amazon Alexa and Google Home for voice control. You can schedule your lights and appliances to turn on and off automatically, or control them remotely when you're away from home. The Kinetic Switch also has a countdown function that lets you set a timer for your appliances to turn off after a certain amount of time.
iEBELONG Kinetic Switch lets you control your home appliances from anywhere using your smartphone. It's easy to set up and use, and it works with Amazon Alexa and Google Home for voice control. You can schedule your lights and appliances to turn on and off automatically, or control them remotely when you're away from home. The Kinetic Switch also has a countdown function that lets you set a timer for your appliances to turn off after a certain amount of time.


-
 1
1
-
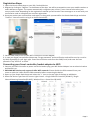 2
2
-
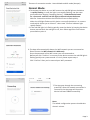 3
3
-
 4
4
-
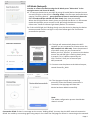
 5
5
-
 6
6
-
 7
7
-
 8
8
-
 9
9
-
 10
10


iEBELONG Kinetic Switch lets you control your home appliances from anywhere using your smartphone. It's easy to set up and use, and it works with Amazon Alexa and Google Home for voice control. You can schedule your lights and appliances to turn on and off automatically, or control them remotely when you're away from home. The Kinetic Switch also has a countdown function that lets you set a timer for your appliances to turn off after a certain amount of time.
Ask a question and I''ll find the answer in the document
Finding information in a document is now easier with AI
Related papers

Other documents
-
QUANTEK CPWIFISW1 User manual
-
 Sycamore LED0143 Operating instructions
-
AKASO P40 Wi-Fi Camera User manual
-
 sycamoreLED com Kinetic 12/24 Volt Receiver User manual
-
Solight DTY02WIFI User manual
-
Goldair GPTF470 User manual
-
Goldair GPPH220 User manual
-
 BlitzWolf BW-SHP3-US User manual
-
Tellur TLL331171 User manual
-
MOES MS-104 User manual


