AKASO Outdoor Security Camera 1080P, Support Alexa, Google Home, Fire TV, Home Indoor Outdoor WiFi Security Camera, IP65 Waterproof, 2 Way Audio, Night Vision, Remote Access, Motion/Sound Detect User manual
- Category
- Convenience lighting
- Type
- User manual

USER
MANUAL
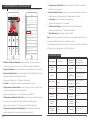
B60 WiFi Camera


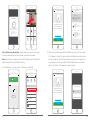
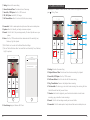
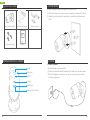
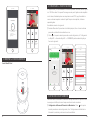
Lens
Microphone
IR LED
Speaker
Reset
SD Card Slot
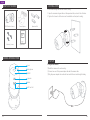
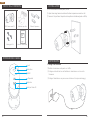
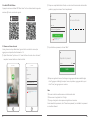
WHAT’S IN THE BOX?
CAMERA INTRODUCTION
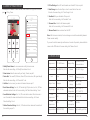
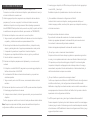
1. INSTALLATION
QUICK
REFERENCE
GUIDE
B60 Wireless Camera
Quick GuideMounting Screws
Expansion BoltPower Adapter
B60 Wireless Camera
3
2
6
5
1
4
1. Drill 3 holes through the holes on the wall / ceiling.
2. Open the accessories bag and take out the expansion bolt, and insert it into the holes.
3. Tighten the 3 screws to fix the device on the installation surface (wall or ceiling).
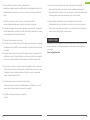
2. SET-UP
1. Plug In Your Camera
Install the camera on the wall or ceiling.
Connect one end of the power adapter cable with the camera cable
Plug the power adapter into a wall outlet and wait for the red indicator light blinking.
01 02
English

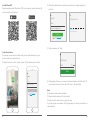
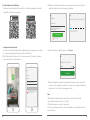
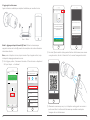
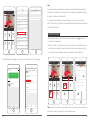
2. Install Phone APP
Please download and install “Akaso Smart” APP on your phone by scanning the below QR
code or searching in the app store.
Download on the
App Store
G
ET IT ON
Google Play
3. Get a New Account
If you already have an account for Akaso Smart, just ignore the below and log in your
account to add device, please refer to 4.
Open “Akaso Smart” to click “ register → agree”, fill in the mobile number or Email.
Register
USA +1
Mobile number / Email
Continue
I agree with Service Agreement and
Privacy Policy
Register
Log in
After filling in Email address, a verification code will be sent to mailbox, please get it
and fill in it.
Verification Code
Verification code has been sent to:
01-123****8623, Resend(49s)
Register
USA +1
Continue
I agree with Service Agreement and
Privacy Policy
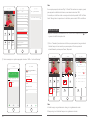
Then set password, click “Done”.
After registering the account, you need to add home information, click “Add Home”, fill
in home name, location, add rooms, then click “Done” to add successfully.
Note:
Username must be a valid email address.
Password must be between 6-20 digits in length.
Please choose the same country in register and login.
If you have forgotten your password, click "Forgot password" to retrieve your password via
email verification.
Set Password
Done
03
04

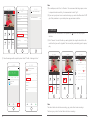
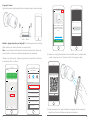
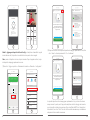
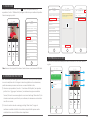
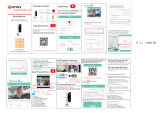
4. Add Your Camera
Follow the on-screen instructions to finish the setup to connect your router.
30cm ~ 100cm
Way 1: Add device by QR Code - Use camera to scan the QR code on the mobile phone
which contains net-pairing information.
Note: When the device is powered on, the indicator light will be on. After the beep is
heard, the device indicator light flashes red quickly.
Click “Add Device → Security Camera → next step → enter WI-FI Password → confirm”.
Gunnar
84.3°F High H...
Outdoor Temp Outdoor AQL Outdoor Humid...
All Devices
Living Room
Bedroom
Setting
Add Device
Nodevices yet
My Home
Smart Scenes
Profile
Select Device Type
Zigbee
Security Camera
ZigBee Gateway
T&H Sensor
Wall Socket(ZigBee)
Wall Switch(ZigBee)
Curtain Switch
Bluetooth
All
Frequently Added
Cancel
Only supported on 2.4GHz Wi-Fi networks
Enter your home’s Wi-Fi pa...
Wi-Fi: AKASO_WiFi Change Network
Confirm
Add Device Otherwise
Power the device on and make
sure the indicator is flashing
quickly or a prompt tone is heard
How to set the indicator to flash
quickly or with a prompt tone
next step
A QR code will be shown, just face the phone to the camera, a beep sounds, then click
“I HEARD THE BEEP”, see below picture
Wait the connecting for a while, the device will be added successfully in seconds. Click
Camera icon to preview camera live image.
Cancel
Scan QR code with the IP Cam
Point the code to the camera lens for 20cm.
NOTHING HAPPEND I HEARD THE BEEP
05
06

Connecting Now
2%
Make sure your phone and device
are as close to your router as possible.
Searching for Device
Registering device to the cloud
Initializing your Device
Cancel
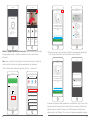
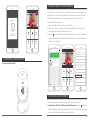
Way 2: Add device by SmartConfig - Mobile phone will broadcast the net-pairing
information, device will connect the router when it receives the information.
Note: When the device is powered on, the indicator light will be on. After the beep is
heard, the device indicator light flashes red quickly.
Select Device Type
Zigbee
Security Camera
ZigBee Gateway
T&H Sensor
Wall Socket(ZigBee)
Wall Switch(ZigBee)
Curtain Switch
Bluetooth
All
Frequently Added
Gunnar
84.3°F High H...
Outdoor Temp Outdoor AQL Outdoor Humid...
All Devices
Living Room
Bedroom
Setting
Add Device
Nodevices yet
My Home
Smart Scenes
Profile
Click “Add Device → Security Camera → Otherwise → SmartConfig”.
Add Device Otherwise
Power the device on and make
sure the indicator is flashing
quickly or a prompt tone is heard
How to set the indicator to flash
quickly or with a prompt tone
next step
Select a method
QR Code
Use camera to sacn the QR code
on the mobile phone which contains
net-pairing info.
AP Code
Mobile phone transmit the net-
pairing info by connecting camera's
hotspot.
SmartConfig
Mobile phone will broadcast the
net-pairing information, device
will connect the router when it
receives the info.
After confirming that the device indicator is flashing red quickly, click "Next → Enter
Wi-Fi Password → Confirm”. The device indicator starts flashing blue quickly, then the
blue light is always on. The mobile app starts counting seconds and is searching for
devices waiting for a connection. After the APP prompts that the device has been
searched, click "Done". Click Camera icon to preview camera.
Add Device Otherwise
Power the device on and make
sure the indicator is flashing
quickly or a prompt tone is heard
How to set the indicator to flash
quickly or with a prompt tone
next step
Cancel
This app is supported only on 2.4GHz Wi-Fi
channels.
Enter Wi-Fi Password
Wi-Fi: AKASO_WiFi Change Network
Confirm
07
08
B60
Alarm
Screenshot
Cloud storage
Speak
Playback
SD
2019-01-09 13:51:48
Record
Back
Signal: 91%

Connecting Now
2%
Make sure your phone and device
are as close to your router as possible.
Searching for Device
Registering device to the cloud
Initializing your Device
Cancel
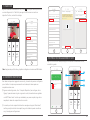
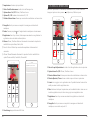
3. INSERT MICROSD CARD
Insert MicroSD Card
4. FORMAT MICROSD CARD
Micro SD Card and Cloud Storage can be selected, support 2-128GB card with Class 10 or
above. In order to make sure the card more compatible with the camera, please format it
firstly on computer as FAT32, then format it again in camera after inserting the card. After
finishing, the camera will start to record.
Please format as per the below:
Open “Akaso Smart” to enter into the main interface, click camera icon to enter into the
live view interface.
Click on the right top to enter into the more setting, click “SD Card Setting → Format
SD Card → CONFIRM” to format the card, please see below:
5. MOTION DETECTION
When the motion is detected, an alarm message with snapshot will be sent to message
center on the mobile phone, at the same time you will hear alarm sound.
Motion Detection Alarm Setting: Click on the right top to enter into the more setting,
click “Motion Detection Settings”, turn on it and select the level of sensitivity.
St
84.3°F Good Good
Outdoor Temp Outdoor AQL Outdoor Humid...
All Devices
Living Room
Bedroom
Setting
My Home
Smart Scenes
Profile
Speed 4 Class
Online
More
Modify Device Name Speed 4 Class2018
Share Devices
Device info
Use Echo
Basic Feature Settings
Sound Detection Settings Off
Cloud Storage Not active
Feedback
Motion Detection Settings Off
SD Card Settings
09 10
B60
Alarm
Screenshot
Cloud storage
Speak
Playback
SD
2019-01-09 13:51:48
Record
Back
Signal: 91%
B60
Alarm
Screenshot
Cloud storage
Speak
Playback
SD
2019-01-09 13:51:48
Record
Back
Signal: 91%

More
Modify Device Name Speed 4 Class2018
Share Devices
Device info
Use Echo
Basic Feature Settings
Sound Detection Settings Off
Cloud Storage Not active
Feedback
Motion Detection Settings Off
SD Card Settings
Motion Detection Settings
Motion Detection Alarm
Tap to set your name
Home Management
Message Center
Scan QR Code
Feedback
Settings
86-13714329321
My Home
Smart Scenes
Profile
View the messages with snapshots pushed: Select “ Profile → Message Center ”.
St
84.3°F Good Good
Outdoor Temp Outdoor AQL Outdoor Humid...
All Devices
Living Room
Bedroom
Setting
My Home
Smart Scenes
Profile
Speed 4 Class
Online
Note:
In a small space, select "Low" or "Medium". For environments with large space, in order
to improve the alarm sensitivity, it is recommended to select "high".
If you need your phone to receive an alert message, you must allow “Akaso Smart” APP
get all the permissions in your mobile phone app permissions interface.
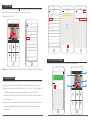
6. PLAYBACK
Enter into the live view interface, click Playback icon to enter into the playback
interface.
Click ”Calendar” to select the date you want playback, then drag the time table to the
exact time that you want to playback. The video will play automatically, press to pause /
play.
2018-09-03 13:51:48
22:00
23:00 0:00 1:00
2:00
2:00
Calendar Record
Screenshot
B60
Back
Signal: 91%
SD
2018-09-03 13:51:48
22:00
23:00 0:00 1:00
2:00
2:00
Calendar Record
Screenshot
B60
Back
Sun Mon Tues Wed Thur Fri Sat
1 2 3
4 5 6 7 8 10
17161514131211
18 19 20 21 22 23 24
302928272625
9
2018 - 11
Note:
The date in black color with video recordings, grey color without video recordings.
The time in grey color in the time table is with video recordings.
11
12
B60
Alarm
Screenshot
Cloud storage
Speak
Playback
SD
2019-01-09 13:51:48
Record
Back
Signal: 91%
B60
Alarm
Screenshot
Cloud storage
Speak
Playback
SD
2019-01-09 13:51:48
Record
Back
Signal: 91%

8. SHARE DEVICES
One camera can only be added to one account, and the account can only be set in by one
phone. If anyone need to view the camera, the camera can be shared unlimited times.
Enter into the more setting, click “Share Devices” to set, click “Add” to select the region
and input the account (the account must be registered in “Akaso Smart” APP
successfully in advance) you want to share, then click complete, the camera is shared to
others successfully.
The account which have been shared will get a message on “Akaso Smart” app, please
confirm and agree to this sharing request, then the others also can live view and do
some settings.
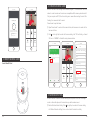
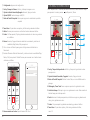
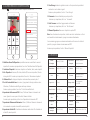
9. LIVE VIEW INTERFACE
Click camera icon to enter into the Live View Interface, see following:
7. USE ECHO
Enter into the live view interface, click on the right top to enter into the more setting,
click “Use Echo” to follow the instructions to connect your device .
Please see below pictures:
More
Modify Device Name Speed 4 Class2018
Share Devices
Device info
Use Echo
Basic Feature Settings
Sound Detection Settings Off
Cloud Storage Not active
Feedback
Motion Detection Settings Off
SD Card Settings
Note: Please make sure Echo show and Smart devices in the same and stable WIFI network.
More
Modify Device Name Speed 4 Class2018
Share Devices
Device info
Use Echo
Basic Feature Settings
Sound Detection Settings Off
Cloud Storage Not active
Feedback
Motion Detection Settings Off
SD Card Settings
Share devices
Add a new family member, so that he can share all
the devices and smart scenarios. Home Settings
No shared devices, please add it.
Add
Add Complete
Region USA +1
Account Enter Mobile Number / E-mail
St
84.3°F Good Good
Outdoor Temp Outdoor AQL Outdoor Humid...
All Devices
Living Room
Bedroom
Setting
My Home
Smart Scenes
Profile
Speed 4 Class
Online
13
14
B60
Alarm
Screenshot
Cloud storage
Speak
Playback
SD
2019-01-09 13:51:48
Record
Back
Signal: 91%
B60
Alarm
Screenshot
Cloud storage
Speak
Playback
SD
2019-01-09 13:51:48
Record
Back
Signal: 91%
1
5
4
2
3

1. Screenshot: Click it to make snapshot and pictures will be saved in mobile phone.
2. Speaker: Press it to talk with your family via camera on phone.
3. Record: Click it to Start / Stop recording manually. The video flips will save on your
phone.
4. Alarm: Turn On / Off the motion detection alarm and select the sensitivity, Low /
Medium / High for optional.
Click “Alarm” icon to enter into the Motion Detection Settings.
Turn on “Motion Detection Alarm” and select the level of sensitivity “Low / Medium /
High” for optional.
Setting: Enter into the more setting.
Camera Date and Time: The date and time of live image.
Sound On / Off Option: Turn On / Off the sound.
SD / HD Option: Switch HD / SD image.
Full Screen Button: Press it to enter into the full screen viewing.
Motion Detection Settings
Motion Detection Alarm
10. PLAYBACK INTERFACE
Click”Playback → Calendar for select the date”, slide the time bar to playback the videos,
press to Play / Pause.
B60
2018-09-03 13:51:48
22:00
23:00 0:00 1:00
2:00
2:00
Calendar Record
Screenshot
Back
1
4
8
6
2
3
5
7
9
1. Setting: Enter into the more setting.
2. Playback Date and Time: The date and time of video recording for playback.
3. Sound On / Off Option: Turn On / Off the sound.
4. Full Screen Button: Press it to enter into the full screen viewing.
5. Play / Pause Button: Pause or start playback video recording.
6. The time table: The time in grey color is with video recordings. You can drag the time
table to the exact time that you want to see.
7. Calendar: Select date for playback, you will see the date in black color with video
recordings, grey color without video recordings.
8. Record: Click it to start recording manually and save on Mobile.
9. Screenshot: Click it to make snapshot and pictures will be saved in mobile phone, as.
15
16
B60
Alarm
Screenshot
Cloud storage
Speak
Playback
SD
2019-01-09 13:51:48
Record
Back
Signal: 91%
B60
Alarm
Screenshot
Cloud storage
Speak
Playback
SD
2019-01-09 13:51:48
Record
Back
Signal: 91%
5. Cloud storage: Support Amazon AWS Cloud

11. MORE SETTING INTERFACE
Click”Playback → Calendar for select the date”, slide the time bar to playback the videos,
press to Play / Pause.
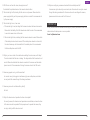
12. SPECIFICATION
More
Modlfy Device Name Speed 4 Class2018
Share Devioes
Device info
Use Echo
Basic Feature Settings
Sound Detection Settings Off
Cloud Storage Not active
Feedback
Motion Detection Settings Off
SD Card Settings
1. Modify Device Name: You can rename and modify the device name.
Enter into the more setting, click “Modify Device Name” to set.
2. Share devices: Share the device with your family / friends, see part 8.
3. Device Info: The owner ID, IP Address, Device ID, Device time zone, Wifi signal strength.
Enter into the more setting, click “Device Info” to set.
4. Use Echo: How to connect your device to Amazon Alexa, see part 7.
5. Basic Feature Settings: Turn On / Off indicator light; flip the video; turn On / Off time
watermark selection. Enter into the more setting, click “Basic Feature Settings” to set.
6. Sound Detection Settings: Turn On / Off sound detection alarm. When the sound is
over 60 decibels, the alarm will activate. Enter into the more setting, click “Sound
Detection Settings” to set.
7. Motion Detection Settings: Turn On / Off motion detection alarm and the selection of
the sensitivity, see part 5.
8. SD Card Settings: Show SD Card information and format SD Card, see part 4.
9. Cloud Storage: Save the video flips on cloud to avoid the loss from card.
Enter into the more setting, click “Cloud Storage” to set.
10. Feedback: Write your feedback of this product.
Enter into the more setting, click “Feedback” to set.
11. Firmware Info.: Check for the firmware update.
Enter into the more setting, click “Firmware Info” to set.
12. Remove Device: Remove devices from this APP.
Note: After the device is deleted, the cloud storage service will be automatically released.
Please consider carefully.
If you need to add the camera by another account or return the product, please delete the
camera in the APP. Enter into the more setting, click “Remove Device”.
Image sensor
Min. illumination
Lens
Angle of view
Day & night
Video
compression
Operating
temperature
Audio
compression
Image resolution
1/2.7 CMOS Sensor
1080P(1920*1080)
G.711
H.264
Auto IR-CUT filter
130 degree
3.6mm
0.1Lux(IR LED On) / F 1.2
Image setting
Wireless
Security
On-board
storage
Power supply
Power
consumption
IR distance
Brightness, contrast,
chroma, saturation
WiFi, 802.11 b/g/n
User authentication,
software encryption
Built-in TF slot,
up to 128GB
- 68 °F to 122 °F
(- 20 °C to 50 °C)
DC 12V / 1A
5W~10W
Night visibility up to 20m
17
18
B60
Alarm
Screenshot
Cloud storage
Speak
Playback
SD
2019-01-09 13:51:48
Record
Back
Signal: 91%

13. TROUBLESHOOTING
1. Why can't I add a device or fail to configure the network?
According to the status of the device indicator, you can determine the cause and solution
of the failure of the network connection.
Before adding the device, ensure that the device is in red flashing state (2 times in
1 second). If the indicator status is abnormal, please reset the device to factory settings
(press and hold the device RESET button until you hear a beep) (The reset button
position of each product is different, but they are marked with "RESET").
The device indicator does not turn blue or does not hear the beep.
A. Note that the screen of the mobile phone is aligned with the lens of the device in
parallel, and the distance is kept at about 15cm.
B. Try to adjust the distance between the phone screen and the device before and after,
and keep it for 2 seconds or so in each position.
C. Please check if there are any stains on the surface of the lens of the device.
D. Make sure the screen of the phone is clear, crack-free and non-reflective.
E. Use the other way of network connection
The device indicator flashes blue quickly and does not turn constant blue.
A. device does not support 5GHz WiFi, please ensure that when adding device, the
phone is connected to 2.4GHZ WiFi.
B. WiFi password must be entered correctly, and there must be no special characters.
C. Note that the current WiFi network is smooth, it is recommended to try to restart the
router.
The device indicator light turns blue. And the APP can not find the device.
A. Try adding devices in other ways
B. If after repeated attempts, the blue light is still on and the device cannot be found.
Please contact customer service for technical assistance.
Note: After any failed addition, you must first reset the device to factory settings when
you need to re-connect the network.
2. When adding a device, the APP prompts that the device has been added by the XXXX
account. What should I do?
Please reset the product to default and try to connect it again.
3. How to reset the camera to factory settings?
Locate the reset button of the device, press and hold until the indicator light goes out,
release it, hear the beep sound, wait for the device to restart, and the indicator lights up.
4. Camera indicator status description
Constant red: The camera is starting up or running abnormally.
Red light flashing quickly: The camera is ready for network connection.
Constant blue: The camera is running normally.
Blue light flashing quickly: The camera is connecting to the network
5. Why is there a blank in the middle of the video intermittent?
The blank space of the recording timeline represents no video file, and the two video
mode problems are different. SD card recording: After the device is powered off, the SD
card will not continue recording. Please check whether the device is powered off during
the blank time. If it is abnormally powered off, please check whether the power supply,
power cable and machine power interface are normal.
6. Why can't the phone receive an alarm message?
Confirm that the notification permission of the AKASO Smart APP in the phone settings
is turned on, and whether the mobile alarm settings are all enabled in the app. Under
normal circumstances, when an abnormality is detected, a message will appear in the
notification bar of the mobile phone. There is no sound or vibration depending on the
settings of the mobile phone.
7. The APP can't load the video, what should I do if the camera is disconnected?
First check if the camera's power and network are normal. If it is normal, turn off the
camera and then restart it. If the camera is still offline after restarting, please remove the
camera in the APP, reset the camera to factory settings, and then re-add the device.
8. APP prompts access to the device failed, what should I do?
Please reset the device after resetting it to factory settings. If this problem still occurs,
please contact customer service staff for technical assistance.
19
20

9. APP often can not load the video, showing disconnect?
Troubleshoot the problem based on the camera's indicator status:
The indicator light is off, indicating that the device is not powered. Please check the
power supply carefully and the power supply interface is normal. It is recommended to
try the power supply.
The indicator light is on, in two cases:
A. The indicator light is red, indicating that the camera's network has been disconnected.
Please check the stability of the WiFi network and restart the router. It is recommended
to move the camera closer to the router.
B. The indicator light is blue, indicating that the camera's network is normal. Please check
if the mobile phone's network is normal. If the mobile phone network is not smooth,
the video stream may not be transmitted to the mobile phone. It is recommended
that the mobile phone switch to WiFi.
10. Why do you have a circle in the middle when watching the video screen, will it delay?
The circle indicates that the video is loading. The delay indicates that the network is not
smooth. Please check whether the network connected to the camera and the mobile
phone is smooth. It is recommended to bring the camera closer to the WiFi router.
11. How many people can log in at the same time?
An account can only be logged in simultaneously by one mobile phone, and others
can only watch the camera through the sharing mechanism.
12. How many accounts can I share with my family?
No limit.
13. Why is the shared account operation function not complete?
For security reasons, the shared account permissions are restricted, and some functions
of the device cannot be operated. If other people need to operate the camera, they
can log in directly with the bound account.
14. Why does configuring a camera network with other mobile phones fail?
A camera can only be bound by one account, and other accounts can only be viewed
through the sharing mechanism. If other accounts need to reconfigure the camera,
please remove the device under the first account.
For any inquiries, issues or comments concerining our products, please send E-mail to the
address below. We will respond as soon as possible.
E-mail: [email protected]
CONTACT US
21
22
English
Page is loading ...
Page is loading ...
Page is loading ...
Page is loading ...
Page is loading ...
Page is loading ...
Page is loading ...
Page is loading ...
Page is loading ...
Page is loading ...
Page is loading ...
Page is loading ...
Page is loading ...
Page is loading ...
Page is loading ...
Page is loading ...
Page is loading ...
Page is loading ...
Page is loading ...
Page is loading ...
Page is loading ...
Page is loading ...
-
 1
1
-
 2
2
-
 3
3
-
 4
4
-
 5
5
-
 6
6
-
 7
7
-
 8
8
-
 9
9
-
 10
10
-
 11
11
-
 12
12
-
 13
13
-
 14
14
-
 15
15
-
 16
16
-
 17
17
-
 18
18
-
 19
19
-
 20
20
-
 21
21
-
 22
22
-
 23
23
-
 24
24
-
 25
25
-
 26
26
-
 27
27
-
 28
28
-
 29
29
-
 30
30
-
 31
31
-
 32
32
-
 33
33
-
 34
34
-
 35
35


AKASO Outdoor Security Camera 1080P, Support Alexa, Google Home, Fire TV, Home Indoor Outdoor WiFi Security Camera, IP65 Waterproof, 2 Way Audio, Night Vision, Remote Access, Motion/Sound Detect User manual
- Category
- Convenience lighting
- Type
- User manual
Ask a question and I''ll find the answer in the document
Finding information in a document is now easier with AI
in other languages
- italiano: AKASO Outdoor Security Camera 1080P, Support Alexa, Google Home, Fire TV, Home Indoor Outdoor WiFi Security Camera, IP65 Waterproof, 2 Way Audio, Night Vision, Remote Access, Motion/Sound Detect Manuale utente
- español: AKASO Outdoor Security Camera 1080P, Support Alexa, Google Home, Fire TV, Home Indoor Outdoor WiFi Security Camera, IP65 Waterproof, 2 Way Audio, Night Vision, Remote Access, Motion/Sound Detect Manual de usuario
Related papers
Other documents
-
HOSAFE COM CQ1S Wireless Solar Security Camera User guide
-
APPS Huilian Smart App User manual
-
Vivo Y3 (2019) User manual
-
LOCKTON ELEV64 WI-FI BRIDGE – G2 Gateway Operating instructions
-
banggood ST-TH01 User manual
-
 HF HFWS 【Alarm Camera】 Floodlight Security Camera Outdoor,WiFi Motion Detection HD 1080P Wireless Surveillance IP Cam,Alarm,Two-Way Audio, Color Night Vision,Include 32G Card,Support Cloud Storage User manual
-
-
 Jayol S1 User manual
-
 Atlantic Energy Mini 8 User manual
-
 VIONMIO L28 Low Power Consumption Mini Wi-Fi Camera User manual


