Page is loading ...

USER
MANUAL
P50 WiFi Camera


English
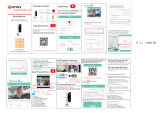
WHAT’S IN THE BOX?
CAMERA INTRODUCTION
QUICK
REFERENCE
GUIDE
P50 WiFi Camera
Mounted Plate Quick GuideMounting Screws
USB Power CablePower AdapterP50 Wireless Camera
1. INSTALLATION
1. Wall-Mounting: Use the included wall-mount plate to fix the camera on a clean surface
of wall / ceiling.
01 02
Light Sensor
Camera Lens
Indicator Light
Microphone
4
3
1
2
Power Port
Reset Button
Micro SD Card Slot
Speaker
5
6
8
7

2. Place on flat surface: Put the camera on flat surface.
03 04
Please download and install “Akaso iEyes” APP on your phone by scanning the below QR
code or searching in the app store.
If you already have an account for Akaso iEyes, just ignore the below and log
in your account to add device.
Open “Akaso iEyes” to click “ Sign up”.
Select the country and fill in the Email Address.
Press “Obtain” to get the verification code.
Download on the
App Store
GET IT ON
Google Play
2. INSTALL PHONE APP
3. GET A NEW ACCOUNT
Fill in the verification code which get from your mailbox and click ”Software Agreement
and Privacy Policy”, and click “Next”.
Set your password, input twice times, click “OK”. Then you finish the registration and get
a new account.
Sign up
Enter password
Enter email
Sign in
Fongot password?
FeedbackDemo
Verification..e(6 digits)
Enter email
Next
Sign up
America
Obtain
Accepted Software agreement and Privacy Policy
Verification..e(6 digits)
Enter email
Next
Sign up
America
Obtain
Accepted Software agreement and Privacy Policy
Enter new password
Confirm password
OK
Sign up

4. FORMATTING MICRO SD CARD
The Memory Card is needed to format firstly on computer and then format on the camera
to make sure it can be more compatible with the camera.
This wifi cam support micro SD card, up to 128GB with class 10 & above.
Please format the card on computer firstly as “FAT32”, see below picture.
Format NEW VOLUME (F:)
Capacity:
File system
14.8 GB
FAT 32 (Default)
Allocation unit size
32 kilobytes
Volume label
MicroSD
Restore device defaults
Format options
Quick Format
CloseStart
After inserting the card into the camera, and then powering on the camera.
Open the Phone APP to select the setting icon to enter into Camera Setting,
click “Memory Card Information → Format Memory Card → OK” to format the card.
My camera
P50
Online
360°
Album AlertMy camera Setting
Camera Setting
Alert Mode
Motion Detected
Volume
A
Language & Timezone
Encryption mode Default Encryption
Timer Recording
Change Router
Camera Information
Video Storage Location
Firmware Upgrade
Reboot Camera
Refresh Setting Information
Delete device
Micro SD card
Latest Version
Memory Card Information
Memory card informati..
Format Memory card
Data partitionVideo
Status
Total capacity
Normal
14820M
Note: Before format the card, please make sure you already add the camera to your
phone app.
05 06
Note:
Username must be a valid email address.
Password must be between 6-20 digits in length.
Please choose the same country in register and login.
If you have forgotten your password, click "Forgot password" to retrieve your
password via email verification.

1. Creating Panoramic Navigation Picture
Click “ → Try now”, the camera will automatically rotate and capture 15 pictures from
different directions, then combine these pictures to generate a new panoramic navigation
picture.
5. 360°PANORAMIC NAVIGATION
360°
My camera
P50
Online
360°
Album AlertMy camera Setting
Creating navigtion pictur...
Try Now
Note: Do not move or block in the
vision of camera
Get a navigation picture:
P50
Note:
After creating a 360° Panoramic image, the Panoramic Navigation Mode cannot turn
off, only delete the camera from APP, add the camera again on APP, it can turn off.
If you change the location of the camera, you can create a new panoramic navigation
picture as per above setting.
2. Set Shooting Angle via Panoramic Navigation Picture
You can set maximum 3 sets of shooting angles via panoramic navigation picture. Once
set, the camera will automatically rotate to the preset location at preset time.
Tap on a target point of panoramic navigation picture to rotate the camera to the
location you want.
Click icon on Live View Interface, a pop-up window appears for setting shooting
angle, select time, click “OK” to finish the setup.
Repeat and to set each shooting angle, max. 3.
Note: Icon will display in panoramic navigation picture after completing shooting angle
setting, means a single preset of a single shooting angle.
After generating the navigation picture, click “Play” to enter into the live view interface.
You can tap on any point of the picture and the camera will rotate immediately and point
to that location.
P50P50
07 08

3. Delete Shooting Angle
Click on Live View Interface, a pop-up window will show, select “Delete” to delete
shooting angle.
P50 P50
P50
Tips
Akk shooting angles have been set, clear
and reset?
Cancel Delete
P50
Click on My Camera Interface to enter Cloud Storage Service Interface, you can check
cloud video, purchase cloud storage service, check purchase orders’ history and cloud
storage service terms.
First using the APP has a free 30-day trail of Cloud storage Service, click “Start a free trail”
to open Cloud service.
6. CLOUD STORAGE
My camera
P50
Online
360°
Album AlertMy camera Setting
1. Motion Detection Setting
Way 1. Click “ “ on My Camera Interface to enter alert mode setting, Turn on “Motion
detection” to enable motion detection and select “ON” on alert sound switch.
7. MOTION DETECTION
09 10

Way 2. Click “ ”on My Camera Interface to enter camera setting, click ”Alert mode”, turn
on“Motion detection” to enable it and select “ON” on alert sound switch, then click
“AlarmTime And Sensibility” to set Alert Time and Motion Detection Sensitivity, click “OK”
to save settings.
My camera
P50
Online
360°
Album AlertMy camera Setting
Then click “AlarmTime And Sensibility” to set Alert Time and Motion Detection Sensitivity,
click “OK” to save settings.
My camera
P50
Online
360°
Album AlertMy camera Setting
11 12

2. Message Check & Download
Click “ → Alert message” to select video flips you want to check, then click “ ” to
share this video with your family and friends or on any social platforms.
Note:
To download the alert videos, the camera needs to
switch on Cloud service or gets a SD card insert;
without Cloud service or SD card, the APP will only
receive the alert message but cannot download
any video.
Ensure the camera is power-off when inserting /
removing SD card; check network condition if APP
promotes message for “download failed” with SD
card inserted, return to last interface and try again.
Alert
P50
P50
P50
My camera
P50
Online
360°
Album AlertMy camera Setting
Click “ → →input an account name to share”, click “OK” to save.
8. SHARE DEVICES
My camera
P50
Online
360°
Album AlertMy camera Setting
Note: The account shared has to register an account of AKASO iEyes.
13 14

9. PLAYBACK
Click camera icon to enter into live view interface, click or on date icon to
select date and drag the timebar to select the time period you want to play back the
video.
2018-12-28
18:00 19:00
Note: The blue is recorded
video. When playing the
video, you also can reduce
or enlarge the image by
sliding two fingers on the
playback video.
10. AUTO MOTION TRACKING
Enable Tracking: Click camera icon to enter into live view interface, click to enable
tracking.
15 16
My camera
P50
Online
360°
Album AlertMy camera Setting
11. RETRIEVE PASSWORD
If you forgot your password of AKASO iEyes account, please enter the retrieve password
page to get back, see following:
Open “AKASO iEyes” Phone APP, click “Forgot password”;
Choose your registered country and your account, then click “Obtain” to get a
verification code in your registered email box.
Enter the correct verification code and new password to complete the operation, click
“OK”.
60
40
20
220
240
260 280
P50
My camera
P50
Online
360°
Album AlertMy camera Setting
Disable Tracking: Click to disable tracking.
United States
Tracking enabled
60
40
20
220
240
260 280
60
40
20
220
240
260 280
Tracking enabled
60
40
20
220
240
260 280
Tracking enabled
This icon means the auto motion tracking is turn off;
This icon means the auto motion tracking is turn on.
60
40
20
220
240
260 280
60
40
20
220
240
260 280

12. MY CAMERA INTERFACE
My camera
P50
Online
360°
Album AlertMy camera Setting
1
2
3 4 5 6 7 8
9
10 11
Add Camera: Add more cameras on this APP.
Open Live View / Playback Interface: Enter Live View
/ Playback Interface
360 Panoramic Navigation: Create a Panoramic
Navigation
Cloud Storage: Check your cloud storage information
Alert Function: Enable/Disable Alert Function
Delete Camera: Delete this added camera from this
APP
Share the camera to another account: Share this
camera to your family or friends
Camera Setting: More functions can be set here
Album: Save footage / snapshot
Alert Messages: Check alert messages
APP Setting: Message setting, Feedback, Help (User
Manual), APP version, Purchase cloud storage service,
clean space, modify password and logout’s setting.
11
13. LIVE VIEW & PLAYBACK INTERFACE
Click camera icon to enter into live View / Playback interface.
14. CAMERA SETTING INTERFACE
Click to enter into Camera Setting interface.
2018-12-28 19:04:50
encrypted to pretect your privacy
68 KB/S
2 KB/S
2018-11-09
Talk
19:04
17:00 18:00 19:00 20:00 22:0021:00
60
40
20
220
240
260 280
P50
1
2
3
4
5
6
7
8
9
10
11
Live View Interface
Network Speed: Show Network condition
Live View Date/Time: Show the date/time of live view
Live View Video: Show live view video image
Shooting Angle: Set camera’s shooting angle
Playback Date: Select date to playback video
Playback Time: Select time to playback video
Off / On Audio: Turn on / off live video sound
Screenshot: Take screenshot of live video
Intercom (Press to talk): Transmit and receive sounds
Local recording: Recording video in local file
Streaming resolution: HD / SD / AUTO
11
My camera
P50
Online
360°
Album AlertMy camera Setting
Camera Setting
Alert Mode
Motion Detected
Volume
A
Language & Timezone
Encryption mode Default Encryption
Timer Recording
Change Router
Camera Information
Video Storage Location
Firmware Upgrade
Reboot Camera
Refresh Setting Information
Delete device
Micro SD card
Latest Version
Memory Card Information
17 18
Playback Interface
Network Speed: Show Network condition
Live View Date/Time: Show the date/time of live view
Playback Video: Show playback video image
Playback Date: Show the date of playback video
Playback Time: Show the time of playback video
Off / On Audio: Turn on / off playback video sound
Screenshot: Take screenshot of playback video
Local recording: Record video in local file
60
40
20
220
240
260 280
P50
1
2
3
4
5
6
7 8
P50

Rename: Give a new name of the device
In Camera Setting interface, click” Rename”, input new name and click “OK” to finish and
save setting.
Share camera: Share the device to another account, please refer to part 8.
Shooting angle: Set camera shooting angle
In Camera Setting interface, click” Shooting angle”, select “Horizontal (Normal)” or
“Horizontal (Reverse)” to get different shooting angles.
P50
2018-12-28 19:04:50
encrypted to pretect your privacy
68 KB/S
2 KB/S
2018-12-28
Talk
19:04
17:00 18:00 19:00 20:00 22:0021:00
60
40
20
220
240
260 280
Status Light: Turn on / off camera indicator light.
Alert mode: Turn on / off Motion detection, please refer to part 7.
19 20
P50
P50
P50
P20
2018-12-28 19:04:50
encrypted to pretect your privacy
68 KB/S
2 KB/S
2018-12-28
Talk
19:04
17:00 18:00 19:00 20:00 22:0021:00
60
40
20
220
240
260 280
P50

Volume: Adjust / turn off the sounds (Speaker / Notification / Microphone volume).
Language & time zone: Set language of camera and select time zone, after setting, click
“OK” to save and exit.
Encryption mode: Set encryption mode to protect the data, Default and custom for
optional. Default is Default encryption.
In Camera Setting interface, click” Encryption mode” to choose Default or Custom
Encryption.
Default encryption: User does not have to enter the password in default mode
Click”Encryption mode → Default encryption → click “OK” to save and exit”.
Custom encryption: User set customized encryption password in 6-18 characters, you
need to enter the password when reviewing video every time on phone app.
Click”Encryption mode → Custom encryption → Enter Password and Confirm → OK to
save and exit”.
Note:
In Custom encryption mode, user needs to enter the customized encryption password
for verification to preview video/view alarm pictures on mobile phone, and other clients
only get blurred images when view the video. Protect your privacy all the time.
Only camera’s system version in format “v3.xx.xx” supports custom encryption.
Timer Recording: Set camera’s recording time. Four
options: Daytime (08:00-18:00), Evening (18:00-08:00),
Whole day (00:00-24:00), Customized (User defined).
After setting, click “OK” to save and exit.
21 22

Video Storage Location: Select video storage location,
Micro SD Card and Cloud for optional.
After finishing the setting, click “OK” to save and exit.
Change router: Change the wifi network of camera connecting to another WiFi route.
In Camera Setting interface, click” Change router”, press the RESET button on camera
about 2 seconds, then click “Next → Wireless mode”, when the camera’s red light is
blinking, click “Next” to configure WIFI, input WIFI password to finish connecting.
Camera information: View camera information, such as Camera mode, Firmware version,
MAC address.
Memory card information: Check SD card status, total capacity and format the card,
please refer to part 4.
Firmware upgrade: Check the latest firmware.
Reboot camera: Reboot the camera remotely.
Refresh setting information: Refresh the setting information of camera.
Delete the camera: Delete the camera from this APP.
23 24

Click Setting icon on my camera interface to enter APP Setting interface.
15. APP SETTING INTERFACE
Waterproof Glass Lens
3.6mm
6 LED
8m
H.264
Automatic switching / IR-CUT
5V / 1.2A
Supports 8G-128G capacity MicroSD card
Optional 7 days / 30 days event storage
-10°C~+50°C
10%~ 95% non-condensing
Lens
Focal length
Infrared light
Night vision distance
Video compression
Day and night mode
Power supply
Micro SD card
Cloud storage
Working temperature
Working humidity
TROUBLESHOOTING
Setting
Message setting: Turn on / off Alert sound when APP is on.
Feedback: when using, if any issues or advice, you can feedback here.
Help: User’s Manual for normal setting.
About: Check APP version.
Clear Cache: clean some trace
Modify password: Change the account’s password of Phone APP. In Setting interface, click
“Modify password”, enter old password and new password to modify.
Account delete: Delete the account of APP.
Logout: Logout the account of Phone APP.
Q: Why can't I add a device or fail to configure the network?
A: According to the status of the device indicator, you can determine the cause and
solution of the failure of the network connection.
Before adding the device, ensure that the device is in red flashing state (2 times in 1
second). If the indicator status is abnormal, please reset the device to factory settings
(press and hold the device RESET button until you hear a beep) (The reset button
position of each product is different, but they are marked with "RESET").
The device indicator flashes red quickly and does not turn constant green.
a. Device does not support 5GHZ WIFI, please ensure that when adding device, the
phone is connected to 2.4GHZ WiFi.
b. WiFi password must be entered correctly, and there must be no special characters.
c. Note that the current WiFi network is smooth, it is recommended to try to restart the
router.
Q: When adding a device, the APP prompts that the device has been added by the XXXX
account. What should I do?
A: Please reset the product to default and try to connect it again.
25 26
My camera
P50
Online
360°
Album AlertMy camera Setting
Material ABS+PC+ fireproof material
1080P (1920*1080)
1/2.7" SC2232 Low Illumination CMOS Sensor
130°(diagonal) / 90°(horizontal)
Resolution
Image sensor
Angle of view
16. SPECIFICATION

Q: How to reset the camera to factory settings?
A: Long press the reset button of the device, press and hold until the indicator light goes
out, release it, hear the beep sound, wait for the device to restart, and the indicator
lights up red flashing.
Q: Camera indicator status description
A: Constant red :The camera is starting up or running abnormally.
Red light flashing quickly :The camera is ready for network connection.
Constant green:The camera is running normally.
Green light flashing quickly:The camera is connecting to the network
Q: Why can't the phone receive an alarm message?
A: Confirm that the notification permission of “AKASO iEyes” Phone APP in the phone
settings is turned on, and whether the mobile alarm settings are all enabled in the app.
Under normal circumstances, when an abnormality is detected, a message will appear
in the notification bar of the mobile phone. There is no sound or vibration depending
on the settings of the mobile phone.
Q: The APP can't load the video, what should I do if the camera is disconnected?
A: First, check if the camera's power and network are normal. If it is normal, turn off the
camera and then restart it. If the camera is still offline after restarting, please remove the
camera in the APP, reset the camera to factory settings, and then re-add the device.
Q: APP prompts access to the device failed, what should I do?
A: Please reset the device to factory settings. If this problem still occurs after resetting,
please contact customer service staff for technical assistance.
Q: APP often can not load the video, showing disconnect?
A: Troubleshoot the problem based on the camera's indicator status:
The indicator light is off, indicating that the device is not powered. Please check the
power supply carefully and the power supply interface is normal. It is recommended
to plug in all the time.
The indicator light is on, in two cases:
a. The indicator light is red, indicating that the camera's network has been disconnected.
Please check the stability of the WIFI network and restart the router. It is recommended to
move the camera closer to the router.
b. The indicator light is green, indicating that the camera's network is normal. Please
check if the mobile phone's network is normal. If the mobile phone network is not smooth,
the video stream may not be transmitted to the mobile phone. It is recommended that the
mobile phone switch to WiFi.
Q: Why do you have a circle in the middle when watching the video screen, will it delay?
A: The circle indicates that the video is loading. The delay indicates that the network is not
smooth. Please check whether the network connected to the camera and the mobile
phone is smooth. It is recommended to bring the camera closer to the WIFI router.
Q: How many people can log in at the same time?
A: An account can only be logged in simultaneously by one mobile phone, and others can
only watch the camera through the sharing mechanism.
Q: How many accounts can I share with my family?
A: Five account at most.
Q: Why is the shared account operation function not complete?
A: For security reasons, the shared account permissions are restricted, and some functions
of the device cannot be operated. If other people need to operate the camera, they can
log in directly with the bound account.
Q: Why does configuring a camera network with other mobile phones fail?
A: A camera can only be bound by one account, and other accounts can only be viewed
through the sharing mechanism. If other accounts need to reconfigure the camera,
please remove the device under the first account.
CONTACT US
For any inquires, issue or comments concerning our products, please send E-mail to the
address below, and we will respond as soon as possible.
Email: [email protected]
27 28
English
/