
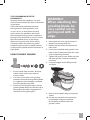
STAND MIXER
KM 8020
Instruction Manual
STAND MIXER
Návod kobsluze
KUCHYŇSKÝ ROBOT
Návod na obsluhu
KUCHYNSKÝ ROBOT
К

STAND MIXER

1
CONTENTS
CONTENTS
3 CATLER RECOMMENDS SAFETY FIRST
10 KNOW YOUR STAND MIXER KM 8020
10 STAND MIXER description
12 Description of accessories
14 OPERATING YOUR STAND MIXER KM 8020
14 Before rst use
15 Speed control
16 Use with the blending beaker
19 Using the meat grinder
20 Using the cutting and grating attachment
22 CARE AND CLEANING
24 TROUBLESHOOTING

CONGRATULATIONS
2
Congratulations
on the purchase of your new KM 8020 stand mixer.

3
CATLER RECOMMENDS SAFETY FIRST
CATLER RECOMMENDS SAFETY FIRST
We understand the importance of safety and that’swhy we put your safety rst from the
initial design concept to the production itself. Nevertheless, please be careful and follow the
instructions below when using this appliance.
• This appliance is not to be used by children.
Keep this appliance and its power cord out of
the reach of children.
• The appliances may be used by persons
with physical or mental impairments or by
inexperienced persons only if they are properly
supervised or have been informed about how
to use of the product in asafe manner and
understand the potential dangers.
• Children must not play with the appliance.
• Cleaning and maintenance performed by the
user must not be performed by children.
• If the power cord is damaged, ask the
authorised service for areplacement in order
to prevent hazards. It is forbidden to use the
appliance with the power cord damaged.
• Use the appliances according to the
instructions in this user'smanual. Otherwise,
there is arisk of personal injury.
• Please use only supplied accessories or
the accessories recommended by the

4
CATLER RECOMMENDS SAFETY FIRST
manufacturer. It is forbidden to used other than
supplied accessories with this appliance.
• Please clean the accessories that comes into
contact with food after each use according to
the instructions in chapter “Care and cleaning”
of these user’sinstructions. Keep the appliance
and its accessories clean at all times.
• Always disconnect the appliance from the
power socket if you are leaving it unattended
and before assembly, disassembly or cleaning.
• Before replacing the accessories or accessible
movable parts, please turn the appliance o
and disconnect it from the power supply.
• Always wait for the moving accessory or
accessible parts to stop completely during use.
• This appliance is designed for household
use only. This appliance is not designed for
commercial use. Do not use this appliance
in moving vehicles or on boats, outdoors,
or for any purpose other than it’sintended.
Otherwise, there is arisk of personal injury.
• Before connecting this appliance to apower
socket, make sure the voltage stated on the
product'srating label corresponds to the
voltage in your power socket.

5
CATLER RECOMMENDS SAFETY FIRST
• Put the appliance on astable, heat-resistant,
at and dry surface away from the countertop
edge.
• Avoid placing the appliance on or in the vicinity
of heat sources, such as hot plates, ovens or gas
burners. Vibrations during operation may cause
the appliance to move.
• Never use multiple attachment types
simultaneously.
• Do not use this appliance with aprogrammable
switch, timer switch or any other device that
automatically switches the appliance on.
• For safety reasons, this appliance is equipped
with asafety mechanism that prevents the
motor from being started if the appliance is
incorrectly assembled or the tilt-back head is
lifted.
• Before turning the appliance on, check that it is
correctly assembled and that the tilt-back head
is in the horizontal position.
• Allow hot liquids or food to cool down before
processing.
• Do not attempt to grind bones, nut shells or
other hard ingredients.

6
CATLER RECOMMENDS SAFETY FIRST
• Be careful not to get injured on the edge when
handling the blade and the graters.
• Do not leave the appliance in continuous
operation under aheavy load for aperiod
longer than 15 minutes. Before turning it on
again, allow it to cool down for at least 10
minutes.
• Do not lift the tilt-back head or put your
hands or items, such as akitchen knife, fork
or wooden spoon, into the bowl while the
appliance is in operation. Do not touch rotating
parts of the appliance or attachments and
ensure that foreign items such as clothing, hair,
etc. are kept away. An injury could occur or the
appliance could be damaged.
• If any item such as aspoon or awooden
spoon falls into the blending beaker while the
appliance is in operation, press the power On/
O button immediately to turn the appliance
o , unplug the power cord from the socket,
wait for the rotating parts to stop and then
remove the item.
• If you need to wipe the inside of the bowl or
the attachments, turn the appliance o and
disconnect it from the mains. Wait until the

7
CATLER RECOMMENDS SAFETY FIRST
rotating parts come to acomplete stop. Use
aspatula to clean the attachments and the
inside of the bowl. Then you can continue
processing.
• Never use your ngers or other items to push
the ingredients through the feed tube of
meat grinder, sausage attachment, cookie
attachment or cutting and grating attachment.
Always use the provided plungers.
• Never run the appliance with no load. This may
lead to damage.
• Before storing the appliance, make sure that
both the appliance and the accessories are
cleaned and the tilt-back head is in the folded
position.
• Do not disconnect the appliance from the
power socket by pulling the power cord. This
could damage the power cord or the power
socket. Disconnect the cord from the power
socket by gently pulling the plug of the power
cord.

8
CATLER RECOMMENDS SAFETY FIRST
IMPORTANT SAFETY INSTRUCTIONS FOR
USING ELECTRICAL EQUIPMENT
• Fully unwind the power cord before use.
• Do not leave the power cord hanging over the
edge of atable or countertop or allow it to
touch ahot surface or to become tangled up.
Do not put heavy objects on the power cord.
• For safety reasons, we recommend to connect
the appliance in an independent electrical
circuit separated from other appliances. Do
not use adapter plugs or extension cords to
connect the appliance to apower outlet.
• To prevent electric shock, do not submerge this
appliance, its base or power cord in water or
any other liquid.
• We recommend that you inspect the appliance
regularly. Do not use the appliance if it is
damaged in any way or if the power cord or
plug is defective. All repairs or adjustments
must be performed at the nearest Catler
authorised service centre.
• Any maintenance other than standard cleaning
must be performed at authorised Catler service
centre.

9
CATLER RECOMMENDS SAFETY FIRST
• We recommend to install aresidual current
device (standard safety switches in your power
outlet) to provide ahigher level of protection
when using the appliance. We recommend to
install aresidual current device (with anominal
residual operating current of no more than
30mA) in the electric circuit in which your
appliance is to be connected. For further expert
advise, please contact your electrician.

10
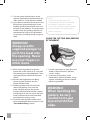
KNOW YOUR STAND MIXER KM 8020
KNOW YOUR STAND MIXER KM 8020
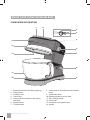
STAND MIXER DESCRIPTION
21
3
4
5
6
7
8
9
11
12
13
14
10
1. Protective cover for the lling opening
2. Filling funnel
3. Locking screw
4. Front cover
5. Lighting for the interior of the mixing
container
6. Speed control
7. Tilt-back head
8. Lock button to lift and lower the tilt-back
head
9. Stand mixer base
10. Blending beaker insertion hole
11. Glass mixing beaker
12. Drive shaft
13. Protective mixing bowl cover
14. Handle

11
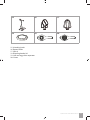
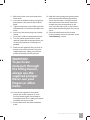
KNOW YOUR STAND MIXER KM 8020
15 16 17
18 19 20
15. Kneading hook
16. Beater blade
17. Whisk
18. Blending beaker lid
19. Yolk and egg white separator
20. Grater

12
KNOW YOUR STAND MIXER KM 8020
DESCRIPTION OF ACCESSORIES
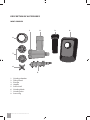
MEAT GRINDER
12
3
4
8
6
5
7
1. Grinding chamber
2. Filling funnel
3. Plunger
4. Hopper
5. Screw shaft
6. Grinding blade
7. Grinding discs
8. Screw ring

13
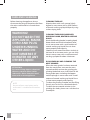
KNOW YOUR STAND MIXER KM 8020
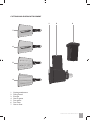
CUTTING AND GRATING ATTACHMENT
12
3
6
5
4
7
1. Grating attachment
2. Filling funnel
3. Plunger
4. Coarse grater
5. Fine grater
6. Fine slicer
7. Coarse slicer

14
OPERATING YOUR STAND MIXER KM 8020
OPERATING YOUR STAND MIXER KM 8020
BEFORE FIRST USE
Before rst use, remove all packaging
and advertising labels / stickers from the
appliance. Make sure you have removed all
accessories from the package.
Wipe the stand mixer base with asoft sponge
slightly moistened in warm water. Wipe dry
using aclean wiping cloth.
Wash the blending beaker, protective cover,
beaters, hooks and all accessories in warm
water with asmall amount of washing-up
liquid. Rinse in clean water and wipe dry.
Before storing the stand mixer, make sure
that all parts are clean and dry.
FOOD PROCESSOR CONTROLS
Tilt-back head
Always release the lock to raise or lower the
arm. Hold the arm by the handle with the
other hand.
You must hear aclick to be sure the arm is
properly lowered.
If you are about to lower of lift the tilt-back
head, always make sure that the power cord
is unplugged from the mains socket.
ATTENTION:
Never try to lift or lower the tilt-
back head by force. There is arisk of
damage to the appliance.
WARNING!
To prevent serious
injury, keep your
hands and fingers
away from the
hinged arm.
LIGHTING
The LED light will illuminate the interior
of the mixing container while the robot is
operating.
The LED light will ash In the event of an
operating error or the overheating of the
motor. More information further in the
user'smanual.
MOUNTING THE POWER CORD SOCKET
The power cord can be placed in the base of
the food processor.
Pull the plug to remove the power cord from
the inside of the base, and then plug it back
into the base after use.
ATTENTION:
Pull and insert the power cord with
adequate force to prevent damage,
for eample to the base.
FILLING FUNNEL
The food processor arm is equipped with
a lling hole, allowing you to easily add
ingredients while the food processor is
running. It is always recommended to use
the ller cap.

15
OPERATING YOUR STAND MIXER KM 8020
WARNING!
To prevent serious
personal injury or
product damage,
NEVER pour boiling
water into the
mixing container.
NEVER use amixing
bowl to heat
ingredients or cook.
Do not expose the
mixing container
to extreme
temperatures - the
container may
rupture or break.
SPEED CONTROL
Set the speed control dial to arequired speed
between 1 - 10 where “1” ´is the lowest and
“10” is the highest speed. Turn the speed
control dial clockwise to increase the speed
or turn the speed control dial anticlockwise
to decrease the speed.
If you need to pause the appliance operation,
set the speed control dial to “0”.
WARNING!
Before assembling
or disassembling,
always make sure
that the power plug
is disconnected
from the mains
socket.
WARNING!
Never run the
stand mixer with
any accessories
continuously for
longer than 15
minutes. After
15 minutes of
continuous running,
turn the appliance
off, unplug the
power cord and
let it cool down for
about 10 minutes.

16
OPERATING YOUR STAND MIXER KM 8020
USE WITH THE BLENDING BEAKER
Assembling the appliance
1. Put the stand mixer on clean, rm and
stable surface within easy reach of
amains socket.
2. Check that the speed control dial is in
position "0" and that the power cord is
disconnected from the power socket.
3. Press the lock button and lift the tilt-back
head.
4. Insert the mixing container into the hole
in the base of the machine. Rotate the
blending beaker clockwise until you feel
the hole.
5. Attach the mixing bowl cover to the
underside of the folding arm. You can
also place the protective cover on the
mixing bowl and lower the arm.
6. Place the attachment (kneading hook,
broom or whisk) on the shaft so that
the projections on the shaft t into the
slots in the attachment. Then turn the
attachment clockwise. This will x the
attachment on the shaft.
NOTE
It is recommended to always use the
protective bowl cover of the mixing
container.- it prevents ingredients
from splashing and helps keep the
appliance clean.
NOTE
To dismantle the food processor,
proceed in the opposite way.
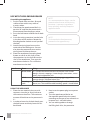
Attachment Name Using
Beater blade It is suitable for conventional to solid mixes such as cake
doughs, biscuits, toppings, Linzer doughs, meat mixes, sweet
mixes, mashed potatoes, etc.
Whisk Suitable for whipping mixes, whipping eggs, egg whites,
sponge doughs, whipped cream, etc.
Kneading
hook
Suitable for kneading yeast-based doughs such as bread, rolls,
loaves, etc. The recommended kneading speed is 4 and below.
USING THE APPLIANCE
1. Place the raw materials that you wish
to process into the jar. Always observe
the maximum level line. The maximum
amount of food that can be processed is
3 l.
2. In order to lower the tilt-back head, press
the lock button and lowly lower the tilt-
back head.
3. Now insert the power plug into apower
socket.
4. Turn the speed control dial to set
the required speed. Select the speed
according to the type of raw materials to
be processed - see table below.
5. You can add ingredients through
the lling hole. Also, the protective

17
OPERATING YOUR STAND MIXER KM 8020
cover prevents the raw materials from
splashing out of the beaker.
6. If you need to wipe the inside of the
bowl, set the speed dial control to “0”,
unplug the power cord from the mains
socket and wait until the rotating parts
come to acomplete stop. Press the lock
button and lift the tilt-back head. Wipe
the inside of the bowl using aspatula or
awooden spoon.
7. When the mixture in the bowl has
been processed into the appropriate
consistence, set the speed to “0”,
wait until the rotating parts come to
acomplete stop. Then, unplug the power
cord from the mains socket. Press the
lock button and lift the tilt-back head.
Take the bowl by the handle and rotate it
anticlockwise to remove it from the base.
8. Remove blend from the bowl.
9. Clean the appliance according to the
instructions in the “Care and Cleaning”
chapter.
SPEED OVERVIEW TABLE
Speed Speed description Using the speed settings
1 Slow mixing Suitable for:
- Slow mixing of ingredients
- Initial speed if you do not attach the protective cover of
the mixing bowl
- Adding our or other loose or solid ingredients to the
dough
- Adding liquids to bulk materials
- Mixing solid mixtures
2-3 Slow mixing, faster
mixing
Suitable for:
- Slow mixing, faster mixing, mashing
- Mixing sti doughs and confectionery
- Initial speed for mashed potatoes or other vegetables
- Mixing fats into the our
- Mixing light doughs
- Mixing and kneading yeast dough
4-5 Medium speed
for mixing and
kneading dough
Suitable for:
- Mixing medium sti doughs, like biscuits
- Mixing sugar and butter
- Adding sugar to egg whites to prepare ameringue
- Mixing dough for cakes
6-7 Slow whipping Suitable for:
- Slow whipping
- Final mixing of the dough for cake, doughnuts etc.
- Mixing the dough for pies
8-9 Whipping Suitable for:
- Whipping cream, egg whites and toppings
10 Fast whipping Suitable for:
- Whisking small amounts of cream or egg whites

18
OPERATING YOUR STAND MIXER KM 8020
ATTENTION:
If you are going to process solid
mixtures such as bread doughs, do
not run the stand mixer for more
than 10 minutes. Then, turn the stand
mixer off and let it cool down for
about 10 minutes.
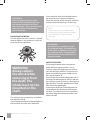
ADJUSTING THE WHISK
You can adjust the whisk so that it is placed
lower or higher in the container so you can
easily whisk the ingredients.
WARNING!
Always adjust
the whisk when
removing it from
the shaft. The
whisk must not be
mounted on the
shaft.
The whisk can be unscrewed or screwed at
the top of the whisk.
If you need the whisk to be placed higher in
the container, turn the screw clockwise.
If you need the whisk to be placed lower in
the container,turn it counter-clockwise.
Check the position of the whisk by attaching
it to the shaft and adjusting it if necessary.
NOTE
The kneading hook and at beater
are factory set to the optimum height
in the container. They cannot be
adjusted.
ATTENTION:
Be careful not to unscrew or screw
the screw too much - it could fall out
of the whisk. In addition, if you screw
the screw too much, it may interfere
with the whisk on the shaft when it is
properly seated.
SAFETY FEATURES
If you plug the power cord into apower
outlet while the speed control is set to
acertain speed, the food processor will not
start and the light will ash. Disconnect the
power cord from the power socket and set
the control knob to "0".
If you lift the arm while the food processor is
running, the food processor will turn o and
the light will go out. If the arm is lowered, the
light will ash. Turn the speed dial to “0” and
then select the speed again.
If the engine overheats, the food processor
will automatically shut down and the light
will ash. Turn the control to “0”, disconnect
the power plug from the power outlet, and
allow it to cool.
Page is loading ...
Page is loading ...
Page is loading ...
Page is loading ...
Page is loading ...
Page is loading ...
Page is loading ...
-
 1
1
-
 2
2
-
 3
3
-
 4
4
-
 5
5
-
 6
6
-
 7
7
-
 8
8
-
 9
9
-
 10
10
-
 11
11
-
 12
12
-
 13
13
-
 14
14
-
 15
15
-
 16
16
-
 17
17
-
 18
18
-
 19
19
-
 20
20
-
 21
21
-
 22
22
-
 23
23
-
 24
24
-
 25
25
-
 26
26
-
 27
27


Ask a question and I''ll find the answer in the document
Finding information in a document is now easier with AI
Related papers
Other documents
-
 Lincoln Manufacturing 16900 Operating instructions
-
Gastroback 40979 Datasheet
-
Livoo DOP236 User manual
-
 Mezzo PSM-1000 User manual
-
 Cooks Club USA VC02RBL User guide
-
Orava RM-250 A User manual
-
-
Philips RI7915/00 User manual
-
-
Sencor SHM 6206SS User manual


