Page is loading ...

FAMILIARISATION
4 -

5
FAMILIARISATION
-
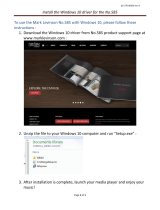
INSTRUMENTS AND CONTROLS
12. Windscreen demisting vents.
13. Speaker (tweeter).
14. Door window demisting vents.
15. Side adjustable heating/
ventilation vents.
16. Passenger air bag disarming
control.
17. Upper glove box or passenger
air bag.
18. Lower glove box.
19. RD3 audio equipment.
20. Heating/air conditioning controls.
21. Storage compartment.
22. Movable ashtray.
23. Gear lever.
24. Lighter.
25. Handbrake.
26. Heated seats control.
27. Steering lock and ignition.
28. Steering wheel adjustment
control.
29. Bonnet release.
30. Fuse box.
31. Headlamp height adjustment.
32. Passenger's electric mirror
control.
1. Speed limiter/cruise control
switch.
2. Lights and direction indicators
controls.
3. Driver's air bag.
Horn.
4. Instrument panel.
5. Audio equipment steering wheel
control.
6. Wipers/wash-wipe controls.
7. Central adjustable heating/
ventilation vents.
8. Hazard warning lights switch.
9. Multifunction display or clock.
10. Central locking button.
11. Controls:
- Electric windows.
- Rear door windows or tailgate
demisting.
- Air conditioning.

FAMILIARISATION
6 -
THE KEYS
The keys allow you to switch on the
ignition and operate the passenger
air bag disarming switch, as well as
to independently operate the locks
on the doors and the fuel fi ller cap.
STARTING
The remote control
Central locking
From the front doors, the keys allow
you to lock and unlock the doors and
tailgate.
If one of the doors or the tailgate is
open, it is impossible to operate the
central locking.
The remote control performs the
same functions at a distance.
Unlocking
Press button B to unlock the vehicle.
This is confi rmed by rapid fl ashing of
the direction indicators.
Locating the vehicle
To locate your vehicle, previously
locked, in a car park:
press button A , the courtesy lights
come on and the direction indica-
tors fl ash for a few seconds.
54
Locking
Press button A to lock the vehicle.
This is confi rmed by fi xed lighting of
the direction indicators for approxi-
mately two seconds.
STOP position (S):
the ignition is off.
To release the steering, turn the
steering wheel slightly while turning
the key, without forcing it.
Accessories position (A):
The ignition is off but the accessories
can be used.
On position (M):
The ignition is on.
Starting position (D):
Operates the starter.
Release the key when the engine
has started. Never operate the starter
while the engine is running.

7
FAMILIARISATION
-
WINDSCREEN WIPERS
STEERING WHEEL STALKS
LIGHTING
Front fog lamps (1 st turn of the ring
forwards).
Front fog lamps and rear fog lamp
(2 nd turn of the ring forwards).
To switch off: turn the ring rearwards.
Lights off
Side lights
Dipped headlamps/
Main beam headlamps
Vehicles fi tted with a rear
fog lamp (ring B)
Turn the ring forwards.
Vehicles fi tted with
front fog lamps and
a rear fog lamp
(ring B)
Off Wash-
wipe
Intermittent
wipe
Rear
62 63
Front and rear lights (ring A)
Front
2 Rapid wipe (heavy rain).
1 Normal wipe (moderate rain).
I Intermittent wipe.
0 Off.
Single wipe.
Windscreen wash-wipe: pull the stalk
towards you.

FAMILIARISATION
8 -
FRONT SEATS
Never travel with the head
restraints removed.
2. Armrest.
3. Seat back angle adjustment.
4. Forwards-backwards
adjustment.
5. Storage drawer
(passenger).
40
1. Head restraint height adjustment.

9
FAMILIARISATION
-
REAR BENCH SEATS
(7 SEAT VERSION)
Disarming the passenger air bag
With the ignition off , insert the
ignition key into the passenger
air bag switch 1 and turn it to the
"OFF" position.
As soon as you remove the child
seat, turn the air bag switch to the
"ON" position to activate the air
bag again.
Disarming check
With the ignition switched
on (2 nd notch), illumina-
tion of this warning light
indicates that the passenger
air bag is disarmed (switch
in the "OFF" position).
The warning light remains on throughout
the duration of disarming.
79
Front air bags
These are folded in the centre of the steering
wheel for the driver and in the fascia for the
front passenger. They are deployed simulta-
neously, except in cases where the passen-
ger air bag is disarmed.
Precautions regarding the
passenger air bag
disarm the air bag if you install a
rear-facing child seat,
activate the air bag for an adult
passenger.
78
Side air bags *
Side air bags are incorporated into
the front seat back frame, on the
door side.
They are deployed independently of
each other, on whichever side the
collision occurs.
44
The 7 seat version is fi tted with a
2-seat bench in row 2 and a 3-seat
bench in row 3.
* According to version.

FAMILIARISATION
10 -
STEERING WHEEL HEIGHT
ADJUSTMENT
When stationary, push the control
A forwards to unlock the steering
wheel.
Adjust the height of the steering
wheel.
Lock it by pulling control A towards
you fully.
ELECTRIC WINDOWS
1. Driver's electric window.
2. Passenger's electric window.
EXTERIOR MIRRORS
Move the manual control 3 in all
four directions to adjust.
Electric control for the
passenger's side mirror
From the driver's seat, adjust in
all four directions by operating
the control 4 .
Manual mode:
Press the switch. The window
stops as soon as the switch is re-
leased.
Automatic mode (driver):
Press and hold the switch. One
touch completely opens or closes
the window.
64 65 68

11
FAMILIARISATION
-
SPEED LIMITER *
CRUISE CONTROL *
75 73
If the vehicle is fi tted with
a speed limiter and cruise
control, these functions can-
not be activated at the same
time.
This limiter indicates the status
of selection of the function on the
instrument panel and displays the
programmed speed. The minimum
speed which can be programmed is
at least 18 mph (30 km/h).
It prevents exceeding of the speed
programmed by the driver, this func-
tion remains active regardless of any
action on the brake or clutch pedals.
On the other hand, pressing the
accelerator pedal to the point of
resistance does not have any effect.
It is possible to exceed the programmed
speed temporarily by pressing the
accelerator fi rmly beyond this point of
resistance.
The operating actions must be car-
ried out with the engine running.
The cruise control has a display on
the instrument panel to indicate the
programmed reference speed.
It enables the vehicle to maintain the
reference speed programmed by the
driver.
In order for it to be programmed or
activated, the vehicle speed must be
greater than 25 mph (40 km/h) with
at least fourth gear engaged.
* According to version.

FAMILIARISATION
12 -
N° Symbol Function
1 Air fl ow adjustment.
2
Air fl ow adjustment
and air intake
control.
3
Temperature
adjustment.
4
Air distribution
adjustment.
N° Symbol Function
1
Air conditioning
control.
2
Air fl ow adjustment
and air intake
control.
3
Temperature
adjustment.
4
Air distribution
adjustment.
36
38
HEATING
AIR CONDITIONING

13
FAMILIARISATION
-
RECOMMENDED INTERIOR SETTINGS
I require...
Heating or Manual air conditioning
Air distribution Air fl ow
Air recirculation/
Intake of exterior air
Temperature Manual AC
HOT
COLD
DEMISTING
DE-ICING

FAMILIARISATION
14 -
FRONT LAYOUT
1.
Storage compartments in the doors.
A. Bottle holder.
B. Can holder.
C. Storage compartment.
2. Overhead storage.
3. Map reading light.
4. Courtesy light.
5. Sun visors.
6. Glove box.
7. Lighter.
8. Removable ashtray.
9. Storage drawer (passenger).
67

15
FAMILIARISATION
-
REAR LAYOUT
Stowing rings
For greater safety, always
ensure that the loads trans-
ported are secured fi rmly.
69
1. Load space cover.
2. High load retaining net.
3. Stowing rings.
4. Side door storage compartment.
5. Trays between the front and rear
seats.
6. Seat back storage pockets.
70

FAMILIARISATION
16 -
This operation must be carried out
with the engine switched off .
Insert the key then turn it to the
left.
Remove the cap.
A label indicates which type of fuel to
use.
When you fi ll your tank, do not con-
tinue after the third cut-off of the
pump. This could cause engine mal-
functions.
The capacity of the tank is appro-
ximately 55 litres for petrol engines
and 60 litres for Diesel engines.
From the time this light comes on,
you have enough fuel left to cover
approximately 30 miles (50 km) .
Note: the right-hand sliding side door
cannot be opened while the fuel tank
cap is removed.
Outside the vehicle: Lift the control,
raise the bonnet and secure the strut
to keep the bonnet open.
Inside the vehicle: Pull the control
on the left-hand side, under the fascia
panel.
Low fuel level
warning light
61 61
FILLING WITH FUEL

INSTRUMENTS, CONTROLS and DISPLAYS
18 -
1. Seat belt not fastened warning
light
2. Front and side air bags warning
light
3. Passenger air bag disarmed
warning light
4. Front fog lamps indicator light
5. Anti-lock braking system (ABS)
warning light
6. Rear fog lamp indicator light
7. Diesel pre-heat warning light
8. Left hand direction indicator
9. Total distance recorder, service
indicator and engine oil level
indicator
10. Right hand direction indicator
11. Emission control system warning
light
12.
Main beam headlamps indicator light
13. Handbrake, low brake fl uid
level and electronic brake force
distribution warning light
14. Dipped beam headlamps
indicator light
15. Battery charge warning light
16. Engine oil pressure and
temperature warning light
17. Water in diesel fi lter warning light
18. Low coolant level warning light
19. Coolant temperature indicator
20. Total distance recorder button
21. Central (STOP) warning light
22. Speedometer
23. Rev counter
24. Lighting rheostat button
25. Fuel level indicator
26. Low fuel level warning light
27. Speed limiter/cruise control
display
INSTRUMENT PANEL: PETROL - DIESEL

19
INSTRUMENTS, CONTROLS and DISPLAYS
-
INSTRUMENTS AND CONTROLS
A permanently lit warning light or
one fl ashing, with the engine run-
ning, indicates an operating fault of
the unit concerned. The illumination
of certain warning lights may be
accompanied by an audible signal
and a message on the display. Do
not ignore this warning: consult a
PEUGEOT dealer as soon as pos-
sible.
If the central STOP warning light
comes on when you are driving,
stop your vehicle immediately,
where it is safe to do so.
Central (STOP)
warning light
Linked to the warning
lights:
- ''engine oil pressure and temper-
ature'',
- ''low coolant level'',
- 'handbrake'',
- ''low brake fl uid level'',
- ''electronic brake force distribution
system fault''.
Linked with the "coolant temperature"
indicator.
You must stop if the light fl ashes
with the engine running.
Consult a PEUGEOT dealer.
Engine oil pressure
and temperature
warning light
Linked to the central (STOP) warning
light.
You must stop.
This warning light indicates one of
the following:
- insuffi cient oil pressure indicated
by the message "Oil pressure
insuffi cient" on the display.
- a lack of oil in the lubrication circuit.
Top up the level.
- an oil temperature which is too high.
To lower the oil temperature, reduce
your speed.
Lighting of the warning light is ac-
companied by an audible signal.
Consult a PEUGEOT dealer.
Low engine coolant
level warning light
Linked to the central (STOP)
warning light.
This comes on for a few seconds
when the ignition is switched on.
Lighting of this warning light is ac-
companied by an audible signal and
the message "Top up engine fl uid
level" on the display.
You must stop.
Wait for the engine to cool before
topping up the level.
The cooling circuit is pressurised.
Handbrake, low
brake fluid level and
Electronic Brake Force
Distribution system
fault warning light
Linked to the central (STOP) warning
light.
This comes on each time the ignition
is switched on.
Lighting of this warning light is ac-
companied by an audible signal and
a message on the display indicating
the cause of the warning:
- "Handbrake on", if the handbrake
is applied or not fully released.
- "Brake fl uid level low" if there is
an excessive drop in brake fl uid
level (if the warning light remains
on even when the handbrake is
released).
- "Braking fault" is displayed to-
gether with the ABS warning
light, indicating a malfunction of
the Electronic Brake Force Distri-
bution system.
You must stop.
Consult a PEUGEOT dealer.
In the event of breakdown and to pre-
vent any risk of burns, unscrew the
cap by two turns to allow the pressure
to drop.
When the pressure has dropped,
remove the cap and top up the level.
Consult a PEUGEOT dealer.

INSTRUMENTS, CONTROLS and DISPLAYS
20 -
Battery charge warning
light
This comes on for a few sec-
onds when the ignition is
switched on. Lighting of this warning
light, when the engine is running, ac-
companied by an audible signal and
the message "Battery charge fault"
on the display, indicates one of the
following:
- faulty operation of the charging
circuit,
- slack battery or starter terminals,
- a cut or slack alternator belt,
- an alternator failure.
Consult a PEUGEOT dealer.
Emission control
system warning light
This comes on for a few sec-
onds each time the ignition is
switched on.
If it comes on with the engine running,
accompanied by an audible signal
and the message on the display:
- "Antipollution fault", this indi-
cates a failure of the emission
control system.
- "Catalytic converter fault", this
indicates a malfunction of the in-
jection or ignition system. There
is a risk of damage to the catalytic
converter (petrol engine only).
Consult a PEUGEOT dealer.
Diesel engine pre-heat
warning light
Wait until the warning light
goes out before starting the
engine.
If the temperature is high enough,
the warning light comes on for less
than one second. You can start the
engine without waiting.
Low fuel level
warning light
This comes on for a few
seconds when the igni-
tion is switched on.
When the ignition is on, it is accom-
panied by an audible signal and the
message "Fuel level low" on the
display.
If it fl ashes with the fuel gauge needle
in the lowest position, when the igni-
tion is on, this indicates a malfunction
of the fuel gauge.
When this warning light fi rst comes
on, you have enough fuel left to drive
approximately 30 miles (50 km) .
Capacity of the tank:
- approximately 55 litres for petrol
engines,
- approximately 60 litres for Diesel
engines.
Water in diesel filter
indicator *
There is a risk of damage to
the injection system.
Consult a PEUGEOT dealer as soon
as possible.
Anti-lock braking
system (ABS) warning
light
This comes on for a few seconds each
time the ignition is switched on.
If the warning light remains on or
comes on above 8 mph (12 km/h),
this indicates an ABS malfunction.
However, the vehicle retains conven-
tional servo-assisted braking.
Lighting of this warning light, accom-
panied by an audible signal and the
message "ABS fault" on the display,
indicates an ABS fault.
Consult a PEUGEOT dealer.
* According to country.

21
INSTRUMENTS, CONTROLS and DISPLAYS
-
Seat belt not fastened
warning light *
When the ignition is switched
on, this indicator light comes
on if the driver has not fastened his
seat belt.
Above 12 mph (20 km/h), the warning
light fl ashes for two minutes. Once the
two minutes have elapsed, the warn-
ing light remains on until the driver
fastens his seat belt.
Coolant temperature indicator
- needle in zone (A) , the tempera-
ture is correct,
- needle in zone (B) , the tempera-
ture is too high. The central STOP
warning light fl ashes, accompa-
nied by an audible signal and the
message "Engine coolant temp.
too high" on the display.
You must stop.
Consult a PEUGEOT dealer.
* According to country.
Passenger air bag
disarmed warning
light *
Lighting of this warning light is accom-
panied by the message "Passenger
air bag deactivated" on the display.
If the passenger air bag is disarmed,
the warning light comes on when the ig-
nition is switched on and it remains on.
Always consult a PEUGEOT dealer if
the warning light fl ashes.
Front and side air bags
warning light
This comes on for a few sec-
onds when the ignition is
switched on.
With the engine running, illumination
of this warning light accompanied by
an audible signal and the message
"Air bag fault" on the multifunction
display, indicates a fault in the air
bags.
Consult a PEUGEOT dealer.

INSTRUMENTS, CONTROLS and DISPLAYS
22 -
Service indicator
This is a visual reminder of when the
next service is due. This service is to
be carried out according to the man-
ufacturer's servicing schedule.
5 seconds after the ignition is
switched on, the total distance re-
corder resumes normal operation and
the display shows the total or trip dis-
tances.
The distance remaining before the next
service is less than 500 miles (1,000 km).
Example: 400 miles (900 km) remain
before the next service is due.
When switching on the ignition and
for 5 seconds, the display shows:
5 seconds after the ignition is
switched on, the total distance re-
corder resumes normal operation
and the symbol remains lit.
This indicates that a service should
be carried out shortly. The display
shows the total or trip distances.
The service is overdue.
Each time the ignition is switched on
and for 5 seconds, the symbol and
the excess distance fl ash.
Example: the service is overdue by
300 miles/km. The service should be
carried out very shortly.
When the ignition is switched on and
for 5 seconds, the display shows:
5 seconds after the ignition is
switched on, the total distance re-
corder resumes normal operation and
the symbol remains lit. The display
shows the total or trip distances.
Note: the spanner lights if the two-year
interval has been exceeded.
INSTRUMENT PANEL
DISPLAY
After switching on the ignition, three
functions are shown in succession:
- service indicator,
- engine oil level indicator,
- total distance recorder/total and
trip distances.
Note : the total and trip distances are
displayed for 30 seconds when the
ignition is switched off, on opening
the driver's door, as well as on lock-
ing and unlocking the vehicle.
Example: 4,800 miles/km remain be-
fore the next service is due. When the
ignition comes on and for 5 seconds
the display shows:
Operation
As soon as the ignition is switched
on and for 5 seconds, the spanner
symbolising ''service operation'' is lit.
The trip recorder display shows the
distance remaining (in round fi gures)
before the next service.

23
INSTRUMENTS, CONTROLS and DISPLAYS
-
Engine oil level indicator
When the ignition is switched on,
the engine oil level is indicated for
approximately 10 seconds, after the
service information.
Flashing of the six squares and dis-
playing of "max" indicate a surplus of
oil which could damage the engine.
If the surplus of oil is confi rmed by
a check using the dipstick, contact a
PEUGEOT dealer without delay.
Your PEUGEOT dealer carries out
this operation after each service.
The reset procedure is as follows:
- Switch off the ignition.
- Press and hold button 1 .
- Switch on the ignition.
The display begins a 10 second
countdown.
-
Keep button 1 pressed for 10 seconds.
The display shows [=0] and the span-
ner disappears.
Flashing of the six segments and dis-
playing of "min" indicate a lack of oil
which could damage the engine.
If the lack of oil is confi rmed by a
check using the dipstick, it is essential
that the level is topped up.
Flashing of the six segments indi-
cates a malfunction of the oil level
indicator.
There is a risk of damage to the engine.
Consult a PEUGEOT dealer.
The level read on the dipstick or on
the indicator will only be correct if
the vehicle is on level ground and
the engine has been off for more
than 15 minutes.
Resetting the service indicator
Surplus of oil
Lack of oil
Oil level indicator fault
/