Page is loading ...

network-electronics.com
DVB-ASI to IP
Gateway
Rev. 2.10.0
Flashlink User Manual
ASI-IP-GTW

ASI-IP-GTW User's Manual
Page 2
This page is intentionally left blank

ASI-IP-GTW User's Manual
Page 3
Important notice:
Network Electronics ASA reserve the right to make corrections,
modifications, enhancements, improvements and other changes to its
products or services at any time and to discontinue any product or
service without notice.
About this manual
This manual explains how to operate the ASI-IP-GTW IP to ASI Video
Gateway. It is shown how to install and maintain the unit. In addition,
the functionality of the unit is described in detail.
This manual should be kept in a safe place for reference for the life time
of the equipment. Further copies of this manual can be ordered from
Network. If passing the equipment to a third party, please ensure to
pass all relevant documentation including this manual.
Issues of this manual are listed below:
How to use this manual
Novice users unfamiliar with the Video Gateways from Network should
read this manual starting with Chapter
1. Users familiar with the
Network Video Gateways and operation of video over IP equipment may
start with Chapter
2. Users which are more interested in the
functionality offered by the ASI-IP-GTW may directly go to Chapter
3.
Rev. Date SW ver. Comment
1.1 July 2005 0.11.4 Initial release
2.0 September 2005 1.1.0 Release with FEC, VLAN and SFP interface
2.1 November 2005 1.1.5 Intermediate release with implementations on
iterative FEC, more on alarms and other general
improvements.
2.2 January 2006 1.2.2 Release with SNMP support as optional feature
and support for UDP transmission mode
2.3 April 2006 1.3.x Release with bi-directional operation, and IGMPv3
support.
2.3b May 2006 1.3.x Small patch on description of RTP sequence
errors.
2.4 July 2006 1.3.11 Ping option (3.5.5), New clock options (3.5.2),
Advanced tab on IPRX (
3.7.4),
Speed-/ duplex mode for management port (3.5.1)
2.5 Sept. 2006 1.3.18 Added support for GPS module.
2.6 Oct. 2006 1.3.22 Added support for User Security and RIPv2.
2.7 March 2007 1.3.33 SNMP tab, Burst/Spread mode, No lock mode,
updated features list.
2.8 April 2007 1.4.0 Dual ASI, Increased FEC matrixes, VBR mode,
new FEC alarm, password resetting.
2.9 November 2007 2.20.4 Data channel ping, ASI bitrate limiter, Static MAC
2.10 January 2008 2.22.0 204 byte MPEG-2 transport stream support

ASI-IP-GTW User's Manual
Page 4

ASI-IP-GTW User's Manual
Page 5
Table of Contents
1 Introduction ................................................................................ 8
1.1 Purpose of this Manual ......................................................... 8
1.1.1 Who Should Use this Manual................................................... 8
1.1.2 Warnings, Cautions and Notes................................................. 8
1.2 Contact Information.............................................................. 9
1.2.1 What Equipment is Covered by this Manual ............................ 9
1.2.2 Software versions................................................................... 10
1.3 Role of the ASI-IP-GTW in a Typical System......................... 10
1.4 Summary of Features.......................................................... 10
1.5 Guided Tour ....................................................................... 12
1.5.1 The User Interface ................................................................. 12
1.5.2 Front Panel Description ......................................................... 12
1.5.3 Rear Panel Description .......................................................... 12
1.5.4 Construction.......................................................................... 13
1.5.5 Hardware Options.................................................................. 13
1.5.6 Software Options ................................................................... 14
2 Installing the Equipment ........................................................... 15
2.1 Introduction........................................................................ 15
2.1.1 Read this first! ....................................................................... 15
2.1.2 To inspect package content.................................................... 15
2.2 Installing the Equipment..................................................... 15
2.2.1 Selecting a site for the equipment .......................................... 15
2.2.2 To fix the equipment .............................................................. 16
2.2.3 To cable the equipment.......................................................... 16
2.2.4 Equipment access.................................................................. 16
2.2.5 Ventilation ............................................................................. 16
2.2.6 To connect the equipment...................................................... 17
2.3 Power ................................................................................. 18
2.3.1 AC Power Supply ................................................................... 18
2.3.2 Power Cable and Protective Earth .......................................... 18
2.3.3 Optional DC Power Supply..................................................... 20
2.4 Signal Connections ............................................................. 21
2.4.1 Introduction........................................................................... 21
2.4.2 ASI ports ............................................................................... 21
2.4.3 Ethernet data port ................................................................. 22
2.4.4 Ethernet management port .................................................... 23
2.5 LEDs .................................................................................. 23
2.6 Powering Up/Down ............................................................. 24
2.6.1 Before Powering up ................................................................ 24
2.6.2 Powering Up .......................................................................... 24
2.6.3 Powering Down ...................................................................... 24
3 Operating the Equipment........................................................... 25
3.1 Introduction........................................................................ 25
3.2 Changing the IP address of the unit .................................... 25
3.3 Looking at the WEB interface .............................................. 26
3.4 Status................................................................................. 28
3.5 Device Info.......................................................................... 29
3.5.1 Network ................................................................................. 30

ASI-IP-GTW User's Manual
Page 6
3.5.2 Time settings ..........................................................................33
3.5.3 Alarms....................................................................................34
3.5.4 SNMP .....................................................................................34
3.5.5 Ping ........................................................................................36
3.5.6 Security ..................................................................................38
3.6 IP TX .................................................................................. 39
3.6.1 Main.......................................................................................39
3.6.2 FEC Settings...........................................................................42
3.6.3 Ethernet Settings....................................................................44
3.6.4 Ping Settings ..........................................................................45
3.7 IP RX .................................................................................. 46
3.7.1 Main.......................................................................................46
3.7.2 FEC Settings...........................................................................48
3.7.3 Ethernet Settings....................................................................50
3.7.4 Ping Settings ..........................................................................51
3.7.5 Advanced Tab .........................................................................52
3.8 Network .............................................................................. 54
3.9 Save/Load .......................................................................... 56
3.9.1 Saving a Configuration ...........................................................56
3.9.2 Loading a Configuration .........................................................57
4 Options ..................................................................................... 58
4.1 1PPS/10MHz interface modules .......................................... 58
4.1.1 Separate 10MHz/1PPS module ...............................................58
4.1.2 1PPS interface ........................................................................58
4.1.3 Operating the 1PPS/10MHz interface module .........................59
4.1.4 LED descriptions ....................................................................60
4.2 RIPv2 functionality.............................................................. 61
4.2.1 User interface .........................................................................61
5 Equipment Description .............................................................. 63
5.1 Introduction........................................................................ 63
5.2 Functional Description........................................................ 63
5.2.1 Introduction ...........................................................................63
5.2.2 IP Transmit Mode ...................................................................63
5.2.3 IP Receive Mode ......................................................................64
5.2.4 IP Bi-directional Mode.............................................................64
5.2.5 Management...........................................................................64
5.2.6 Alarms....................................................................................64
5.3 Overview of Video over IP .................................................... 67
5.3.1 Protocol mapping....................................................................67
5.4 Data Flow Block Diagrams .................................................. 68
5.4.1 Forward Error Correction (FEC) ..............................................68
6 Preventive Maintenance and Fault-finding.................................. 70
6.1 Introduction........................................................................ 70
6.2 Preventive Maintenance ...................................................... 70
6.2.1 Routine Inspection..................................................................70
6.2.2 Cleaning .................................................................................70
6.2.3 Servicing.................................................................................70
6.3 Maintenance ....................................................................... 70
6.3.1 Warranty ................................................................................70
6.4 Fault-finding....................................................................... 71
6.4.1 Fault finding Philosophy .........................................................71

ASI-IP-GTW User's Manual
Page 7
6.4.2 Preliminary Checks................................................................ 71
6.4.3 PSU LED Unlit / Power Supply Problem................................. 72
6.4.4 Fan(s) Not Working / Overheating.......................................... 73
6.4.5 Alarm LED lit / Alarm condition ............................................ 73
6.5 Disposing of this Equipment ............................................... 75
6.5.1 General.................................................................................. 75
6.6 To return the unit ............................................................... 75
7 Appendix A: Glossary................................................................. 76
8 Appendix B: Technical Specification........................................... 80
8.1 DVB ASI port ...................................................................... 80
8.2 Ethernet data port .............................................................. 81
8.3 Ethernet management port ................................................. 81
8.4 Alarm relay and maintenance port specification .................. 81
8.5 AC Mains Input................................................................... 82
8.6 DC Mains input .................................................................. 82
8.7 Physical Details .................................................................. 83
8.8 Environmental Conditions................................................... 84
8.9 Compliance......................................................................... 84
8.9.1 Safety .................................................................................... 84
8.9.2 Electromagnetic Compatibility - EMC..................................... 84
8.9.3 CE Marking ........................................................................... 85
8.9.4 Interface to “public telecommunication system” ..................... 85
9 Appendix C: References ............................................................. 86
10 Appendix D: Upgrade of Features............................................... 87
11 Appendix E: Upgrading Software................................................ 90
12 Appendix F: Quality of service – Setting Packet priority .............. 92
12.1 MPLS.................................................................................. 92
12.2 Layer 3 Routing .................................................................. 92
12.3 Layer 2 priority ................................................................... 93

ASI-IP-GTW User's Manual
Page 8
1 Introduction
1.1 Purpose of this Manual
This manual describes how to operate the ASI to IP Gateway, hereafter
referred to as the ASI-IP-GTW. It also describes how to install and
maintain the unit. A detailed technical description of the functionality
of the unit is given as part of this document.
The following topics are covered in this manual:
o General introduction to the ASI-IP-GTW
o Installation of the Unit
o Functional description of the Unit
o Fault finding and maintenance
1.1.1 Who Should Use this Manual
This manual is written for operators and users of the ASI-IP-GTW and
is meant to provide necessary information for installation, operation
and day-to-day maintenance of the unit.
Note: This manual does not include any maintenance information or
procedures which require the removal of covers.
1.1.2 Warnings, Cautions and Notes
1.1.1.1 Heed Warnings
All warnings on the product and in the operating instructions should
be adhered to. The manufacturer can not be held responsible for
injuries or damages where warnings and cautions have been ignored or
taken lightly.
1.1.1.2 Read Instructions
All the safety and operating instructions should be read before this
product is operated.
1.1.1.3 Follow Instructions
All operating and use instructions should be followed.
1.1.1.4 Retain Information
The safety and operating instructions should be retained for future
reference.
Warning: Warnings give information, if strictly observed, will prevent
personal injury and death, or damage to personal property or the
environment.

ASI-IP-GTW User's Manual
Page 9
Caution: Cautions give information, if strictly followed, will prevent
damage to equipment or other goods.
Note: Notes provides supplementary information. They are highlighted
for emphasis, as in this example, and are placed immediately after the
relevant text.
1.2 Contact Information
Our primary is to provide first class customer care that is tailored to
your specific business and operational requirements.
Telephone: +47 33 48 99 99
Fax: +47 33 48 99 98
Email: support@network-electronics.com
Web: http://www.network-electronics.com
Service: +47 90 60 99 99
Mailing and visiting address:
Network Electronics ASA
Thorøya, P.O. Box 1020
N-3204 Sandefjord
Norway
This manual does not include any maintenance information or
procedures which require the removal of covers.
1.2.1 What Equipment is Covered by this Manual
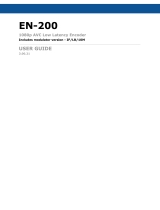
This manual covers the ASI to IP Gateway. Figure 1 shows the physical
unit.
Figure 1. The product
The ASI-IP-GTW consists of a 1RU high rack-mounted enclosure with a
DSP module (Master Module) and 1 or 2 ASI I/O boards. Optical
Gigabit or a second electrical Gigabit port is provided by an optional
SFP (Small Form-Factor Pluggable) slot.

ASI-IP-GTW User's Manual
Page 10
1.2.2 Software versions
This manual covers the functionality of the software version 1.4.0 or
later of the ASI-IP-GTW. This manual continues to be relevant to
subsequent software versions where the functionality of the equipment
has not changed. When a new software version changes the
functionality of the product, a new version of this manual will be
provided.
1.3 Role of the ASI-IP-GTW in a Typical System
The ASI-IP-GTW provides a bridge between the MPEG-2 world and the
IP world. The unit provides an interface between MPEG-2 transport
streams, via DVB-ASI interface, to the IP based Network. It provides the
ability to carry up to 8 individual MPEG-2 transport streams over an IP
network. Each individual MPEG-2 transport stream is carried on an
individual UDP port. At the reception site, the unit de-concentrates the
MPEG-2 transport streams from the IP network, back to individual
MPEG-2 transport streams and out through the DVB-ASI connections.
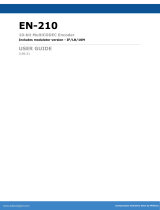
Figure 2 provides an overview of the ASI-IP-GTW in transmit and
receive mode.
Figure 2. ASI-IP-GTW in a system
1.4 Summary of Features
Features of the ASI-IP-GTW include:
o Transmission of MPEG-2 Transport Streams over Gigabit
Ethernet.
o Flexible Forward Error Correction
o End to end Quality of Service
o MPTS/SPTS
o Up to 8 DVB-ASI inputs/outputs
o User configurable as transmitter or receiver
o Increased robustness against network packet losses

ASI-IP-GTW User's Manual
Page 11
o User-friendly configuration and control
o WEB/XML based remote control
o Easy access to unit from any WEB browser
o Easy integration to Network Management System (NMS) with
SNMP Trap support
o Type of Service (TOS) field support for reliable end-to-end
transmissions

ASI-IP-GTW User's Manual
Page 12
1.5 Guided Tour
1.5.1 The User Interface
All connectors are provided at the rear panel. Configuration and
monitoring of the unit is performed via a FLASH-based WEB interface
using a standard WEB browser such as Internet Explorer. The unit also
supports configuration via file transfer of XML files. Once configured,
the unit runs without the need for further intervention unless system
configuration requirement change.
1.5.2 Front Panel Description
The front panel provides four LEDs per ASI-IP-GTW. Table 1 describes
the meaning of the different LED indicators.
Table 1. Front panel LEDs
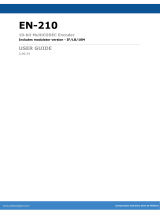
1.5.3 Rear Panel Description
All connectors to the ASI-IP-GTW are provided at the rear panel. Figure
3 shows the rear panel of a ASI-IP-GTW equipped with 4 DVB-ASI
connectors.
1. ASI. In IP TX mode, the connector provides a DVB-ASI input. In IP
Rx mode, the connector provides a DVB-ASI output.
2. Management port. The ASI-IP-GTW provide one Ethernet port for
control and management of the unit.
3. Ethernet data port. The ASI-IP-GTW provides one Ethernet data
port for high speed signal transmission and reception.
4. Alarm/RS232 Connector. This 9-pin male D-SUB connector
provides RS232 access and alarm information.
5. Technical Earth. The ASI-IP-GTW provide a Technical Earth.
6. Mains Power Connection. This is the Power Supply Connection.
Indicator Colour Description
Power Green This LED is lit when power is being received by the
unit.
Alarm Red This LED is lit when a failure is detected by the unit.
IP TX Blue This LED is lit when the unit is configured to transmit
data to the IP Network.
IP RX Yellow This LED is lit when the unit is configured to receive
data from the IP Network

ASI-IP-GTW User's Manual
Page 13
Note: Some units are delivered to use 48 VDC power. These units have
a 3-pin power D-SUB connector instead of the mains connector.
7. LEDs. The ASI-IP-GTW provides on the rear four LEDs related to the
operation of the equipment. In addition, there are LEDs related to the
ASI ports, the management port and the data port.
1.5.4 Construction
The ASI to IP Gateway consists of a main board and one or two ASI
boards mounted horizontally in a screened, self-ventilated cabinet. The
unit is 1RU high and two units can be mounted side-by-side in a 19
inch rack. All inputs and outputs are available at rear panel and there
are no front panel keypads or display.
Figure 3 shows the rear panel of
the unit.
Figure 3. Rear view
1.5.5 Hardware Options
1.1.1.5 4 additional ASI ports
The ASI-IP-GTW is at least fitted with 4 ASI ports from factory. 1 to 4 of
these inputs are enabled from factory. As an option, the unit can be
fitted with an additional ASI module, providing 4 additional ASI ports,
which gives a total of 8 ASI ports.
1.1.1.6 SFP Module
As a factory option, the ASI-IP-GTW can be equipped with an SFP slot
to feature optical Gigabit or a second, redundant electrical Gigabit port.
The SFP module itself is not provided.
1.1.1.7 GPS Module
As a factory option, the ASI-IP-GTW can be equipped with a sync signal
input module. This module gives the ASI-IP-GTW the option to sync to
either a 1pps or 10MHz signal.
1.1.1.8 SFP/GPS Module
As a factory option, the ASI-IP-GTW can be equipped with an SFP slot
to feature optical Gigabit or a second, redundant electrical Gigabit port.
The SFP module itself is not provided. This module also includes a
1pps input for use as a sync signal.

ASI-IP-GTW User's Manual
Page 14
1.5.6 Software Options
The following table describes the features available as software option.
Please refer to
Appendix D: Upgrade of Features for more information
Table 2. Functionality enabled through software licenses
Functionality Max value Description
Number of enabled ports 8 The number of ASI ports enabled. This
can be different from the number of ports
physically mounted.
Data port max. speed: 1000Mbit/s The speed of the data port can be
100Mbit/s or 1000Mbit/s.
Connect Control NA Enabled supervision of the unit through the
Connect software.
Forward Error Correction NA Pro-MPEG Forward Error Correction
enabled for use on all streams.
Bi-directional operation NA Enables simultaneous transmission and
reception of MPEG2 data on the Ethernet
data interface.

ASI-IP-GTW User's Manual
Page 15
2 Installing the Equipment
2.1 Introduction
2.1.1 Read this first!
The ASI-IP-GTW must be handled carefully and thoughtfully to prevent
safety hazards and damage. Ensure that the personnel designated to
install the unit have the appropriate skills and knowledge.
Follow the instructions for installation and only use installation
accessories recommended by the manufacturer.
2.1.2 To inspect package content
o Inspect the shipping container for damage. If your shipping
container is damaged, keep the shipping container or cushioning
material until you have inspected the contents of the shipment for
completeness and have checked that the ASI-IP-GTW
mechanically and electrically.
o Verify that you received the following items and any optional
accessories you may have ordered:
2.2 Installing the Equipment
2.2.1 Selecting a site for the equipment
The ASI-IP-GTW should not be placed where it will be a subject to
extreme temperatures, humidity, or electromagnetic interference.
Specifically, the site you select should meet the following requirements:
o The ambient temperature should be between 0 to 50 degrees
Celsius (32 and 122 degrees Fahrenheit).
o The relative humidity should be less than 90 percent, non-
condensing. Do not install the unit in areas of high humidity or
where there is danger of water ingress.
o Surrounding electrical devices should not exceed the
electromagnetic field (RFC) standards for IEC 801-3, Level 2
(3V/M) field strength.
o Make sure that the equipment receives adequate ventilation. Do
not block the ventilation holes on each side of the ASI-IP-GTW.
o The power outlet should be within 1.8 meters (6 feet) of the ASI-IP-
GTW.
o ASI to IP Gateway
o Power cord
o User’s manual
Note: 48V DC versions do not ship with a power cord, but a male
Power D-SUB connector for soldering to the supply leads.

ASI-IP-GTW User's Manual
Page 16
o Where appropriate ensure that this product has an adequate level
of lightning protection. Alternatively, during a lightning storm or
whenever it is left unattended and unused for long periods of time,
unplug it from the supply outlet and disconnect the output
equipment. This prevents damage to the product due to lightning
and power-line surges.
2.2.2 To fix the equipment
The ASI-IP-GTW is designed for stationary use. The ASI-IP-GTW is
designed for installation in standard 19" racks. When installed in a
rack, ensure that the unit is surely and safely installed and that the
equipment has adequate through-flow of air.
2.2.3 To cable the equipment
Ensure that power supply cables are routed in such a way that they are
not likely to be walked on or pinched by items placed upon or against
them.
Do not run ac power cables and signal cables in the same duct.
2.2.4 Equipment access
The ASI-IP-GTW has connectors at the rear. When installing the unit,
ensure that the unit is installed to allow easy access to the rear of the
unit.
2.2.5 Ventilation
Please observe the following:
1. Openings in the cabinet are provided for ventilation and to ensure
reliable operation of the product and to protect it from overheating.
These openings must not be blocked or covered. This product
should never be placed near or over a radiator or heat register. This
product should not be placed in a built-in installation such as a
rack unless proper ventilation is provided or the instructions have
been adhered to.
2. The fans contained in this unit are not fitted with dust/insect filter.
Play particular attention to the environment in which it is to be
used.
The ASI-IP-GTW should be installed to allow adequate flow of free-
air. Ensure that the ventilation holes on each side of the ASI-IP-
Warning: If the Video Gateway has been subject to a lightning strike or
the power surge which has stopped it working, disconnect the power
immediately. Do not reapply power until it has been checked for safety.
If in doubt, contact Network.
Warning: Never push objects of any kind into this equipment through
openings as they may touch dangerous voltage points or short-out
parts that could result in a fire or electric shock. Never spill liquid of
any kind on or into the product.

ASI-IP-GTW User's Manual
Page 17
GTW are no not blocked and allow at least 50 mm free air-space at
each side of the unit. The ASI-IP-GTW is designed to be stacked in
19"racks without ventilation panels between. In systems with
stacked units, it may be required to use forced-air cooling to reduce
the operating ambient temperature.
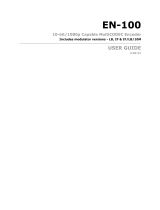
Figure 4 shows the air path through the unit.
Figure 4. Air Path through the unit
2.2.6 To connect the equipment
Once the ASI-IP-GTW is installed in its intended operating position, it is
ready to be connected to the rest of the system. The following figure
shows the different equipment connections.
Figure 5. Signal connections
Remove mains supply previous to move or install the equipment.
Ensure ESD precautions are observed whilst interconnecting
equipment.
1.1.1.9 ASI port
The ASI-IP-GTW can be operated in three modes: IP Transmit, IP
Receive, and IP bi-directional mode.
In IP transmit mode, the equipment receives up to 8 DVB-ASI streams
and sends them to the IP network. In this mode, connect the individual
DVB-ASI input signals to the connectors marked with ASI. If you have
ordered the unit with less than 4 ASI ports, the enabled ports starts at
number 1 up to the number of ports ordered.
In IP receive mode, the equipment receives an IP stream and sends the
individual MPEG-2 transport streams out on the DVB-ASI connectors.
In this mode, connect the DVB-ASI output to the input of the
equipment to receive MEG-2 transport stream from the unit. If you

ASI-IP-GTW User's Manual
Page 18
have ordered the unit with less than 4 ASI ports, the enabled ports
starts at number 1 up to the number of ports ordered.
In IP bi-directional mode, half the DVB-ASI connectors are used as
inputs, and the other half as DVB-ASI outputs. ASI connectors 1, 2, 5
and 6 are used as inputs, while ASI connectors 3, 4, 7 and 8 are used
as outputs.
1.1.1.10 Ethernet data port
Connect the Ethernet data port to the network. In IP transmit mode,
the ASI-IP-GTW will send an IP stream to the network. In IP receive
mode, the ASI-IP-GTW will receive an IP stream from the network.
1.1.1.11 Power supply
Section
2.3 provides details of the power supply, protective earth and
security. Read all these instructions, prior to connecting the unit to
power mains.
1.1.1.12 Management port
The ASI-IP-GTW provides one Ethernet port for control and
management. Connect the management port to the management
network.
1.1.1.13 Technical Earth
Connect the Technical earth to a suitable earth point.
1.1.1.14 Alarm
The ASI-IP-GTW provides an alarm relay for connection to external
alarm system.
2.3 Power
2.3.1 AC Power Supply
The ASI-IP-GTW provides a wide-ranging power supply covering a rate
voltage range 100-240Vac, 50/60Hz. Please refer to
Appendix B: Technical Specification for a detailed specification of the
AC power supply.
2.3.2 Power Cable and Protective Earth
1.1.1.15 General
Ensure that the AC power cable is suitable for the country in which the
unit is to be operated.
Warning: This product should be operated only from the type of power
source indicated on the marking label. Please consult a qualified
electrical engineer or your local power company if you are not sure of
the power supply to your business.

ASI-IP-GTW User's Manual
Page 19
The unit is supplied with a two meter detachable power supply cable
equipped with the moulded plug suitable for Europe, UK or US.
The wires in the mains cable are coloured in accordance with the wire
colour code shown in
Table 3.
Table 3. Supply Cable wiring colours
1.1.1.16 Protective Earth /Technical Earth
The unit has a Technical Earth terminal located at the rear panel. Its
use is recommended. This is not a Protective earth for electrical shock
protection. The terminal is provided to:
1. Ensure all equipment chassis fixed in the rack are at the same
Technical earth potential. To achieve this, connect a wire between
the Technical earth terminal and a suitable point on the rack.
2. Eliminate the migration of stray charges when connecting between
equipment.
Warning: If the moulded plug fitted to the mains cable supplied with
this unit is not required, please dispose of it safely. Failure to do this
may endanger life as live ends may be exposed if the removed plug is
inserted into a mains outlet.
Caution: Power supply cords should be routed so that they are not
likely to be walked on or pinched by items placed upon or against
them, paying particular attention to cords at plugs, convenience
receptacles, and the point where they exit from the appliance.
UK (BS 1363) EUROPE (CEE 7/7) USA (NEMA 5-15P)
Earth: Green-and yellow Green-and yellow Green
Neutral: Blue Blue White
Live: Brown Brown Black
T
o achieve protection against earth faults in the installation, connected
to the equipment by signal cables etc., the equipment should always be
connected to protective earth. If the mains appliance coupler is
disconnected while signal cables are connected to the equipment, earth
connection should be achieved by connecting earth to the additional
technical earth connection on the rear panel of the unit.
Warning: This unit must be correctly earthed through the moulded
plug supplied. If the local mains supply does not have an earth
conductor do not connect the unit.
Caution: Consult the supply requirements in
Appendix B: Technical Specification prior to connecting the unit to the
supply.

ASI-IP-GTW User's Manual
Page 20
1.1.1.17 Connecting the Video Gateway to the AC Power Supply
To connect the unit to the local AC power supply:
1. Ensure that the local ac power supply is switch OFF.
2. Connect the ac power lead to the Video Gateway mains input
connector and then the local mains supply.
2.3.3 Optional DC Power Supply
The ASI-IP-GTW can be delivered with a 48 VDC power supply for use
in environments where this is required. The DC power can tolerate a
voltage range of 36 – 72 VDC. Please refer to
Appendix B: Technical Specification for a detailed specification of the
power supply.
Units delivered with DC power supply, has a 3–pin male power D-SUB
connector in stead of the standard Mains Power Connector. Also a
female 3-pin D-SUB connector is supplied.
The pin assignment is shown in
Table 4.
Table 4 DC power connector pin assignment
To connect the unit to the local DC power supply:
1. Use a soldering tool to attach the supplied loose female power D-
SUB connector to your power leads (not supplied).
2. Connect the power leads to your local power supply.
3. Connect the DC power connector, with attached power leads, to the
Video Gateway power input connector.
Warning: If the terminal screw has to be replaced, use an M4x12mm
long pozidrive panhead. Using a longer screw may cause a safety
hazard.
Warning: Do not overload wall outlets and extension cords as this can
result in a risk of fire or electrical shock. As no power switch is fitted in
this unit, ensure that the local ac power supply is switch off before
connecting the supply cord. The unit is not fitted with an on/off switch.
Ensure that the socket-outlet is installed near the equipment so that is
easily accessible. Failure to isolate the equipment properly may cause a
safety hazard.
Pin (placement) Specification
1 (top)
+ (positive terminal)
2 (middle)
- (negative terminal)
3 (bottom) Chassis Ground
/