Page is loading ...

Hardwood
Shaw
Engineered Hardwood
- Wall Installation
Quick
Guide
Horizontal Floor to
Ceiling Installation
&
Wainscot
Ins
talla
tion
Recommended
Spac
es
Interior
w
alls
Low moisture
r
ooms
Walls less than 10’ tall x 40’ wide
Walls
without anchored objects (such
as a
TV)
Vertical
walls
only
Fla
t
walls
without
w
allpaper
shawfloors.com

2
shawfloors.com
|
1-800-4
11-
7
429
W
elcome!
This
guide
will help you install your new wood wall planks via
Two methods- horizontal floor to ceiling installation
and
w
ainsc
oting
installation.
Here are a
few
quick tips before
getting
s
tart
ed:
HELPFUL TIPS:
•
Do not install on walls
that
are
gr
ea
t
er
than 10
feet
tall and 40 feet
long,
and do not install on
ceilings
or
other overhead surf
ac
es.
•
Installation
on walls
loca
t
ed
in wet areas, i.e., back splash,
bathrooms
et
c.,
is not recommended
.
•
Do not install the
engineered
directly
on walls
that
have
wallpaper
or
paneling.
The wall
surface
mus
t
be a
painted
or
primed drywall,
pr
operly
f
as
t
ened
to
a
wood framed
wall. Metal stud framing
is not approved
f
or
lamina
t
e
to
wall
ins
talla
tion.
•
The
engineered hardwood
wall
installation should
only be
installed
in
clima
t
e-c
ontr
olled
areas
(not recommended
on
exterior
walls or in
accl
imate
d
rooms).
T
he
conditions
of the areas
should
be
maintained
between
65-75 degrees
F
and
35-55%
relative
humidity
.
•
Maintain 3/16” expansion space around all perimeters of installation.
•
Do not install on walls
that
are
below grade exterior
walls
(basements).
•
Do not install the
engineered hardwood
from floor to ceiling v
erticall
y
.
For
this
type of
installation
the
engineered
mus
t
run in the
horizontal
dir
ection.
•
Vertical installations
are only recommended
for
a
wainscot
s
tyle
application
– single plank length
onl
y
.
•
Make sure
to
check the wall
for
flatness. The wall
should
be
flat within
3
/
16
inch in 10
ft.
•
Do not fasten any
decorative objects,
TVs or heavy objects
directly to the
lamina
t
e
.
Make sure
to
f
as
t
en
any
hanging objects
to
the wall
s
tuds.
•
Installation Guidelines
are
for wood frame construction
onl
y
.
*The
above requirements
are not intended
to
supersede federal,
s
ta
t
e
or local
building
codes, but as
with
many other
int
erior
finish
products
,
may
require modifying existing structural components for successful installation. Owner
assumes
r
esponsibility for
compliance with
all
building
c
odes.
CAUTION: WOOD DUST
The
International
Agency for Research on Cancer has classified wood dust as a nasal carcinogen. The sawing, sanding,
and/ or
machining of wood products can produce wood dust that can cause
respiratory,
eye, and skin irritations.
Equipment
should be
equipped with
a
dus
t
collector to reduce airborne wood
dust. Wear an
appropria
t
e
NIOSH
designa
t
ed
dus
t
mask
to
reduce exposure
t
o
airborne wood
dust.
Avoid contact with
eyes and skin. In case of
irritation,
flush eyes or skin
with w
a
t
er
for at
leas
t
15
minutes.
In
cases
of severe
irritation;
seek
immedia
t
e
medical
a
tt
ention.
For
further
t
echnical
or
installation questions
or
to
r
eques
t
a
Product
Specifica
tion
Data Sheet
contact
the
manuf
actur
er
.
1-800-44
1-
7
429
Attention California Installers & Consumers
WARNING
Installation of this product and wood product may create wood dust, which is known to the State of California to cause
cancer

3
shawfloors.com
|
1-800-4
11-
7
429
METHOD
A
Horizontal
Floor to
Ceiling
Ins
talla
tion
(Engineered Hardwood Only)
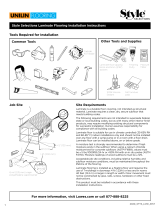
Tools and
Ma
t
erial
•
Caulk
gun
•
General
c
ons
truction
adhesiv
e
•
Tape
measur
e
•
1
½
-
1
¾ inch
br
ad
nails
•
Stud finder
•
Ladder
•
Appropriate
saw
f
or
cutting
and
ripping
lamina
t
e
•
18
gauge brad
/
s
taple
gun
•
Dus
t
mask
•
Safety glasses
•
Glo
v
es
•
Chalk
line
•
Pry
bar
•
Screw driver
(flat &
Phillip’s head)
•
Hammer

4
shawfloors.com
|
1-800-4
11-
7
429
METHOD A - Floor
to
Ceiling
Ins
talla
tion
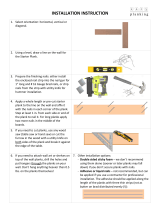
STEP
1
Remove existing baseboards
on the wall
that will
be
receiving
the
engineered hardwood
.
STEP
2
Make
sure
to
turn off the
power supply
while working
around exposed power outlets
or
light
s
wit
ches.
Remove
any
electric outlet
and
light switch
co
v
ers.
Take care not to
t
ouch
any
exposed wiring.
STEP
3
Mark all studs using a stud finder
and then using a
chalk line
from top to bottom
mark the wall
s
tuds.
STEP
4
Determine if
the
installation
will
start at
the
ceiling
working down
or
from
the
floor working
up
.
S
tarting
from
the
top down
is
bes
t
when there is
existing crown molding?
When working
from the
ceiling down, the tongue of the engineered
hardwood should face toward the floor.

5
shawfloors.com
|
1-800-4
11-
7
429
METHOD A - Floor
to
Ceiling Installation
(
c
ont.)
STEP
5
Measure the wall
to determine if
the
first r
o
w
of planks will need
to
be cut
down to avoid a
Small piece on the finish row.
Remember
to
lea
v
e
the
engineered hardwood
½ inch away from
the
finish floor
/
subfloor
.
When working
from
the
floor
up,
the tongue of the engineered hardwood
should face toward the ceiling.
STEP
6
Using a tape measure, pencil
and chalk
line
,
establish
a
starting
line. If you are
starting
a
t
The
floor
,
you can measure from
the
floor
up
the
point where
the
first
row will end
(remember
t
o
allow for
the ½ inch
expansion
gap
at
the
floor),
if
you are
starting from
the
ceiling
you will need
t
o
measure from
the
ceiling down.
Do this on
both
ends of the wall. Using a chalk line, pop a
line
using these
two
marks to
establish
a
starting
line
.
STEP
8
Make sure
to
visually inspect
each plank for
an
y
damage
or visual
def
ects.
STEP
9
Using a
construction adhesive
put an
s-bead
of
adhesive
on the back of the
planks.

6
shawfloors.com
|
1-800-4
11-
7
429
METHOD A - Floor
to
Ceiling Installation
(
c
ont.)
STEP
10
Push the plank
onto
the wall
lining it
up
with
The
starting
line
that
was
established.
Using
the
Brad nailer shoot
a nail
through
the
tongue
of
the
plank into the wall studs.
Proper
air
pressure is
important
- Make sure
that
the nail head is
sea
t
ed
pr
operly
.
Take care not to
shoot
c
omplet
ely
through
the
engineered hardwood
.
STEP
11
You may also
face
nail the
first
row of planks for
added support,
and place the nails low enough
so
that
the
baseboard
or
desired trim
will
cover the
nails. Make sure
to
use a nail
that
is long enough
t
o
go
through
the engineered hardwood
,
sheetrock
and
into the
wall
s
tud.
STEP
12
Once the
first
row is
complete
you will need
t
o
Cut the
first
plank of the
second
row to
cr
ea
t
e
the
proper
end
joint
s
tagger
.
The end
joints should
not
be closer than 8
inches.
STEP
13
Once you have cut the plank to
the
desired length
apply
an
s-bead
of
adhesive
to
the back of
the
plank. Then, engage the length side groove and tongue.
Slide or a taping block or scrap piece of flooring can be
used to tap/engage the short ends together. Using the
brad nailer
,
shoot
a nail
through
the
tongue
of the
plank into
the wall
s
tuds.

7
shawfloors.com
|
1-800-4
11-
7
429
METHOD A - Floor
to
Ceiling Installation
(
c
ont.)
STEP 14
Connect
the planks in the
following
rows
b
y
repeating the process of applying adhesive to
the back of the planks, engaging the length side
tongue and groove, along with the short ends, and
fastening the engineered hardwood with a brad nailer
through the tongue in the wall stud.
STEP
15
The
las
t
row of the engineered hardwood may need
to
be
cut.
Measure the
distance between
the
floor
/
ceiling
to
the
las
t
row of
engineered
hardwood
that
was
installed and
using a table saw
or jig saw cut the engineered hardwood
to the
width
desir
ed.

8
shawfloors.com
|
1-800-4
11-
7
429
METHOD B
Wainscot
Ins
talla
tion
(Engineered Hardwood Only)
Tools and
Ma
t
erial
•
Caulk
gun
•
General
c
ons
truction
adhesiv
e
•
Tape
measur
e
•
1
½
-
1
¾ inch
br
ad
nails
•
Stud finder
•
Ladder
•
Appropriate
saw
f
or
cutting
and
ripping
lamina
t
e
•
18
gauge brad
/
s
taple
gun
•
Dus
t
mask
•
Safety glasses
•
Glo
v
es
•
Chalk
line
•
Pry
bar
•
Screw driver
(flat &
Phillip’s head)
•
Hammer

9
shawfloors.com
|
1-800-4
11-
7
429
METHOD B -
Wainscot Installation
(
c
ont.)
STEP
1
Remove existing baseboards
on the wall
that will
be
receiving
the
engineered hardwood
.
STEP
2
Make sure
to
turn off the
power supply while
working around exposed power outlets
or
light
s
wit
ches.
Remove
any
electrical outlet
and
light
s
wit
ch
covers. Take care not to
t
ouch
any
exposed
wiring.
STEP
3
Mark all studs using a stud finder
and then using a
chalk line
from top to bottom,
mark the
s
tuds.
STEP
4
Measure
to determine
the
desired length
of
the
planks. Make sure
to
allow for
a ½
e
xpansion
between
the
floor
and the
engineered
hardwood
.

10
shawfloors.com
|
1-800-4
11-
7
429
METHOD B -
Wainscot Installation
(
c
ont.)
STEP
5
Using a
construction adhesive
put an
s-bead
of
adhesive
on the back of the
planks.
STEP
7
Push the plank against the wall. Using the
br
ad
nailer shoot
a nail
through
the
tongue
of
the
plank
into the wall. Make sure
that
the nail
head
is
sea
t
ed
properly
and not sticking
up. Take
car
e
not to
shoot completely through
the engineered
hardwood
.
Y
ou
may also
face
nail the planks at
the
bottom
of
the
plank into the wall
pla
t
e
.
Make sure
to
use a
nail
that
is long enough
to
go
through
the
engineered hardwood
,
sheetrock
and into the wall
pla
t
e
.
STEP
8
For the
second
plank and all
other
planks you
will
need
to
insert the groove into the
exposed
tongue
edge of the
first
plank. Using the brad nailer,
shoot a
nail
through
the
tongue
of the plank into the
w
all.
Make sure
to apply
an
s-bead
of
adhesive
to the
back
of all planks. Then using the brad nailer shoot
a
nail
through
the
tongue
edge of every plank into
the
w
all.

11
shawfloors.com
|
1-800-4
11-
7
429
METHOD B -
Wainscot Installation
(
c
ont.)
STEP
9
The
las
t
row of the
lamina
t
e
may need
to
be
cut.
Measure the
distance between
the
finishing
w
alls
To
the
las
t
row of
engineered hardwood
that
was
installed and
using a table saw or jig saw cut the
lamina
t
e
to the width
desir
ed.
/