Page is loading ...

1
2020_STYS_LOW_INST
10' (3 m)
)mm 031( "5 >
nigriv )mm 51.0( lim 6
polyethelene vapor barrier
ground
)mm 002( "8 >
Site Requirements
Laminate is a durable floor covering, not intended as structural
material. Laminate requires a clean, dry, secure subfloor that
meets building codes.
The following requirements are not intended to supersede federal,
state or local building codes, but as with many other interior finish
products, may require modifying existing structural components
for successful installation. Owner assumes responsibility for
compliance with all building codes.
Laminate floor is suitable for use in climate controlled (35-65% RH
and 60-85° F) indoor installations only and should not be installed
over any floor with a sump pump or in a room with a floor drain.
Laminate floor can be installed above, on or below grade.
A moisture test is strongly recommended to determine if high
moisture exists in the subfloor. When using a calcium chloride
moisture test for concrete subfloors (ASTM F1869), values must
be ≤ 5 lbs/1000ft²/24-hr or <80% RH with an in situ probe (ASTM
F2170). Moisture readings of wood subfloors must be ≤ 12%.
Acceptable job site conditions, including relative humidity and
subfloor moisture conditions, must be maintained throughout the
lifetime of the flooring.
Laminate flooring is installed as a floating floor and requires the
use of T-moldings in doorways 4 ft (1.22m) or less and in rooms
40 feet (12.2 m) or larger in length or width. Floor movement must
not be constrained by glue, nails, screws, hardware or other fixed
obstructions.
This product must be installed in accordance with these
installation instructions.
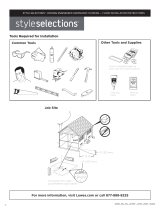
Job Site
Tools Required for InstallationTools Required for Installation
Common Tools
Wood
Glue
Carbide
40T Blade
Other Tools and Supplies
M
A
D
E
I
N
T
H
E
U
S
A
1
F
L
O
Z
(
3
3
.
5
m
l
)
PREMIUM
SYSTEM
COMPONENT
S
P
E
C
I
A
L
L
Y
D
E
V
E
L
O
P
E
D
F
O
R
L
A
M
I
N
A
T
E
F
L
O
O
R
I
N
G
Finishing
Putty
PREMIUM
SYSTEM
COMPONENT
Finishing
Putty
SILICONE
CAULK
SILICONE
CAULK
SILICONE
CAULK
100% Silicone
Sealant
Felt furniture
pads
Moisture
Meter
ON
Non Destructive Moisture
dlfwej dtra
djflsv
dlfwe vtra
alskdjf
vmwjc
Concrete
Encounter
Plus
0
1
2
3
4
5
6
0
50
100
150
200
250
Moisture
Meter
S
p
a
c
e
r
s
5
m
m
S
p
a
c
e
r
s
5
m
m
Laminate oor tapping
block and 5mm (3/16")
spacers
Style Selections Laminate Flooring Installation Instructions
For more information, visit Lowes.com or call 877-888-8225

2
2020_STYS_LOW_INST
Site and Material Preparation
A) Remove carpet and padding. Also remove any wood flooring installed on concrete. Do not remove products
unless they are asbestos-free.
B) Undercut door frame and wallbase. Slide the flooring at least 1/4" underneath the door frame and wallbase.
Also leave a concealed 3/8" minimum expansion space under each.
C) Remove bumps or peaks in subfloor and fill depressions with floor leveling compound to ensure no more than
3/16" unevenness per 10-foot span.
D) Acclimate unopened product before installation. If there is no time for acclimation, there should be no more than
a difference of 25° F and 20% relative humidity between the stocking/transportation environment of the flooring
and the final installation environment of the flooring.
E) Clean debris from subfloor before installation.
F) For planks without attached underlayment, first install Pergo Gold™ Premium Underlayment (Lowes Part # 670312)
over concrete or wood subfloors per the installation instructions included in the Pergo Gold package.
Alternative underlayment
G) For concrete subfloors, first install vapor barrier with overlapped seams of 8" or more.
H) For planks without attached underlayment, install over a single layer of underlayment appropriate for
laminate floors.
Style Selections
Laminate Flooring Installation Instructions
A
Door
Frame
Marco de la
puerta
Cutting Line
Línea de corte
Wallbase
Zócalo
Casing
Contramarco
1 inch
(2.5cm)
B
H
E
suboor
subsuelo
6 mil (0.15 mm) virgin
polyethelene vapor barrier
Barrera contra vapor de polietileno
virgen de 0,15 mm
> 8" (200 mm)
G
F
C
%
48 hours
48 horas
60° – 85° F
15° á 29° C
35% – 65% RH
35 % a 65 % de HR
D

3
2020_STYS_LOW_INST
Flooring Installation
1 2 3
5
> 12 in
> 30 cm
6
14
15
16 17
10
11 1312
4
Left / Izquierda
Right / Derecha
7
8 9
1
2
3
4
18
Style Selections
Laminate Flooring Installation Instructions

4
2020_STYS_LOW_INST
Flooring Installation
1. Inspect each plank. Floor should be installed blending planks from several cartons at the same time to ensure
good color and shade mixture throughout the installation.
2. For the first row along straight walls, remove the tongue on all long side joints and on the short side of the
1st plank only.
3. For uneven walls, trace contour on tongue-side of plank and cut.
4. Assemble the first row tongue side toward wall. Insert the end tongue into the end groove and rotate downward
to assemble. Keep the planks aligned and the joints closed.
5. Two spacers thick side to thick side = 3/8".
6. Provide a 3/8" space for expansion on all sides. First piece must be at least 8" long. Start new rows with pieces
trimmed from previous row. Ensure at least a 12" end joint offset.
7. At a slight angle, insert the tongue of plank 2 into the groove of plank 1 until the laminate edges meet, and then
rotate down until the joints lock.
8. Join the short end of the plank first. There will be a gap on the long side joints when the plank is rotated down.
9. Raise the outside edge of the plank upward approximately 1". Maintain this angle as you push the plank in until
the laminate edges meet. Rotate downward on the plank until the joint locks. Repeat these steps to complete the
installation. Installation Tip: Place a carton of planks across the end of the row being installed to keep installed
planks in place during installation.
10. Alternate Tap Method: Align the tongues into the grooves of the long and short sides of the planks. Install the long
side first by placing a tapping block no closer than 8" from either end and tap lightly along the long side until the
joint is closed tightly. Then tap the end using the tapping block into a locked position. Note: Uneven tapping or use
of excessive force may damage the joint.
11. Ensure there will be a 3/8" gap (after the joint is closed) to the wall for expansion.
12. For the last row, align the plank to be used on top of the 2nd to last row. Using a full width plank as a spacer, trace
wall contour and cut plank.
13. For the last row, install the long side tongue into the groove with the end joint aligned. Using a pull bar and hammer,
work evenly along the length of the plank and lightly tap the joint closed.
14. After tapping the long side joint closed, tap the short side closed, using a tapping block or a pull bar.
Installation Under Doorway Frames
15. Slide plank under pre-cut door frame.
16. Tap the long side joint closed first. Then tap the end joint closed.
Installation Around Fixed Objects (such as Pipes)
17. Allow 3/8" expansion space around pipes or other fixed objects.
Finishing the Installation
18. Remove all spacers.
Style Selections
Laminate Flooring Installation Instructions

5
2020_STYS_LOW_INST
Care and Cleaning
Place felt floor protectors under legs of moveable furniture. Chair casters should be rubber — not plastic or metal.
Place walk-off mats at entrances. Dust mop or damp mop only. NO WET MOPPING. If needed, use a solution of
1 cup vinegar per gallon of water OR 1/3 cup non-sudsing ammonia per gallon of water. DO NOT use abrasive cleaners,
detergents, soaps, waxes or polishes. Use correct hard surface vacuum tools. DO NOT use rotating beater bars, floor
scrubbers, steamers, jet mops or similar products. DO NOT allow liquids to stand on the floor. Wipe up spills immediately.
DO NOT allow moisture to be on the floor for longer than 30 minutes.
WARNING: DRILLING, SAWING, SANDING OR MACHINING WOOD PRODUCTS CAN EXPOSE YOU TO WOOD DUST,
A SUBSTANCE KNOWN TO THE STATE OF CALIFORNIA TO CAUSE CANCER. AVOID INHALING WOOD DUST OR USE
A DUST MASK OR OTHER SAFEGUARDS FOR PERSONAL PROTECTION. FOR MORE INFORMATION, GO TO
WWW.P65WARNINGS.CA.GOV/WOOD.
IMPORTANT HEALTH NOTICE FOR MINNESOTA RESIDENTS ONLY: THESE BUILDING MATERIALS EMIT
FORMALDEHYDE. EYE, NOSE, AND THROAT IRRITATION, HEADACHE, NAUSEA AND A VARIETY OF ASTHMA-LIKE
SYMPTOMS, INCLUDING SHORTNESS OF BREATH, HAVE BEEN REPORTED AS A RESULT OF FORMALDEHYDE
EXPOSURE. ELDERLY PERSONS AND YOUNG CHILDREN, AS WELL AS ANYONE WITH A HISTORY OF ASTHMA,
ALLERGIES, OR LUNG PROBLEMS, MAY BE AT GREATER RISK. RESEARCH IS CONTINUING ON THE POSSIBLE
LONG-TERM EFFECTS OF EXPOSURE TO FORMALDEHYDE. REDUCED VENTILATION MAY ALLOW FORMALDEHYDE
AND OTHER CONTAMINANTS TO ACCUMULATE IN THE INDOOR AIR. HIGH INDOOR TEMPERATURES AND
HUMIDITY RAISE FORMALDEHYDE LEVELS. WHEN A HOME IS TO BE LOCATED IN AREAS SUBJECT TO EXTREME
SUMMER TEMPERATURES, AN AIR-CONDITIONING SYSTEM CAN BE USED TO CONTROL INDOOR TEMPERATURE
LEVELS. OTHER MEANS OF CONTROLLED MECHANICAL VENTILATION CAN BE USED TO REDUCE LEVELS OF
FORMALDEHYDE AND OTHER INDOOR AIR CONTAMINANTS. IF YOU HAVE ANY QUESTIONS REGARDING THE
HEALTH EFFECTS OF FORMALDEHYDE, CONSULT YOUR DOCTOR OR CALL LOCAL HEALTH DEPARTMENT.
A
B
C
Style Selections
Laminate Flooring Installation Instructions

6
2020_STYS_LOW_INST
Although originally designed as a durable floor covering, many consumers have started using Style Selections
®
laminate
flooring on walls to give their rooms more character and to create a feature or accent wall.
Laminate can be utilized as a decorative covering over an existing clean, dry, secure and vertical wall that meets
building codes. The wall substrate should be primed or painted drywall (gypsum board) only. Do not install directly over
wallpaper or paneling. Laminate is not intended to be used on ceilings, countertops or as any type of structural material.
The installation wall should only run vertical to the floor. Sloping walls and surfaces that are parallel to the floor, such as
ceilings or soffits, should not be selected. Limit vertical installations to a maximum of 40 feet in length and a maximum
of 1 plank length in height. Limit horizontal installations to a maximum of 40 feet in length and a maximum of 10 feet in
height.
Laminate is suitable for an accent wall when used in climate controlled (35-65% RH and 60-85º F) indoor installations
only. Acclimate unopened product lying flat in the room where it is to be installed for at least 48 hours. Mix planks from
different cartons as you install to maximize the natural appearance.
Check wall for moisture, visible water stains or leaking windows. Do not install laminate over a wall with known moisture
damage. Do not install in areas near water sources such as a backsplash over a sink or bathtub. Acceptable job site
conditions, including relative humidity and wall moisture conditions, must be maintained throughout the life of the
laminate application.
Check wall for flatness within 3/16" over 10 feet. Correct any unevenness before installing to allow the laminate planks to
lie flat without rocking.
The following requirements are not intended to supersede federal, state or local building codes, but as with many other
interior finish products, may require modifying existing structural components for successful installation. Owner assumes
responsibility for compliance with all building codes, including maintaining the required distance from heat sources such
as fireplaces.
WARNING: For a safe and secure installation, this product MUST be installed in accordance with these
installation instructions.
Tools Required for Installation:
• Caulk gun
• Utility knife
• Stud finder (electronic)
• Carpenters level or laser level
• Chalk line
• 18 gauge brad nail gun (electric or air)
• Tape measure
• Pencil
• Screw gun or drill driver
(for horizontal installation only)
• Safety glasses
• Dust mask
• Gloves
Materials Required for Installation:
• 1
1
/
2
" – 1
3
/
4
" brad nails
• 100% silicone adhesive caulk (clear)
• 1
1
/
2
" - 1
3
/
4
" dry wall screws
(for horizontal installation only)
• Painters tape (for horizontal installation only)
Other Tools and Materials:
• Step ladder (for horizontal installation only)
• Hammer
• Uniclic
®
appropriate tapping block
• Pull bar
• Saw for cutting laminate planks
• Pry bar (for removing existing base or trim)
• Chair rail (for vertical installation only), wall base and
quarter round moldings (to fame out accent wall)
Style Selections Laminate Flooring on Wall Install Instructions

7
2020_STYS_LOW_INST
1. Measure the length of your laminate plank and the length of the wall area to determine the total square footage
area. Order that amount of flooring plus an additional 10% for incorrect cuts. Limit vertical installations to a
maximum of 40 feet in length and a maximum of 1 plank length in height.
2. Remove all base and trim from accent wall. Measure from the floor a distance equal to your laminate plank plus
one inch then level and mark the wall with a chalk line. With an electronic stud finder locate and mark wall studs.
(Figure 1)
3. Turn off power while working around wall outlets and light switches. Pay special attention to avoid contact with
electrical wiring.
4. Inspect each plank for damage before installing. (Figure 1a) Do not install damaged planks. You can use laminate
planks with or without an attached pad. There is no need to remove the pad, so treat the installation the same for
both types of planks.
5. Start from the left side with the short side tongue up and long side groove toward the wall. Place one plank against
the wall and align at the top to test fit. You will want a 1" gap at the bottom of the plank. (Figure 2a)
6. Determine the appropriate number of vertical planks to fill the wall. For the best appearance, the first and last
planks should be approximately the same width. Cut them as needed based on the width of your installation and
the width of your planks.
7. If you don’t need to cut the first plank, remove lower extension of long side groove with saw or utility knife.
(Figure 2b)
55"
54"
1
Level Line
1" Gap
1a
2a
1" Gap
Install
towards
wall
after
before
Cut off
extension
2b
Style Selections
Vertical Wainscot Style Wall Install Instructions

8
2020_STYS_LOW_INST
8. Apply silicone adhesive to the back side of the plank in an “S” pattern. If you’re using a laminate plank with an
attached pad, apply the silicone directly to the pad on the back of the plank. (Figure 3)
9. Adhere the plank to the wall leaving a
3
/16" gap (A) from the corners of the wall and a 1" gap (B) at bottom.
Drive brad nails
1
/2" from the top and bottom of each plank to secure to wall. Place nails where the trim will cover.
10. Continue with the installation for each subsequent plank by first applying silicone adhesive to the back side of the
plank in an “S” pattern. Then angle the groove over the tongue of the previous plank and wiggle into place. Tighten
joints as needed with a tapping block or pull bar. Finally, drive brad nails
1
/2" from the top and bottom of each plank
to secure to wall. Place nails where the trim will cover. Be sure to drive the brad nails into a stud whenever possible.
(Figure 4)
11. Finish wainscot accent to ending wall. (Figure 5)
12. Install trim (chair rail) over the top edge. Install quarter round in the corners. Finish by installing the baseboard of
your choice. (Figure 6)
3
Silicone in
“S” pattern
3/16"
Gap
3/16"
Gap
5
1" Gap
A
Level Line
3/16"
Gap
4
Base Detail
Trim (chair rail)
Wainscot Accent
Laminate
F l o o r
6
Quarter round
Style Selections
Vertical Wainscot Style Wall Install Instructions

9
2020_STYS_LOW_INST
1. Measure the length and width of the wall area to determine the total square footage area. Order that amount of
flooring plus an additional 10% for incorrect cuts. Limit horizontal installations to a maximum of 40 feet in length
and a maximum of 10 feet in height.
2. Remove baseboards from the accent wall and locate the wall studs using the stud finder tool. Mark vertical lines
over all studs. Use painters tape to extend stud location to ceiling if needed. (Figure 1)
3. Turn off power while working around wall outlets and light switches. Pay special attention to avoid contact with
electrical wiring.
4. Inspect each plank for damage before installing. (Figure 1A) Do not install damaged planks. You can use laminate
planks with or without an attached pad. There is no need to remove the pad, so treat the installation the same for
both types of planks.
5. Lay the planks on the floor with the décor side up and the groove side toward the wall. Assemble the short ends of
the planks together and measure length to fit the first row (bottom).
6. Cut the last piece as needed leaving a
3
/16" gap against any adjoining walls, if applicable, and click it into place.
(Figure 2)
NOTE: You may need to adjust placement of the first plank row to account for any floor unevenness so that the first
row is perfectly straight and all end joints remain square and tight.
7. Carefully flip the connected row of planks over so the décor side is now face
down and the tongue side is toward the wall. You may need assistance to
flip the connected row of planks over, depending on the length of your
installation. Make sure that the first row is perfectly straight and the aligned
joints remain square and tight. Apply a bead of 100% silicone adhesive caulk
to the back side of each laminate plank in the first row. If you’re using a
laminate plank with an attached pad apply silicone directly onto the pad on
the back of the plank. (Figure 3)
8. Carefully tilt the row of connected planks against the wall with the tongue
side toward the floor, re-level and press to the wall. (Figure 3a)
Accent Wall
Existing Dry Wall Typical
Wall Studs Marked
Painters
Tape
1
1a
3/16"
Gap
3/16"
Gap
3a
Check floor
levelness
pieces will cover entire length
2
3/16"
Gap
3/16"
Gap
silicone applied in “s” pattern
3
Style Selections
Horizontal Accent Wall Install Instructions

10
2020_STYS_LOW_INST
9. Drive a brad nail into each plank at each wall stud through the shallow area of the extended groove (see inset
diagram). Take care that the brad nail heads are not raised, but also don’t force them all the way through the
groove. This will allow easy connection of the next row of planks. You must also place drywall screws every 16" into
the wall studs or sill plate along the bottom edge of the first row of planks where they will be covered by the wall
base. (Figure 4)
10. Start the second row from the right side. Cut and glue with silicone adhesive caulk the first plank. Fit plank by
angling tongue into groove and wiggle into place. Use tapping block as needed. Drive a brad nail into each plank
through the shallow area of the extended groove at each wall stud. (Figure 5)
NOTE: A joint “stagger” of 8 to 12 inches looks most natural. Avoid allowing plank ends to align.
11. Plank 2 of row 2 (and each plank thereafter in row 2) will be modified by removing the short end tongue. Score the
tongue with a utility knife 3 – 4 times to remove. You will now have a square end. (Figure 6)
12. Apply silicone adhesive caulk in an “S” pattern and install modified boards by tilting into place. Tighten joints as
needed with a tapping block or pull bar. Drive a brad nail into each plank through the shallow area of the extended
groove at each wall stud. (Figure 7)
brad
nail
4
stagger
8-12"
5
remove
6
Plank 3 Row 2
7
Style Selections
Horizontal Accent Wall Install Instructions

11
2020_STYS_LOW_INST
13. Repeat this process for each plank working your way up to the last row. (Figure 8)
14. For the last row of the installation, use painters tape to mark the stud location for brad nailing. Cut all planks in the
last row to the required width to complete the installation. Complete the installation as you have the earlier rows.
(Figure 8A)
15. Use quarter round for inside corners and ceiling. Finish with wall base board of your choice. (Figure 9)
8
8a
9
Quarter round
Wall base
Quarter round
Quarter round
Style Selections
Horizontal Accent Wall Install Instructions

12
2020_STYS_LOW_INST
Care and Cleaning
Dry wipe as primary cleaning method. Occasionally damp wipe with water only. NO wet washing. If needed, use 1 cup
of vinegar per gallon of water OR 1/3 cup non-sudsing ammonia per gallon of water. DO NOT use detergents, abrasive
cleaners, soaps, waxes or polishes. Wipe off spills immediately. DO NOT allow moisture to remain on the product surface
for longer than 30 minutes.
DO NOT attach objects such as pictures, shelves or television mounts directly to the laminate wall. DO NOT apply
adhesive backed hooks or install screws on or into the laminate wall for hanging objects. Instead drill clearance holes
through the laminate and mount these objects directly to wall studs with screws or nails. Drill the clearance holes
through the laminate at least
1
/2" larger than the diameter of the fastener that will be used.
Precautionary Measures
Power tools should be equipped with a dust collector. If high dust levels are encountered use an appropriate NIOSH
designated dust mask. Avoid dust contact with skin and eyes. First Aid Measures in case of irritations: In case of
irritation flush eyes and skin with water for at least 15 minutes.
WARNING: DRILLING, SAWING, SANDING OR MACHINING WOOD PRODUCTS CAN EXPOSE YOU TO WOOD DUST,
A SUBSTANCE KNOWN TO THE STATE OF CALIFORNIA TO CAUSE CANCER. AVOID INHALING WOOD DUST OR USE
A DUST MASK OR OTHER SAFEGUARDS FOR PERSONAL PROTECTION. FOR MORE INFORMATION, GO TO
WWW.P65WARNINGS.CA.GOV/WOOD.
IMPORTANT HEALTH NOTICE FOR MINNESOTA RESIDENTS ONLY:
THESE BUILDING MATERIALS EMIT FORMALDEHYDE. EYE, NOSE, AND THROAT IRRITATION, HEADACHE
NAUSEA AND A VARIETY OF ASTHMA-LIKE SYMPTOMS, INCLUDING SHORTNESS OF BREATH, HAVE BEEN
REPORTED AS A RESULT OF FORMALDEHYDE EXPOSURE. ELDERLY PERSONS AND YOUNG CHILDREN, AS
WELL AS ANYONE WITH A HISTORY OF ASTHMA, ALLERGIES, OR LUNG PROBLEMS, MAY BE AT GREATER
RISK. RESEARCH IS CONTINUING ON THE POSSIBLE LONG-TERM EFFECTS OF EXPOSURE TO FORMALDEHYDE.
REDUCED VENTILATION MAY ALLOW FORMALDEHYDE AND OTHER CONTAMINANTS TO ACCUMULATE IN
THE INDOOR AIR. HIGH INDOOR TEMPERATURES AND HUMIDITY RAISE FORMALDEHYDE LEVELS. WHEN A
HOME IS TO BE LOCATED IN AREAS SUBJECT TO EXTREME SUMMER TEMPERATURES, AN AIR-CONDITIONING
SYSTEM CAN BE USED TO CONTROL INDOOR TEMPERATURE LEVELS. OTHER MEANS OF CONTROLLED
MECHANICAL VENTILATION CAN BE USED TO REDUCE LEVELS OF FORMALDEHYDE AND OTHER INDOOR AIR
CONTAMINANTS. IF YOU HAVE QUESTIONS REGARDING THE HEALTH EFFECTS OF FORMALDEHYDE, CONSULT
YOUR DOCTOR OR CALL LOCAL HEALTH DEPARTMENTS.
Style Selections
Laminate Flooring on Wall Install Instructions

13
2020_STYS_LOW_INST
Style Selections laminate flooring comes with and is subject to the terms of this Limited 30 Year Residential Warranty
for wall installations. This Limited 30 Year Residential Warranty covers defects in material and/or workmanship which
relate to staining and fading during normal residential use when written installation and maintenance instructions are
followed.
Stain Resistance
Style Selections flooring will resist staining.
Fade Resistance
Style Selections flooring will resist fading from exposure to sunlight or artificial light.
To qualify for any repair or replacement, you will need to provide the original dated sales receipt or other
documentation to demonstrate proof of purchase.
For your records, fill in the following information and keep in a safe place with your original documentation.
Lowe’s store number ________________________________________
Lowe’s store address ________________________________________
Purchase date ______________________________________________
Product name ______________________________________________
General Terms and Conditions for Laminate Warranties
All areas must be assessed prior to installation to determine if other surface measures need to be taken or conditions
addressed, including, but not limited to requirements for static control, state health and building codes, high impact
use and moisture/water exposure. Other than the specific warranty identified above, Style Selections provides no
additional warranties and Style Selections does not warrant that any of the uses identified above are in compliance
with any applicable building, health, inspection, and/or other municipal regulation or codes. Style Selections is not
responsible for usage that is not in compliance with any regulation or code. Proper assessment of location and usage
must be applied. Contact your Style Selections representative for questions on performance in specific locations.
Style Selections laminate flooring carries the specific wall installation warranties listed above which are subject to the
following general terms and conditions:
1. This warranty applies only to the person stated as the buyer on the purchase document(s). This warranty applies
only to first quality Style Selections brand product purchases made after the edition date of this warranty when
the product is installed in an indoor, climate controlled private residence and according to the Style Selections
written installation instructions. Product must be maintained in accordance with Style Selections’ written
instructions.
2. This warranty only applies to defects inherent to the material supplied. Style Selections will repair or replace
the area of defective product, at its option. When replacement of the flooring is made, only new planks from
the current product range at the time the complaint is upheld will be supplied. There will be no other form of
compensation. Responsibility under this warranty only applies to defects that were not visible before or during
the installation of the product. If the product was originally professionally installed, Style Selections will cover
reasonable labor costs for repairing or replacing any defective product.
3. This warranty does not cover damage to the product caused by installation errors. Flooring planks must be
checked carefully for material defects before and during installation and under sufficient lighting. Products
with visible defects must not be installed under any circumstances. The retailer must be informed in writing of
such defects within 15 days. After this time has elapsed, no further complaints will be accepted. Color and gloss
differences resulting from material added to an existing installation at a later date and from non-warranty repairs
are excluded from coverage.
Style Selections Limited 30 Year Residential Warranty for Wall Installations Only

14
2020_STYS_LOW_INST
4. This warranty does not apply to laminate flooring that has been put to abnormal use or conditions or abused in
any way, which includes, but is not limited to moisture damage from plumbing, storm, flood or pet urine; damage
from smoke, fire or other casualty events; damage caused by negligence; improper alterations of the original
manufactured product; damage from use of the flooring that is unreasonable considering the normal and expected
uses of a laminate floor in a residential environment; damage of mechanical nature, severe impact or scratches
(caused by dragging objects or furniture) or cutting; damage caused by water or moisture trapped beneath the
floor due to improper walls or underlayment, including but not limited to damage from hydrostatic pressure (water
or moisture on the wall behind the product that is transmitted to the surface through exerted pressure) or other
conditions that result in water or moisture behind the floor; or damage caused by moisture left on the floor around
the wall base and trims. Do not use this product as a backsplash or otherwise install near sinks or other wet work
areas. The damage to the product must be evident, measuring per product unit (plank, accessory, etc.) at least
1.40 square centimeters or 0.5 square inch.
5. These limited warranties apply to vertical wall installations only. They do not apply to floor installations. Other
horizontal uses of this product are not covered by these limited warranties. Never install this product on a ceiling
or as a countertop.
6. This warranty applies only to Style Selections brand product installed according to the manufacturer’s
recommended wall installation instructions in indoor climate controlled residential spaces. The use of accessories
other than Style Selections approved items may cause damage to the Style Selections floor. Proof of compliance
with the installation and maintenance instructions must be provided if a claim is filed.
7. This warranty does not apply to damage from exposure to extreme heat, dryness, or stains as a result of chemical
or industrial products (other than recommended cleaning products). The flooring may not be installed in damp
and/or humid areas, in extremely dry areas, or areas where there are extremely high temperatures (such as saunas
or swimming pool areas).
8. Pro Ration of Warranty Period: The Limited Residential warranty period is pro rata over 30 years. A pro rata
warranty is one that provides for a refund or credit that decreases according to a set formula as the warranty
period progresses. The Style Selections original warranty value is reduced by the amount of time that you own
it. When a claim is made, the value of the warranty becomes a percentage of ownership per year based upon the
30 years for the general warranty for flooring, and accessories and/or 30 years on the integrity of the joint. Any
services provided as part of this warranty do not extend the original warranty period. If the product for which a
claim is made is no longer available, the customer will be able to choose a Style Selections product of equal value
from the current product range. Warranty coverage is limited to a one-time floor replacement.
No Implied Warranties/Special Damages
ALL IMPLIED WARRANTIES WHICH MAY ARISE BY IMPLICATION OF LAW OR APPLICATION OF COURSE OF
DEALING OR USAGE OF TRADE—INCLUDING BUT NOT LIMITED TO IMPLIED WARRANTIES OF MERCHANTABILITY
OR FITNESS FOR A PARTICULAR PURPOSE— ARE EXPRESSLY EXCLUDED. NO WARRANTIES, EXPRESS, IMPLIED,
STATUTORY OR OTHERWISE, EXTEND BEYOND THOSE EXPRESSLY SET FORTH IN THIS WARRANTY BROCHURE,
AND ALL SUCH WARRANTIES ARE EXPRESSLY DISCLAIMED. Implied warranties refer to ones that the law
presumes to have been given by the seller even though they are not set out in writing. STYLE SELECTIONS SHALL
NOT BE LIABLE FOR AND WILL NOT PAY CONSEQUENTIAL, INCIDENTAL OR SPECIAL DAMAGES OF ANY KIND
WHATSOEVER UNDER THIS WARRANTY. PLEASE NOTE: Some states do not allow the exclusion or limitation of
incidental or consequential damages, or limitations on how long an implied warranty lasts, so the above limitation or
exclusion may not apply to you. Except for these rights, the remedies provided under these warranties state the entire
limit of Style Selections’ responsibilities.
For service under this warranty please contact your local Lowe’s store. Describe the problem and in many cases, they
can provide you with a solution.
For installation, maintenance and technical questions please call (877) 888-8225.
Style Selections laminate flooring is manufactured by
Unilin Flooring North America LLC
550 Cloniger Drive
Thomasville, NC 27360
Edition Date: 06/22/2020
Style Selections Limited 30 Year Residential Warranty for Wall Installations Only
/