Page is loading ...

2. Attach the electrical cable to the fixture.
Make sure the brass piercing points in the cable channel at the base of the
fixture are straight. Place the electrical cable over the piercing points and
press the cable down firmly. (It may help to use something with a hard, flat
surface to press the wire into the piercing points.) If you have done this
correctly, the fixture will light. If it doesn’t, make sure the power pack is on
(and the photocell is covered to block light), the piercing points are straight,
and try again. You can reposition the cable; the earlier holes created by the
piercing points will self-seal and not cause a hazard.
1. Install the light bulb.
Turn the fixture’s ring and lens assembly counterclockwise while
holding the base stationary. Lift the assembly off the base.
Install the new bulb by pushing it straight down into the socket.
Replace the ring and lens assembly and turn it clockwise to click it
into place.
3. Attach the stake to the fixture.
Slide the closed stake onto the fixture base, locking the cable against the
contacts (follow the arrow direction on the fixture).
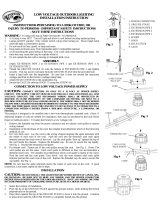
The most important part of
installing the fixtures is
making sure their metal
pins pierce the wire inside
the cable:
You’ll know they’re well-
aligned and the wire was
pierced when the light
comes on.
Misaligned
Piercing
Points
Correct
Piercing
Points
This
Not This
INSTALLATION
GUIDE
FORM NO. 3315–920
MODEL NO. 52202 39000001 & up
Accent Lights™
®
4. Run the cable through the stake.
Open the stake by pinching the locking tabs together.
Fold the cable into each side of the stake. Align the cable
with the notches at the bottom of the stake and snap the
stake closed.
5. Put the stake into the ground.
Make a hole in the ground for the stake. Don’t push the
stake into the ground without making a hole first because
the stake could be damaged. Insert the stake, fill around it
with dirt. Do not hammer or press on the lamp fixture assembly.
Removing Accent
™
Light rings.
The Toro Accent
™
Light fixture can provide additional light output if you remove the
fixture’s middle ring.
1. Turn the fixture ring and lens assembly counterclockwise while holding the base
stationary. Lift the assembly off its base.
2. Remove the top cap and top ring.
3. Remove the middle ring by pressing very firmly at one point to lift the ring over the
lip. Keep pushing the ring up until it is free.
4. Replace the top ring and top cap.
WARNING
! Possible Burns !
Do not attempt to
remove any bulbs while
the fixtures are on or
you may be burned.
IMPORTANT: To
ensure your power
pack isn’t overloaded,
use a replacement
bulb with the same
wattage as the original
bulb. Maximum
wattage allowed for
this fixture is 12 watts.
/