Page is loading ...

BOLBASE INSTALLATION INSTRUCTIONS
IMPORTANT
READ CAREFULLY BEFORE INSTALLING FIXTURE. RETAIN THESE INSTRUCTIONS FOR FUTURE REFERENCE.
RAB xtures must be wired in accordance with the National Electrical Code and all applicable local codes. Proper
grounding is required for safety. THIS PRODUCT MUST BE INSTALLED IN ACCORDANCE WITH THE APPLICABLE
INSTALLATION CODE BY A PERSON FAMILIAR WITH THE CONSTRUCTION AND OPERATION OF THE PRODUCT
AND THE HAZARDS INVOLVED.
WARNING: Make certain power is OFF before installing or maintaining xture.
Thank you for buying RAB lighting xtures. Our goal is to design the best quality products to get the job done right. We’d like to hear your comments. Call
the Marketing Department at 888-RAB-1000, or email: market[email protected]
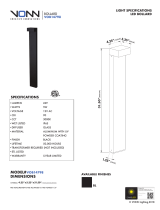
BOLBASE
Bollard Base for BLED5, BLED10, BLED13’s (Bollards with Fixtures sold separately). Supplied with Anchor Bolts with
nuts, washers and lock washers and Base Plate.
1. Place Anchor Bolts in concrete according to the template. Bolt projection should be no more than 1 1/2”.
CAUTION: Be sure orientation of Anchor Bolts is parallel to the area being illuminated.
CAUTION: Be sure the conduit is within 3 1/2” center diameter.
2. Place the Base Plate over the Anchor Bolts. Add nuts, washers and lock washers to Anchor Bolts.
3. Use the four Leveling Bolts to set and secure the Base Plate.
4. Level the Base Plate by adjusting the Leveling Bolts. Tighten Anchor Bolts nuts.
5. Place Bollard Base over the Base Plate and tighten the four Set Screws.
6. Place Bollard over Bollard Base and tighten Bollard Screws.
Note: These instructions do not cover all details or variations
in equipment nor do they provide for every possible situation
during installation, operation or maintenance.
Anchor
Bolts
Bollard Base
Concrete
(not shown to
proper depth)
Leveling
Bolts(4)
Set
Screws (4)
Base Plate
Bollard Screws
(4)(Provided
with BLED’s)
Bollard (sold
separately)

BOLBASE INSTALLATION INSTRUCTIONS
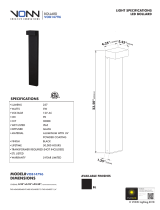
BASE PLATE TEMPLATE
Template as shown is Actual Size when printed on 8 1/2 x 11 paper. Otherwise refer to dimensions shown.
CAUTION: Before drilling and mounting, make sure to align Bollard Base in the orientation that will result in the
desired Bollard Fixture orientation.
BOLBASE-IN-1110
7.49”
4.90”
0.40”
6.0”
Drilled & Tapped
for 5/16-18 Leveling
Bolts
3.50”
Conduit Entry Area

BOLBASE RETRO INSTALLATION INSTRUCTIONS
IMPORTANT
READ CAREFULLY BEFORE INSTALLING FIXTURE. RETAIN THESE INSTRUCTIONS FOR FUTURE REFERENCE.
RAB xtures must be wired in accordance with the National Electrical Code and all applicable local codes. Proper
grounding is required for safety. THIS PRODUCT MUST BE INSTALLED IN ACCORDANCE WITH THE APPLICABLE
INSTALLATION CODE BY A PERSON FAMILIAR WITH THE CONSTRUCTION AND OPERATION OF THE PRODUCT
AND THE HAZARDS INVOLVED.
WARNING: Make certain power is OFF before installing or maintaining xture. No user serviceable
parts inside.
Thank you for buying RAB lighting xtures. Our goal is to design the best quality products to get the job done right. We’d like to hear your comments. Call
the Marketing Department at 888-RAB-1000, or email: marketing@rabweb.com
Bollard Base
Retro
Field
Drilling
Location
BOLBASE RETRO
Retrot Bollard Base for BLED5, BLED10, BLED13’s (Bollards with Fixtures sold separately) for retrot application for
existing concrete or base. No anchor bolts or internal hardware is provided. Internal and external dimensions shown on
page 2. Drilling template shown on page 3.
1. Drill Bollard Base Retro in the drilling location shown in the detailed dimensional drawings. Place the Bollard Base
Retro on the mounting surface covering any existing obsolete hardware.
CAUTION: Before drilling and mounting, make sure to align Bollard Base Retro in the orientation that will
result in the desired Bollard Fixture orientation.
2. Set anchors(not provided) and mount through the top of the Bollard Base Retro at the Drilling Location to surface
with appropriate hardware.
3. Place Bollard over Bollard Base Retro with bollard gasket and secure with four Bollard Screws.
Bollard Screws
(4)(Provided
with BLED’s)
Bollard (sold
separately)

BOLBASE RETRO INSTALLATION INSTRUCTIONS
BOLBASE RETRO
Detailed Dimension Drawings shown below.
5
4.36”
.95”
7.69”
8.33”
1.18”
4.55”
6.55”
BOLBASE retro-IN-1012
Drilling
Locations
.33” ID
.50” OD
Note: These instructions do not cover all details or variations
in equipment nor do they provide for every possible situation
during installation, operation or maintenance.

BOLBASE RETRO INSTALLATION INSTRUCTIONS
BASE PLATE TEMPLATE
Template as shown is Actual Size when printed on 8 1/2 x 11 paper. Otherwise refer to dimensions shown.
CAUTION: Before drilling and mounting, make sure to align Bollard Base Retro in the orientation that will result in
the desired Bollard Fixture orientation.
6.5”
0.33” dia
0.50” dia

BOLBASE24 RETRO INSTRUCTIONS BLED12, 18, 24
Thank you for buying RAB lighting xtures. Our goal is to design the best quality products to get the job done right. We’d like to hear your comments.
Call the Marketing Department at 888-RAB-1000 or email: marketing@rabweb.com
Note: These instructions do not cover all details or variations in equipment nor do they provide for every possible situation during installation, operation or
maintenance.
IMPORTANT
READ CAREFULLY BEFORE INSTALLING FIXTURE. RETAIN THESE INSTRUCTIONS FOR FUTURE REFERENCE.
RAB xtures must be wired in accordance with the National Electrical Code and all applicable local codes. Proper grounding
is required for safety. THIS PRODUCT MUST BE INSTALLED IN ACCORDANCE WITH THE APPLICABLE INSTALLATION CODE BY A
PERSON FAMILIAR WITH THE CONSTRUCTION AND OPERATION OF THE PRODUCT AND THE HAZARDS INVOLVED.
WARNING: Make certain power is OFF before installing or maintaining xture. No user serviceable
parts inside.
BOLBASE24 RETRO
CAUTION: Before drilling and mounting, make sure to align Bollard Base Retro in the orientation that will result in the
desired Bollard Fixture orientation.
Retrot Bollard Base for retrot application for existing concrete or base (Bollards sold separately).
1. Drill the surface in the drilling location shown in the detailed dimensional drawings.
2. Feed the conduit through 2.45” dia hole of the Retrot Bottom Plate. Place the Retrot Bottom Plate on the mounting
surface and tighten it with 4 screws.
3. Place Retrot Top Plate on Retrot Bottom Plate and tighten it with Set Screws.
4. Install Bollard on the Retrot Top Plate using appropriate hardware.
Mounting
Surface
Conduit
Bollard
Base
Set
Screws
Retrot Top
Plate
Retrot
Bottom
Plate

BOLBASE24 RETRO INSTRUCTIONS BLED12, 18, 24
Thank you for buying RAB lighting xtures. Our goal is to design the best quality products to get the job done right. We’d like to hear your comments.
Call the Marketing Department at 888-RAB-1000 or email: marketing@rabweb.com
BASE PLATE TEMPLATE
Template not to scale. Use actual plate as template.
CAUTION: Before drilling and mounting, make sure to align Bollard Base Retro in the orientation that will result in the
desired Bollard Fixture orientation.
4.500
114,3[ ]
8.547
217,1[ ]
.257
6,53[ ]
45.0°
2.298
[58,37]
6.500
165,1[ ]
2.747
[69,77]
50.0°
BOLBASE24 IN 0614
Easy Installation & Product Help
Tech Help Line
Call our experts 888 RAB-1000
©2014 RAB LIGHTING Inc.
No
rthvale, New Jersey 07647 USA
rabweb.com
Visit our website for product info
email
Answered promptly sales@rabweb.com
/