DLED4AR DLED6AR INSTALLATION INSTRUCTIONS
Thank you for buying RAB lighting xtures. Our goal is to design the best quality products to get the job done right. We’d like to hear your comments.
Call the Marketing Department at 888-RAB-1000 or email: marketing@rabweb.com
WIRING
WARNING: To prevent wiring damage or abrasion, do
not expose wiring to edges of sheet metal or other sharp
objects.
Fixture operates at 120V 60 Hz and can be dimmed with
most forward phase incandescent dimmers. For a list of
compatible dimmers see www.rabweb.com
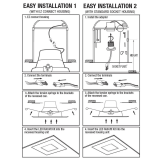
1. Screw in medium base socket adaptor.
2. Connect GROUND wire from DLED xture to the
existing housing with # 8 screw provided to any
existing housing hole as shown or drill a new 1/8” diam-
eter hole.
3. Plug in wire connector between socket adaptor and
DLED xture.
TROUBLESHOOTING
Check that the line voltage at xture is correct.
1. Check that the socket adaptor is properly seated in the socket.
2. Do not attempt to modify the socket in any way.
CLEANING & MAINTENANCE
CAUTION: Be sure xture temperature is cool enough to
touch. Do not clean or maintain while xture is energized.
1. Clean lens & xture with non-abrasive cleaning solution.
2. Do not open xture to clean the LED. Do not touch the LED.
Note: These instructions do not cover all details or variations in equipment nor do they provide for every possible situation during installation, operation
or maintenance.
DLED4AR DLED6AR IN 0716
Easy Installation & Product Help
Tech Help Line
Call our experts 888 RAB-1000
©2016 RAB LIGHTING Inc.
No
rthvale, New Jersey 07647 USA
rabweb.com
Visit our website for product info
email
Answered promptly sales@rabweb.com
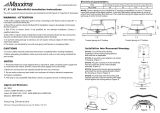
DLED4AR
DLED6AR
Medium Base Socket
Existing Housing
Fig. 3
UL CLASSIFIED FOR RETROFIT
COMPATIBILITY
Check that the existing housing is one of the following
compatible xtures.
1. Retrot has an E26 Edison screw-base.
2. DLED4AR and DLED6AR can be used in
existing
housings
with opening of 4 or 6”. These xtures are UL
Classied for retrot in the following housings:
• Halo: Housing Series H99TAT
• Elite: B4, B4IC, BL4_Bae, ID4-AT
• Nora: NS-401QAE, NS-401QAT, NSR-404QAT
• Halo: Housing Series H7x, H27x, ET7x, Ei7x, ET27x,
EI27x. Halo H750ICAT, H750RICAT, H750T and
H750TCP series recessed LED housings.
• Juno:IC22, IC22R, IC22W, IC22S, IC23, IC23W, IC21,
IC21R, TC2, TC2R
• Capri: CR1, PR1, QL1, R9ASIC
• Lightolier: 1104ICS, 11041CR, 1104SIC, 1104SICR
• Progress: P87-AT, P86TG
• Lithonia: L7X, L7XP
• Thomas: PST, R9ASIC/PS9RM
• Prescolite: IBXS
• Commercial Electric: H3
• Elco: EL71CA
• Elite: B6IC-AT-W