Page is loading ...

S&S® Cycle, Inc.
14025 Cty Hwy G
Viola, Wisconsin 54664
Phone: 608-627-1497 • Fax: 608-627-1488
Technical Service Phone: 608-627-TECH (8324)
Technical Service Email: sstech@sscycle.com
Website: www.sscycle.com
Installation Instructions: 510-0588 Hooligan 2-2 Exhaust System
for 1991-2018 HD® Sportster® Models
WARRANTY:
All S&S parts are guaranteed to the original purchaser to be free of
manufacturing defects in materials and workmanship for a period of twelve
(12) months from the date of purchase. Merchandise that fails to conform to
these conditions will be repaired or replaced at S&S’s option if the parts are
returned to us by the purchaser within the 12 month warranty period or within
10 days thereafter.
In the event warranty service is required, the original purchaser must call or
write S&S immediately with the problem. Some problems can be rectied by a
telephone call and need no further course of action.
A part that is suspect of being defective must not be replaced by a Dealer
without prior authorization from S&S. If it is deemed necessary for S&S to
make an evaluation to determine whether the part was defective, a return
authorization number must be obtained from S&S. The parts must be packaged
properly so as to not cause further damage and be returned prepaid to S&S
with a copy of the original invoice of purchase and a detailed letter outlining
the nature of the problem, how the part was used and the circumstances at the
time of failure. If after an evaluation has been made by S&S and the part was
found to be defective, repair, replacement or refund will be granted.
ADDITIONAL WARRANTY PROVISIONS:
(1) S&S shall have no obligation in the event an S&S part is modied by any
other person or organization.
(2) S&S shall have no obligation if an S&S part becomes defective in whole or
in part as a result of improper installation, improper maintenance, improper
use, abnormal operation, or any other misuse or mistreatment of the S&S part.
(3) S&S shall not be liable for any consequential or incidental damages resulting
from the failure of an S&S part, the breach of any warranties, the failure to
deliver, delay in delivery, delivery in non-conforming condition, or for any other
breach of contract or duty between S&S and a customer.
DISCLAIMER:
DISCLAIMER: FOR CLOSED COURSE COMPETITION USE ONLY. NOT INTENDED
FOR STREET USE.
LEGAL IN CALIFORNIA ONLY FOR RACING VEHICLES WHICH MAY NEVER BE
USED, OR REGISTERED OR LICENSED FOR USE, UPON A HIGHWAY.
IMPORTANT NOTICE:
Statements in this instruction sheet preceded by the following words are of
special signicance.
WARNING
Means there is the possibility of injury to yourself or others.
CAUTION
Means there is the possibility of damage to the part or motorcycle.
NOTE
Other information of particular importance has been placed in italic type.
S&S recommends you take special notice of these items.
SAFE INSTALLATION AND OPERATION RULES:
Before installing your new S&S part, it is your responsibility to read and follow
the installation and maintenance procedures in these instructions and follow
the basic rules below for your personal safety.
• Gasoline is extremely ammable and explosive under certain conditions
and toxic when breathed. Do not smoke. Perform installation in a well
ventilated area away from open ames or sparks.
• If motorcycle has been running, wait until engine and exhaust pipes have
cooled down to avoid getting burned before performing any installation
steps.
• Before performing any installation steps, disconnect battery to eliminate
potential sparks and inadvertent engagement of starter while working
on electrical components.
• Read instructions thoroughly and carefully so all procedures are
completely understood before performing any installation steps.
Contact S&S with any questions you may have if any steps are unclear or
any abnormalities occur during installation or operation of motorcycle
with an S&S part on it.
• Consult an appropriate service manual for your motorcycle for correct
disassembly and reassembly procedures for any parts that need to be
removed to facilitate installation.
• Use good judgment when performing installation and operating
motorcycle. Good judgment begins with a clear head. Don’t let alcohol,
drugs or fatigue impair your judgment. Start installation when you are
fresh.
• Be sure all federal, state and local laws are obeyed with the installation.
• For optimum performance and safety and to minimize potential damage
to carb or other components, use all mounting hardware that is provided
and follow all installation instructions.
• Motorcycle exhaust fumes are toxic and poisonous and must not be
breathed. Run motorcycle in a well ventilated area where fumes can
dissipate.
Instruction 510-0588
08-10-18
Version 1
© 2018
by S&S® Cycle, Inc.
All rights reserved.
Printed in the U.S.A.

FOR 1991-2003 MODELS USE STEPS 1-4 BELOW
1. Loosen muer clamps. Remove locknut from sprocket cover and
bolt securing rear muer to muer support bracket. Remove
muers.
2. Remove the nuts from the front and rear header ange at the
cylinder head, remove header.
3. Remove and save retaining rings and anges from stock header.
4. Remove stock exhaust port gaskets. Install new supplied conical
gaskets to avoid leaks (HD® 65324-83B or S&S 106-5029 gaskets must
be used for a proper seal).
5. Skip to step 8 below.
FOR 2004-’18 MODELS USE STEPS 1-7 BELOW.
1. Loosen heat shield clamps. Remove the nuts from the front and
rear header ange at the cylinder head.
2. If equipped, unplug oxygen sensor connectors and free from
motorcycle. Remove the clamp and hardware that mounts the rear
header to the sprocket cover.
3. Remove the bolts fastening muers to mounting bracket. Remove
exhaust as an assembly.
4. Remove sprocket cover and remove mounting bracket from cover,
this will not be reused.
5. Remove right side foot controls to allow removal of stock exhaust
bracket, this will not be reused.
6. Remove and save oxygen sensors, retaining rings and anges from
stock header.
7. Remove stock exhaust port gaskets. Install new supplied conical
gaskets to avoid leaks (HD 65324-83B or S&S 106-5029 gaskets must
be used for a proper seal).
8. Install anges and retaining rings on new exhaust header. Install
oxygen sensors, adaptors (5) and plugs (6) as necessary. (550-0375
adaptor is used with 2014-2018 model oxygen sensors).
9. Loosely install supplied header ange nuts.
10. Install clamp back half (10) to bracket (13). For 2004-later models,
assemble clamp back half to bracket with rubber isolators (12) in
between. Isolator is not used for 2003 and earlier models. Install
assembly onto shock mount, loosely tightening nut.
11. Determine megaphone orientation. Top (front cylinder)
megaphone cone angles slightly down, bottom (rear cylinder)
megaphone angles slightly up. Correct orientation will have S&S
badges positioned identically. See Picture 1
12. Slide top megaphone onto front cylinder header and hold onto
bracket. If you need help, use a zip tie or safety wire to hold muer
in place while installing lower megaphone.
13. Slide bottom megaphone onto rear cylinder header and use
anged screws (8 and 9) to hold muers in place.
14. Align muers so that S&S badges are positioned identically,
tighten clamp bolts
15. Tighten shock mount nut to 30 lb/ft.
16. Reconnect oxygen sensor electrical plugs if equipped.
17. Before operating motorcycle, clean pipes and muer with soap
and water or window cleaner. Any grease or oil will permanently
burn onto pipes. Dry thoroughly.
18. Check all mounting hardware to be sure it is tight before and after
rst operation of motorcycle. Periodically, check tightness of all
mounting hardware.
2
Picture 1

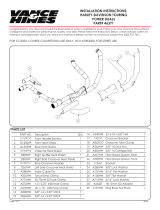
1. Tube,Front,Head Pipe,Hooligan,2 Into 2,Weldment,1991-2017 xl ....551-0596
2. Tube,Rear,Head Pipe,Hooligan,2 Into 2,Weldment,1991-2017 xl ......551-0594
3. Muer,Assembly,Front,2 Into 2,Hooligan,1991-2017 xl .......................551-0588
4. Muer,Assembly,Rear,2 Into 2,Hooligan,1991-2017 xl .........................551-0589
5. Adapter, Oxygen Sensor, 12mm to 18mm, Stainless Steel ..................550-0375
6. Plug,M18 x 1.5 Thread .......................................................................................551-0122
7. Bracket, outer, muer clamp, ¼-20 hardware, outside process,
3.5” dia, anodized. .............................................................................................. 510-0779
8. Screw, anged, 12pt, ¼-20 x 2-½”, black oxide ........................................500-0822
9. Screw, anged, 12pt, ¼-20 x 1”, black oxide .............................................500-0823
10. Bracket, inner, muer clamp, ¼-20, hardware, outside process,
3.5” dia, anodized...............................................................................................551-0778
11. Nut, anged, 12pt, ¼-20, stainless steel ....................................................550-0885
12. Mount, vibration damping, ¼-20 x ½” ....................................................... 500-0839
13. Bracket,Muer,Megaphone,2 Into 2,Hooligan,Powdercoated,Bla
ck,1991-2017 xl ......................................................................................................551-0580
14. Screw, anged, 12pt, ¼-20 x ⁄”, black oxide ...........................................500-0884
15. Gasket,Exhaust,Tapered,Stainless Steel,1984-up bt, 1986-up xl ..... 106-5029
16. Nut,HSFH,5/16-24 UNF-2B x .283”,Zinc,Steel .......................................... 50-5025-S
3
6
3
11
12
13
14
10
1
2
16
15
5
4
7
8
9
/