Page is loading ...

Firebrand Design • 14025 Cty Hwy G • Viola, WI 54664 • 608-627-0406 • www.firebrandmotorcycle.com • customerservice@firebrandmotorcycle.com
BUILT BY RIDERS
FOR RIDERS
installation instructions # 100684
Smoothbore Headers
PART # 10-1039 & 10-1040
rev: 01/11/2023
1. Unpack the header kit and familiarize yourself
with the components.
2. Remove saddlebags.
3. Remove mulers.
4. Remove right front loorboard and mounting
brackets.
5. Loosen the left side exhaust pipe clamp and
remove left side head pipe.
6. Remove the bolt and nut from the clamp that
holds the header to the bracket on the side of the
transmission.
7. Disconnect oxygen sensors (2007–’08) models.
8. Loosen and remove the ⁄-24 hex lange port
nuts. It may be necessary to remove the heat
shields to access the lange nuts on some
models.
9. Remove the stock header. Remove the exhaust
langes, retainer rings and Oxygen sensors (if
present), these will be used on the new header.
10. Remove the exhaust bracket that is mounted
to the top of the starter, this bracket will not be
needed. Replace screws.
11. Remove the exhaust bracket located on the right
side of the transmission. The transmission end
cover will need to be removed to access all of the
fasteners (1995–’06). Replace transmission end
cover and screws. Replace gasket if damaged.
12. Locate the provided angle bracket (#8) in the
hardware kit. Remove the two lowest ⁄" socket
head cap screws on the side of the transmission.
Apply thread locking compound to these screws
and install the angle bracket, torque to 1518 ft.-lb.
TOOLS REQUIRED:
• ¼" drive ratchet
• ¼" drive ½" socket
• ¼" drive ⁄" socket
• ¼” drive 6" extension
• ⁄" Allen wrench
• ¼" Allen wrench
• ⁄" Allen wrench
• Snap ring pliers
• ⁄" nut driver or lat
screwdriver
• ⁄" box wrench
• ½" box wrench
• ⁄" box wrench
• 14mm box wrench
• 15mm box wrench
• 22mm box wrench
13. Remove the four ¼” socket head cap screws
closest to the rear of the oil pan (leave the
rear center screw in place). Locate the oil pan
mounting bracket (#11) and 4, ¼"-20 x 1-⅞" socket
head cap screws (#13) and a ⁄" carriage bolt
(#13). Loosely place the carriage bolt in the slot
of the bracket with threaded end facing out
as shown in (Picture 1). Apply thread locking
compound to the screws and install the oil
pan bracket. Note that the screws must be
countersunk in the bracket (Picture 2).
PICTURE 1
PICTURE 2

Firebrand Design • 14025 Cty Hwy G • Viola, WI 54664 • 608-627-0406 • www.firebrandmotorcycle.com • customerservice@firebrandmotorcycle.com
DISCLAIMER:
Firebrand exhaust systems are warrantied against defects in material and workmanship for a period of 1 year from the date of purchase from an authorized dealer. is
warranty does not cover discoloration or rust of chrome nishes. is warranty is limited to the repair or replacement of a product proven to be defective from normal use.
Firebrand exhaust systems are designed to t and operate on OEM motor and chassis. is warranty does not cover any product subject to abuse, misuse, improper instal-
lation or modication. Every eort is made for Firebrand Exhaust Systems to provide improved cornering clearance. However, due to design and space limitations on some
motorcycle models, ground and cornering clearance may not be improved and in some cases may be reduced. Be sure to follow proper installation instructions
14. Torque the ¼" screws to 100 in.-lb.
15. Inspect exhaust port gaskets, replace as
necessary with Firebrand p/n 991016.
16. Install the langes and retaining rings on the
new exhaust header. Install oxygen sensors or
supplied plugs (#6). Use anti-seize on the threads.
17. Install new header. Seat front pipe irst then
rear. A irm pull rearward on the rear header,
while keeping the front header seated, may be
necessary to clear the rear head casting. Be
careful not to damage the gaskets. Install the
provided ⁄"-24 hex lange nuts (#17) but do not
fully tighten yet.
18. Locate the ⅜" carriage bolt (#7) and hex lange
nut (#10). Fasten the side P-clamp (#9) to the
transmission bracket (#6), do not fully tighten yet.
Note: Both legs of the P-clamp should be under
the transmission bracket.
19. Install retained clamp or Firebrand 991013 on
the expanded end of the crossover pipe with the
bolt to the inside of the header and the nut facing
down.
20. With the expanded end of the crossover pipe
facing forward, install the crossover pipe P-clamp
onto the crossover pipe in the orientation shown
(Picture 3). Use pliers to close the ends of the
clamp. Loosely install the ⁄" carriage bolt (#13)
and lange nut (#15) but do not fully tighten yet.
PICTURE 3
21. Position the crossover pipe under the oil pan and
slide the expanded end onto the end of the front
header pipe using existing clamp or Firebrand
991013.
22. Locate a ⁄" lange nut (#15) and loosely fasten
the crossover pipe P-clamp to the transmission
bracket with the carriage bolt.
23. Apply anti-seize to the muler clamp threads.
Re-install mulers.
24. Ensure the entire exhaust system is properly
aligned and tighten all fasteners beginning at
the mulers and move forward to the head pipe
langes.
25. Locate the heat shield clamps and place them in
the heat shield clips. Orient the screw heads as
shown in the parts diagram so that they are easily
accessible when the shields are installed. Install
the shields and tighten the clamps.
26. Connect the oxygen sensor electrical connectors.
27. Install the right-side loor board in the lowest
position.
28. Before operating the motorcycle, clean the
heat shields and mulers with soap and water
or window cleaner. Any oil or ingerprints will
permanently burn into the coating if not removed.
29. Check all mounting hardware to be sure it is tight
before and after irst operation of motorcycle.
Periodically, check tightness of all mounting
hardware.
USE AND CARE: Wash the exhaust system with the
same care you use when washing your motorcycle.
Use mild soap and water. DO NOT use harsh
chemicals, abrasive cleaners or high pressure
washers
NOT LEGAL FOR SALE OR USE IN CALIFORNIA ON ANY POLLUTION CONTROLLED MOTOR VEHICLE. Not legal for sale or use on EPA federal pollution
controlled vehicles originally equipped with catalyst. *Qualied manufacturer declared emissions replacement part on FL touring models listed below. California Models:
FL Touring Fuel Injected MY 1995-2003, and 2007 CVO FL Touring MY 2000-2003 49 State Models: FL Touring Carbureted MY 1995-2005 FL Touring Fuel Injected MY
1995-2005 and 2007-2008 CVO FL Touring MY 2000-2005

Firebrand Design • 14025 Cty Hwy G • Viola, WI 54664 • 608-627-0406 • www.firebrandmotorcycle.com • customerservice@firebrandmotorcycle.com
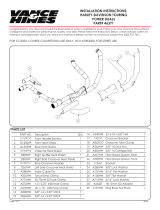
SMOOTHBORE HEADER REPLACEMENT PARTS
1. Pipe, Header, Weldment, 19952008 Touring
(1 Req)................................................... 5510083
2. Tube, Crossover, Weldment, 19952008 Touring
(1 Req)....................................................5510077
3. Shield,Front,19952008 Touring (1 Req)
Chrome ................................................ 5510091
Black ................................................... 5510092
4. Shield,Rear,19952016 Touring (1 Req)
Chrome ................................................ 5510103
Black .................................................... 5510104
5. Shield,Left,19952016 Touring (1 Req)
Chrome ................................................. 5510115
Black ..................................................... 5510116
6. Plug, M18 x 1.5 Thread (2 Req) ..............5510122
7. Bolt, Carriage, 3/816 x 11/4” (1 Req) . 5000553
8. Bracket, Transmission, Side,
19952008 Touring (1 Req) ....................5510125
9. Clamp, P-style, Side,
19952016 Touring (1 Req) ..................... 5510119
10. Nut, Flanged, Serrated, 3/816
(1 Req).................................................. 5000554
11. Bracket, Assembly, Transmission, Pan
19952008 Touring (1 Req) ....................5510126
12. Screw, SHC, 1/420 x 17/8”, Zinc Plated
(4 Req) .................................................. 5000641
13. Bolt, Carriage, 5/1618 x 3/4” (2 Req) 5000555
14. Clamp, P-style, Crossover, 19952008 Touring
(1 Req).................................................... 5510120
15. Nut, Flanged, Serrated, ⁄”-18
(2 Req) ................................................ 505053S
16. Clamp, Hose, Worm Drive, SAE #20
(8 Req) ................................................... 5510527
17. Nut, HSFH,5/1624 ............................505025S
1
7
8
10
16
12
11
6
5
2
13
14
15
3
4
9
NOTE - Install #16 heat shield clamps with screw heads pointing in direction shown by arrows.
17
/