
1
Thank you for purchasing this Croydex product. Please follow the xing and care instructions to ensure
your shower chair is tted safely and retains its high quality nish.
Please retain this leaet for future reference.
This installation guide applies to the following product:
AP503122 - White Padded Wall Mounted Shower Chair
Tools required - not supplied
Pencil;Tape Measure; Screwdriver appropriate to xings; Spirit level; Drill; Masonry drill bit appropriate to
xings, Ceramic drill bit (optional) appropriate to xings.
KEEP DIY TOOLS OUT OF THE REACH OF CHILDREN
Note: Please ensure suitable xings are purchased that are compatible with wall construction materials.
Home Safety Advice
• It is recommended that two people t this product to ensure that it is tted safely.
• Always take care when using power tools, particularly in the bathroom.
• Always check for hidden cables and pipework before drilling and take extreme care if there is any water
in the working area.
• It is advisable to use a residual current circuit breaker (RCCB).
• Always wear suitable eye protection when drilling.
• If the product is to be tted on a ceramic tiled wall, a ceramic drill bit should be used.
• Always ensure that the drill hole passes through the central tiled area rather than through the
grouted area. To prevent damage to the tile, mask the area around the hole with tape before drilling.
• Do not strike the product with hard or sharp objects.
Product Care
To retain the best quality nish, clean product regularly with a soft damp cloth.
Do not use abrasive or chemical cleaners as these will damage the product.
Dry the shower chair after use.
Product Location
Shower chairs are only as strong as the wall to which they are xed and the xings that are used.
For different wall types you will need to ensure that you are using the correct type of xing for the material
of the wall.
The addition of backboards on the outside of the wall or appropriate strengthening of internal structures
may be required to provide adequate wall strength.
NOTE: If the wall is made of lightweight thermal blocks, aerated hollow brickwork or prefabricated
partitions even the most appropriate xings may not be able to withstand the loads which can be
suddenly applied to shower chairs.
Curved surfaces such as corners of bathtubs are not acceptable.
S&H 039 R01
Shower Chair

Fitting Instruction
1. Identify the most appropriate position for the shower chair ensuring the product is at a comfortable
height and distance for showering.
NOTE: When determining the most appropriate position for the shower chair ensure the legs are
fully extended, level and resting on the shower tray. The leg extension height can be adjusted by
removing the locking pins. Once the ideal height has been determined re-insert the locking pins to
secure the legs in position (See Fig.1).
2. The product can be folded upwards for more convenient storage so please ensure there is sufcient
space above the xing position to allow for this.
3. Place the shower chair in the desired position on the wall and using the hole centres located on the wall
bracket as a template, mark the screw xing positions on the wall surface ensuring the product is level.
ALL FIXING HOLES MUST BE USED (See Fig.1).
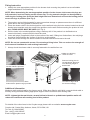
4. Drill the holes in the marked positions using a masonry drill. If the product is to be tted onto a
ceramic tiled wall, a ceramic drill bit should be used.
5. Insert wall plugs (if applicable) ush to the surface of the wall. If tting to a tiled surface, the wall plugs
should be inserted below the surface of the tile to avoid cracking.
6. Insert the screws through the holes located on the wall bracket and screw to the wall.
NOTE: Do not use countersink screws. Do not enlarge xing holes. This can reduce the strength of
the frame and invalidate the safe working load stated.
7. Always check the shower chair is securely fastened to the wall before use.
Additional Information
Maximum safe working load for the shower seat is 158kg when tted to solid brick, concrete block walls or
similarly strong materials offering appropriate support for the maximum safe working load.
NOTE: Lightweight thermal blocks, aerated hollow brickwork or prefabricated partition walls will
reduce the maximum safe working load of this product.
For details of the other items in the Croydex range please visit our website: www.croydex.com
Croydex Ltd, Central Way, Andover, Hants, SP10 5AW, UK
Tel: +44 (0) 1264 365881
Fax: +44 (0) 1264 356437
Email: [email protected]
2S&H 039 R01
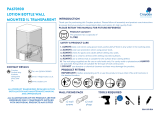
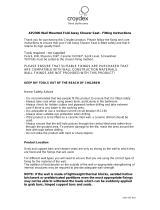
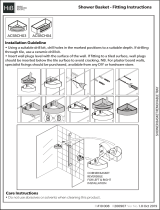
Fig.1
Remove locking pins for
leg adjustment. Re-insert
once ideal leg height is
determined.
Lift collar on leg to level
the seat accordingly.
To secure the pad to the seat
use the retainers provided.
If the seat pad is removed, ll the
holes with the plastic bungs provided.
Make sure all xing
holes are used.
-
 1
1
-
 2
2


Ask a question and I''ll find the answer in the document
Finding information in a document is now easier with AI
Related papers
-
 Croydex AJ401341 User manual
-
 Croydex PA670100 User manual
-
 Croydex AP501422 User manual
-
 Croydex QA103041 User manual
-
 Croydex Newport AP504122 User manual
-
 Croydex AP230022YW Installation guide
-
 Croydex QM950122 User manual
-
 Croydex AP120122 User manual
-
 Croydex AP701022H User manual
-
 Croydex PA670322 User manual


Other documents
-
 HiB Corner Shower Basket Fitting Instructions
-
 HiB Easy Clean Shower Shelf Fitting Instructions
-
Bristan SM385 W Installation Instructions And User Manual
-
 Aarrow Signature Inset 5 Installation guide
-
HP COMBI 2180206H User manual
-
-
Dimplex Shower User manual
-
 Aqualisa COLT Installation guide
-
Wonderfire lincoln 5403 Installer's Manual
-
Triton Aquatronic 2 Plus Installation and Operating Instruction


