Page is loading ...

Professional Accessories Handrail Fitting Instructions –
QA103541 – QA103641 – QA103741
Thank you for purchasing this Croydex product. Please follow the fixing and care
instructions to ensure your accessory is fitted safely and retains its high quality
finish.
Please retain this leaflet for future reference.
Tools Required
Pencil
Drill
Masonry drill bit (appropriate to fixings used)
Ceramic drill bit (optional) (appropriate to fixings used)
Spirit Level
Suitable screwdriver (appropriate to fixings used)
Please ensure that suitable fixings are purchased which are compatible with wall
construction materials.
KEEP DIY TOOLS OUT OF THE REACH OF CHILDREN
Safety and Care Advice
1. Always take care when using an electric drill, particularly in the bathroom.
Always check for hidden cables and pipework before drilling. Always use a
residual current circuit breaker (RCCB) when using mains powered tools and
take extreme care if there is any water in the working area.
2. Always wear suitable eye protection when drilling.
3. If the product is to be fitted on a ceramic tiled wall, a ceramic drill bit should be
used. Do not drill mounting holes in the grouted area between tiles. Mask the
area around the hole with tape before drilling to prevent damage to the tile.
Product Location
• Hand rails are only as strong as the wall to which they are fixed and the
fixings that are used.
• For different wall types you will need to ensure that you are using the
correct type of fixing for the material of the wall.
•
The addition of backboards on the outside of the wall or appropriate
strengthening of internal structures may be required to provide adequate
wall strength.
• NOTE: If the wall is made of lightweight thermal blocks, aerated hollow
brickwork or prefabricated partitions even the most appropriate fixings may
not be able to withstand the loads which can be suddenly applied to hand
rails.

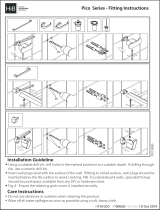
Fitting Instructions
S&H 018 R01
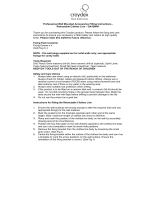
. Slide each of the wall bracket covers off the grab rail ends. (See Fig.1)
. Place the hand rail in position on the wall and using the hole centres of each
wall bracket as a template, mark the screw fixing positions on the wall surface.
ntally
h the holes of the wall brackets and screw securely to
cure in position. (See Fig.3)
lock walls or similarly
working load.
he maximum safe working load is 80kgs.
• To retain the best quality finish, clean product regularly with a soft damp cloth.
Do not use abrasive or chemical cleaners, as these will damage the product.
Tel: +44 (0) 1264 365881.
Fig.2
Fig.3
Fig.1
1
2
(See Fig.1) Fitted correctly, straight rails should be installed either horizo
or vertically and one side of the angled rail should be positioned horizontally.
3. Drill the holes to a depth suitable for your fixings in the marked positions using
a masonry drill. If the product is to be fitted onto a ceramic tiled wall, a ceramic
drill bit should be used.
4. Insert the wall plugs flush to the surface of the wall. If fitting to a tiled surface,
the wall plugs should be inserted below the surface of the tile to avoid cracking.
5. Insert wall screws throug
the wall. (See Fig. 2)
6. Align the indentations on the wall bracket cover with the corresponding
recesses on the hand rail wall bracket and push the cover against the wall.
Rotate the cover to se
7. Before first use check the rail is securely fastened to the wall.
This product must only be fitted to solid brick, concrete b
strong materials offering appropriate support for the maximum safe
T
Product Care Advice
•
For details of the other items in the Croydex range please visit our website: www.croydex.co.uk
Croydex Limited, Central Way, Andover, Hants, SP10 5AW, UK
Fax: +44 (0) 1264 356437
te: www.croydex.co.ukWebsi
. E-mail: [email protected]
/