Page is loading ...

2 of 4
www.jasonl.com.au
Need help! Call us on 1300 527 665
Heron Mesh Ergonomic
Drafting Chair

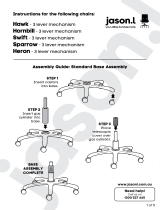
STEP 1
Insert castors
into base.
STEP 2
Insert gas cylinder
into base.
STEP 3
Insert drafting ring
over gas as shown.
Base assembly complete !
Drafting Base Assembly
2 of 4
www.jasonl.com.au
Need help! Call us on 1300 527 665
Heron Mesh Ergonomic
Drafting Chair
Base with
gas inserted.

Heron Mesh Ergonomic
Drafting Chair
Leave elastic inplace. This keeps the
two sections of the back bellow in
place.
STEP 4
Identify the stem of the chair back inside the square back bellow
STEP 5
Insert the stem firmly into
mechanism at the back bottoms out.
Therachet height adjustor works like
a car head rest. Press all the way
down then lift to required position.
When back is in place, remove
elastic band.
STEP 6
Assembly Done
The levelers adjust seat height and
back angle.
3 of 4
www.jasonl.com.au
Need help! Call us on 1300 527 665
Back Assembly

Heron Mesh Ergonomic
Drafting Chair
Height adjustable arms Assembly
4 of 4
www.jasonl.com.au
Need help! Call us on 1300 527 665
STEP 1
Adjustable arm and armpad comes
assembled
STEP 3
Attach arm using 6 x M6*35mm (3
on the left armand 3 on the right
arm). Tighten screws all the way
down into the chair seat.
Tip chair seat upside down. Rest seat
on corner of a table. Attach arm to
chair seat using B spacer on the one
hole each left and right arm.
STEP 2
/


