Page is loading ...

Maintaining and
Troubleshooting
Your E-4200
System
MAN US E-4200 TECH REF R0 10/98
8503809

Maintaining and
Troubleshooting
Your E-4200
System
Part #8503809 MAN US E-4200 TECH REF R0 10/98
In our effort to use nature’s resources efficiently and wisely, we print all manuals on recycled papers that meet the
minimum requirements established by the Federal EPA in its guidelines for recycled paper products.

Notices
Copyright © 1998 Gateway 2000, Inc.
All Rights Reserved
610 Gateway Drive
N. Sioux City, SD 57049 USA
All Rights Reserved
This publication is protected by copyright and all rights are reserved. No part of it may be reproduced
or transmitted by any means or in any form, without prior consent in writing from Gateway 2000.
The information in this manual has been carefully checked and is believed to be accurate. However,
changes are made periodically. These changes are incorporated in newer publication editions.
Gateway 2000 may improve and/or change products described in this publication at any time. Due to
continuing system improvements, Gateway 2000 is not responsible for inaccurate information which
may appear in this manual. For the latest product updates, consult the Gateway 2000 web site at
www.gateway.com. In no event will Gateway 2000 be liable for direct, indirect, special, exemplary,
incidental, or consequential damages resulting from any defect or omission in this manual, even if
advised of the possibility of such damages.
In the interest of continued product development, Gateway 2000 reserves the right to make
improvements in this manual and the products it describes at any time, without notices or obligation.
Trademark Acknowledgments
AnyKey, black-and-white spot design, CrystalScan, Destination, EZ Pad, EZ Point, Field Mouse, Solo,
TelePath, Vivitron, stylized “G” design, and “You’ve got a friend in the business” slogan are registered
trademarks and GATEWAY, Gateway Solo, green stylized GATEWAY, green stylized Gateway logo, and
the black-and-white spotted box logo are trademarks of Gateway 2000, Inc. Intel, Intel Inside logo, and
Pentium are registered trademarks and MMX is a trademark of Intel Corporation. Microsoft, MS, MS-
DOS, and Windows are trademarks or registered trademarks of Microsoft Corporation. All other
product names mentioned herein are used for identification purposes only, and may be the trademarks
or registered trademarks of their respective companies.
Copyright © 1998 Advanced Logic Research, Inc. (ALR)
All Rights Reserved
9401 Jeronimo
Irvine, CA 92618 USA
All Rights Reserved
This publication is protected by copyright and all rights are reserved. No part of it may be reproduced
or transmitted by any means or in any form, without prior consent in writing from ALR.
The information in this manual has been carefully checked and is believed to be accurate. However,
changes are made periodically. These changes are incorporated in newer publication editions. ALR
may improve and/or change products described in this publication at any time. Due to continuing
system improvements, ALR is not responsible for inaccurate information which may appear in this
manual. For the latest product updates, consult the ALR web site at www.alr.com. In no event will ALR
be liable for direct, indirect, special, exemplary, incidental, or consequential damages resulting from
any defect or omission in this manual, even if advised of the possibility of such damages.
In the interest of continued product development, ALR reserves the right to make improvements in this
manual and the products it describes at any time, without notices or obligation.
Trademark Acknowledgments
ALR is a registered trademark of Advanced Logic Research, Inc. All other product names mentioned
herein are used for identification purposes only, and may be the trademarks or registered trademarks
of their respective companies.

Contents i
Contents
Preface .....................................................................................iii
Conventions used in this guide .............................................................. iv
Safety instructions ................................................................................... v
Additional information sources ............................................................. vi
The Gateway Support Center.......................................................... vi
The System Restoration CD ......................................................... vii
Case Access ............................................................................ 1
Static electricity precautions ................................................................... 2
Identifying your computer case .............................................................. 3
Opening the case...................................................................................... 4
Removing the desktop case cover ................................................... 4
Removing the mid-tower case cover............................................... 6
Removing the tower case cover....................................................... 7
Replacing the cover................................................................................. 9
Replacing the desktop case cover.................................................... 9
Replacing the mid-tower case cover.............................................. 10
Replacing the tower case cover...................................................... 11
System Components ............................................................. 13
Locating components ............................................................................ 14
Desktop components...................................................................... 14
Mid-tower components.................................................................. 15
Tower components......................................................................... 16
System board ......................................................................................... 17
I/O connectors........................................................................................ 19
Front panel I/O connections........................................................... 20
Setting the jumpers................................................................................ 21
Recovery mode............................................................................... 22
Replacing the processor ........................................................................ 23
Installing memory.................................................................................. 29
Installing and replacing drives .............................................................. 31
Replacing and installing drives in your desktop computer........... 32
Replacing and installing drives in your mid-tower computer ...... 40
Replacing and installing drives in your tower computer .............. 45
Adding an expansion card..................................................................... 55

ii Maintaining and Troubleshooting Your E-4200 System
LM81 hardware management .............................................................. 57
Installing LANDesk Client Manager................................................... 58
Replacing the battery ............................................................................ 58
Troubleshooting the battery installation ....................................... 60
Replacing the power supply ................................................................. 60
BIOS Setup .............................................................................65
About the BIOS setup utility ................................................................ 66
Using the BIOS setup utility.......................................................... 66
Updating the BIOS................................................................................ 67
Troubleshooting ......................................................................69
Introduction........................................................................................... 70
Troubleshooting checklist .................................................................... 70
Verifying your configuration......................................................... 70
Viewing system resources............................................................. 70
Troubleshooting guidelines........................................................... 71
CD-ROM problems .............................................................................. 72
Hard disk problems............................................................................... 73
Memory/Processor problems ............................................................... 74
Modem problems.................................................................................. 75
Peripheral/Adapter problems................................................................ 76
Printer problems.................................................................................... 78
System problems................................................................................... 79
Video problems..................................................................................... 80
Error messages...................................................................................... 83
Appendix .................................................................................87
Specifications........................................................................................ 88
Regulatory Compliance Statements..................................................... 90
Index .......................................................................................93


iv Maintaining and Troubleshooting Your E-4200 System
Conventions used in this guide
Throughout this guide, you will see the following conventions:
Convention Description
E
NTER
Keyboard key names are printed in small
capitals.
C
TRL
+A
LT
+D
EL
A plus sign indicates that the keys must be
pressed simultaneously.
Setup
Commands to be entered, options to
select, and messages that appear on your
monitor are printed in bold.
User’s Guide
Names of publications and files are printed
in italic.
An important note informs you of special
circumstances.
A caution warns you of possible damage
to equipment or loss of data.
A warning indicates the possibility of
personal injury.
Important!
Caution!
Warning!

Preface v
Safety instructions
Observe the following safety instructions when using your system:
•
Follow all instructions marked on the system and in the
documentation.
•
When the computer is turned off, a small amount of electrical
current still runs through the computer. Always unplug the
computer from the electrical outlet before cleaning the system or
opening the computer cover. (Follow the cleaning instructions in
your user’s guide.)
•
Do not use this product near water or a heat source, such as a
radiator or heat register.
•
Do not spill anything on or into the system. The best way to avoid
spills is to avoid eating and drinking near your system.
•
Make sure you set up the system on a stable work surface.
•
Openings in the computer cabinet are provided for ventilation. Do
not block or cover these openings. Make sure you provide adequate
space (at least 12 inches) around the system for ventilation when
you set up your work area. Never insert objects of any kind into the
computer ventilation slots.
•
Use the voltage setting for your area. The voltage selector switch is
set at the factory to the correct voltage.
•
As a safety feature, this system is equipped with a 3-wire power
cord to ensure that the product is properly grounded when in use.
The plug will only fit into a grounding-type outlet. If you are
unable to insert the plug into an outlet, contact an electrician to
install the appropriate outlet.
•
Do not walk on the power cord or allow anything to rest on it.
•
If you use an extension cord with this system, make sure the total
ampere ratings on the products plugged into the extension cord do
not exceed the extension cord ampere rating. Also, the total ampere
requirements for all products plugged into the wall outlet must not
exceed 15 amperes.
Warning!
Do not attempt to service
the system yourself except
as explained elsewhere in
the system documentation.
Adjust only those controls
covered in the instructions.
Opening or removing
covers marked “Do Not
Remove” may expose you
to dangerous electrical
voltages or other risks.
Refer all servicing of those
compartments to qualified
service personnel.

vi Maintaining and Troubleshooting Your E-4200 System
•
There is a danger of explosion if the CMOS (complementary
metal-oxide semiconductor) battery is replaced incorrectly.
Replace the battery with the same or equivalent type recommended
by the manufacturer. Dispose of used batteries according to the
manufacturer’s instructions.
•
Unplug the system from the wall outlet and refer servicing to
qualified personnel if:
• The power cord or plug is damaged.
• Liquid has been spilled into the system.
• The system does not operate properly when the operating
instructions are followed.
• The system was dropped or the cabinet is damaged.
• The system’s performance changes.
Additional information sources
Along with this manual and your user’s guide, you can find additional
information by using the following sources.
The Gateway Support Center
Log on to the Gateway Support Center at www.gateway.com/support to
access information about your system or other Gateway products. Some
types of information you can access are:
•
Hardware driver (including BIOS) and software
application updates
•
An expanded glossary
•
Technical tips
•
Service Agreement information
•
Technical documents and component information
•
Frequently Asked Questions (FAQ)
•
Online access to Tech Support

Preface vii
The System Restoration CD
The System Restoration CD included with your system can be used to:
•
Restore your Windows 95 or Windows 98 operating system
•
Install hardware drivers for Windows 95, Windows 98, and
Windows NT
•
Reinstall selected software applications, such as LANDesk Client
Manager or McAfee Virus Scan
•
View or install component online documentation
Instructions for each operating system are provided with the System
Restoration CD.

viii Maintaining and Troubleshooting Your E-4200 System


2 Maintaining and Troubleshooting Your E-4200 System
Static electricity precautions
Static electricity can permanently damage electronic components in your
computer. When opening your computer case, always perform the
following procedure:
1.
Wear a grounding wrist strap (available at most electronics stores).
2.
Turn off the system power.
3.
Touch the back of the power supply fan, located on the back of the
case, to discharge any static electricity.
4.
Unplug all power cords from AC outlets.
5.
Remove the computer case cover.
Follow these precautions to avoid electrostatic damage to your system
components:
•
Avoid static-causing surfaces such as plastic and styrofoam in your
work area.
•
Remove the parts from their antistatic bags only when you are
ready to use them. Do not lay parts on the outside of antistatic bags
since only the inside of the bag provides antistatic protection.
•
Always hold cards by their edges and their metal mounting bracket.
Avoid touching components on the cards and the edge connectors
that connect to expansion slots.
•
Never slide cards or other parts over any surface.
Caution!
Prevent electrostatic
damage to your system by
following static electricity
precautions every time you
open your computer case.
Warning!
To avoid exposure to
dangerous electrical
voltages and moving parts,
turn off your computer and
unplug the power cord
before removing the system
cover.

Case Access 3
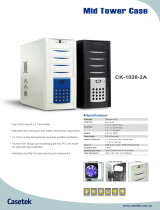
Identifying your computer case
This chapter includes the procedures for opening and closing the case for
each of the four models shown below. Refer to the section appropriate to
your case style.
Mid-tower case
Tower case
Desktop case

4 Maintaining and Troubleshooting Your E-4200 System
Opening the case
The system is available in three basic models:
•
Desktop
•
Mid-tower
•
Tower
The desktop case has a removable top panel and a removable front bezel.
The mid-tower and tower cases have two removable side panels, and a
removable front bezel.
To install or remove components inside your desktop system, you must
remove the top cover panel. For some procedures you must remove the front
bezel. For the mid-tower and tower systems, you must remove the panel on
the right side (as seen from the back of the system). For some procedures
you must remove the left side panel and the front bezel.
Your system includes an anti-intrusion switch on the case. If you attempt to
open the case without turning off the system, your system automatically
turns off.
Because the components inside your computer are extremely sensitive to
static electricity, be sure to follow the precautions for avoiding static
electricity damage at the beginning of this chapter.
Removing the desktop case cover
You need a grounding wrist strap and a Phillips screwdriver to open the
case.
1.
Turn off the computer and disconnect all power cords.
2.
Remove the two thumbscrews at the back of the computer and set
them aside.
To remove the desktop case cover
Important!
Only qualified personnel
should open the system for
maintenance. You need a
grounding wrist strap and a
Phillips screwdriver to
remove the computer’s
cover.

Case Access 5
3.
Slide the top cover panel back, lift it up, and set it aside.
4.
If you are replacing or adding a drive you may also need to remove the
bezel. To do this, lift up on the tabs at each end of the top edge of the
case bezel and pull the bezel away from the system frame.

6 Maintaining and Troubleshooting Your E-4200 System
Removing the mid-tower case cover
You need a grounding wrist strap and a Phillips screwdriver to open the
case.
1.
Turn off the system and disconnect all power cords.
2.
Remove the thumbscrews on the right side of the back of the
computer.
3.
Remove the right side panel by pulling on the handgrip between the
thumbscrew holes.
4.
If you are replacing externally accessible drives, remove the two
Phillips screws on the other side of the back of the computer and
remove the side panel. Both side panels must be removed to access the
four screws that attach such devices to the drive cage.
5.
Remove the four screws that attach the 5.25-inch CD-ROM drive to
the drive cage. Pull the CD-ROM drive out half-way. This allows the
bezel to be removed.
To remove the mid-tower case cover

Case Access 7
6.
If you are installing externally accessible drives or replacing existing
ones, remove the bezel by inserting a finger into each of the two
circular openings at the front of the computer, pushing in on the spring
clips, and pulling the upper portion of the bezel slightly forward to
release it.
7.
Lift the bezel up until the bottom tabs release.
8.
Pull the bezel away from the computer.
Removing the tower case cover
You need a grounding wrist strap and a Phillips screwdriver to open the
case.
1.
Turn off the system and disconnect all power cords.
To open the case

8 Maintaining and Troubleshooting Your E-4200 System
2.
With the back of the computer facing you, remove the three
thumbscrews and the three Phillips screws that attach the side panels
to the chassis.
3.
Grasp the right panel by the handholds on the panel and slide the panel
towards you until the panel comes off the chassis.
4.
Grasp the left panel by the handholds on the panel and slide the panel
towards you until the panel comes off the chassis.
Right side
panel
Left side
panel

Case Access 9
5.
Push in the tabs on each side of the front bezel and pull the bezel off
the chassis.
Replacing the cover
Replace the cover as soon as you finish installing or removing components
so that dust and dirt (which could damage the computer) do not collect
inside the computer.
Replacing the desktop case cover
You need a grounding wrist strap and a Phillips screwdriver to close the
case.
1.
If you removed the case bezel, replace the bezel by inserting it at the
bottom of the system frame and snapping the top tabs back in place.
2.
Slide the top panel cover back on to the case frame.
3.
Secure the top panel cover with the thumbscrews you removed.
To replace the desktop case cover
1. Press in tabs
on both sides
of chassis
2. Pull off
bezel
/