Page is loading ...

Disclaimer: Configuration Notes are designed to be a general guide reflecting AVAYA Inc.’s experience
configuring its systems. These notes cannot anticipate every configuration possibility given the inherent
variations in all hardware and software products. Please understand that you may experience a problem
not detailed in a Configuration Note. If so, please notify the TAC/TSO at (408) 922-1822 and if
appropriate we will include it in our next revision. AVAYA Inc. accepts no responsibility for errors or
omissions contained herein.
Octel® 100
Messaging Server
Configuration Note 7042
Comdial DXP*
Revised 06/21/01
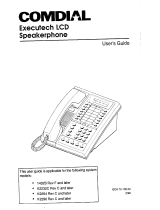
Personal Computer
Voice Board(s)
Digital Ports
D
S
T
Comdial
DXP
ATI ATI ATI ATI
One ATI
per port
There are two other ways
to attach the Comdial DXP.
See paragraph 3.0
1.0 METHOD OF INTEGRATION
Inband. Call forward to personal greeting is achieved via DTMF signals
passed from the Comdial DXP to the Octel 100, hereafter identified by
(O100). Message waiting indicators are set and canceled by dialing a
feature access code followed by the extension number. A hook flash
followed by the extension transfers outside callers to the operator (internal
transfers are not possible).
1.1 SUPPORTED VOICE PROCESSING MODULE
The Octel 100 is a Year 2000 (Y2K) compliant, PC based, enhanced voice
messaging product release intended to replace the OPC, Signature
Performer, CEO, CP, and CP+ product lines. For installed systems that
Communications between the
Comdial DXP and the O100 are
via DTMF Inband Signaling.
Supported Voice Processing
Module

Octel 100 Configuration Note (7042)
Comdial DXP Confidential Page 2
The information contained in this document is provided by AVAYA Inc. to serve as a guide. See the
disclaimer on page 1
Avaya Inc. PROPRIETARY. Use pursuant to Company instructions.
Avaya
Communications Applications Group
have port capacities above 16 ports contact your Avaya representative for
the proper solution
2.0 O100 ORDERING INFORMATION
There are many options available for this product, depending on the
application. Voice Boards supported:
Dialogic DIALOG/4 ™
Fax Boards supported:
Brooktrout TruFax
®
200
Optional Remote Service
Internal Modem
Please consult with your sales representative.
2.1 VOICEMAIL PORTS SUPPORT
Standard configuration for this integration is 16 ports Max. Provision has
been made that based on the type of Platform and Sentinel, that a max 32
ports may be achieved. Contact your Avaya Inc representative if more
then 16 ports are required.
3.0 COMDIAL HARDWARE REQUIREMENTS
• O100 can be attached to Digital Station ports using an ATI-D-1PT,
Analog Station Ports using VMI-X, or Industry Standard Stations
using additional DTMF Receivers and an external Ring Generator.
Each configuration is listed below with their corresponding part
numbers. You can combine any of the configurations listed below.
– Digital Station Card DXDST-8 (8 port) or DXDST-16 (16 port).
Each O100 port requires an Analog Terminal Interface (ATI-D-
1PT, one per O100 port). Instructions for installing the Digital
Station Cards with the ATI-D-1PT can be found in Comdial's IMI-
89-037.
– Analog Station Card DXAST-8 (8 port) or DXAST-16 (16 port).
A Voice Mail Interface (VMI-X, one for every two O100 ports) is
required for every two O100 ports. Instructions for installing the
Analog Station Cards with the VMI-X can be found in Comdial's
IMI-89-023.
– Industry Standard Card DXIST-8 (8 port) or DXIST-16 (16 port).
An external ring generator (DXRNG) and additional DTMF
Receivers are required if O100 is installed on Industry Standard
Ports. The DXP CPU card has two DTMF Receivers, additional
DTMF Receivers can be installed on an Auxiliary Circuit Board
(DXAUX). Each DTMF Receiver Card (DXOPT-TON) provides
four additional DTMF Receivers. Instructions for installing
Industry Standard Station Cards can be found in Comdial's IMI-89-
078.
O100 Ordering Information
This integration will support 16
ports
Switch hardware requirements

Octel 100 Configuration Note (7042)
Comdial DXP Confidential Page 3
The information contained in this document is provided by AVAYA Inc. to serve as a guide. See the
disclaimer on page 1
Avaya Inc. PROPRIETARY. Use pursuant to Company instructions.
Avaya
Communications Applications Group
3.1 COMDIAL DXP SOFTWARE REQUIREMENTS
• Rev. 7.A and above
3.2 ADDITIONAL MATERIAL REQUIREMENTS
• When using the DIALOG/4 you will need:
– One RJ-14 jack with 4-conductor line cord for every two O100
ports The specific configuration will vary depending on the type of
station card being used with the DXP. Refer to the appropriate
Comdial Installation Instructions (listed above in 3.0).
• One analog line for remote service access
• One RJ-11 Jack for above and 2-conductor modular telephone cord.
• If FaxMail is installed.
– One analog line per FAX port. The specific configuration will vary
depending on the type of station card being used with the DXP.
Refer to the appropriate Comdial Installation Instructions (listed
above in 3.0).
– One RJ-11 Jack for every Brooktrout TruFax
®
200, along with
4-conductor modular telephone cords.
4.0 SUPPORTED FEATURES
[ü] Items are supported
System Forward to Personal Greeting Multiple Return to Operator
1
[ü]
All Calls [ ]
Direct Call
2
[ü]
Ring/no answer [ ]
Auto Attendant
1
[ü]
Busy [ ]
Outcalling
[ü]
Busy/No Answer [ü]
Personal Greeting of Original-Called Party
Do Not Disturb [ ] Multiple Call Forward [ ]
Station Forward to Personal Greeting
Double Call Forward [ ]
All Calls [ü] Call Coverage [ ]
Ring/no answer [ ]
Intercom Paging
[ ]
Busy [ ]
Supervised Transfers
1
Busy/No Answer [ü]
Call Screening
1
[ü]
Do Not Disturb [ ]
Call Queuing
1
[ü]
Flexible Forwarding Intercom Paging
1
[ü]
Forward to No Answer Greeting [ ]
Identify Calling Party (Ver. 2.0 and up)
Forward to Busy Greeting [ ] System Forward to Personal Greeting [ ]
Intercom/CO Forwarding [ ] Station Forward to Personal Greeting [ ]
Message Waiting
Flexible Forwarding (NA with CO) [ ]
LCD Display [ ]
Record Telephone Conversation
[ ]
LED [ü]
Lamp [ ]
Audible / Stutter Dial Tone [ü]
Note
1
External Callers Only, See Section 7.1
2
Direct Call Limitations, See Section 7.4
Switch Software Requirements
Additional Material Requirements
Supported Integration Features

Octel 100 Configuration Note (7042)
Comdial DXP Confidential Page 4
The information contained in this document is provided by AVAYA Inc. to serve as a guide. See the
disclaimer on page 1
Avaya Inc. PROPRIETARY. Use pursuant to Company instructions.
Avaya
Communications Applications Group
4.1 DISCONNECT TYPE
Disconnect is achieved via an A Tone sent from the DXP. For proper
external disconnect supervision, Ground start or Supervised Loop start CO
lines are recommended.
5.0 CONFIGURING THE COMDIAL DXP
Before you begin programming, it is recommended that a hard copy of the
customer database be obtained to verify existing programming.
Refer to the Programming section in the Comdial DXP manual for
information on entering, saving, and exiting database programming.
5.1 CONFIGURING STATION PORTS FOR O100
After installing the appropriate interface devices for the O100 ports
(VMI-X for analog stations, ATI-D-1PT for digital stations, or DXIST for
industry standard stations), you must identify the ports where the devices
are connected. Program as follows:
1. From Main Menu, select Stations.
2. From Stations Menu, select Phone Types.
3. Enter the row number for the station port type. (ExecuTech=analog,
DigiTech=digital, IST=industry standard).
4. Enter row number for the device that is connected to the O100 port
(VMI-X or ATI-D-1PT). This step is not required for IST.
5. Enter the O100 station port number.
Repeat this step for each O100 port.
5.2 ASSIGNING O100 PORTS TO EXECUMAIL TABLE
This procedure is required to provide Voice Mail functionality to the O100
ports and also forms a circular hunt group for the O100 ports.
1. From Main Menu, select Peripherals.
2. From Peripherals Menu, select ExecuMail.
3. Enter the row number for the O100 port to be assigned as ExecuMail.
4. Enter the Intercom Number (or name) of the O100 port.
5. Press TAB to move cursor to the Linked Station field and enter the
intercom number (or name) of the next O100 port (link the last O100
port to the O100 port in the first row).
6. Press ESCAPE and repeat steps 4-6 for the next row number.
5.3 CONFIGURING O100 PORT TRANSFER PARAMETERS
O100 listens for DTMF to determine call progress. Two DXP transfer
parameters could conflict with O100 call progress, Automatic Attendant
Transfer on Busy and Immediate Transfer. Both of these should be disabled.
Disable Automatic Transfer on Busy as follows:
Disconnect Type
Programming switch
parameters
Configuring Station Ports
for O100
Assigning O100 Ports to
ExecuMail Table
Configuring O100 Port
Transfer Parameters

Octel 100 Configuration Note (7042)
Comdial DXP Confidential Page 5
The information contained in this document is provided by AVAYA Inc. to serve as a guide. See the
disclaimer on page 1
Avaya Inc. PROPRIETARY. Use pursuant to Company instructions.
Avaya
Communications Applications Group
1. From Main Menu, select Stations.
2. From Stations Menu, select Station Programming.
3. Enter the Intercom Number (or name) of the O100 port.
4. Enter the item number for the feature "Auto Att Transfer on Busy".
5. Press Space to toggle for the desired setting ("NO").
6. Press ESCAPE twice when finished.
Do this for each O100 port.
Disable Immediate Transfer as follows:
1. From Main Menu, select System.
2. From System Menu, select System Parameters.
3. Enter item number for the feature (Immediate Transfer).
4. Press Space to toggle for the desired setting ("NO").
5. Press ESCAPE twice when finished.
5.4 CONFIGURING O100 PORT RINGING ASSIGNMENTS
The Comdial DXP can be programmed to ring at the O100 port directly,
delayed, or at night. Direct ringing will ring the O100 port immediately.
With delayed ringing, calls wait before ringing the O100 port. Delayed
ringing can be used to provide for operator overflow.
Ringing assignments are programmed as follows:
1. From Main Menu, select Stations.
2. From Stations Menu, select Station Programming.
3. Enter the intercom number of the first O100 port.
4. Enter the Item Number of the feature (Direct Ring, Delayed, etc.).
5. Press CONTROL-E
6. Enter "a" for add or "r" for remove, press Enter.
7. Enter the line port numbers (1-128) for the line you want to ring O100.
8. Press ESCAPE twice when you are finished.
5.5 CONFIGURING SPECIFIC GREETING BY LINE
As an option, you can have O100 answer with a greeting specific to the
line it came in on. This is done by programming the line with an
ExecuMail ID that corresponds to a Mailbox in the O100 that is set up
with a Vtree that answers calls according to how you set the Vtree up for
that line.
Program the ExecuMail ID as follows:
Configuring O100 Port Ringing
Assignments
Configuring Specific Greeting By
Line

Octel 100 Configuration Note (7042)
Comdial DXP Confidential Page 6
The information contained in this document is provided by AVAYA Inc. to serve as a guide. See the
disclaimer on page 1
Avaya Inc. PROPRIETARY. Use pursuant to Company instructions.
Avaya
Communications Applications Group
1. From Main Menu, select Lines.
2. From Lines Menu, select Line Programming.
3. Enter the Line you want to program an ExecuMail ID for.
4. Enter the item number for the feature (ExecuMail ID).
5. Enter the Vtree Mailbox Number plus "2", press Enter.
(example, Vtree Mailbox=300, ExecuMail ID = 3002)
6. Press ESCAPE twice when you are finished.
5.6 CONFIGURING CALL FORWARD
This section contains information on programming System Call Forward
to Personal Greeting and Station Call Forward to Personal Greeting.
System Call Forward to Personal Greeting is a feature provided for
individual extensions by the System Administrator through station
programming. It automatically forwards their phone to O100 under
busy/no answer conditions without the subscriber having to set call
forwarding from the station. System Call Forwarding is overridden if
Station Call forwarding is set.
Program System Call Forwarding as follows:
1. From Main Menu, select Stations.
2. From Stations Menu, select Stations Programming.
3. Enter the intercom number of the station you want to set for call
forwarding, press enter.
4. Enter the Item Number of the feature (Default FWD Type).
5. Press Space bar to toggle for desired setting ("Itcm FWD"), press
Enter.
6. Enter the Itcm FWD To: (first O100 Port), press Enter.
7. Press Space bar to toggle for desired setting ("All Calls").
8. Press Escape.
9. Enter the Item number of the feature (RNA Rings), press Enter.
10. Enter the number of rings before the system will forward the call to
O100, press Enter. (Note: Ensure that RNA rings for the station is than
the Station Transfer Recall Timer. Otherwise, transferred will recall
to the station that transferred rather than forwarding to O100.)
11. Press Escape twice when you are finished.
Station users can set call forwarding by using the LCD Display Menus or
by dialing feature codes. System Call Forwarding is overridden if Station
Call forwarding is set.
Subscribers can set Call Forward/All Calls from their stations as follows:
1. Press INTERCOM and listen for dial tone.
2. Dial *52.

Octel 100 Configuration Note (7042)
Comdial DXP Confidential Page 7
The information contained in this document is provided by AVAYA Inc. to serve as a guide. See the
disclaimer on page 1
Avaya Inc. PROPRIETARY. Use pursuant to Company instructions.
Avaya
Communications Applications Group
3. Dial extension number of the first O100 port.
4. Hang up.
Subscribers can set Call Forward Busy/No Answer from their stations as
follows:
1. Press INTERCOM and listen for dial tone.
2. Dial *54.
3. Dial extension number of the first O100 port.
4. Hang up.
Cancel Station Call Forward as follows:
1. Press INTERCOM and listen for dial tone.
2. Dial #5.
3. Hang up.
5.7 CONFIGURING VOICE MAIL TRANSFER BUTTON
The system administrator can pre-program a button to transfer an incoming call
directly into a voice mail box on O100. The subscriber can press the button plus
the target mailbox number, and the call will be sent directly to the mailbox
greeting.
Program the Voice Mail Transfer button as follows:
1. From Main Menu, select Stations.
2. From Stations Menu, select Button Mapping.
3. Enter the intercom number for the station(s) you want to program with
this feature (the terminal will display a button map with current
assignments).
4. Enter the code for the button you want to program (L1-L25), press Enter.
5. Enter the mnemonic (XVM) for Transfer to Voice Mail plus the 2
digit code for which O100 port (found in the ExecuMail table, 01-32)
you want it to transfer to (typically the first O100 port, example
XVM01).
6. Press Escape twice when you are finished.
6.0 CONFIGURING THE O100
Section 6.1 is used for integrating O100 which provides for the detection
of caller id when available from the PBX. During the install process run
the Integrator program and select the Comdial DXP switch. The Integrator
will place appropriate feature codes into the O100 Setup.
6.1 INTEGRATING O100 VERSION 2.0 AND ABOVE
The Integrator inserts the following codes. Adjust to match site requirements.
O100 Configuration
Integrating O100 Version 2.0 and
above

Octel 100 Configuration Note (7042)
Comdial DXP Confidential Page 8
The information contained in this document is provided by AVAYA Inc. to serve as a guide. See the
disclaimer on page 1
Avaya Inc. PROPRIETARY. Use pursuant to Company instructions.
Avaya
Communications Applications Group
Outside Line Access Code
9,
Off Hook Delay (OFFHDLY)
50
Hook Flash Interval (FLINTVL)
50
DTMF Tone Length (TONELEN)
8
Transfer, Paging and Screening Parameters
Custom Transfer Code
A&,XDR
Custom Message Delivery Code
AXD
Intercom Paging Code
A&,C270NR
Transfer Release Code when Busy
&
Transfer Release Code when No Answer
&
Call Screening Release Code when Busy
&
Call Screening Release Code when No
&
Call Screening Release Code when Reject
&
Call Screening Release Code When Transfer
&
Release Code for Intercom Paging
&
Message Waiting Parameters
Permit Message Waiting Lights
üü
Message Waiting Light Prefix ON
*3
Message Waiting Light Prefix OFF
#3
Hangup Detection Parameters
Hangup String (HANGUPSTR)
A
Hangup String Timeout (HANGUPDLY)
50
Inband Parameters
Total Number of DID Digits
8
Seconds to Wait for First Digit
1
Millisecs to Wait for Next Digit
500
Inband Templates
R2 Go to Voice Mail
R3 Auto Login
These Codes apply to the Inband Template:
R = Receiving Mailbox
S = Sending Mailbox
X = Ignore Character
Valid Characters are:
~ $ * # 0-9 A-D F N T
Note: Verify all these dialing sequences for your PBX.
7.0 CONSIDERATIONS / ALTERNATIVES
The following items should be considered, below:
Internal transfers
No Dialer or Immediate Call with Visual Mailbox
Call Screening
FaxMail
Direct Call (for message retrieval)
Unsupervised CO Lines
Important notes concerning this
integration

Octel 100 Configuration Note (7042)
Comdial DXP Confidential Page 9
The information contained in this document is provided by AVAYA Inc. to serve as a guide. See the
disclaimer on page 1
Avaya Inc. PROPRIETARY. Use pursuant to Company instructions.
Avaya
Communications Applications Group
7.1 INTERNAL TRANSFERS
Ports programmed as ExecuMail cannot place internal (intercom) calls on
hold, and thus cannot transfer internal calls. Due to this limitation, all
Automated Attendant and Subscriber functions that require O100 to perform a
transfer will fail if the subscriber (or caller) is calling from an internal
extension. For example: Joe places an intercom call to Mary, Mary's phone
is programmed to forward to O100. While Joe is listening to Mary's personal
greeting, he presses 0 to reach Mary's Personal Operator. The transfer will
not be complete and Joe will be dropped. If Joe was calling from an outside
line, the transfer would be successful. Careful consideration must be used
when using features such as Call Queuing, since an internal caller will never
advance beyond the first position and will prevent all others queued to the
extension from advancing.
7.2 NO DIALER OR IMMEDIATE CALL WITH VISUAL
MAILBOX
If the Visual Mailbox product is used (an option starting with version 2.0
software), Dialer and Immediate Call functions will not operate due to switch
design shortcomings discussed above under “Internal Transfers.”
7.3 CALL SCREENING
O100 must establish a three way conference in order to return to the calling party
if the subscriber wishes to reject or redirect a call. When using Call Screening to
redirect or reject a call, the subscriber must wait until the entire phrase "Please
hang up now to transfer the caller" or "Thank you, good-bye" is voiced before
hanging up. Subscribers who have not been trained on the proper use of Call
Screening should have the feature disabled in the Mailbox Class of Service.
7.4 FAXMAIL
DXP ports that are programmed as ExecuMail ports cannot place internal
(intercom) calls on hold, and thus cannot transfer. Due to this limitation, the
Local Fax Machine must be attached to an outside line.
7.5 DIRECT CALL (FOR MESSAGE RETRIEVAL)
If a station is programmed to forward to O100 (System Forward or Station
Forward), the subscriber can dial his own extension and the call will forward
to the Personal Greeting. During the Personal Greeting, the subscriber can
press the pound key (#) and O100 will ask for the subscribers password. This
will provide for quicker access to the mailbox for message retrieval.
7.6 UNSUPERVISED CO LINES
The O100 may experience delays in disconnecting if using unsupervised
trunks.

Octel 100 Configuration Note (7042)
Comdial DXP Confidential Page 10
The information contained in this document is provided by AVAYA Inc. to serve as a guide. See the
disclaimer on page 1
Avaya Inc. PROPRIETARY. Use pursuant to Company instructions.
Avaya
Communications Applications Group
If Call Queuing is used, enable the System Parameter “Require Caller to Press
Star to Stay in Queue”. Unsupervised CO lines will cause the Subscriber to
receive phantom calls because of callers who have decided not to wait in
queue. This will alleviate the perception that the called subscriber is losing
calls.
©1994-2001 Avaya Inc. All rights reserved. All trademarks identified by the ®, SM and TM are registered trademarks,
servicemarks or trademarks respectively. All other trademarks are properties of their respective owners. The above
information is based on knowledge available at the time of publication and is subject to change without notice.
DIALOG/4 ™ is a registered trademark of Dialogic Corporation
TruFax is a registered trademark of Brooktrout Technology Inc.
*Trademark of Comdial Corporation
Printed in the United States
AVAYA Inc.
1001 Murphy Ranch Road
Milpitas, CA 95035-7912
(408) 577-7000
http://www.avaya.com
(CFN 7042)
/