
Part Number: 808F0105© 2011 Pella Corporation
REMEMBER TO USE APPROPRIATE PERSONAL PROTECTIVE EQUIPMENT.
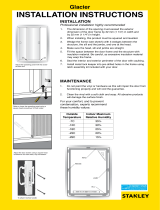
INSTALLATION INSTRUCTION -
INSTRUCCIONES DE INSTALACION
PELLA
®
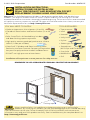
PRECISION FIT AND RENOVATION POCKET
REPLACEMENT DOUBLE-HUNG VENT WINDOW
Always read the Pella® Limited Warranty before purchasing or installing Pella
products. By installing this product, you are acknowledging that this Limited Warranty
is part of the terms of the sale. Failure to comply with all Pella installation and maintenance
instructions may void your Pella product warranty. See Limited Warranty for complete details at
http://warranty.pella.com.
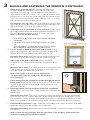
INTERIOR
Flashing tape
Checkrail
YOU WILL NEED TO SUPPLY: TOOLS REQUIRED:
• Cedar or Impervious shims/spacers (12 to 20)
• Closed cell foam backer rod/sealant backer (12 to 30
ft.)
• Pella
®
SmartFlash
™
foil backed butyl window
and door flashing tape or equivalent
• High quality exterior grade polyurethane or silicone
sealant (1 tube per window)
• Great Stuff ™ Window and Door Insulating Foam
Sealant by the Dow Chemical Company or equivalent
low pressure polyurethane window and door foam -
DO NOT use high pressure or latex foams.
• Tape measure
• Level
• Hammer
• Utility knife
• Pry bar
• Sealant gun
• Screwdrivers
(#2 Phillips and Flat blade)
• Putty knife
• Wood chisel
• Drill
Installation will require two or more persons for safety reasons.
SEALANTSEALANT
Important! The Pella Replacement Window is designed to replace older style double-hung
windows. The original window frame will remain in place and only the existing sash will be
removed. Read these instructions thoroughly before beginning. Failure to install as recommended
will void any warranty, express or implied. For types of installation other than shown, contact your
local Pella representative or visit http://www.pella.com.

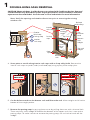
Interior
sash stop
Exterior
blind
stop
Parting
stop
Bottom
sash
Stool
Sill
Apron
Top sash
Bottom
sash
weight
Top
balance
cord
Balance
cord pulleys
Top sash
weight
Bottom
balance
cords
Interior
sash stop
Parting stop
Exterior
blind stop
1A
1C
1A
CAUTION: Many windows in older homes are painted with lead-based paint. Removal
of old windows may disturb this paint. Proper precautions must be taken to minimize
exposure to dust and debris. Consult state or local authorities for more information.
Note: Verify the opening and window dimensions prior to removing the existing
window sash.
A. Score paint or varnish along interior sash stops with a sharp utility knife. Remove the
interior sash stops at jambs (sides) and head (top) using a putty knife and pry bar.
B. Cut the balance cords on the bottom sash and lift out the sash. Allow weights to fall to the
bottom of the weight pocket.
1
DOUBLE-HUNG SASH REMOVAL
C. Remove the parting stops by prying them out or by pulling them out with a channel lock.
There may be a small wedge of wood at the bottom of the upper sash that is next to the
parting stops. To make it easier to remove the parting stop, use a chisel to knock off the
wedge.
INTERIOR
SASH STOP
1A
1B
PARTING STOP
WEDGE
1C

D. Lower the top sash and cut the balance cords allowing the
balance weights to fall into the weight pocket. Remove the
top sash.
E. Remove the balance cord pulleys. Unscrew and remove the
balance cord pulleys. If they cannot be removed easily, drive
them into the jamb using a hammer.
F. If desired, insulate the weight chamber by filling it with low
pressure window and door insulating foam.
1E
2
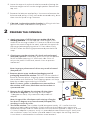
PREPARE THE OPENING
Blind stop
Flashing
Tape
2A
2B
2D
Sill Adapter
A. Apply one piece of sill flashing tape to the sill of the
existing window. Cut the tape the same length as the
width of the existing window sill. Place one side of the tape
against the vertical leg of the stool, and work the tape into
the corner before applying to the sill. Press down firmly.
DO NOT allow the ashing tape to extend past the blind
stops.
B. Check to ensure the existing sill is level and not bowed
(humped) upward. If necessary, place shims on the bottom
of the window opening 1/2" from each side. Shim sill
only at the jambs. Once level, attach shims to prevent
movement.
Note: Improper placement of shims may result in bowed
(humped) sill.
C. Remove plastic wrap, cardboard packaging and sill
packaging board from window. DO NOT cut the checkrail
bands or remove plastic shipping spacers located between
the window sash and frame. The shipping spacers will help
keep the window square during installation.
Note: If screens, grilles or hardware are removed from
the window at this time, label them and store them in
a protected area.
D. Remove the sill adapter for existing sills that slope
less than 13 degrees. For existing sills that slope
13 degrees or more, fully extend the adjustable sill
adapter.
Note: Usage of the sill adapter with existing sill angles
less than 13 degrees may cause bowed (humped) sills,
resulting in screen fit issues.
E. Test fit the window. The window should be approximately 1/2" smaller than the
opening in both width and height. Check to ensure the window rests against the
exterior blind stops and will make contact with the sealant applied in steps 3 A, B and
C. If the sill adpater is present, verify it is extended to meet the existing sill. Verify that
the installation screws will fasten into solid wood. If not, repair the existing frame to
insure there is solid wood at installation screw locations.

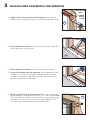
3C
A. Apply a 3/8" continuous bead of sealant to the interior
face of the existing blind stops at the head and both jambs.
B. Place a bead of sealant where the existing stool meets the
existing frame sill and jambs.
C. Place a bead of sealant where the jamb and sill meet.
D. Insert the window into the opening. Set the bottom of the
window in first and tilt the top into place. Make sure the
window is centered in the opening and is pressed firmly
against the exterior blind stops.
E. Place a shim at each of the top corners in line with the pre-
punched holes, and partially insert 2-1/2" screws (provided).
This will hold the window in place while shimming it plumb
and square. Trim shims back so they recessed back 1/4” -
1/2” from the interior face of the window frame.
3
SEALING AND FASTENING THE WINDOW
3A
Jamb
blind
stop
Head blind
stop
Sill
Stool
3B
3E

3F
F. Place shims approximately 5" up from the bottom of
window to plumb and square the window. Check for
squareness by making sure the diagonal measurement
from corner to corner is within 1/16" in both directions. Also
place shims in line with the jamb hole near the center of the
unit. Trim shims back so they recessed back 1/4” - 1/2” from
the interior face of the window frame.
For windows over 53" tall: Place two additional shims along
each side of the window, evenly spacing them between the
top and bottom shims and the midpoint shim.
G. Check the new sill to confirm it is flat and level using a level
or straight edge along the exterior edge of the new sill. If
the sill is bowed (humped) screen t issues may result.
3I
EXTERIOR
3G
Note: To Resolve Sill Bow (hump):
• Push Down on the center of the sill to seat the adjustable
sill adapter.
• Check the shims at the sill for proper location. (See Step
2B).
• If the sill adapter is touching the existing (old) sill, remove
the sill adapter to relieve pressure on the new sill.
H. Cut the checkrail band at each jamb and remove. Check
jambs for straightness by measuring the top, middle and
bottom of the frame. Widths should be within 1/16".
Designer Series only: After cutting the checkrail band, push
the remaining tails of the band into the jambliner hole.
I. Adjust the screw jacks if required. With a flat blade
screwdriver turn clockwise to move the frame toward the
sash.
Architect Series Units: The jamb jack holes are located in the
interior balance channel near the checkrail; the lower sash
must be tilted in to adjust the jamb jack.
Note: If the frame and sash are too tight and are
not adjustable using the jamb jacks, the window is
over-shimmed.
J. Finish driving the top installation screws through the wood
frame jamb, ensuring the head of the screw is flush with the
surface of the wood frame to avoid interference with the
balance assembly.
K. Raise the bottom sash to install the lower two installation
screws. Drive the installation screws below the surface of the
wood frame.
Architect Series Units: The lower installation holes are located in the interior balance
channel near the sill. These holes are not pre-drilled through the wood frame. Drive
the installation screws through the wood frame jamb, ensuring the head of the screw is
below the surface of the wood frame to avoid interference with the balance assembly.
L. Check window operation. Open and close the window a few times to check for proper
operation. Make sure the window will tilt correctly.
Designer Series Only: After adjustments are completed, install plastic plugs in the jamb
liner holes.
Note: If there are any problems with the operation of the window, recheck the shim
locations and adjust for plumb and square.
3
SEALING AND FASTENING THE WINDOW (CONTINUED)

Caution: Ensure use of low pressure polyurethane window and door insulating foams
and strictly follow the foam manufacturer’s recommendations for application. Use of
high pressure foams or improper application of the foam may cause the window frame
to bow and hinder operation.
A. Place a corner bead of sealant at the jambs
and head connecting the existing frame and the
replacement window frame.
Caution: DO NOT seal the bottom exterior to allow for
incidental water to weep.
B. Check to ensure the sill adapter is properly seated.
If the window sill appears humped in the center,
carefully push sill down to straighten.
4
INTERIOR SEAL
A. Apply insulation foam. From the interior, insert the nozzle
of the applicator approximately 1" deep into the space
between the window and the rough opening and apply a
1" deep bead of foam. This will allow room for expansion
of the foam and will minimize squeeze out. Apply sealant
across the interior surface of the shims to create a
continuous seal. Follow foam manufacturer’s instructions.
Note: It may be necessary to squeeze the end of the tube
with pliers to be able to insert into the space between the
new and existing window frame. DO NOT completely fill
the space from the back of the blind stops to the interior
face of the opening.
B. Check window operation by opening and closing the window.
Note: If the window does not operate correctly, check to make sure it is still plumb,
level, square and that the sides are not bowed. If adjustments are required, remove the
foam with a serrated knife. Adjust the shims, and reapply the insulating foam sealant.
C. Inspect the foam after it has cured. Fill any voids with foam prior to installing interior trim.
D. Reinstall the existing interior sash stops or new trim as desired.
5
EXTERIOR SEAL
5A
4A

EXTERIOR FINISH
The exterior frame and sash are protected by aluminum cladding with our tough EnduraClad
®
or EnduraClad Plus baked-on factory nish that needs no painting. Clean this surface with mild
soap and water. Stubborn stains and deposits may be removed with mineral spirits. DO NOT
use abrasives. DO NOT scrape or use tools that might damage the surface.
Use of inappropriate finishes, solvents, brickwash or cleaning chemicals will cause adverse
reactions with window and door materials and voids the Limited Warranty.
If products cannot be finished immediately, cover with clear plastic to protect from dirt, damage
and moisture. Remove any construction residue before finishing. Sand all wood surfaces lightly
with 180 grit or ner sandpaper. DO NOT use steel wool. BE CAREFUL NOT TO SCRATCH THE
GLASS. Remove sanding dust.
Pella products must be finished per the below instruction; failure to follow these instructions voids
the Limited Warranty.
• On casement and awnings, it is optional to paint, stain or finish the vertical and horizontal sash
edges.
• On single-hung and double-hung, do not paint, stain or finish the vertical sash edges, any finish on the
vertical sash edges may cause the sash to stick; it is optional to paint, stain or finish the horizontal sash
edges.
• On patio doors, it is optional to paint, stain or finish the vertical and horizontal panel edges.
Note: To maintain proper product performance do not paint, finish or remove the weather-strip-
ping, mohair dust pads, gaskets or vinyl parts. Air and water leakage will result if these parts are
removed. After finishing, allow venting windows and doors to dry completely before closing them.
Pella Corporation is not responsible for interior paint and stain nish imperfections for any product
that is not factory-applied by Pella Corporation. Use of inappropriate nishes, solvents, brickwash,
or cleaning chemicals will cause adverse reactions with window and door materials and voids the
Limited Warranty.
For additional information on finishing see the Pella Owner’s Manual or go to www.pella.com.
INTERIOR FINISH

CARE AND MAINTENANCE
Care and maintenance information is available in the Pella Owner’s Manual. You can
obtain an owner’s manual by contacting your local Pella retailer. This information is also
available on www.pella.com.
IMPORTANT NOTICE
Because all construction must anticipate some water infiltration, it is important that the wall
system be designed and constructed to properly manage moisture. Pella Corporation is not
responsible for claims or damages caused by anticipated and unanticipated water infiltration;
deficiencies in building design, construction and maintenance; failure to install Pella products
in accordance with Pella’s installation instructions; or the use of Pella products in wall
systems which do not allow for proper management of moisture within the wall systems. The
determination of the suitability of all building components, including the use of Pella products,
as well as the design and installation of flashing and sealing systems are the responsibility of
the Buyer or User, the architect, contractor, installer, or other construction professional and are
not the responsibility
of Pella.
Pella products should not be used in barrier wall systems which do not allow for proper
management of moisture within the wall systems, such as barrier Exterior Insulation and Finish
Systems, (EIFS) (also known as synthetic stucco) or other non-water managed systems. Except
in the states of California, New Mexico, Arizona, Nevada, Utah, and Colorado, Pella makes no
warranty of any kind on and assumes no responsibility for Pella windows and doors installed
in barrier wall systems. In the states listed above, the installation of Pella Products in barrier
wall or similar systems must be in accordance with Pella’s installation instructions.
Product modications that are not approved by Pella Corporation will void the Limited
Warranty.
-
 1
1
-
 2
2
-
 3
3
-
 4
4
-
 5
5
-
 6
6
-
 7
7
-
 8
8


Ask a question and I''ll find the answer in the document
Finding information in a document is now easier with AI
Related papers
Other documents
-
TAFCO WINDOWS VBS2241S Installation guide
-
 Stanley Doors 600008 Installation guide
-
Stanley Doors 500003 Operating instructions
-
LARSON SNX55034419 Installation guide
-
-
-
Andersen 9069188 Stationary Sash Replacement Service Instructions
-
JELD-WEN LOWOLPDHPR3740LE User manual
-
-
Andersen 200 Series User manual
