Page is loading ...

for the installation of nugget ice diverting kit, KNUGDIV
The kit is used when dispensing nugget ice from an ID150, ID200 or ID250 ice
dispenser or equivalent Cornelius ice and beverage dispenser. It is designed to divert
the nugget ice into the dispenser’s chute. Follow these instructions to install the
diverting plate onto the dispenser.
Kit contents: diverting plate, RTV sealant.
1. Remove or melt all ice from the dispenser. Check agitator, replace it if it is bent or
deformed.
2. Disconnect dispenser from electrical power.
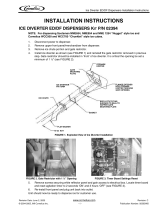
Instructions
Diverting
Plate
Restrictor
Plate
Gasket
Chute
Chute
Mounting
Beverage Valves

3. Remove merchandiser or stainless cover from upper front of dispenser.
4. Remove four hex nuts holding chute to dispenser, using a 3/8” nut driver or socket.
5. Remove chute from dispenser.
6. Apply a very thin bead or RTV to the back of the diverter mounting plate.
7. Place ice diverter plate onto the four mounting studs on the dispenser.
Note: Flange of diverting plate extends into storage hopper.
8. Position restrictor plate
over diverting plate, adjust so
that at least 1 ½” inches of space is open below the
bottom edge. Full open will provide maximum ice flow,
any less than 1 ½” will restrict ice.
9. Reinstall gasket and ice chute. Do NOT overtighten
nuts.
10. Open front of electrical cover of dispenser, locate
circuit board. Adjust motor on time to a half second,
adjust off time between agitation to every 3 hours.
11. Reconnect power, agitator should cycle a half second*. Check ice shutter
operation.
12. Return merchandiser or cover to unit.
11/2"
Set full
CCW*
Set full CW
Restrictor
Plate
Chute
Opening
/


