Page is loading ...

Setting the Date
• Press and hold MODE button until the hour segment of the time display
flashes
• Press MODE button four more times until you see the date flash on the
display
• Press + button until the desired date appears on the display
• Press MODE button two more times to exit the set mode and resume normal
time keeping.
IMPORTANT: As soon as any manual setting changes are made, the display
will indicate a loss of signal strength (see SIGNAL STRENGTH INDICATOR)
to indicate that the clock is now running on manual settings instead of signals
received from the Atomic Clock.
Setting the Language
• Press and hold MODE button until the hour segment of the time display
flashes.
• Press MODE button five more times until you see a single letter (E, D, F, I
or S) appear on the display next to the time.
• Press + button until the desired language indicator appears on the display (E
for English, D for German, F for French ,I for Italian and S for Spanish).
• Press MODE button one more time to exit the set mode and resume normal
time keeping
WARNINGS
This product is designed to give you years of service if handled properly. Observe
the following guidelines:
• Never immerse the product in water. This can cause electrical shock and
damage the product.
• Do not subject the main unit to extreme force, shock, or fluctuations in
temperature or humidity.
• Do not tamper with the internal components.
• Do not mix old and new batteries. Do not mix alkaline, standard (carbon-
zinc), or rechargeable (nickel-cadmium) batteries.
• Do not use rechargeable batteries with this product.
• Remove the batteries if storing this product for a long period of time.
• Do not scratch the LCD display.
TROUBLESHOOTING
Check here before contacting our customer service department.
SPECIFICATIONS
Temperature Measurement
Main unit
Indoor Temperature measurement
Displayed IN temperature range : -9.9°C to +70.0°C (-9.9°F to 158.0°F)
Proposed operating range : -5.0°C to +50.0°C (23.0°F to 122.0°F)
Temperature resolution : 0.1°C (0.2°F)
Remote Temperature measurement
Displayed OUT temperature range: -50.0°C to +70.0°C (-58.0°F to 158.0°F)
Proposed operating range : -5.0°C to +50.0°C (23.0°F to 122.0°F)
Temperature resolution : 0.1°C (0.2°F)
Remote unit
Displayed range : -50.0°C to +70.0°C (-58.0°F to 158.0°F)
Proposed operating range : -30.0°C to +60.0°C (-22°F to 140.0°F)
Temperature resolution : 0.1°C (0.2°F)
RF Transmission Frequency : 433 MHz
Number of Remote unit : Maximum of 3
RF Transmission Range : Maximum 30 meters or 100 feet
Temperature sensing cycle : around 30 seconds
Radio Controlled Clock
Main time set and synchronized by Radio Signal WWVB for USA
12hr display with hh : mm ss
Date Format : Month . Day
Day of week selectable in 5 language (E, D, F, I, S)
Four time zones with date and day
2-minute crescendo alarm
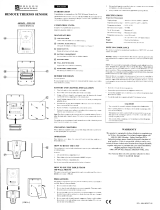
C. MEMORY BUTTON
Recalls the maximum or minimum temperature of individual channels
D. ALARM/24HR ALARM OFF BUTTON
Sets the time for the alarms
E. MODE/SET BUTTON
Toggles the display modes and confirms entry while setting the values for
the display
F. RADIO RECEPTION SIGNAL
Indicates the condition of radio reception
G. UP ( + ) BUTTON
Advances the value of a setting
H. ZONE BUTTON
Selects the US time zone
I . ALARM (AL) ON/OFF BUTTON
Enables or disables the alarms
J. RESET BUTTON
Returns all settings to default values
K. °C/°F SLIDE SWITCH
Selects between Centigrade (°C) and Fahrenheit (°F)
L. BATTERY COMPARTMENTS
One on each side. Each accommodates an AA-size battery
M. TABLE STAND
For standing the main unit on a flat surface
N. WALL-MOUNT RECESSED HOLE
For mounting the main unit on a wall
MAIN FEATURES: REMOTE UNIT
A. LCD
Displays the current temperature monitored by the remote unit
B. LED INDICATOR
Flashes when the remote unit transmits a reading
C
°C/°F SLIDE SWITCH
Selects between Centigrade (°C) and Fahrenheit (°F)
D. CHANNEL SLIDE SWITCH
Designates the remote unit Channel 1, Channel 2 or Channel 3
E. RESET BUTTON
Returns all settings to default values
F. BATTERY COMPARTMENT
Accommodates two AA-size batteries
G. BATTERY DOOR
Watertight sealed door is removed by sliding in downward motion.
H. WALL-MOUNT HOLDER
Supports the remote unit in wall-mounting
I. REMOVABLE TABLE STAND
For standing the remote unit on a flat surface
BEFORE YOU BEGIN
For best operation:
1. Assign different channels to different remote units.
2. Insert batteries for remote units before inserting batteries into the main unit.
3. Place the main unit as close as possible next to the remote unit, reset the
main unit after installing batteries. This will ensure easier synchronization
between the transmission and reception of signals.
4. Position the remote unit and main unit within effective transmission range,
which, in usual circumstances, is 20 to 30 meters or 60 to 100 feet.
NOTE: The effective range is vastly affected by the building materials and
where the main and remote units are positioned. Try various set-ups for best
result.
Though the remote units are weather-resistant, they should be placed away
from direct sunlight, rain or snow.
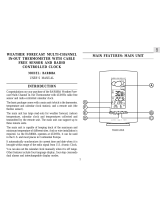
BATTERY AND CHANNEL INSTALLATION:
REMOTE UNIT
The remote unit uses two AA-size batteries. To install them:
1. Gently press against battery door and slide downward to remove.
2. Select the channel number on the CHANNEL slide switch.
Each remote unit (up to 3) will need to be set to a different channel.
3. Select the temperature display unit on the
°C/°F slide switch.
AA / UM-3 1.5V
AA / UM-3 1.5V
1CF RESETCH 23
AA / UM-3 1.5V
AA / UM-3 1.5V
1C F RESET CH 2 3
4. Insert the batteries according to the polarities shown inside the battery
compartment.
5. Replace the battery compartment door.
Replace the batteries when the low-battery indicator of the particular channel
lights up on the main unit. (Repeat the steps described in section "BEFORE
YOU BEGIN")
NOTE: Once a channel is assigned to a remote unit, you can only change the
channel by removing the batteries from the remote unit or resetting the main
unit.
Standard Alkaline batteries contain signifcant amounts of water. Because of
this they will freeze in low temperatures of approximately 10°F (-12°C).
Disposable Lithium batteries have a much lower threshold for temperature with
an estimated freezing range of below -40°F (-40°C). The Liquid Crystal Display
in outdoor thermometers will remain operational to -20°F (-29°C) with adequate
power.
Wireless ranges can be impacted by a variety of factors such as extremely cold
temperatures. Extreme cold may temporarily reduce the effective range between
thesensor and the base station. If the unit's performance fails due to low
temperature, the unit will resume proper functioning as the temperature rises to
within the normal temperature range (i.e no permanent damage will occur to
the unit due to low temperatures).
Power
Main unit : use 2 pcs UM-3 or “AA” 1.5V alkaline
battery
Remote sensing unit : use 2 pcs UM-3 or “AA” 1.5V alkaline
battery
Weight
Main unit : 8.08 ounces (229 g)
Remote sensing unit : 3.08 ounces (87.3g)
Dimension
Main unit : 136 x 108 x 27 mm or
5.35 x 4.25 x 1.06 inches
(L x W x T)
Remote sensing unit : 105 x 70 x 22.5 mm or
4.13 x 2.76 x 0.89 inches
(L x W x T)
ABOUT OREGON SCIENTIFIC
Visit our website (www.oregonscientific.com) to learn more about Oregon
Scientific products such as digital cameras; MP3 players; children’s electronic
learning products and games; projection clocks; health and fitness gear; weather
stations; and digital and conference phones. The website also includes contact
information for our Customer Care department in case you need to reach us, as
well as frequently asked questions and customer downloads.
We hope you will find all the information you need on our website, however if
you’re in the US and would like to contact the Oregon Scientific Customer
Care department directly, please visit:
www2.oregonscientific.com/service/default.asp
OR
Call 1-800-853-8883.
For international inquiries, please visit:
www2.oregonscientific.com/about/international.asp
FCC STATEMENT
This device complies with Part 15 of the FCC Rules. Operation is subject to the
following two conditions: (1) This device may not cause harmful interference,
and (2) This device must accept any interference received, including interference
that may cause undesired operation.
WARNING Changes or modifications not expressly approved by the party
responsible for compliance could void the user's authority to operate the
equipment.
NOTE This equipment has been tested and found to comply with the limits for
a Class B digital device, pursuant to Part 15 of the FCC Rules. These limits are
designed to provide reasonable protection against harmful interference in a
residential installation.
This equipment generates, uses and can radiate radio frequency energy and, if
not installed and used in accordance with the instructions, may cause harmful
interference to radio communications. However, there is no guarantee that
interference will not occur in a particular installation. If this equipment does
cause harmful interference to radio or television reception, which can be
determined by turning the equipment off and on, the user is encouraged to try to
correct the interference by one or more of the following measures:
• Reorient or relocate the receiving antenna.
• Increase the separation between the equipment and receiver.
• Connect the equipment into an outlet on a circuit different from that to which
the receiver is connected.
• Consult the dealer or an experienced radio / TV technician for help.
DECLARATION OF CONFORMITY
The following information is not to be used as contact for support or sales.
Please call our customer service number (listed on our website at
www.oregonscientific.com), or on the warranty card for this product) for all
inquiries instead.
We
Name: Oregon Scientific, Inc.
Address: 19861 SW 95th Ave., Tualatin, Oregon 97062 USA
Telephone No.: 1-800-853-8883
declare that the product
Product No.: RMR112A
Product Name:Multi-Channel IN-OUT Thermometer with Cable Free Sensor
and RF Clock
Manufacturer:IDT Technology Limited
Address: Block C, 9/F, Kaiser Estate,
Phase 1, 41 Man Yue St.,
Hung Hom, Kowloon,
Hong Kong
is in conformity with Part 15 of the FCC Rules. Operation is subject to the
following two conditions: 1) This device may not cause harmful interference.
2) This device must accept any interference received, including interference
that may cause undesired operation.
CAUTION
- The contents of this manual is subject to change without further notice.
- Due to printing limitations, the displays shown in this manual may differ
from the actual display.
- The contents of this manual may not be reproduced without the permission
of the manufacturer.
INTRODUCTION
Thank you for purchasing the Oregon Scientific RMR112A Indoor-Outdoor
Thermometer with 433MHz-cable free temperature sensor and radio-controlled
calendar clock.
This unique, versatile unit includes the indoor temperature, outdoor temperature
and calendar clock station. The remote unit transmits the outdoor temperature
back to the main unit via a radio signal.
The main unit has large read-outs for indoor temperature, calendar, clock and
temperatures collected and transmitted by the remote unit. The main unit can
support up to three remote units.
The main unit is capable of keeping track of the maximum and minimum
temperature of different sites. No wire installation is required.
The RMR112A operates at 433MHz. The calendar clock is radio-controlled. It
automatically synchronizes its current time and date when it receives the radio
signal generated from Colorado, USA (WWVB) which is operated by the US
Department of Commerce's National Institute of Standards and Technology.
You can also set the calendar clock manually when it is out of range of the
atomic clock signal. Other features include five-language display, crescendo
alarm and interchangeable display modes.
MAIN FEATURES: MAIN UNIT
A. FOUR-LINE DISPLAY
Facilitates easy reading of remote and indoor temperatures and calendar
clock
B. CHANNEL BUTTON
Selects among different channels
Wireless Thermometer with Self-Setting
Atomic Clock
MODEL: RMR112A
USER'S MANUAL
MAIN UNIT
REMOTE UNIT
H
I
B
A
AA / UM-3 1.5V
AA / UM-3 1.5V
1C F RESET CH 2 3
C
F
G
D
E
+
ZONE
ENGLISH
+
ZONE
+
Z
O
N
E
+
Z
O
N
E
BATTERY INSTALLATION: MAIN UNIT
The main unit uses two AA-size batteries. To install them,
1. Slide open the battery compartment doors.
2. Insert the batteries according to the polarities shown inside the battery
compartment.
3. Replace the battery compartment doors.
Replace the batteries when the low-battery indicator of the indoor temperature
lights up. (Repeat the steps described in section "BEFORE YOU BEGIN")
LOW BATTERY WARNING
When it is time to replace batteries, the respective low-battery indicator will
show up when the respective channel is selected. The battery level of the main
unit will be shown in the indoor temperature area when it is running low.
HOW TO USE THE TABLE STAND OR WALL
MOUNTING
The main unit has a removable table stand, which when connected, can support
the unit on a flat surface. Or you can remove the stand, store it on the back of
the unit and mount the unit on a wall using the recessed screwhole.
Wall-mount
Table stand
As for the remote unit, it comes with a wall-mount holder and a removable
stand. Use either to hold the unit in place.
Wall-mount Table stand
THE RESET BUTTON
This button is only used when the unit is operating in an unfavorable way or
malfunctioning. Use a blunt stylus to hold down the button. All settings will
return to their default values.
GETTING STARTED
Once batteries are in place for the remote units, they will start transmitting
temperature readings at 30-second intervals.
The main unit will also start searching for signals once batteries are installed.
Upon successful reception, the individual channel temperatures will be displayed
on the top line and the indoor temperature on the second line. The main unit
will automatically update its readings at about 30-second intervals.
If no signals are received, blanks "----" will be displayed and the kinetic wave
icon will show " . ". Press CHANNEL and MEMORY at the same time to
enforce another search for about 30 seconds. This is useful in synchronizing the
transmission and reception of the remote and main units.
Repeat this step whenever you find discrepancies between the reading shown
on the main unit and that on the respective remote unit.
HOW TO CHECK REMOTE AND INDOOR
TEMPERATURES
The indoor temperature is shown on the second line of the display.
The remote temperature is shown on the top line of the display.
(One remote unit comes in your package. Up to two additional remote units can
be purchased and set to the additional two channels.)
To check the remote temperatures, press CHANNEL to go from one channel to
another. The kinetic wave display on the channel number indicates the reception
of that particular channel is in good order.
If no readings are received from one particular channel for more than two minutes,
blanks "---" will be displayed until further readings are successfully searched.
Check to ensure that the remote unit is sound and secure. You can wait for a
little while or press CHANNEL and MEMORY at the same time to enforce an
immediate search. Of course no reading will be shown if no remote unit is
assigned to that channel.
The temperature trend indicator on the screen shows the trend of samplings
collected at that particular remote site. One of three trends will be shown: rising,
steady or falling.
If the temperature goes above or below the temperature measuring range of the
main unit or the remote unit (stated in specification), the display will show
"HHH" for over high or "LLL" for under low.
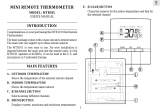
HOW TO READ THE KINETIC WAVE DISPLAY
The kinetic wave display shows the signal receiving status of the main unit.
There are three possible forms:
MAXIMUM AND MINIMUM TEMPERATURES
The maximum and minimum recorded indoor temperatures and those of each
channel will be automatically stored in memory. To display them,
1. Select the channel to be checked.
2. Press MEMORY once to display the maximum temperature and press again
to display the minimum temperature. The respective indicators, MAX or
MIN will be displayed.
To clear the memory, select the channel and hold down MEMORY for two
seconds. The maximum and minimum temperatures will be erased. If you press
MEMORY now, the maximum and minimum temperatures will have the same
values as the current ones until different readings are recorded.
DISCONNECTED SIGNALS
If without obvious reasons the display for a particular channel goes blank, press
CHANNEL and MEMORY at the same time to force an immediate search. If
that fails, check to ensure that:
1. The remote unit of that channel is still in place.
2. The batteries of both the remote unit and main unit are good. Replace as
necessary.
NOTE: When the temperature falls below the freezing point for extended periods
of time, the batteries of outdoor units may freeze, lowering their voltage supply
and the effective range. This may be resolved by the use of Lithium 1.5-volt
AA batteries which will supply voltage at much lower temperatures.
3. The transmission is within range and path is clear of obstacles and
interference. Shorten the distance when necessary.
TRANSMISSION COLLISION
Signals from other household devices, such as doorbells, home security systems
and entry controls, may interfere with those of this product and cause temporarily
reception failure. This is normal and does not affect the general performance of
the product. The transmission and reception of temperature readings will resume
once the interference recedes.
NOTE: SELECTION OF °C OR °F
The type of temperature display is selected on the main unit with the °C/°F slide
switch.
Select °C for Centigrade or °F for Fahrenheit.
NOTE: The remote temperature display on the main unit is dominated by the
selection on the °C/°F slide switch of the main unit. Whatever the display units
of the remote sensors are, they will be automatically converted to read in the °C/
°F selection of the main unit.
ABOUT RADIO RECEPTION
The split-second, precise timelines of RMR112A is achieved through its
pre-tuned internal radio receiver that responds to a special 60kHz frequency
time signal, generated by the US Atomic Clock, one of the most accurate clocks
in the world.
This extraordinary timepiece, located outside Boulder, Colorado, is operated by
the US Department of Commerce's National Institute of Standards and Tech-
nology.
Your RMR112A automatically activates its receiver for 2 to 10
minutes immediately upon battery insertion. Do not be concerned if your
RMR112A does not receive a signal within the first 72 hours. It will continue to
seek a signal six times every 24 hours. Due to possible interference, the best
reception often occurs between midnight and 4 am. If your unit has not picked
up a signal after 48 hours, remove and reinsert the batteries in the late evening.
Do not adjust the time zone until after the clock has picked up the signal.
SIGNAL STRENGTH
You may not receive a signal immediately. Please be patient with the first
receptions of the time signal. Due to possible interference, the best reception
often occurs between midnight and 4 am. If your unit has not picked up a signal
after 48 hours, remove and reinsert the batteries in the late evening. Do not
adjust the time zone until after the clock has picked up the signal. Once the
RMR112A has received a time signal, updates are accomplished with greater
ease. This unit like other radio equipment is most effective when it is placed
near a window. You may need to move or reposition your RMR112A.
Remember RMR112A not only sets itself to synchronize its digital time and
Arrow
indicator
Temperature
Trend
Rising Steady Falling
The unit is in searching mode.
Temperature readings are securely reg-
istered.
No signals.
date with the Atomic Clock's signal, but it also automatically adjusts for Daylight
Saving Time.
Your RMR112A also offers daily alarm clock function with day and date
display.
Indicators Meaning
Your last signal reception was excellent and time
synchronization with the US Atomic Clock has
Taken place.
Your last signal reception was insufficient and it
is recommended that you reposition or rotate the
antenna.
The displayed time has been manually set and is
not synchronized by the radio signal.
Your radio reception is disabled and no signal
reception will be initiated unless it is enabled
again.
SELECTING THE APPROPRIATE TIME ZONE
CAUTION: Do not press and hold the ZONE button for more than three seconds.
Press and release the ZONE button to advance the time zone one step. If you
press and hold the ZONE button, it will deactivate the automatic time signal
reception. (The tower icon will disappear.) To reactivate the time search, press
and hold the + button for three seconds.
• Press the ZONE button located on the back of the unit until the correct US
time zone is indicated on the LCD panel by a darkened section of the US
map in the lower right corner of the LCD panel
To see the time in a different time zone:
• Press the ZONE button located on the back of the unit to move one zone at
a time until the desired zone is indicated on the display panel.
The correct time for that zone will automatically be displayed.
SETTING THE ALARM
• Press the ((•)) button until the ((•)) symbol appears in the lower left corner of
the display panel. The alarm time will then also be displayed at the bottom
of the display panel.
• Press and hold the ((•)) button until the hour portion of the alarm time is
flashing.
• Press + button located on the back to increase the hour by one. Or press and
hold + button to rapidly advance the hour.
When the hour is set:
• Press ((•)) button again and the minutes will flash.
• Press + button located on the back to increase by one minute. Or press and
hold the + button to rapidly advance the minute to the desired time.
When the alarm time is set:
• The alarm will automatically arm itself. This will be indicated by the bell
icon, just above the ((•)) icon on the display panel.
If you do not want the alarm to sound at the time you just set:
• Press the AL ON/OFF key until the bell icon disappears.
ENABLING/DISABLING THE ALARM
To turn the alarm on or off:
• Press the AL ON/OFF button
NOTE: If the alarm is on, the bell icon will appear in the lower left corner of
the LCD. If the alarm is off, there will be no bell icon.
When the alarm sounds there are two ways to turn it off:
• Press ((•)) or AL ON/OFF button The alarm will not sound again until the
next day.
• Press AL ON/OFF again. The alarm will not sound again until reactivated.
MANUALLY SETTING THE TIME AND DATE
IMPORTANT: It is highly unlikely that you should ever need or want to set
these features manually; however, in the event that you should travel outside
the United States and want this capability, we include these instructions. As
soon as any manual setting changes are made, the display will indicate a loss of
signal strength (see SIGNAL STRENGTH INDICATOR) to indicate that the
clock is now running on manual settings instead of signals received from the
Atomic Clock. It is very unlikely that your unit will receive the time and date
signal in this mode. To reactivate the atomic signal press the reset button on the
rear of the unit or remove and reinsert the batteries.
Setting the Time
• Press and hold MODE button until the hour segment of the time flashes
• Press + button until the desired hour appears on the LCD panel
NOTE: Be sure to check the AM or PM symbol for accuracy
• Press MODE button again until the minute segment of the time flashes
• Press + button until the desired minutes appear on the LCD panel
• Press MODE button five more times to exit setting mode
Setting the Year
• Press and hold MODE button until the hour segment of the time display
flashes
• Press MODE button twice more until you see a year appear on the display
• Press + button until the desired year appears on the display
• Press MODE button four more times to exit the set mode and resume
normal time keeping.
Setting the Month
• Press and hold MODE button until the hour segment of the time display
flashes
• Press MODE button three more times until you see the month digit flash on
the display.
• Press + button until the desired month appears on the display
• Press MODE button three more times to exit the set mode and resume normal
time keeping.
No indicator
PROBLEM
Calendar
Clock
Temp
Remote
sensor
SYMPTOM
Strange date / month
Cannot adjust clock
Cannot auto-synch
Shows “LLL” or
“HHH”
Cannot locate
remote sensor
Cannot change
channel
Data does not match
main unit
REMEDY
Change language
Disable Atomic Clock
1. Adjust batteries
2. Press RESET
3. Manually activate
Atomic Clock feature
Temperature is out-of-
range
Check batteries
Check location
Check all sensors for
proper operation
Initiate a manual sensor
search
RMR112A EN_ES OP 1.P65 10/1/06, 10:35 AM1

Setting the Date
• Press and hold MODE button until the hour segment of the time display
flashes
• Press MODE button four more times until you see the date flash on the
display
• Press + button until the desired date appears on the display
• Press MODE button two more times to exit the set mode and resume normal
time keeping.
IMPORTANT: As soon as any manual setting changes are made, the display
will indicate a loss of signal strength (see SIGNAL STRENGTH INDICATOR)
to indicate that the clock is now running on manual settings instead of signals
received from the Atomic Clock.
Setting the Language
• Press and hold MODE button until the hour segment of the time display
flashes.
• Press MODE button five more times until you see a single letter (E, D, F, I
or S) appear on the display next to the time.
• Press + button until the desired language indicator appears on the display
(E for English, D for German, F for French ,I for Italian and S for Spanish).
• Press MODE button one more time to exit the set mode and resume normal
time keeping
WARNINGS
This product is designed to give you years of service if handled properly.
Observe the following guidelines:
• Never immerse the product in water. This can cause electrical shock and
damage the product.
• Do not subject the main unit to extreme force, shock, or fluctuations in
temperature or humidity.
• Do not tamper with the internal components.
• Do not mix old and new batteries. Do not mix alkaline, standard (carbon-
zinc), or rechargeable (nickel-cadmium) batteries.
• Do not use rechargeable batteries with this product.
• Remove the batteries if storing this product for a long period of time.
• Do not scratch the LCD display.
TROUBLESHOOTING
Check here before contacting our customer service department.
SPECIFICATIONS
Temperature Measurement
Main unit
Indoor Temperature measurement
Displayed IN temperature range : -9.9°C to +70.0°C (-9.9°F to 158.0°F)
Proposed operating range : -5.0°C to +50.0°C (23.0°F to 122.0°F)
Temperature resolution : 0.1°C (0.2°F)
Remote Temperature measurement
Displayed OUT temperature range: -50.0°C to +70.0°C (-58.0°F to 158.0°F)
Proposed operating range : -5.0°C to +50.0°C (23.0°F to 122.0°F)
Temperature resolution : 0.1°C (0.2°F)
Remote unit
Displayed range : -50.0°C to +70.0°C (-58.0°F to 158.0°F)
Proposed operating range : -30.0°C to +60.0°C (-22°F to 140.0°F)
Temperature resolution : 0.1°C (0.2°F)
RF Transmission Frequency : 433 MHz
Number of Remote unit : Maximum of 3
RF Transmission Range : Maximum 30 meters or 100 feet
Temperature sensing cycle : Around 30 seconds
Radio Controlled Clock
Main time set and synchronized by Radio Signal WWVB for USA
12hr display with hh : mm : ss
Date Format : Month . Day
Day of week selectable in 5 language (E, D, F, I, S)
Four time zones with date and day
2-minute crescendo alarm
C. MEMORY BUTTON
Recalls the maximum or minimum temperature of individual channels
D. ALARM/24HR ALARM OFF BUTTON
Sets the time for the alarms
E. MODE/SET BUTTON
Toggles the display modes and confirms entry while setting the values
for the display
F. RADIO RECEPTION SIGNAL
Indicates the condition of radio reception
G. UP ( + ) BUTTON
Advances the value of a setting
H. ZONE BUTTON
Selects the US time zone
I . ALARM (AL) ON/OFF BUTTON
Enables or disables the alarms
J. RESET BUTTON
Returns all settings to default values
K. °C/°F SLIDE SWITCH
Selects between Centigrade (°C) and Fahrenheit (°F)
L. BATTERY COMPARTMENTS
One on each side. Each accommodates an AA-size battery
M. TABLE STAND
For standing the main unit on a flat surface
N. WALL-MOUNT RECESSED HOLE
For mounting the main unit on a wall
MAIN FEATURES: REMOTE UNIT
A. LCD
Displays the current temperature monitored by the remote unit
B. LED INDICATOR
Flashes when the remote unit transmits a reading
C °C/°F SLIDE SWITCH
Selects between Centigrade (°C) and Fahrenheit (°F)
D. CHANNEL SLIDE SWITCH
Designates the remote unit Channel 1, Channel 2 or Channel 3
E. RESET BUTTON
Returns all settings to default values
F. BATTERY COMPARTMENT
Accommodates two AA-size batteries
G. BATTERY DOOR
Watertight sealed door is removed by
sliding in downward motion.
H. WALL-MOUNT HOLDER
Supports the remote unit in wall-mounting
I. REMOVABLE TABLE STAND
For standing the remote unit on a flat surface
BEFORE YOU BEGIN
For best operation:
1. Assign different channels to different remote units.
2. Insert batteries for remote units before inserting batteries into the main unit.
3. Place the main unit as close as possible next to the remote unit, reset the
main unit after installing batteries. This will ensure easier synchronization
between the transmission and reception of signals.
4. Position the remote unit and main unit within effective transmission range,
which, in usual circumstances, is 20 to 30 meters or 60 to 100 feet.
NOTE: The effective range is vastly affected by the building materials and
where the main and remote units are positioned. Try various set-ups for best
result.
Though the remote units are weather-resistant, they should be placed away
from direct sunlight, rain or snow.
BATTERY AND CHANNEL INSTALLATION:
REMOTE UNIT
The remote unit uses two AA-size batteries. To install them:
1. Gently press against battery door and slide downward to remove.
2. Select the channel number on the CHANNEL slide switch.
Each remote unit (up to 3) will need to be set to a different channel.
3. Select the temperature display unit on the °C/°F slide switch.
AA / UM-3 1.5V
AA / UM-3 1.5V
1C F RESET CH 2 3
AA / UM-3 1.5V
AA / UM-3 1.5V
1C F RESET CH 2 3
4. Insert the batteries according to the polarities shown inside the battery
compartment.
5. Replace the battery compartment door.
Replace the batteries when the low-battery indicator of the particular channel
lights up on the main unit. (Repeat the steps described in section "BEFORE
YOU BEGIN")
NOTE: Once a channel is assigned to a remote unit, you can only change the
channel by removing the batteries from the remote unit or resetting the main
unit.
Standard Alkaline batteries contain signifcant amounts of water. Because of
this they will freeze in low temperatures of approximately 10°F (-12°C).
Disposable Lithium batteries have a much lower threshold for temperature
with an estimated freezing range of below -40°F (-40°C). The Liquid Crystal
Display in outdoor thermometers will remain operational to -20°F (-29°C) with
adequate power.
Wireless ranges can be impacted by a variety of factors such as extremely cold
temperatures. Extreme cold may temporarily reduce the effective range between
thesensor and the base station. If the unit's performance fails due to low
temperature, the unit will resume proper functioning as the temperature rises
to within the normal temperature range (i.e no permanent damage will occur to
the unit due to low temperatures).
Power
Main unit : use 2 pcs UM-3 or “AA” 1.5V alkaline
battery
Remote sensing unit : use 2 pcs UM-3 or “AA” 1.5V alkaline
battery
Weight
Main unit : 8.08 ounces (229 g)
Remote sensing unit : 3.08 ounces (87.3g)
Dimension
Main unit : 136 x 108 x 27 mm or
5.35 x 4.25 x 1.06 inches
(L x W x T)
Remote sensing unit : 105 x 70 x 22.5 mm or
4.13 x 2.76 x 0.89 inches
(L x W x T)
ABOUT OREGON SCIENTIFIC
Visit our website (www.oregonscientific.com) to learn more about Oregon
Scientific products such as digital cameras; MP3 players; children’s electronic
learning products and games; projection clocks; health and fitness gear; weather
stations; and digital and conference phones. The website also includes contact
information for our Customer Care department in case you need to reach us, as
well as frequently asked questions and customer downloads.
We hope you will find all the information you need on our website, however if
you’re in the US and would like to contact the Oregon Scientific Customer
Care department directly, please visit:
www2.oregonscientific.com/service/default.asp
OR
Call 1-800-853-8883.
For international inquiries, please visit:
www2.oregonscientific.com/about/international.asp
FCC STATEMENT
This device complies with Part 15 of the FCC Rules. Operation is subject to
the following two conditions: (1) This device may not cause harmful
interference, and (2) This device must accept any interference received,
including interference that may cause undesired operation.
WARNING Changes or modifications not expressly approved by the party
responsible for compliance could void the user's authority to operate the
equipment.
NOTE This equipment has been tested and found to comply with the limits for
a Class B digital device, pursuant to Part 15 of the FCC Rules. These limits are
designed to provide reasonable protection against harmful interference in a
residential installation.
This equipment generates, uses and can radiate radio frequency energy and, if
not installed and used in accordance with the instructions, may cause harmful
interference to radio communications. However, there is no guarantee that
interference will not occur in a particular installation. If this equipment does
cause harmful interference to radio or television reception, which can be
determined by turning the equipment off and on, the user is encouraged to try
to correct the interference by one or more of the following measures:
• Reorient or relocate the receiving antenna.
• Increase the separation between the equipment and receiver.
• Connect the equipment into an outlet on a circuit different from that to
which the receiver is connected.
• Consult the dealer or an experienced radio / TV technician for help.
DECLARATION OF CONFORMITY
The following information is not to be used as contact for support or sales.
Please call our customer service number (listed on our website at
www.oregonscientific.com), or on the warranty card for this product) for all
inquiries instead.
We
Name: Oregon Scientific, Inc.
Address: 19861 SW 95th Ave., Tualatin, Oregon 97062 USA
Telephone No.: 1-800-853-8883
declare that the product
Product No.: RMR112A
Product Name: Multi-Channel IN-OUT Thermometer with Cable Free
Sensor and RF Clock
Manufacturer: IDT Technology Limited
Address: Block C, 9/F, Kaiser Estate,
Phase 1, 41 Man Yue St.,
Hung Hom, Kowloon,
Hong Kong
is in conformity with Part 15 of the FCC Rules. Operation is subject to the
following two conditions: 1) This device may not cause harmful interference.
2) This device must accept any interference received, including interference
that may cause undesired operation.
CAUTION
- The contents of this manual is subject to change without further notice.
- Due to printing limitations, the displays shown in this manual may
differ from the actual display.
- The contents of this manual may not be reproduced without the
permission of the manufacturer.
INTRODUCTION
Thank you for purchasing the Oregon Scientific RMR112A Indoor-Outdoor
Thermometer with 433MHz-cable free temperature sensor and radio-controlled
calendar clock.
This unique, versatile unit includes the indoor temperature, outdoor temperature
and calendar clock station. The remote unit transmits the outdoor temperature
back to the main unit via a radio signal.
The main unit has large read-outs for indoor temperature, calendar, clock and
temperatures collected and transmitted by the remote unit. The main unit can
support up to three remote units.
The main unit is capable of keeping track of the maximum and minimum
temperature of different sites. No wire installation is required.
The RMR112A operates at 433MHz. The calendar clock is radio-controlled.
It automatically synchronizes its current time and date when it receives the
radio signal generated from Colorado, USA (WWVB) which is operated by
the US Department of Commerce's National Institute of Standards and
Technology. You can also set the calendar clock manually when it is out of
range of the atomic clock signal. Other features include five-language display,
crescendo alarm and interchangeable display modes.
MAIN FEATURES: MAIN UNIT
A. FOUR-LINE DISPLAY
Facilitates easy reading of remote and indoor temperatures and calendar
clock
B. CHANNEL BUTTON
Selects among different channels
Wireless Thermometer with Self-Setting
Atomic Clock
MODEL: RMR112A
USER'S MANUAL
MAIN UNIT
REMOTE UNIT
H
I
B
A
AA / UM-3 1.5V
AA / UM-3 1.5V
1C F RESET CH 2 3
C
F
G
D
E
+
ZONE
ENGLISH
+
ZONE
+
Z
O
N
E
+
Z
O
N
E
BATTERY INSTALLATION: MAIN UNIT
The main unit uses two AA-size batteries. To install them,
1. Slide open the battery compartment doors.
2. Insert the batteries according to the polarities shown inside the battery
compartment.
3. Replace the battery compartment doors.
Replace the batteries when the low-battery indicator of the indoor temperature
lights up. (Repeat the steps described in section "BEFORE YOU BEGIN")
LOW BATTERY WARNING
When it is time to replace batteries, the respective low-battery indicator will
show up when the respective channel is selected. The battery level of the main
unit will be shown in the indoor temperature area when it is running low.
HOW TO USE THE TABLE STAND OR WALL
MOUNTING
The main unit has a removable table stand, which when connected, can support
the unit on a flat surface. Or you can remove the stand, store it on the back of
the unit and mount the unit on a wall using the recessed screwhole.
Wall-mount
Table stand
As for the remote unit, it comes with a wall-mount holder and a removable
stand. Use either to hold the unit in place.
Wall-mount Table stand
THE RESET BUTTON
This button is only used when the unit is operating in an unfavorable way or
malfunctioning. Use a blunt stylus to hold down the button. All settings will
return to their default values.
GETTING STARTED
Once batteries are in place for the remote units, they will start transmitting
temperature readings at 30-second intervals.
The main unit will also start searching for signals once batteries are installed.
Upon successful reception, the individual channel temperatures will be
displayed on the top line and the indoor temperature on the second line. The
main unit will automatically update its readings at about 30-second intervals.
If no signals are received, blanks "----" will be displayed and the kinetic wave
icon will show " . ". Press CHANNEL and MEMORY at the same time to
enforce another search for about 30 seconds. This is useful in synchronizing
the transmission and reception of the remote and main units.
Repeat this step whenever you find discrepancies between the reading shown
on the main unit and that on the respective remote unit.
HOW TO CHECK REMOTE AND INDOOR
TEMPERATURES
The indoor temperature is shown on the second line of the display.
The remote temperature is shown on the top line of the display.
(One remote unit comes in your package. Up to two additional remote units
can be purchased and set to the additional two channels.)
To check the remote temperatures, press CHANNEL to go from one channel
to another. The kinetic wave display on the channel number indicates the
reception of that particular channel is in good order.
If no readings are received from one particular channel for more than two
minutes, blanks "---" will be displayed until further readings are successfully
searched. Check to ensure that the remote unit is sound and secure. You can
wait for a little while or press CHANNEL and MEMORY at the same time to
enforce an immediate search. Of course no reading will be shown if no remote
unit is assigned to that channel.
The temperature trend indicator on the screen shows the trend of samplings
collected at that particular remote site. One of three trends will be shown:
rising, steady or falling.
If the temperature goes above or below the temperature measuring range of the
main unit or the remote unit (stated in specification), the display will show
"HHH" for over high or "LLL" for under low.
HOW TO READ THE KINETIC WAVE DISPLAY
The kinetic wave display shows the signal receiving status of the main unit.
There are three possible forms:
MAXIMUM AND MINIMUM TEMPERATURES
The maximum and minimum recorded indoor temperatures and those of each
channel will be automatically stored in memory. To display them,
1. Select the channel to be checked.
2. Press MEMORY once to display the maximum temperature and press again
to display the minimum temperature. The respective indicators, MAX or
MIN will be displayed.
To clear the memory, select the channel and hold down MEMORY for two
seconds. The maximum and minimum temperatures will be erased. If you press
MEMORY now, the maximum and minimum temperatures will have the same
values as the current ones until different readings are recorded.
DISCONNECTED SIGNALS
If without obvious reasons the display for a particular channel goes blank,
press CHANNEL and MEMORY at the same time to force an immediate
search. If that fails, check to ensure that:
1. The remote unit of that channel is still in place.
2. The batteries of both the remote unit and main unit are good. Replace as
necessary.
NOTE: When the temperature falls below the freezing point for extended
periods of time, the batteries of outdoor units may freeze, lowering their voltage
supply and the effective range. This may be resolved by the use of Lithium
1.5-volt AA batteries which will supply voltage at much lower temperatures.
3. The transmission is within range and path is clear of obstacles and
interference. Shorten the distance when necessary.
TRANSMISSION COLLISION
Signals from other household devices, such as doorbells, home security systems
and entry controls, may interfere with those of this product and cause
temporarily reception failure. This is normal and does not affect the general
performance of the product. The transmission and reception of temperature
readings will resume once the interference recedes.
NOTE: SELECTION OF °C OR °F
The type of temperature display is selected on the main unit with the °C/°F
slide switch.
Select °C for Centigrade or °F for Fahrenheit.
NOTE: The remote temperature display on the main unit is dominated by the
selection on the °C/°F slide switch of the main unit. Whatever the display units
of the remote sensors are, they will be automatically converted to read in the
°C/°F selection of the main unit.
ABOUT RADIO RECEPTION
The split-second, precise timelines of RMR112A is achieved through its
pre-tuned internal radio receiver that responds to a special 60kHz frequency
time signal, generated by the US Atomic Clock, one of the most accurate clocks
in the world.
This extraordinary timepiece, located outside Boulder, Colorado, is operated
by the US Department of Commerce's National Institute of Standards and Tech-
nology.
Your RMR112A automatically activates its receiver for 2 to 10
minutes immediately upon battery insertion. Do not be concerned if your
RMR112A does not receive a signal within the first 72 hours. It will continue
to seek a signal six times every 24 hours. Due to possible interference, the best
reception often occurs between midnight and 4 am. If your unit has not picked
up a signal after 48 hours, remove and reinsert the batteries in the late evening.
Do not adjust the time zone until after the clock has picked up the signal.
SIGNAL STRENGTH
You may not receive a signal immediately. Please be patient with the first
receptions of the time signal. Due to possible interference, the best reception
often occurs between midnight and 4 am. If your unit has not picked up a
signal after 48 hours, remove and reinsert the batteries in the late evening. Do
not adjust the time zone until after the clock has picked up the signal. Once the
RMR112A has received a time signal, updates are accomplished with greater
ease. This unit like other radio equipment is most effective when it is placed
near a window. You may need to move or reposition your RMR112A.
Arrow
indicator
Temperature
Trend
Rising Steady Falling
The unit is in searching mode.
Temperature readings are securely reg-
istered.
No signals.
Remember RMR112A not only sets itself to synchronize its digital time and
date with the Atomic Clock's signal, but it also automatically adjusts for Daylight
Saving Time.
Your RMR112A also offers daily alarm clock function with day and date
display.
Indicators Meaning
Your last signal reception was excellent and time
synchronization with the US Atomic Clock has
Taken place.
Your last signal reception was insufficient and it
is recommended that you reposition or rotate the
antenna.
The displayed time has been manually set and is
not synchronized by the radio signal.
Your radio reception is disabled and no signal
reception will be initiated unless it is enabled
again.
SELECTING THE APPROPRIATE TIME ZONE
CAUTION: Do not press and hold the ZONE button for more than three
seconds.
Press and release the ZONE button to advance the time zone one step. If you
press and hold the ZONE button, it will deactivate the automatic time signal
reception. (The tower icon will disappear.) To reactivate the time search,
press and hold the + button for three seconds.
• Press the ZONE button located on the back of the unit until the correct US
time zone is indicated on the LCD panel by a darkened section of the US
map in the lower right corner of the LCD panel.
To see the time in a different time zone:
• Press the ZONE button located on the back of the unit to move one zone at
a time until the desired zone is indicated on the display panel.
The correct time for that zone will automatically be displayed.
SETTING THE ALARM
• Press the ((•)) button until the ((•)) symbol appears in the lower left corner
of the display panel. The alarm time will then also be displayed at the
bottom of the display panel.
• Press and hold the ((•)) button until the hour portion of the alarm time is
flashing.
• Press + button located on the back to increase the hour by one. Or press and
hold + button to rapidly advance the hour.
When the hour is set:
• Press ((•)) button again and the minutes will flash.
• Press + button located on the back to increase by one minute. Or press and
hold the + button to rapidly advance the minute to the desired time.
When the alarm time is set:
• The alarm will automatically arm itself. This will be indicated by the bell
icon, just above the ((•)) icon on the display panel.
If you do not want the alarm to sound at the time you just set:
• Press the AL ON/OFF key until the bell icon disappears.
ENABLING/DISABLING THE ALARM
To turn the alarm on or off:
• Press the AL ON/OFF button
NOTE: If the alarm is on, the bell icon will appear in the lower left corner of
the LCD. If the alarm is off, there will be no bell icon.
When the alarm sounds there are two ways to turn it off:
• Press ((•)) or AL ON/OFF button The alarm will not sound again until the
next day.
• Press AL ON/OFF again. The alarm will not sound again until reactivated.
MANUALLY SETTING THE TIME AND DATE
IMPORTANT: It is highly unlikely that you should ever need or want to set
these features manually; however, in the event that you should travel outside
the United States and want this capability, we include these instructions. As
soon as any manual setting changes are made, the display will indicate a loss
of signal strength (see SIGNAL STRENGTH INDICATOR) to indicate that
the clock is now running on manual settings instead of signals received from
the Atomic Clock. It is very unlikely that your unit will receive the time and
date signal in this mode. To reactivate the atomic signal press the reset button
on the rear of the unit or remove and reinsert the batteries.
Setting the Time
• Press and hold MODE button until the hour segment of the time flashes
• Press + button until the desired hour appears on the LCD panel
NOTE: Be sure to check the AM or PM symbol for accuracy
• Press MODE button again until the minute segment of the time flashes
• Press + button until the desired minutes appear on the LCD panel
• Press MODE button five more times to exit setting mode
Setting the Year
• Press and hold MODE button until the hour segment of the time display
flashes
• Press MODE button twice more until you see a year appear on the display
• Press + button until the desired year appears on the display
• Press MODE button four more times to exit the set mode and resume
normal time keeping.
Setting the Month
• Press and hold MODE button until the hour segment of the time display
flashes
• Press MODE button three more times until you see the month digit flash
on the display.
• Press + button until the desired month appears on the display
• Press MODE button three more times to exit the set mode and resume
normal time keeping.
No indicator
PROBLEM
Calendar
Clock
Temp
Remote
sensor
SYMPTOM
Strange date / month
Cannot adjust clock
Cannot auto-synch
Shows “LLL” or
“HHH”
Cannot locate
remote sensor
Cannot change
channel
Data does not match
main unit
REMEDY
Change language
Disable Atomic Clock
1. Adjust batteries
2. Press RESET
3. Manually activate
Atomic Clock feature
Temperature is out-of-
range
Check batteries
Check location
Check all sensors for
proper operation
Initiate a manual sensor
search
+
ZONE
+
Z
O
N
E
+
Z
O
N
E
INSTALLATION DES PILES ET SÉLECTION
DES CHAÎNES : APPAREIL À DISTANCE
L’appareil à distance utilise deux piles de taille AA. Pour les installer :
1. Retirez les vis du couvercle du compartiment des piles.
2. Sélectionnez le numéro de la chaîne en poussant l’encoche CHANNEL.
Chaque capteur à distance (trois maximum) doit être réglé sur une chaîne
différente.
3
. Sélectionnez l’unité de mesure de la température en poussant l’encoche °C/°F.
AA / UM-3 1.5V
AA / UM-3 1.5V
1C F RESET CH 2 3
AA / UM-3 1.5V
AA / UM-3 1.5V
1C F RESET CH 2 3
4. Insérez les piles en respectant les polarités comme indiqué sur
le compartiment des piles.
5. Remettez le couvercle du compartiment des piles, et revissez-le.
Remplacez les piles lorsque l’indicateur de faiblesse de la chaîne en question
s’allume sur l’appareil principal. (Répétez les étapes décrites dans la section
« AVANT DE METTRE L’APPAREIL EN MARCHE ».)
REMARQUE : Une fois une chaîne assignée à un capteur à distance, vous ne
pourrez la modifier qu’en retirant les piles de l’appareil à distance ou en réinitialisant
l’appareil principal.
Les piles alcalines standard sont composées d’un volume d’eau non négligeable.
Par conséquent, elles peuvent geler lors de températures inférieures à -12 °C
(10 °F). Les piles au lithium ont un seuil inférieur lors de températures froides,
elles ne peuvent en effet geler qu’à -40 °C (-40 °F). L’écran ACL des
thermomètres extérieurs restera opérationnel jusqu’à -29 °C (-20 °F) avec une
alimentation appropriée.
Les ondes radio peuvent être endommagées par divers facteurs comme les
températures extrêmement froides. En effet, le froid intense peut temporairement
réduire le champ de transmission radio entre le capteur et la station de base.
Si un dysfonctionnement de l’appareil est remarqué dû à des températures
froides, l’appareil reviendra en mode de fonctionnement normal dès que
la température repassera dans une plage acceptable (ainsi aucun dommage
permanent ne sera remarqué).
INSTALLATION DES PILES : APPAREIL
PRINCIPAL
L’appareil principal utilise deux piles de taille AA. Pour les installer :
1. Ouvrez le couvercle du compartiment des piles.
2. Insérez les piles en respectant les polarités comme indiqué sur
le compartiment des piles.
3. Remettez le couvercle du compartiment en place.
Remplacez les piles dès que l’indicateur de faiblesse situé dans la zone
température intérieure s’allume. (Répétez les étapes décrites dans la section
« AVANT DE METTRE L’APPAREIL EN MARCHE ».)
AVERTISSEMENT DE FAIBLESSE DES PILE
S’il est nécessaire de changer les piles, l’indicateur respectif s’affichera pour
la chaîne en question. La zone de température intérieure indiquera l’état des
piles de l’appareil principal si elles sont jugées faibles.
UTILISATION DU SUPPORT DE TABLE OU DE
LA FIXATION MURALE
L’appareil principal est composé d’un support de table qui, une fois installé,
peut soutenir l’appareil sur une surface plane. Vous pouvez également retirer
le support, le plier à l’arrière de l’appareil et fixez l’appareil au mur à l’aide
du trou des vis
Fixation murale
Support de table
Comme pour le capteur, il est livré avec une fixation murale et un support de table.
Utilisez le support de table ou la fixation murale pour le maintenir en place.
Fixation murale Support de table
BOUTON RESET (RÉINITIALISATION)
Utilisez ce bouton uniquement si vous constatez que le fonctionnement
de l’appareil n’est pas approprié. Utilisez un crayon taillé pour appuyer sur
la touche. Tous les réglages reviendront aux valeurs par défaut.
AU COMMENCEMENT
Une fois les piles installées dans les appareils à distance, ces derniers
transmettront les relevés de température toutes les 30 secondes.
L’appareil principal tentera de localiser les signaux, une fois les piles installées.
Une fois les données reçues, les températures des chaînes individuelles
s’afficheront sur la ligne supérieure et les températures intérieures sur
la deuxième ligne. L’appareil principal effectuera automatiquement une mise à
jour des lectures toutes les 30 secondes environ.
Si aucun signal n’est reçu, le symbole vierge « --- » s’affichera et l’icône des
ondes cinétiques indiquera « . ». Appuyez simultanément sur CHANNEL
et MEMORY pour initier une nouvelle recherche d’environ 30 secondes.
Ceci est très utile pour la synchronisation de la transmission et de la réception
des appareils principaux et distants.
Recommencez cette procédure si vous constatez des différences entre la lecture
indiquée sur l’appareil principal et celle indiquée sur le capteur.
VÉRIFICATION DE LA TEMPÉRATURE
INTÉRIEURE ET À DISTANCE
La température intérieure est indiquée sur la deuxième ligne de l’écran.
La température extérieure est indiquée sur la première ligne de l’écran.
(Un appareil à distance est inclus avec ce produit. Vous pouvez acheter jusqu’à
deux appareils à distance supplémentaires et régler deux chaînes
supplémentaires.)
Pour vérifier les températures relevées à distance, appuyez sur CHANNEL
pour aller d’une chaîne à l’autre. L’affichage des ondes cinétiques sur le numéro
de chaîne indique le bon fonctionnement de la réception d’une chaîne
en particulier.
Si aucune donnée n’est reçue d’une chaîne en particulier pendant plus de deux
minutes, l’icône vierge « --- » s’affichera jusqu’à ce que les données soient
correctement collectées. Vérifiez que le capteur à distance est en bon état. Vous
pouvez patienter un instant ou appuyer simultanément sur les touches
CHANNEL et MEMORY pour initier une recherche immédiate. Aucune
lecture ne s’affichera si aucun appareil à distance n’est assigné à cette chaîne.
L’indicateur de changement de température affiché à l’écran vous indique les
modifications des données collectées pour cet appareil à distance en particulier.
Une des trois variations s’affichera : augmentation, stable ou diminution.
Si la température est supérieure ou inférieure à la plage de mesure de l’appareil
principal ou de l’appareil à distance (voir la section Caractéristiques),
« HHH » (trop chaud) ou « LLL » (trop froid) s’afficheront.
LECTURE DE L’AFFICHAGE DES ONDES
CINÉTIQUES
L’icône des ondes cinétiques indique l’état de réception du signal de l’appareil principal.
Il peut se présenter sous trois formes différentes :
MINIMA ET MAXIMA
Les minima et les maxima des températures intérieures et des autres chaînes
seront automatiquement enregistrés en mémoire. Pour les afficher :
1. Sélectionnez la chaîne à vérifier.
2. Appuyez une fois sur MEMORY pour afficher la température maximale et
appuyez une nouvelle fois pour la température minimale. Les indicateurs
respectifs MAX. ou MIN. s’afficheront.
Pour effacer la mémoire, sélectionnez la chaîne et appuyez sur MEMORY pendant deux
secondes. Les minima et les maxima seront effacés. Si vous appuyez
maintenant
sur MEMORY, les maxima et les minima auront la même valeur qu
e les données
actuelles, et ce, jusqu’à ce que de nouveaux relevés soient enregistrés.
SIGNAUX DE DÉCONNEXION
Si, sans raisons apparentes, l’écran d’une chaîne spécifique devient vierge,
appuyez simultanément sur CHANNEL et MEMORY pour initier
immédiatement une recherche. Si la recherche échoue, vérifiez que :
1. L’appareil à distance relié à cette chaîne est toujours en place.
2. Les piles de l’appareil principal et du capteur à distance fonctionnent
et remplacez-les au besoin.
REMARQUE : Si les températures chutent en dessous du niveau de gel pour
une période indéterminée, il se peut que les piles des appareils extérieurs gèlent,
diminuant ainsi le voltage et le champ de transmission effectif. Pour résoudre
le problème, utilisez des piles au lithium AA, 1,5 V, à même d’alimenter les
appareils par températures froides.
3. Le champ de transmission n’est pas obstrué par des obstacles ou des
interférences et réduisez la distance si nécessaire.
INTERFÉRENCES DE TRANSMISSION
Les signaux émis par les autres appareils, comme les sonneries de porte, les
systèmes de sécurité et les contrôleurs d’entrée, peuvent interférer avec un de
ces produits et être la cause d’un échec temporaire de réception. C’est normal,
et cela n’affecte pas le bon fonctionnement du produit. La transmission et la
réception des relevés de température reprendront une fois les interférences
disparues.
REMARQUE : SÉLECTION DES °C OU °F
Sélectionnez l’unité de mesure désirée sur l’appareil principal à l’aide
de l’encoche °C/°F.
Sélectionnez °C pour les degrés Celsius ou °F pour les degrés Fahrenheit.
REMARQUE : L’unité de mesure de la température est soumise à la sélection
des °C/°F par l’encoche correspondante sur l’appareil principal. Qu’importe
l’unité de mesure des capteurs à distance, elle sera automatiquement convertie
selon l’unité de l’appareil principal.
RÉCEPTION RADIO
La précision horaire, à la fraction de seconde près, du modèle RMR112A est
garantie par le récepteur radio interne préréglé répondant au signal radio
60 kHz, généré par l’horloge atomique américaine, une des plus précises
de la planète.
Cet appareil extraordinaire, situé à proximité de Boulder (Colorado), est exploité
par l’Institut national des Normes et de la Technologie du ministère
du Commerce des États-Unis.
Le RMR112A active automatiquement le récepteur pendant deux à dix minutes
,
immédiatement après avoir installé les piles. Ne vous inquiétez pas s’il ne reçoit
pas de signal lors des premières 72 heures. Il initiera une recherche de signal
six fois toutes les 24 heures. En raison des inférences possibles, la meilleure
réception est entre minuit et 4 heures du matin. Si l’appareil n’a pas trouvé
de signal dans les 48 heures, retirez et réinstallez les piles tard dans la soirée.
Ne réglez pas le fuseau horaire avant que l’horloge n’ait reçu un signal.
FORCE DU SIGNAL
Il se peut que vous ne receviez pas immédiatement un signal. Soyez patient
lors des premières réceptions. En raison des inférences possibles, la meilleure
réception est entre minuit et 4 heures du matin. Si l’appareil n’a pas trouvé
de signal dans les 48 heures, retirez et réinstallez les piles tard dans la soirée.
Ne réglez pas le fuseau horaire avant que l’horloge n’ait reçu un signal.
Une fois le signal reçu, les mises à jour sont effectuées très rapidement.
Cet appareil comme les autres équipements radio sont plus efficaces si placés
à proximité d’une fenêtre. Vous devrez peut-être déplacer ou repositionner
le RMR112A.
Rappelez-vous qu’il ne synchronise pas seulement l’heure digitale et la date
avec le signal de l’horloge atomique, mais ajuste également l’heure avancée.
Il fournit également une alarme quotidienne avec affichage du jour et de la date.
SÉLECTION DU FUSEAU HORAIRE APPROPRIÉ
ATTENTION : N’appuyez pas sur le bouton ZONE pendant plus de trois
secondes.
Appuyez et relâchez la touche ZONE pour avancer d’un fuseau horaire.
Si vous appuyez et maintenez enfoncée la touche ZONE, la réception
du signal de l’heure atomique sera désactivée (l’icône de la tour disparaîtra).
Pour réactiver la synchronisation de l’heure, appuyez et maintenez enfoncée la
touche + pendant trois secondes.
• Appuyez sur la touche ZONE située à l’arrière de l’appareil jusqu’à ce que
le bon fuseau horaire s’affiche, représenté par une section noircie sur
la carte des États-Unis dans le coin inférieur droit le l’écran ACL.
Pour visualiser l’heure d’un fuseau horaire différent :
• Appuyez sur la touche ZONE située à l’arrière de l’appareil pour faire
avancer l’heure jusqu’à ce que le fuseau horaire désiré s’affiche à l’écran.
L’heure de ce fuseau horaire s’affichera automatiquement.
Indicateurs
Signification
La dernière réception du signal était bonne et la
synchronisation de l’heure avec l’horloge
atomique américaine a eu lieu.
La dernière réception était insuffisante et nous
vous recommandons de repositionner l’antenne.
L’heure a été réglée manuellement et n’est pas
synchronisée avec le signal radio.
La réception radio est désactivée et aucune
réception de signal ne sera initiée à moins d’être
activée.
Aucun indicateur
L’appareil est en mode recherche.
Les relevés de température sont
correctement enregistrés .
Aucun signal.
Indicateur
Changement
de température
Augmentation Stable Diminution
FRENCH
INTRODUCTION
Nous vous remercions d’avoir fait l’acquisition de ce thermomètre intérieur/
extérieur RMR112A à capteur de température 433 MHz sans fil et horloge/
calendrier radio pilotée.
Cet appareil unique et polyvalent inclut la température intérieure, la température
extérieure et la fonction horloge calendrier. L’appareil à distance transmet les
relevés de température extérieure par signal radio à l’appareil principal.
L’appareil principal est composé d’un écran ACL affichant les relevés
de température intérieure, le calendrier, l’horloge et les températures collectées
par l’appareil à distance. L’appareil principal peut également s’accompagner
de trois appareils à distance au maximum.
L’appareil principal enregistre les minima et les maxima des températures
relevés sur les différents sites. Aucune installation de câble n’est nécessaire.
Le modèle RMR112A fonctionne avec une fréquence de 433 MHz. L’horloge
calendrier est radio pilotée. Elle synchronise automatiquement l’heure actuelle
et la date du jour, dès qu’elle reçoit le signal radio (WWVB) émis depuis
le Colorado, É.-U., opéré par l’Institut national des Normes et de la Technologie
du ministère du Commerce des États-Unis. Vous pouvez également régler
manuellement l’horloge si elle est hors de portée du champ de transmission
de l’horloge atomique. D’autres fonctions sont disponibles : affichage en cinq
langues, alarme en crescendo et affichage interchangeable.
CARACTÉRISTIQUES PRINCIPALES :
APPAREIL PRINCIPAL
A. AFFICHAGE SUR QUATRE LIGNES
Facilite la lecture des températures intérieures et extérieures relevées
à distance et de l’horloge/calendrier
B. BOUTON CHANNEL (CHAÎNES)
Permet de sélectionner différentes chaînes
C. BOUTON MEMORY (MÉMOIRE)
Permet d’afficher les minima et les maxima des températures des chaînes
individuelles
D. BOUTON ALARM/24HR ALARM (ALARME)
Permet de régler l’heure des alarmes
E BOUTON MODE/SET (MODE/CONFIRMATION)
Permet d’alterner entre les différents modes d’affichage et de confirmer
les entrées d’un réglage
F. SIGNAL DE RÉCEPTION RADIO
Vous indique l’état du signal de réception radio
G. BOUTON AUGMENTATION (+)
Augmente les valeurs d’un réglage
H. BOUTON ZONE
Permet de sélectionner le fuseau horaire américain
I . BOUTON ALARM (AL) ON/OFF (ALARME)
Active ou désactive les alarmes
J. BOUTON RESET (RÉINITIALISATION)
Permet de revenir aux réglages par défaut
K. ENCOCHE °C/°F
Permet de choisir entre les degrés Celsius (°C) et les degrés
Fahrenheit (°F)
L. COMPARTIMENTS DES PILES
Un de chaque côté contenant une pile de taille AA
M. SUPPORT DE TABLE
Vous permet de maintenir l’appareil principal sur une surface plane
N. TROU DE FIXATION MURALE
Permet de fixer l’appareil principal au mur
CARACTÉRISTIQUES PRINCIPALES :
APPAREIL À DISTANCE
A. ÉCRAN ACL
Affiche la température actuelle relevée par l’appareil à distance
B. INDICATEUR DEL
Clignote lorsque le capteur à distance transmet les données
C ENCOCHE °C/°F
Permet de choisir entre les degrés Celsius (°C) et les degrés
Fahrenheit (°F)
D. ENCOCHE CHAÎNE
Vous permet de choisir entre la chaîne 1, la chaîne 2 ou la chaîne
3 du capteur à distance
E BOUTON RESET (RÉINITIALISATION)
Permet de revenir aux réglages par défaut
F. COMPARTIMENT DES PILES
Contient deux piles de taille AA
G. COUVERCLE DU COMPARTIMENT DES PILES
Le couvercle étanche se détache en desserrant les vis
H. SUPPORT DE FIXATION MURALE
Permet de fixer l’appareil au mur
I. SUPPORT DE TABLE AMOVIBLE
Vous permet de maintenir l’appareil à distance sur une surface plane
AVANT DE METTRE L’APPAREIL EN MARCHE
Pour un fonctionnement optimal :
1. Assignez les différentes chaînes aux différents capteurs.
2. Insérez les piles des capteurs avant celles de l’appareil principal.
3. Placez l’appareil principal à proximité du capteur à distance, réinitialisez
l’appareil principal après avoir installé les piles. Vous garantirez ainsi une
meilleure synchronisation entre les signaux de transmission et de réception.
4. Placez l’appareil à distance et l’appareil principal dans le champ
de transmission effectif, habituellement 20 à 30 mètres (60 à 100 pieds).
REMARQUE : L’étendue de transmission effective peut être affectée par les
installations situées à proximité de l’appareil principal et du capteur.
Positionnez-les en différents endroits pour obtenir de meilleurs résultats.
Bien que les capteurs à distance soient résistants aux intempéries, ne les exposez
pas directement aux rayons du soleil, à la pluie ou à la neige.
RMR122A_EN_ES_FR 8/10/06, 6:20 PM1
P/N: 086L001841-165 REV1
1/2
/